Counterfeits! Antique Golf Balls That Don't Fly
Copyright © Jeff Ellis, 2023
Copyright © Jeff Ellis, 2023
This article was researched and written by Jeff Ellis, author of And The Putter Went Ping ;
The Clubmakers Art: Antique Golf Clubs & Their History; and The Golf Club: The Good, The Beautiful &
The Creative. Click here for more about Jeff.
This article is best viewed on a larger screen.
The antique golf market has become fertile ground for the sale of counterfeit golf balls, and has been for upwards of 15 years or more. To my knowledge, nobody has addressed this issue, so I am presenting here the results of a ten-month study on the topic. My statements and conclusions throughout this report are mine alone. They represent how I personally see things. I invite and encourage others to study my findings themselves, study antique golf balls themselves, and make their own conclusions.
Antique golf ball collecting is big business. The more desirable examples are not inexpensive. The most valuable balls have sold for upwards of $10,000 to over $30,000 in days past. Unfortunately, given the amount of money involved, golf ball collecting has taken a turn for the worse. Case in point:
At the end of last year, a ball collector sent me his collection of approximately 200 balls. He said over 100 of them “were repainted.”
Repainted antique golf balls are not new to the hobby. During the late 19th century and early 20th century various ball manufacturers offered repainted balls, plus golf ball paint was offered in various golf catalogs for the do-it-yourselfer. Such balls are legitimate. During the late 20th century, as golf ball collecting came into prominence, antique balls were sometimes repainted to brighten up what might otherwise be seen as an unattractive dingy relic. Repainted golf balls have always been a part of the game and the collecting world, and of course, collectors always knew that bad things could lurk under the paint if it was too fresh. Even so, golf ball fraud was not seen as a big problem.
Many of the balls the fellow sent, however, made me stop and take notice. They were not early 20th century dingy white repaints, although most of the repainted balls were sold to him as from the early 20th century. Instead, these balls were painted with dramatic contrast, most often in black with the recessed portions white, but sometimes the opposite, and in other cases using unusual but repeated color schemes. Many had cover patterns that I had never seen or read about. It looked to me like many if not all these balls were recently painted by the same individual or group. There was an unmistakable consistency to them. They included a wide variety of balls painted in black, red, white, gray, and yellow in the same contrasting style.
Because there was such a significant concentration of newly painted balls with cover patterns I had never seen, I had my questions. Golf collecting is not immune to counterfeiting. Using 62 pages in the second edition of The Clubmakers Art: Antique Golf Clubs and Their History, I document over 76 fake and replica antique golf clubs, many of which have unique made-up designs.
With my curiosity piqued, I explained to the owner that there could be some problems with some of the repainted balls. He understood and was willing to allow me to do what was needed to vet the balls before putting them up for auction. None made it.
What this man called repainted balls included hand-hammered, mesh, bramble, dimple, lattice (square dimple) and unique balls with previously unknown/extremely rare patterns. For the remainder of this report, I will refer to these balls—balls painted/produced in dramatic colors and striking two-color combinations as opposed to the solid white color of a traditional golf ball—as either “black” or “decorated” balls.
My prior experience with decorated balls was limited. Around the same time that I encountered these balls, I received a few phone calls from an individual who had been offered other decorated balls for sale. Two other individuals sent me small collections that also included a few decorated balls. Approximately five years earlier, I had seen a few black balls (including a Dunn’s Stars and Stripes) on eBay and did not quite know what to make of them. They were obviously repainted but not inexpensive. Nowhere was it stated that they were replicas or anything like that. I recall asking myself the question, “Why in the world would anyone paint a genuine 1897 Stars and Stripes ball, let alone paint it black!?”
To me, repainted balls are worth significantly less than original condition balls. After all, a new coat of paint can be put on anything, but when the original paint is gone, it’s gone—along with a key element of authenticity.
Among the decorated balls delivered to me, there was not one that I could validate as genuine. All the balls that I invasively tested and examined in depth proved to be fakes. These counterfeit antique balls appear to be created in several ways. In general, here is how I believe the ones I examined were produced:
A purchaser of some of these balls remarked that they were told the balls were pond finds and repainted because of the damage to the ball from sitting under water and mud for years upwards of a century or more... which sounded fishy to me, like nothing more than a smoke-and-mirrors story. However, the story of a continuous supply of great antique balls being gathered from lakes like eggs out of a chicken coop has apparently worked. Based on my research on the topic, I estimate that there are many thousands of black/decorated balls, and in a much bigger variety than the 100+ sent to me, currently in circulation—and they kare scattered far and wide.
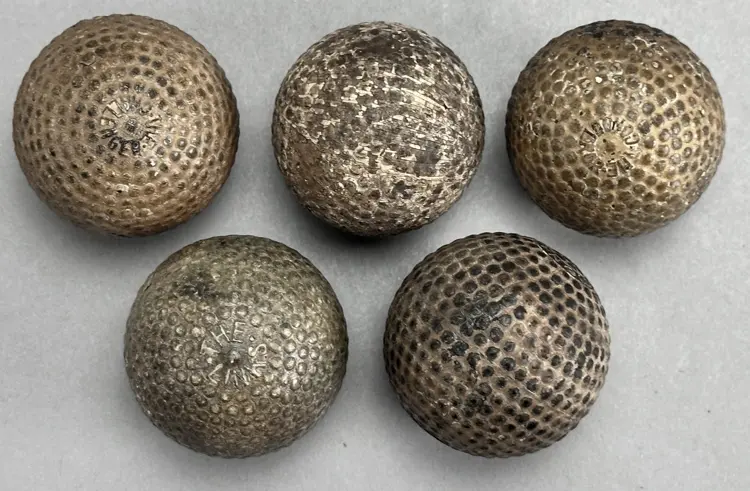
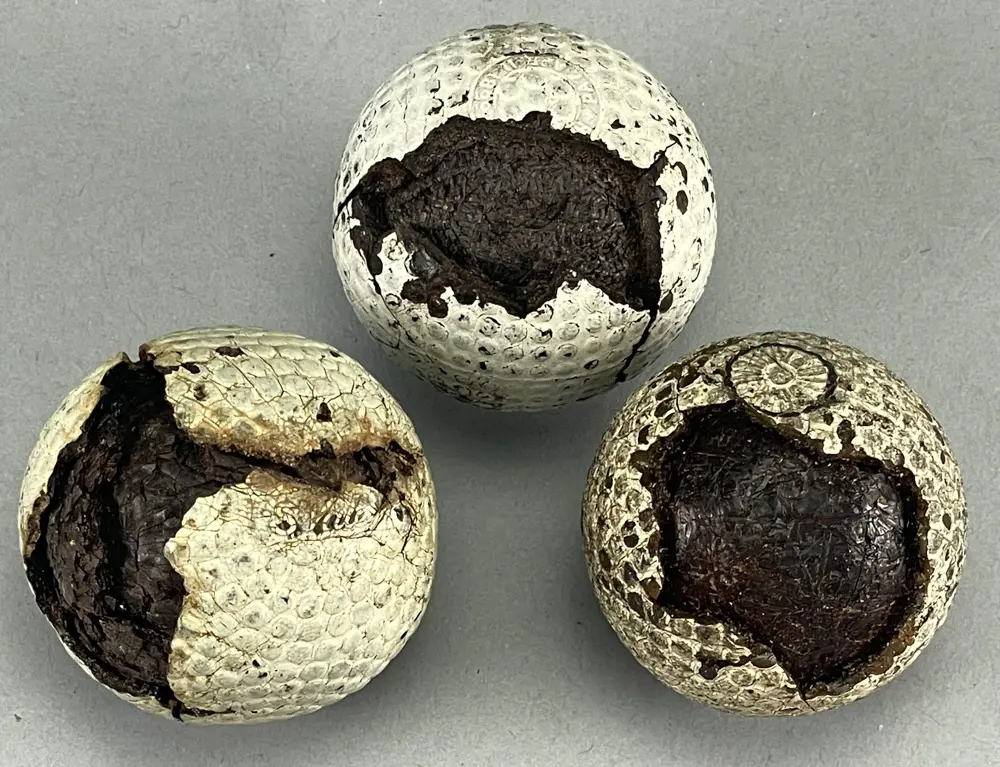
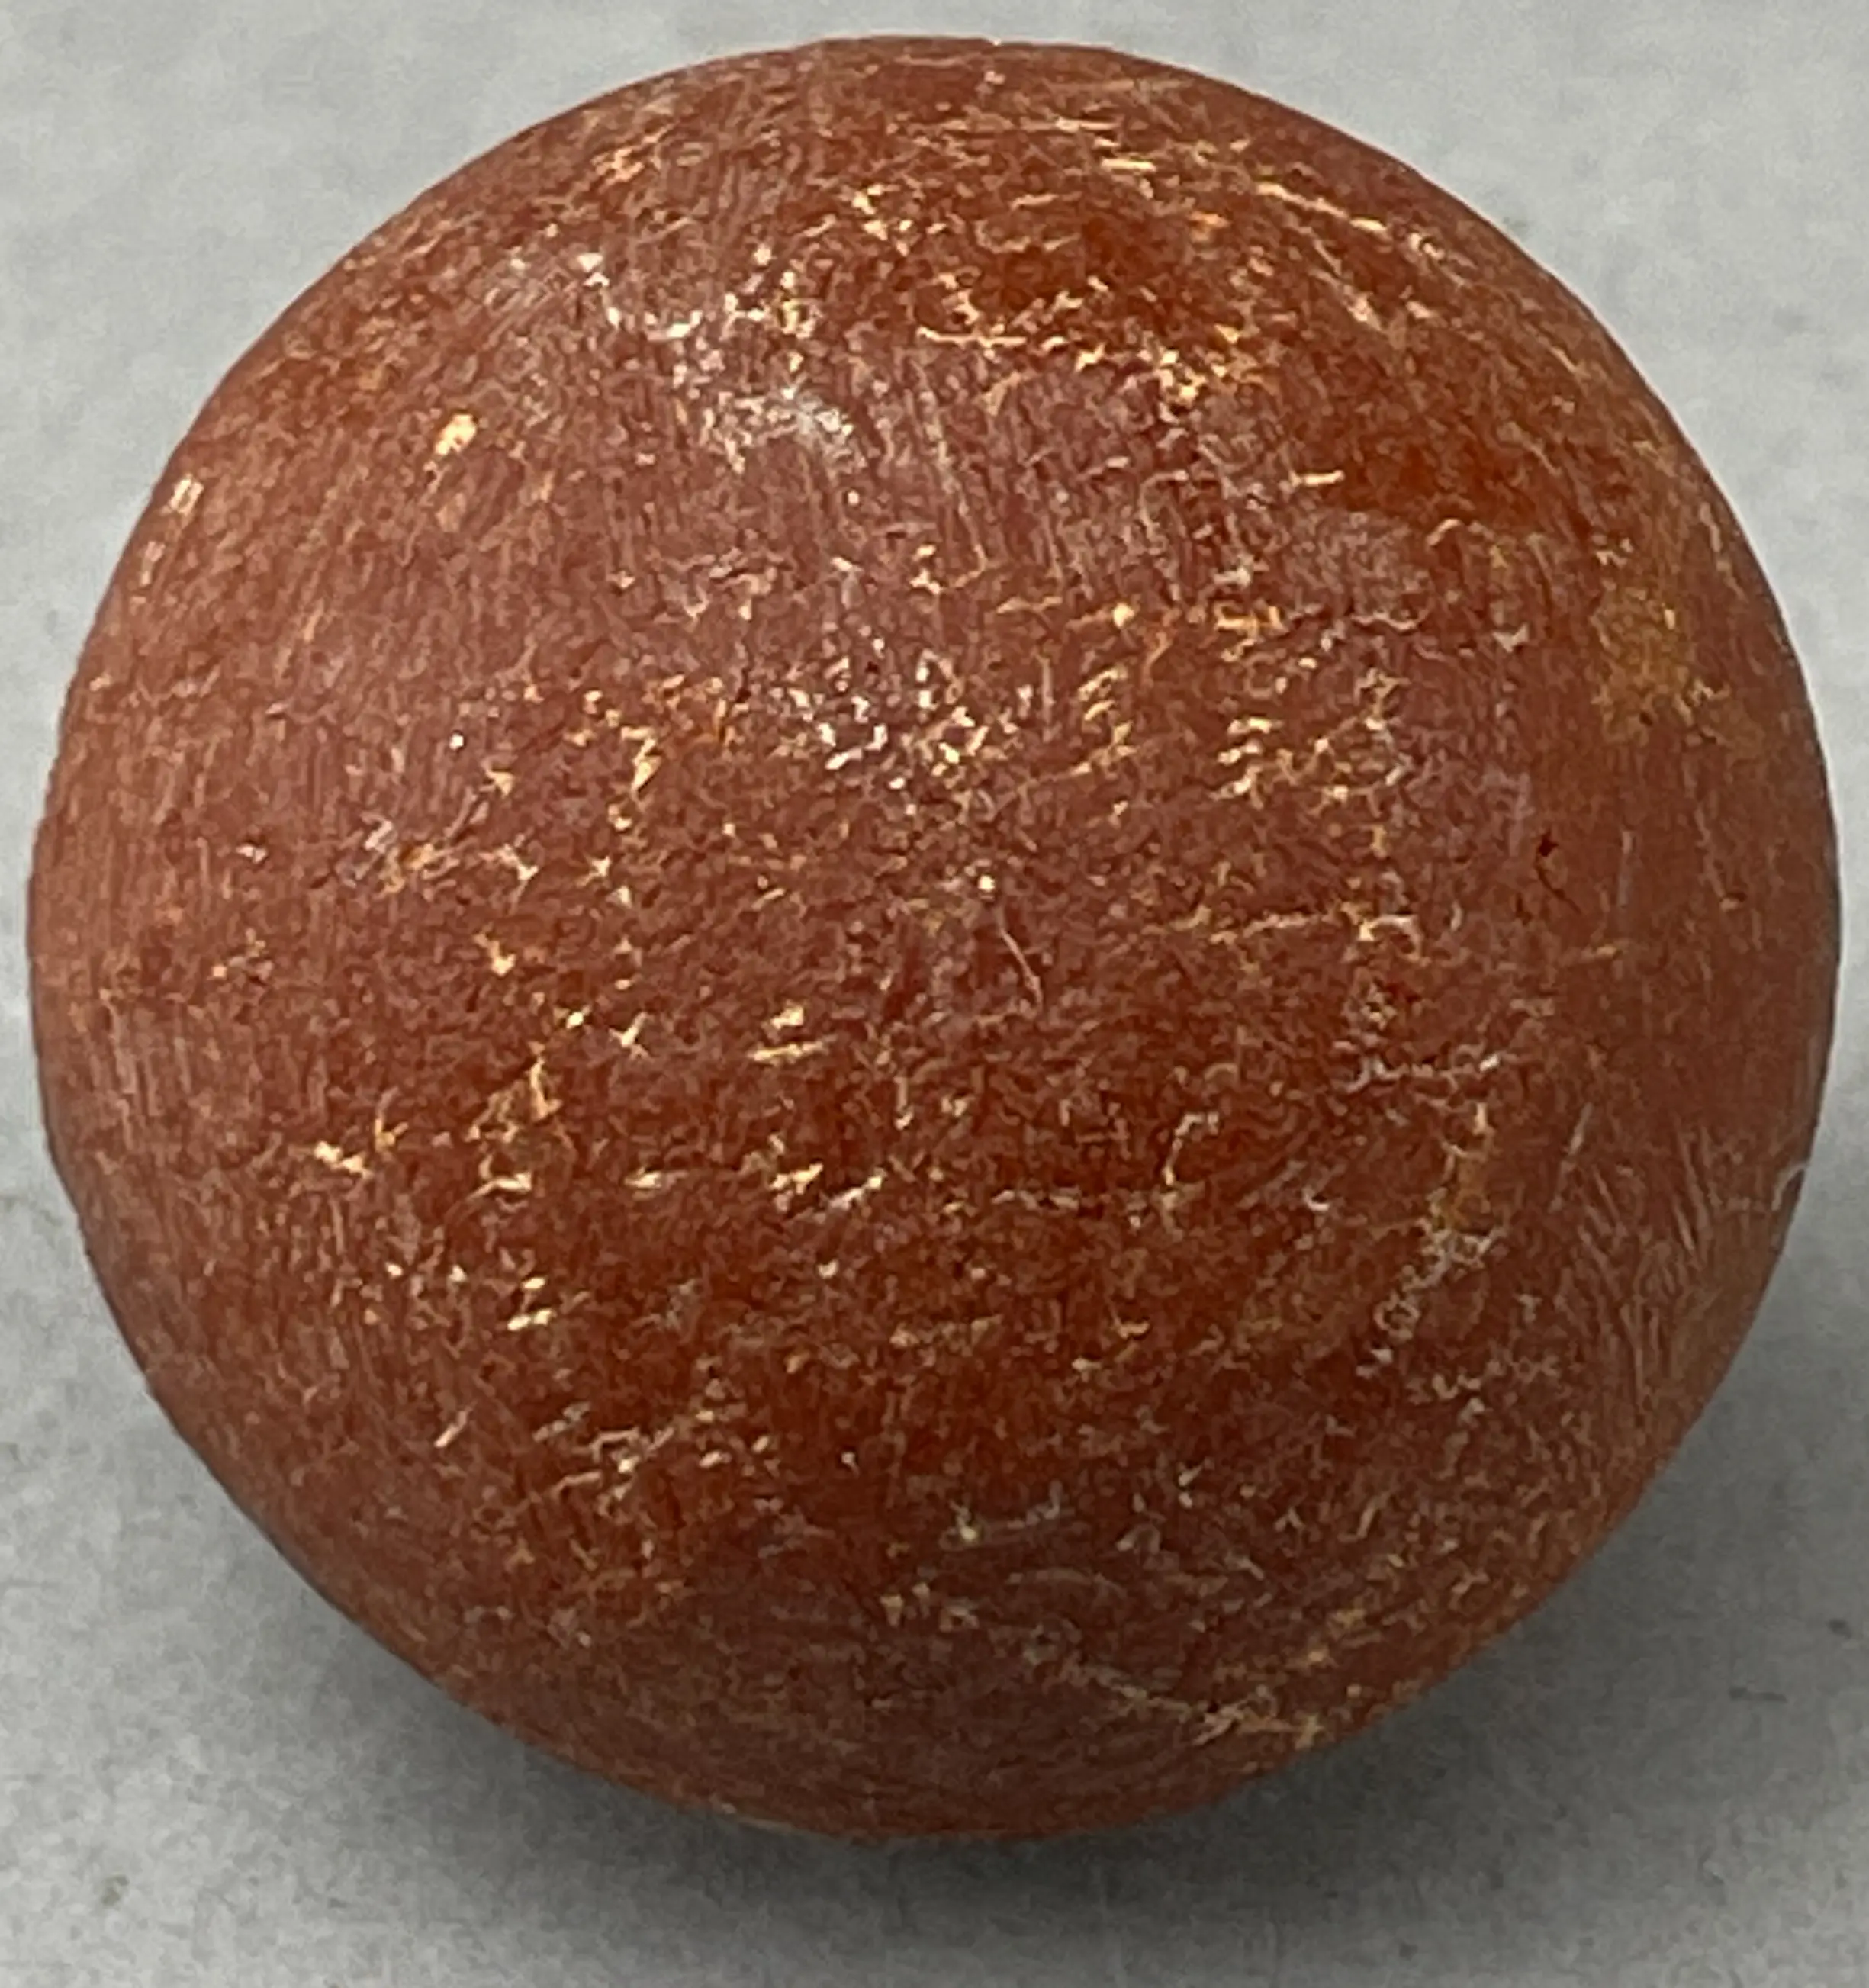
That story was flawed from the start, however, as the counterfeiters were selling purported “lake balls” that were either heavily engraved because “their surfaces had deteriorated in the water” or, in polar opposite fashion, had tack-sharp patterns and letters just like a brand new ball made yesterday. You can’t have it both ways. Circa 1890-1920 golf balls that have been underwater for a century will share an overall consistency in their condition when found, some bearing more mud staining than others, and all of them having lost a little sharpness to their lettering, patterns, brambles, etc. To their credit, some lake-found antique balls can clean up and still look quite presentable in their new light “mud-brown” color or exposed gutta percha. The appearance of the five balls shown below is consistent with reclaimed lake balls after they have been cleaned up.
A few months after I initially posted this article, the story has apparently changed. A recent buyer of two decorated balls on ebay asked the seller based in the UK where he/she obtained the balls and was told:
“I purchased those balls and most of my collection from a gentleman in the UK. He acquired a piece of property only to find out once he started to develop that it was an old golf course from the late 1800’s to early 1900’s. Once he began to develop, he uncovered vintage ball after ball. I bought most all of them.”
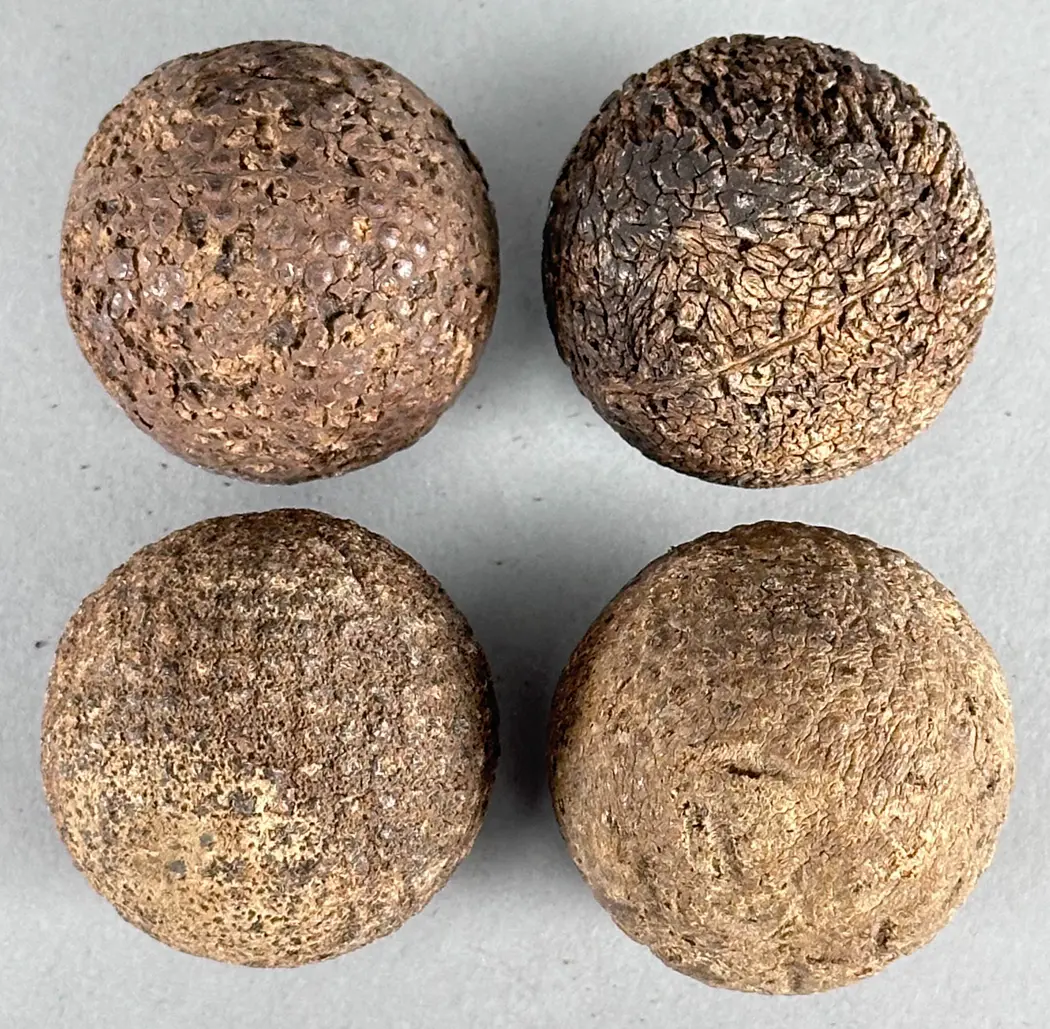
One of many big problems with that story is this: If solid gutta percha or gutta percha-covered golf balls were left out in the weather burrowed into and under overgrown sod that was once used as a golf course, after 100 years they would be in extremely poor condition. Their surfaces (not simply the paint) would show various stages of deterioration/rot as is consistently demonstrated by old gutta percha balls that actually have been dug out of the ground, as shown directly below.
As a result of my study, I learned a great deal and hope that it will be of help to the golf ball collecting world. Here are four points on how I currently see antique golf ball collecting in general:
Many of these decorated or black balls are crudely painted, though others are painted with great exactness. Some also attempt to duplicate the “look” of a used ball. Normally, when paint wears off the high points on an early rubber core ball, the underlying raw surface shows its usual (dark) natural color. Instead, on many of these decorated balls the dark color on the “worn” points is actually black paint intended to approximate the appearance of gutta percha while any recesses are filled with contrasting paint. In general, as you will see in this report, decorated balls are typically easy to recognize, and best to avoid.
The fallout from these imposter balls goes beyond the major losses sustained by the buyers. Because many genuine antique balls have been repainted, how can a collector determine what is real and what is not? Therein lies the rub—and the reason for presenting the results of my research here.
In order to accurately assess and evaluate purported antique golf balls, one needs to understand how genuine antique golf balls were made. Here are a few basics.
Patented in 1899, rubber core golf balls brought the production of solid gutta percha golf balls, first tried in 1845, to a conclusion by roughly 1903. The continued use of gutta percha to make covers for the new wound rubber core balls, however, was fundamental to the ball. The covers on the early rubber core balls were made from either pure or supplemented gutta percha. In 1902, there were no less than 17 British patents that called for making the cover or surface of a golf ball from gutta percha or gutta percha mixed with various additives. During the ensuing years, ballmakers often mixed various additives such as india rubber, vulcanite, balata, chemicals, minerals, and other materials with gutta percha, the ballmaker hoping to either make a cheaper ball or devise a cover that would be more durable and/or improve feel, distance, accuracy, etc. In the vast majority of instances, however, the gutta percha used to make golf ball covers was dark brown, the same basic color as the gutta percha used to make solid gutty balls during the 19th century.
From 1899 to the early 1920s, gutta percha covers remained in widespread use. An article titled “The Making of a Golf Ball” in the October 1904 issue of The World’s Work reports:
“Dissect a rubber cored ball and …. you may dig out with your scalpel an inner core of wood, cork, vulcanite, or leather; you may find it wound in rubber threads or rubber tape, and a glance at the cover will reveal the purest gutta percha.”
The Travelers Standard, July 1913, (p. 213) described how golf balls were made as follows:
“A core of hard rubber, cork, or wood [was] wound with rubber tape under tension, and an outer covering of gutta percha was then molded around this winding. Two sizes of windings were used—a primary one of rubber thread, and an outer one of rubber tape.”
The September 1918 issue of The American Golfer published a letter that asked what is “the outer layer on the golf ball, is it rubber the same as on the inside of the ball?” The editor, Walter Travis, responded, “The cover or shell of the rubber core ball is largely composed of refined gutta-percha, with an admixture of balata.”
In his article On the Inside of a Golf Ball published in the September 6, 1920, issue of The American Golfer, Walter Trumbell described the construction of a golf ball in part as follows:
“This core is placed in a machine and many yards of rubber band or tape is wound upon it…. When the tape is all put on, the ball looks nothing so much as a mass of extremely emaciated angleworms. On top of this a shell of gutta percha is moulded, varying in thickness from 1/16 to 1/8 of an inch. Then the ball is painted. Four coats of paint are general.”
In the December 17, 1921, issue of The American Golfer, O.B. Keeler described the golf ball as a “lively and expensive globule of rubber core and rubber strands and gutta-percha shell.”
Before Surlyn, a synthetic resin, was used to make golf ball covers in the 1960s, covers were made out of gutta percha or balata either entirely or in large part. They could be mixed together, combined with various chemicals and other ingredients, plus they could be processed in a variety of ways including extracting and combining resins and vulcanizing. Even so, gutta percha and balata were the two main materials used to make covers prior to Surlyn. Natural rubber (para rubber or india rubber as it was often called) was used to create the rubber thread/strips that wound around the cores of early rubber core balls. Para rubber covers were tried on a few balls, but with poor results.
There are two reasons why it is important for collectors to understand that gutta percha was the primary material used to make golf ball covers during the initial decades of the 20th century. First, such covers will typically have a dark brown color depending on what if anything was mixed in with the gutta percha. Second, gutta percha covers typically make a distinctly bright clicking sound when they are lightly bounced on a hard surface (just release the ball from ¼” above a rock-solid countertop and listen). The sound is much like the click made when two pool balls collide.
In some instances, an early 1900s rubber core ball with a gutta percha cover will sound so much like a solid gutta percha ball that it can be nearly impossible from sound alone to tell the two apart. Typically, if the cover is a gutta percha composition, it will still make a clicking sound but not quite as sharp—there are degrees here, especially if much para rubber was mixed in, or so I believe. Balata covers which came into prominence later during the 1920s and ‘30s can also make distinct but differing clicks depending on the process used to form the cover and the purity of the balata—whether it has additional material or additives mixed in. In some instances, balata-covered balls sound like they are made from solid gutta percha, in other instances they can sound muted.
Of course, there are other factors beyond the cover material that determines the sound an antique golf ball makes when bounced. For example, the tension of the winding, if the winding has hardened or solidified over time, the amount of pressure used to compress the core (some were slightly oversized) when the cover was applied, and the connection of the cover to the wound core are all elements that can influence the sound. The center of the core, which was made from a wide variety of materials such as para rubber, gutta percha, liquids, celluloid, chemicals, air, metal, etc., can also influence sound if only to a slight degree. The cover, however, normally plays a sizeable role. While there can be variations in the sounds made by rubber core balls, the critical point is that solid gutta percha balls and rubber core balls with gutta percha covers will typically sound much different from old balls remade with new rubber covers as with many of the counterfeit balls described hereafter.
It should be noted that, in addition to the typical dark brown gutta percha, both black gutta percha and white gutta percha was advertised as cover materials by a few ballmakers. An exposed black gutta percha cover simply looks more black than brown. It has been my experience that an exposed white gutta percha cover will appear reddish brown to yellow depending on what it is mixed with, and it will have a genuine degree of translucence. The lighter the yellow color, the more translucent its surface (especially any raised edges such as in its name/pattern) will look when viewed with a jeweler’s loupe in bright light.
Soft para rubber (natural rubber) was the standard material used to make the inner elastic thread and tape wound around the spherical center in a rubber core ball. Para rubber covers were tried on only four different balls that I know of but with poor results. Such covers look similar to dark brown gutta percha in color. Balata covers were tried on a scant few balls prior to 1920 for a few reasons. It was much harder to source, more expensive than gutta percha, and not as durable. Eventually the supply of balata increased, and ball manufacturers figured out how to make balata covers that were better than gutta percha covers. Consequently, during the 1920s and ‘30s balata was used more and more, sharing the stage with gutta percha before becoming the main ingredient used to make covers in the ball-making industry for many years.
Golf balls were made from molds for decades before the rubber core golf ball was patented in 1899. Over time, the molds became more refined. By the 1890s there were businesses in the UK that supplied molds to the golf ball industry. These molds were made by professional craftsmen and to perfection. The December 1, 1899, issue of Golf Illustrated promoted one company in particular:
“The essential requirements for the remaking of balls are a first-class engraved mould and a screw press, and we cannot do better than recommend our readers to the appliances made by John White and Company, engineers, Edinburgh, who can supply the moulds engraved to any pattern desired, and whose goods are of first-class manufacture.”
White advertised “golf ball moulds in ‘Haskell,’ ‘Lynx,’ ‘Bramble,’ ‘Silvertown,’ ‘Ocobo,’ &c. markings” for many years in the major golf magazines from the early 1890s into the 1910s.
In the earliest patterned molds, the pattern was engraved into each half of the mold. A professional engraver would literally cut in the pattern to be reproduced, which typically consisted of lines. According to “Morris,” as published in the April 9, 1880, issue of The Illustrated Carpenter and Builder, “Golf Ball moulds are made from gun metal in two halves, both halves grooved out instead of hammering.”
By the mid 1890s master balls were also being used to make patterned molds. A master ball had the advantage of being able to make multiple duplicate molds, which was most helpful if the pattern was intricate or production sizeable.
Those who desired a mold could purchase a well-known pattern that was in stock, or they could have one or more molds made with their own, unique pattern. Making a mold with a new pattern, however, could be quite expensive. To make a mold from a master ball, the first step was to craft the master ball. Whatever the new pattern was to be, it needed to be perfectly formed on the surface of a brass master ball. Again, once a master was made, it could be used to cast multiple identical molds.
The craftsman who made master balls and engraved molds were truly artisans. The exacting details found on various patterned golf balls such as Henry’s Rifled with its graduated spiral pattern, Helsby’s Link with its raised chains, Stow Woodward’s Burbank swirling whirlwind ball, and Cochrane’s map of the world ball with its continents, countries, oceans, and brambles are testimonies to their incredible skill. It’s clear that the master balls and engraved molds that produced antique golf balls were meticulously crafted to an exacting standard. With all that was at stake—the large amount of money spent to make the molds and the need to sway golfers to buy the finished ball—the pattern needed to be as close to flawless as possible. Many of the engraved decorated balls that will follow stand in stark contrast to the beautiful and exacting workmanship of the early 20th-century ballmakers.
Speaking of flawless, see Image 1 here.
This intricate incised brass master “half ball” (shown both assembled and taken apart) was offered in Sotheby’s July 11, 1994, sale with the description in part as follows:
“The difficulty was removing the patterned master ball from the mould. John White, North St. Andrews Street, Edinburgh, overcame this problem by making these half balls. One ‘half’ comprised seven pieces, each piece was hand filed and machined to an accuracy of 1/1000 of an inch, then sent to have the design of the golf ball maker engraved onto it. This particular ball was made over 90 years ago. It cost as much as £30 to have one ‘master ball’ engraved. On completion of the half ball it was accurately placed in the centre of a brass cup, and white molten metal was poured in around it. Removing the half ball, with its engraved indentations, from the solidified metal was the main problem, hence the reason that the half ball was made in seven pieces. By taking out each piece in sequence the master ball came clear out of the mould. Two moulds would be made from the ‘master ball’ so that the cover could be placed—in two pieces—one in each mould. The elastic cored ball would then be placed between the two moulds and the cover pressed on.”
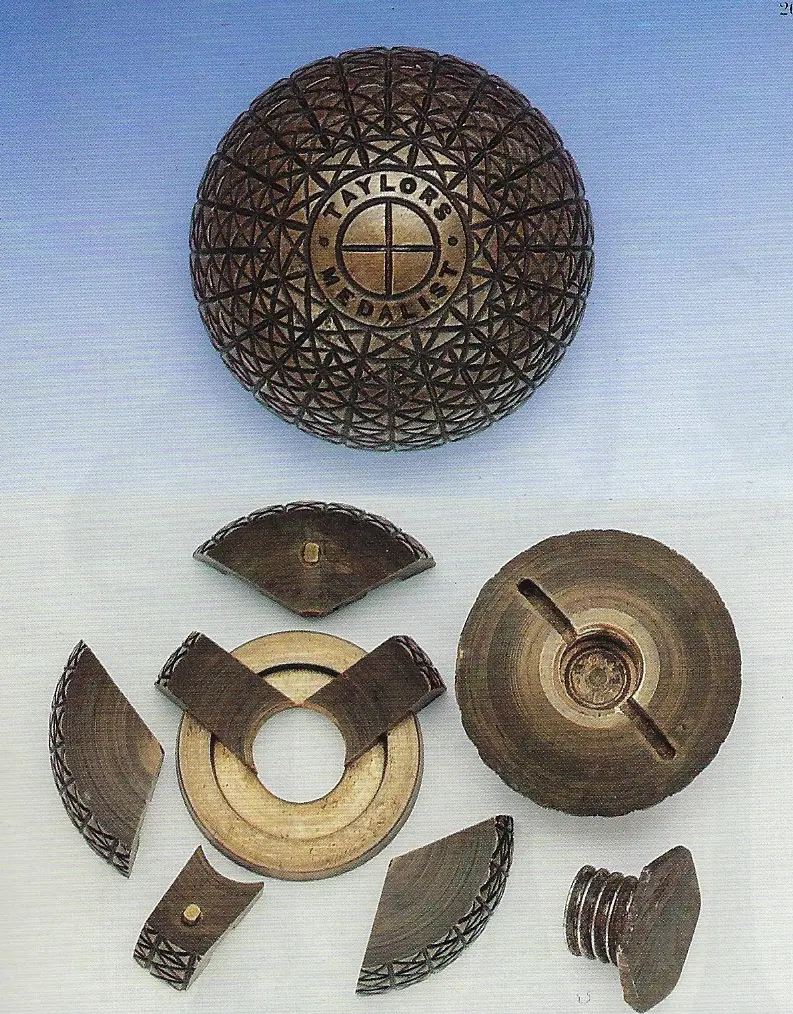
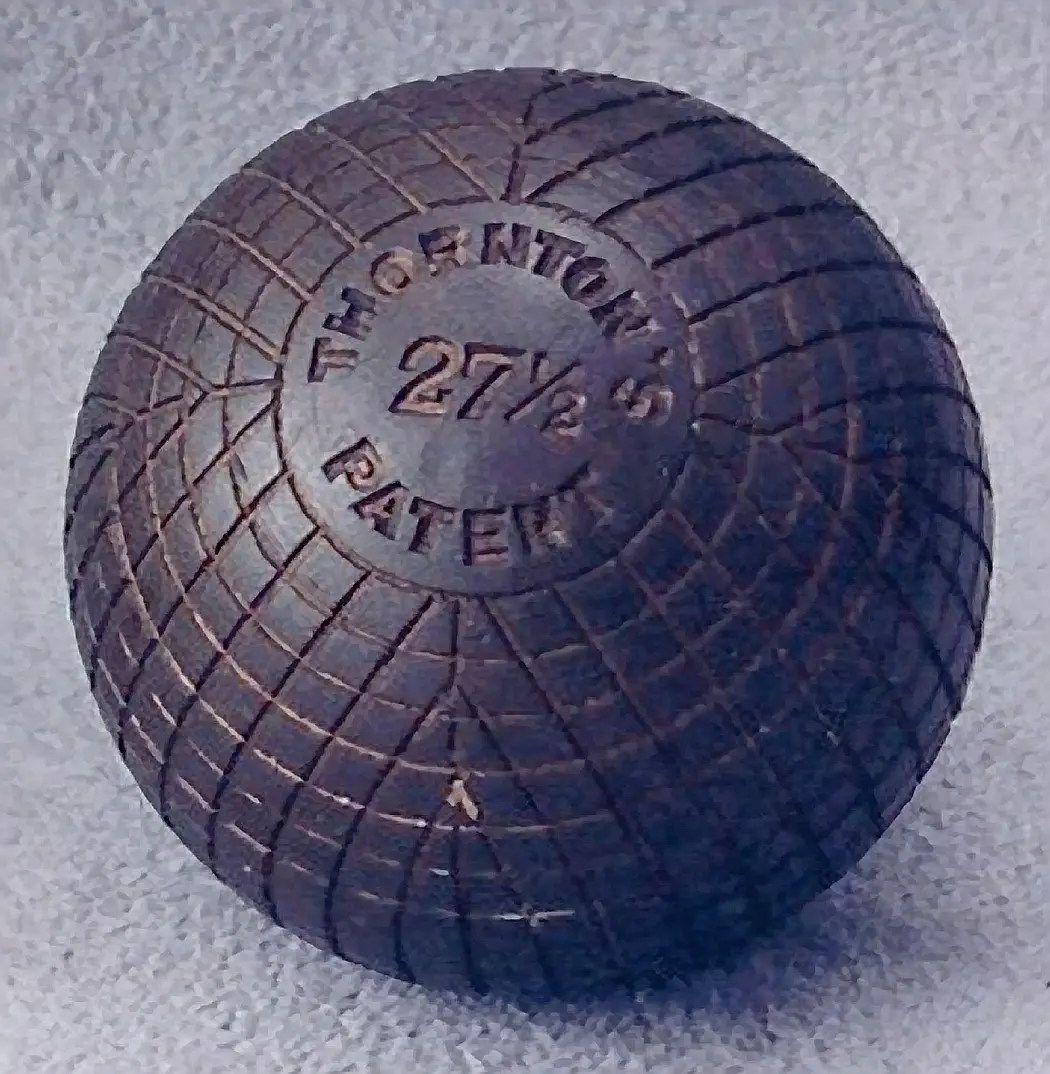
As can be seen in Image 1 above, the production of a master ball was accomplished with exacting precision. Such was also the case with the more common solid brass master balls, such as the extremely heavy Thornton's Patent 27 ½ brass master ball shown in Image 2
Once a master ball was crafted, the next step was to make the mold. The bramble ball mold in Image 3 here consists of ten pieces. It could make balls marked with two different names and two slightly different patterns (or possibly ball sizes). The outside of the two large pieces is marked with a British patent number. J. Murry and A. Levack filed their application for this mold in June of 1895.
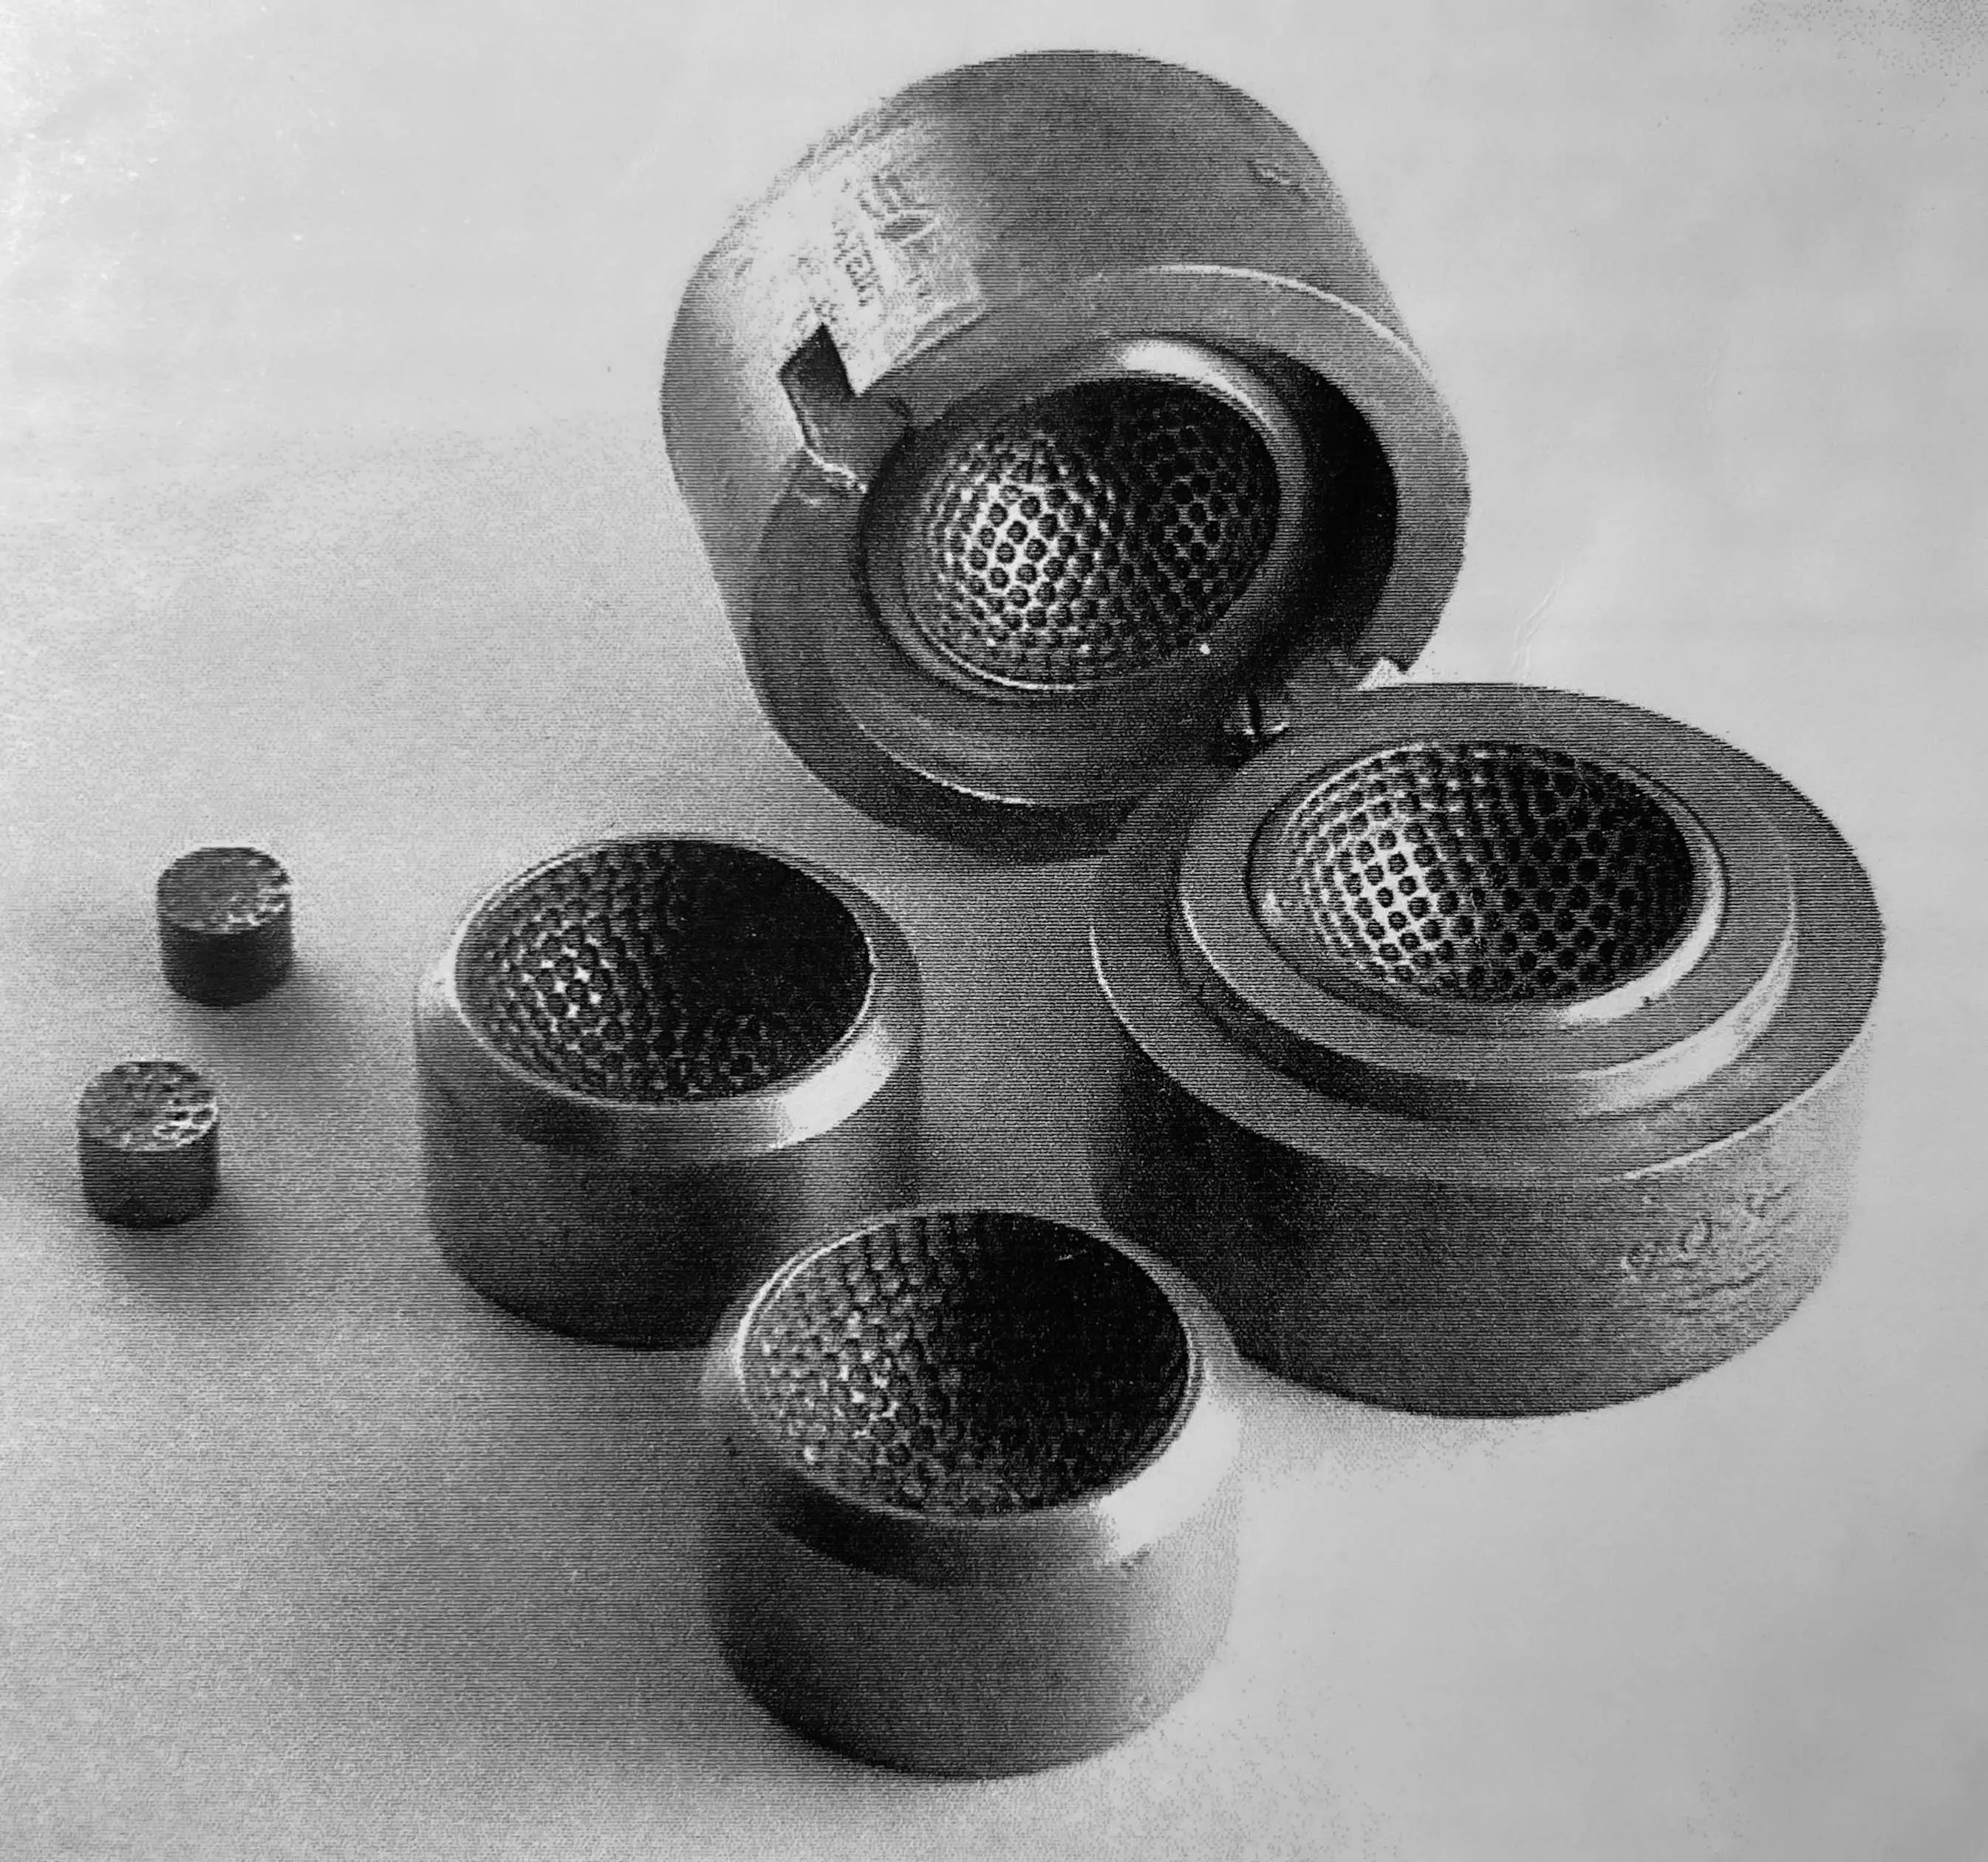
Four interchangeable small pieces, four interchangeable medium size pieces and two large pieces make up this ten-piece mold. The small pieces are name plugs that fit into the middle pieces. Two of the middle pieces fit in the two larger pieces. There are two screws in the sides of both large pieces; loosen the screws and the inner molds will come loose. There is a hole in the bottom of each large piece to aid in the removal of the inner piece. There is also a centered hole in the underside of the middle pieces, to aid in the removal of the small name pieces. The four small pieces are actually two matching pairs. A different ball name is on each pair.
As can be seen in the images above, master balls and the molds made from them, be they ten pieces or two pieces (as most were), were the product of professionals—sculptors, engravers, and foundries. A single master ball could produce many identical molds.
By the 1920s, golf balls were made in die sunk steel molds. As reported in 1923:
“Golf ball centers are usually covered with gutta percha or balata in special steel molds. Their manufacture necessitates special tools and specialized training and skill on the part of the workman who finish the cavities by hand methods. Each mold cavity is die sunk or cut from a solid block of special quality steel. The raised spots on the mold cavity that produce the dimpled markings on the surface of the ball are most accurately located and cut in relief by special die sinking tools. The bottom of the cavity is bored to receive a plug with surface concaved to the same radius as the ball cavity, and bearing in raised characters the name of the ball. This feature requires exceptionally careful work. When completely cut, and engraved, the cavity is hand scraped and polished free of tool marks and undergoes heat treatment to prevent rusting. Such a steel mold is permanent and accurate and a marvel of the art of die sinking.
“The process of making it is slow and expensive. The high cost naturally restricts ball manufacturers’ investment in such equipment, and discourages changes in design of markings and production of special types.
“Balls molded in a die sunk steel mold of the sort described are remarkable for perfection. However, the growing popularity of golf is increasing the demand for balls and emphasizing the need of enlarged mold equipment. The solution of the problem of excessive cost without loss of the accuracy and perfection of the steel golf ball was found in the process and application of die casting.
“Die casting is the process of making castings from non-ferrous alloys by injecting the very hot fluid metal under high pressure into heavy steel dies provided with an internal water circulating system for rapidly cooling the casting…
“The die used for casting golf balls is of the same type as that for die casting in general. It is separable, built of steel, and contains a copper pipe system for internal circulation of water for cooling the casting. It has also an air outlet. In the case of golf balls several cores are mounted in the die and the cavities assembled in gates to make several molds at one casting.” (India Rubber World, Nov. 1, p.83)
Duplicate molds were required in order to provide the large number of molds needed to produce the massive number of golf balls sold each year by 1920.
Once die cast golf ball molds were introduced in the early 1920s, up to twenty-five or more molds could be made by an automated machine during one casting. As a result, the cost to produce golf balls dropped, production speed increased, and balls became much easier to make—with no loss in accuracy, markings, size, or perfection when compared to balls produced from die sunk molds.
After a ball was made, it could be remade once it started to show notable damage or wear. Remade balls were a staple of the golf ball market during the early 1900s. They were typically sold with “remade” marked on their cover or else the ball’s name was advertised as a remade ball.
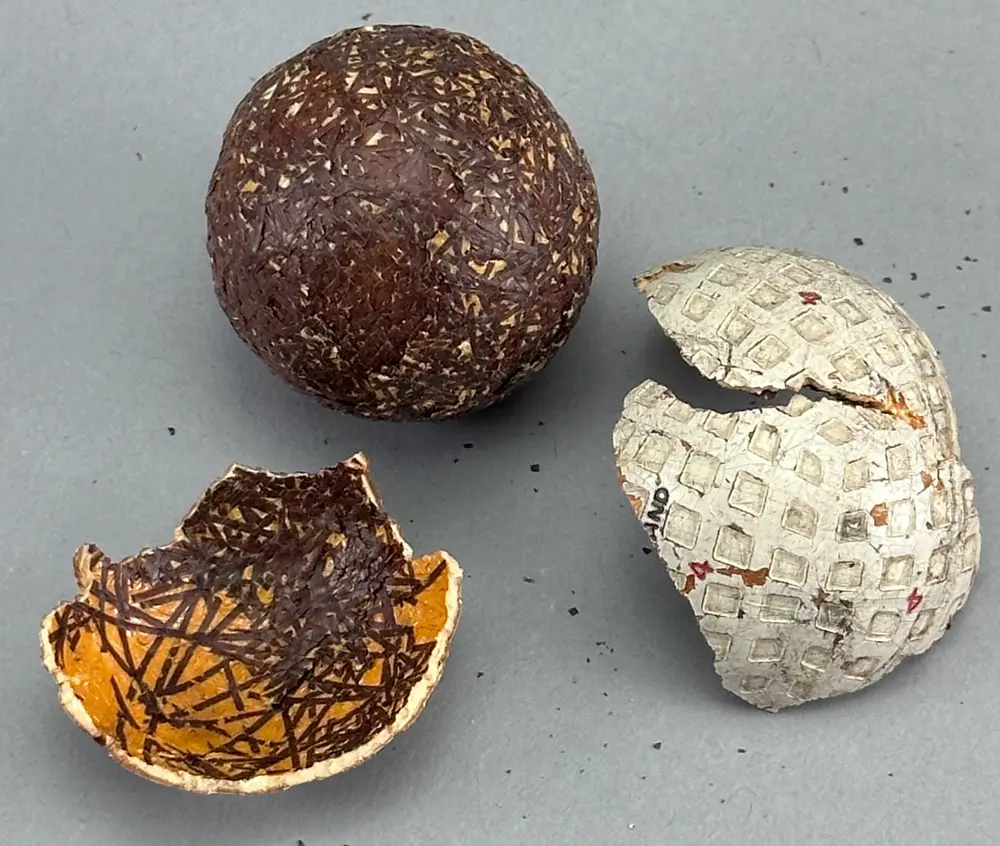
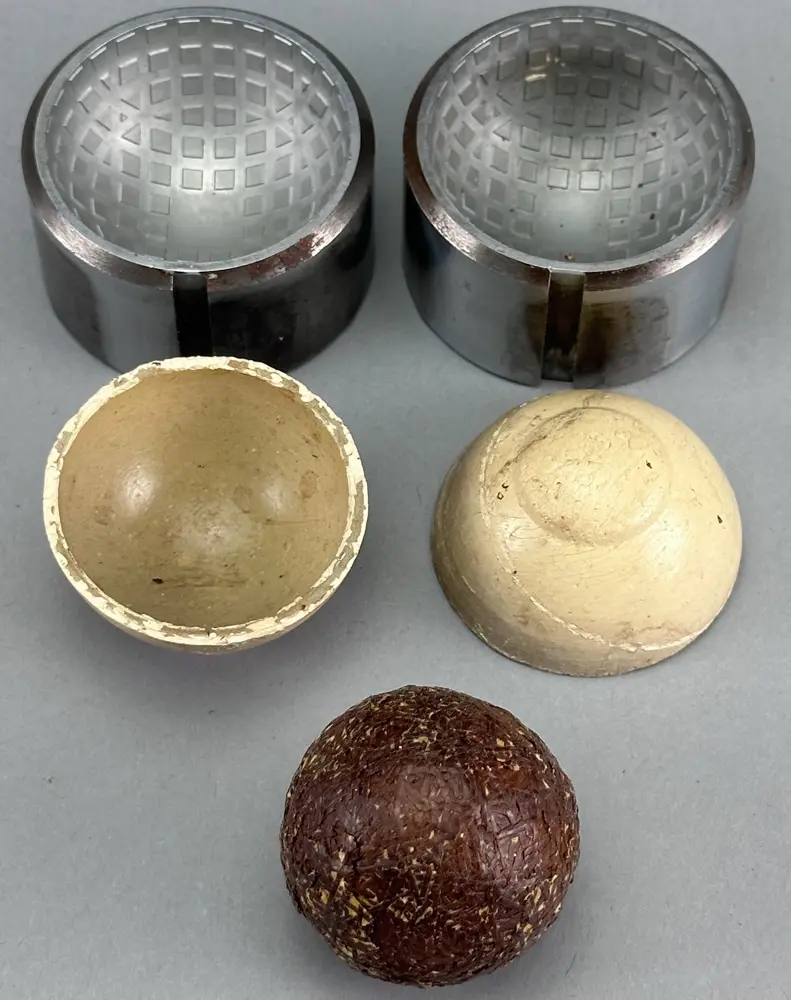
The image above left shows a wound rubber core with its original lattice pattern cover removed.
The image above right shows both halves of a c. 1930 lattice pattern ball mold, two c. 1930s balata shells used to form a cover, and the neatly wound rubber core removed from the ball above left. Back in the day, to mold or remold a golf ball required either a new or used wound rubber core. Next, it was placed between two thin shells (previously molded from either gutta percha or balata) and everything was heated/molded together inside a ball mold. The exterior of the new cover would bear whatever pattern was on the inside of the mold. After the ball cooled, any excess material forced out where the two mold halves met when pushed together under heat and pressure was trimmed off, and the ball was ready for painting.
If somebody wanted to make or remold a rubber core golf ball today, a metal mold is no longer necessary. Soft molds can be formed around a genuine ball and, after curing, replicate the genuine ball. However, it would not be an exact replica for a variety of reasons, not the least of which is that the copied castings produced so far are not made from genuine gutta percha or balata.
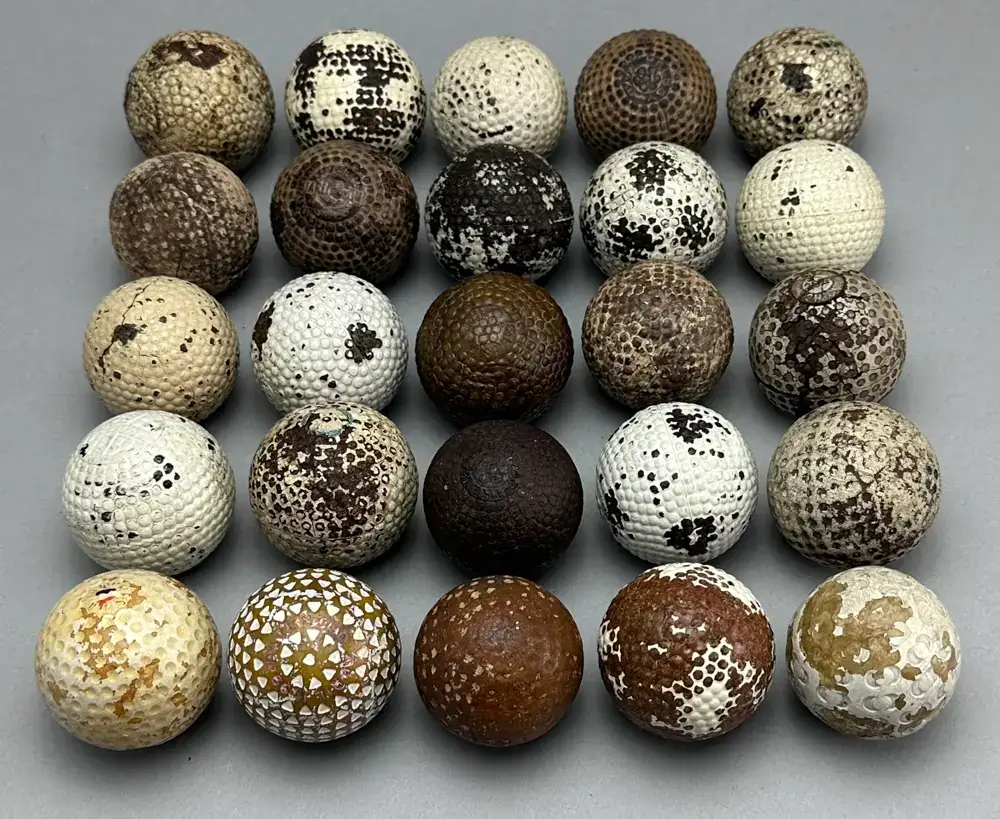
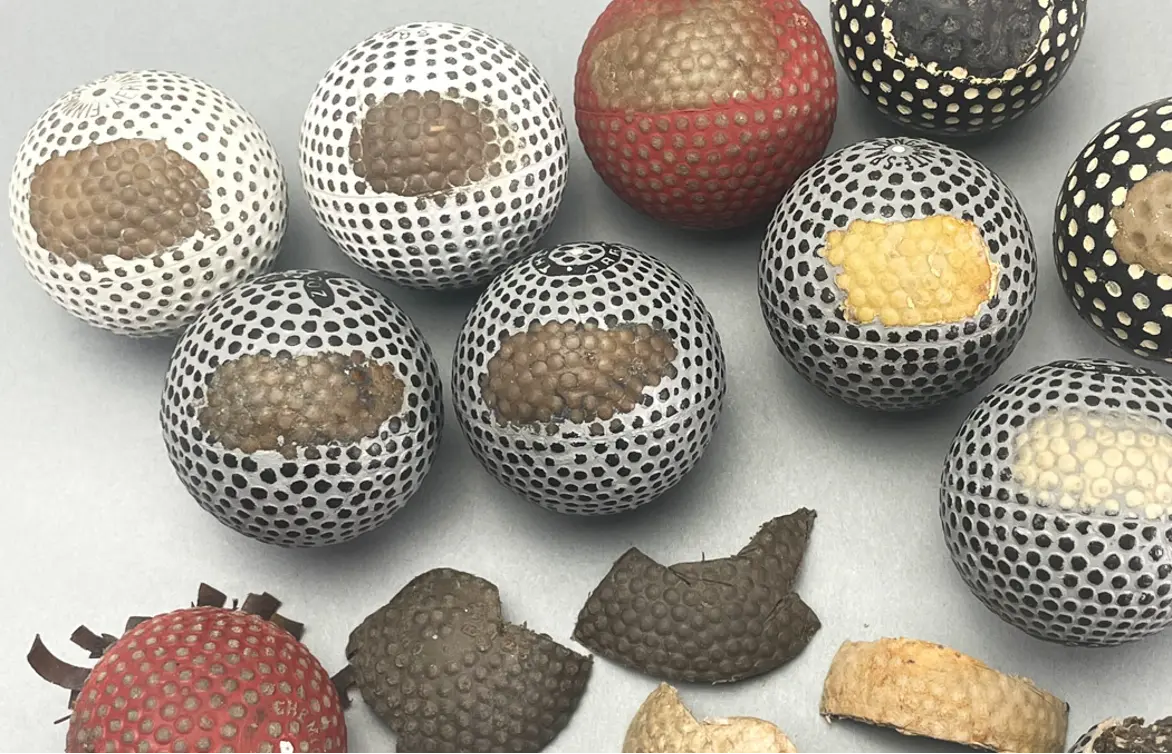
Above, 25 rubber core golf balls from the early 1900s demonstrate three fundamental points about golf ball covers made prior to the early 1920s:
Unlike rubber, white gutta percha covers are plastic-like with a genuine degree of translucence especially when viewed under magnification. The covers on the few Goodrich balls advertised as made from “pure white gutta percha” that I have seen are a translucent yellow, like it is on the Goodrich Whippet shown above. The reddish-brown white gutta percha cover on the Spalding White was advertised as made from a “purified” white gutta percha produced under a patented process.
Note: In the image above, there is one white gutta percha cover for every four dark brown gutta percha covers. In reality, white gutta percha covers are far more rare. Also note that during the 1920s and ‘30s, ballmakers would sometimes use yellow varnish and/or a thin layer of material, sometimes yellow, under the finish coats of white paint. In the early 1930s, Silvertown, to name just one ball manufacturer, used a thin film of vulcanized rubber over top of the winding to prevent their gutta percha covers from penetrating the elastic thread.
Consequently, chipped paint on a balata cover can reveal what appears to be white gutta percha, but it’s not. It’s an undercoat of yellow
varnish or thin layer of material used to improve the qualities of the paint and the ball itself. As found today, many 1920s and 1930s balls
have a coating, primer, and/two or more layers under their white exterior. In many instances, the color directly under the white paint as seen
where it is chipped or worn is not the color of the cover's base layer. I have personally witnessed this in a number of worn 1920s and ‘30s
balls as well as some of the balls that I have stripped and cut apart (see 4.22 Dunlop Lattice Ball).
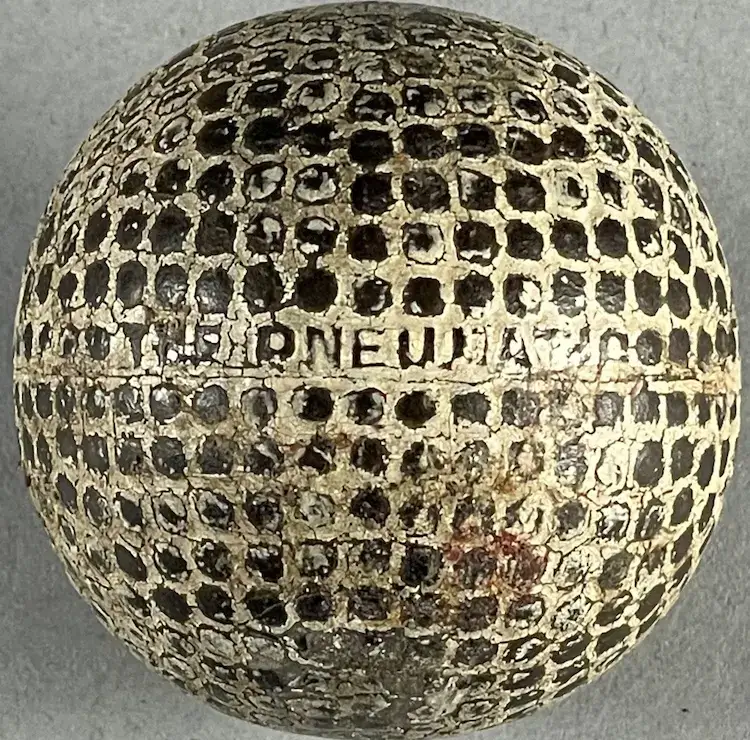
For sake of reference, the 1906 Goodyear Pneumatic golf ball shown here is one of only four early 20th-century golf balls I have
found that were advertised as having a para rubber cover. I have never seen any of the other three. As shown on this ball, the color of its para
rubber cover is consistent with the black/brown color of the para rubber cores shown in the first image of this section.
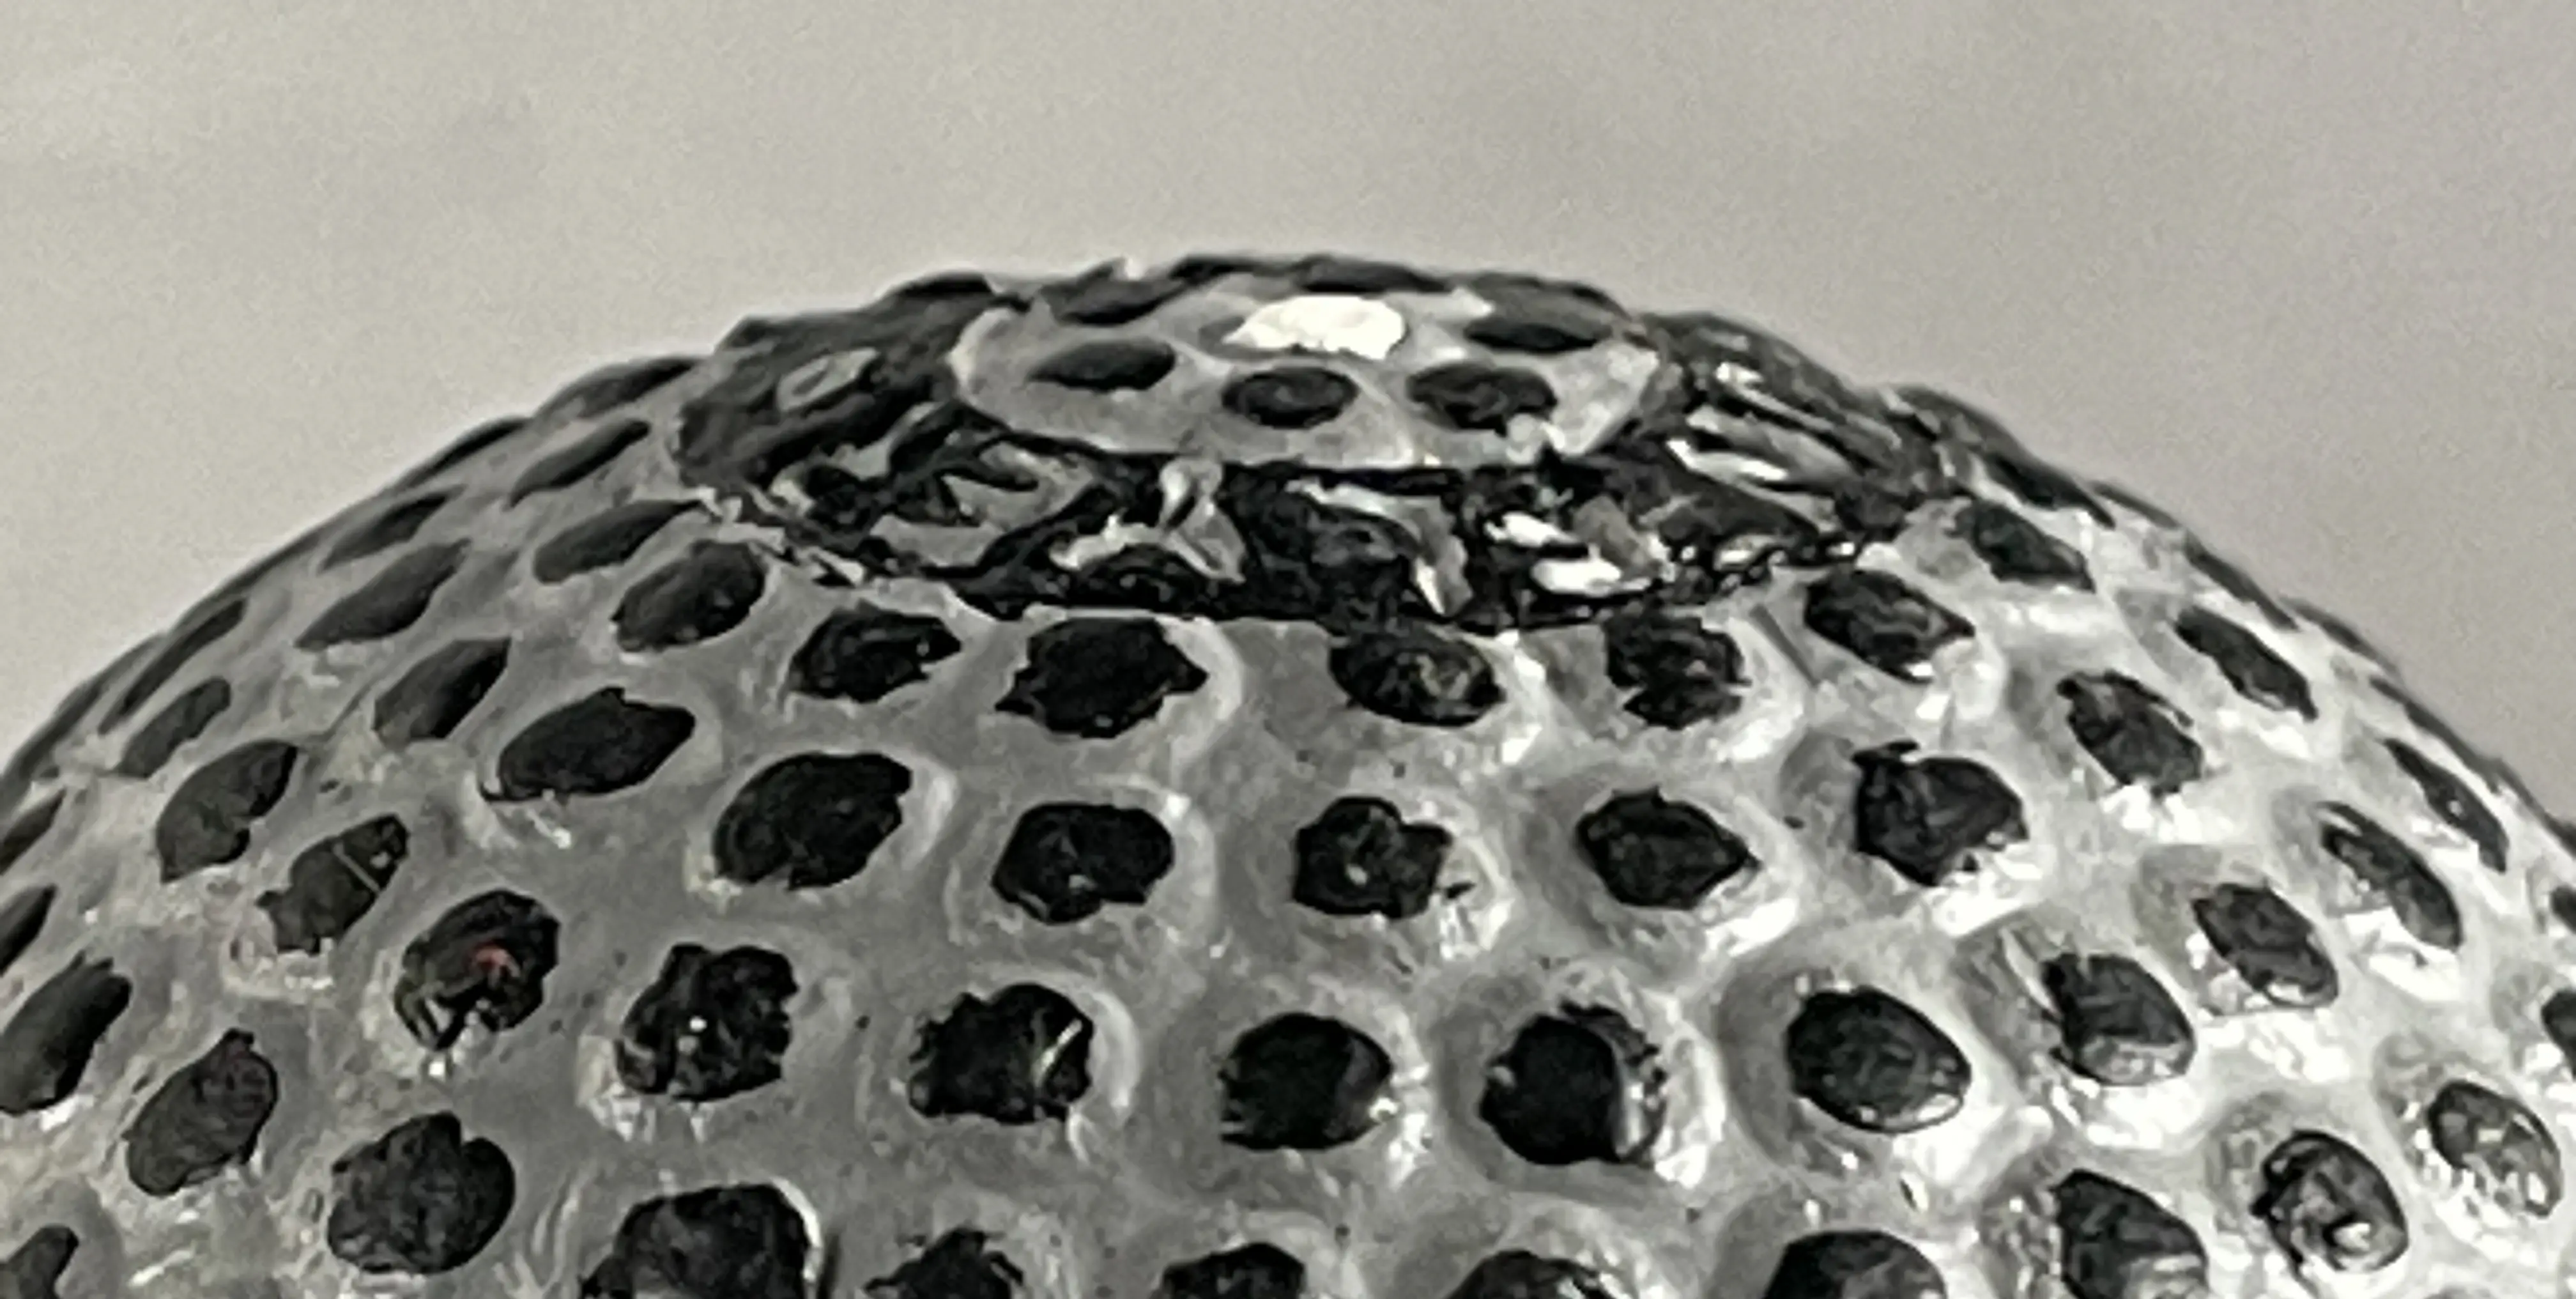
The above statement might seem obvious if you are a golfer or golf ball collector, because no genuine golf balls from any era were ever made with holes molded into their covers. It would be counterproductive to the efficiency and durability of the balls. Besides, what golfer would ever buy a new ball that was made with a literal hole, an obvious blemish to begin with, in its cover!
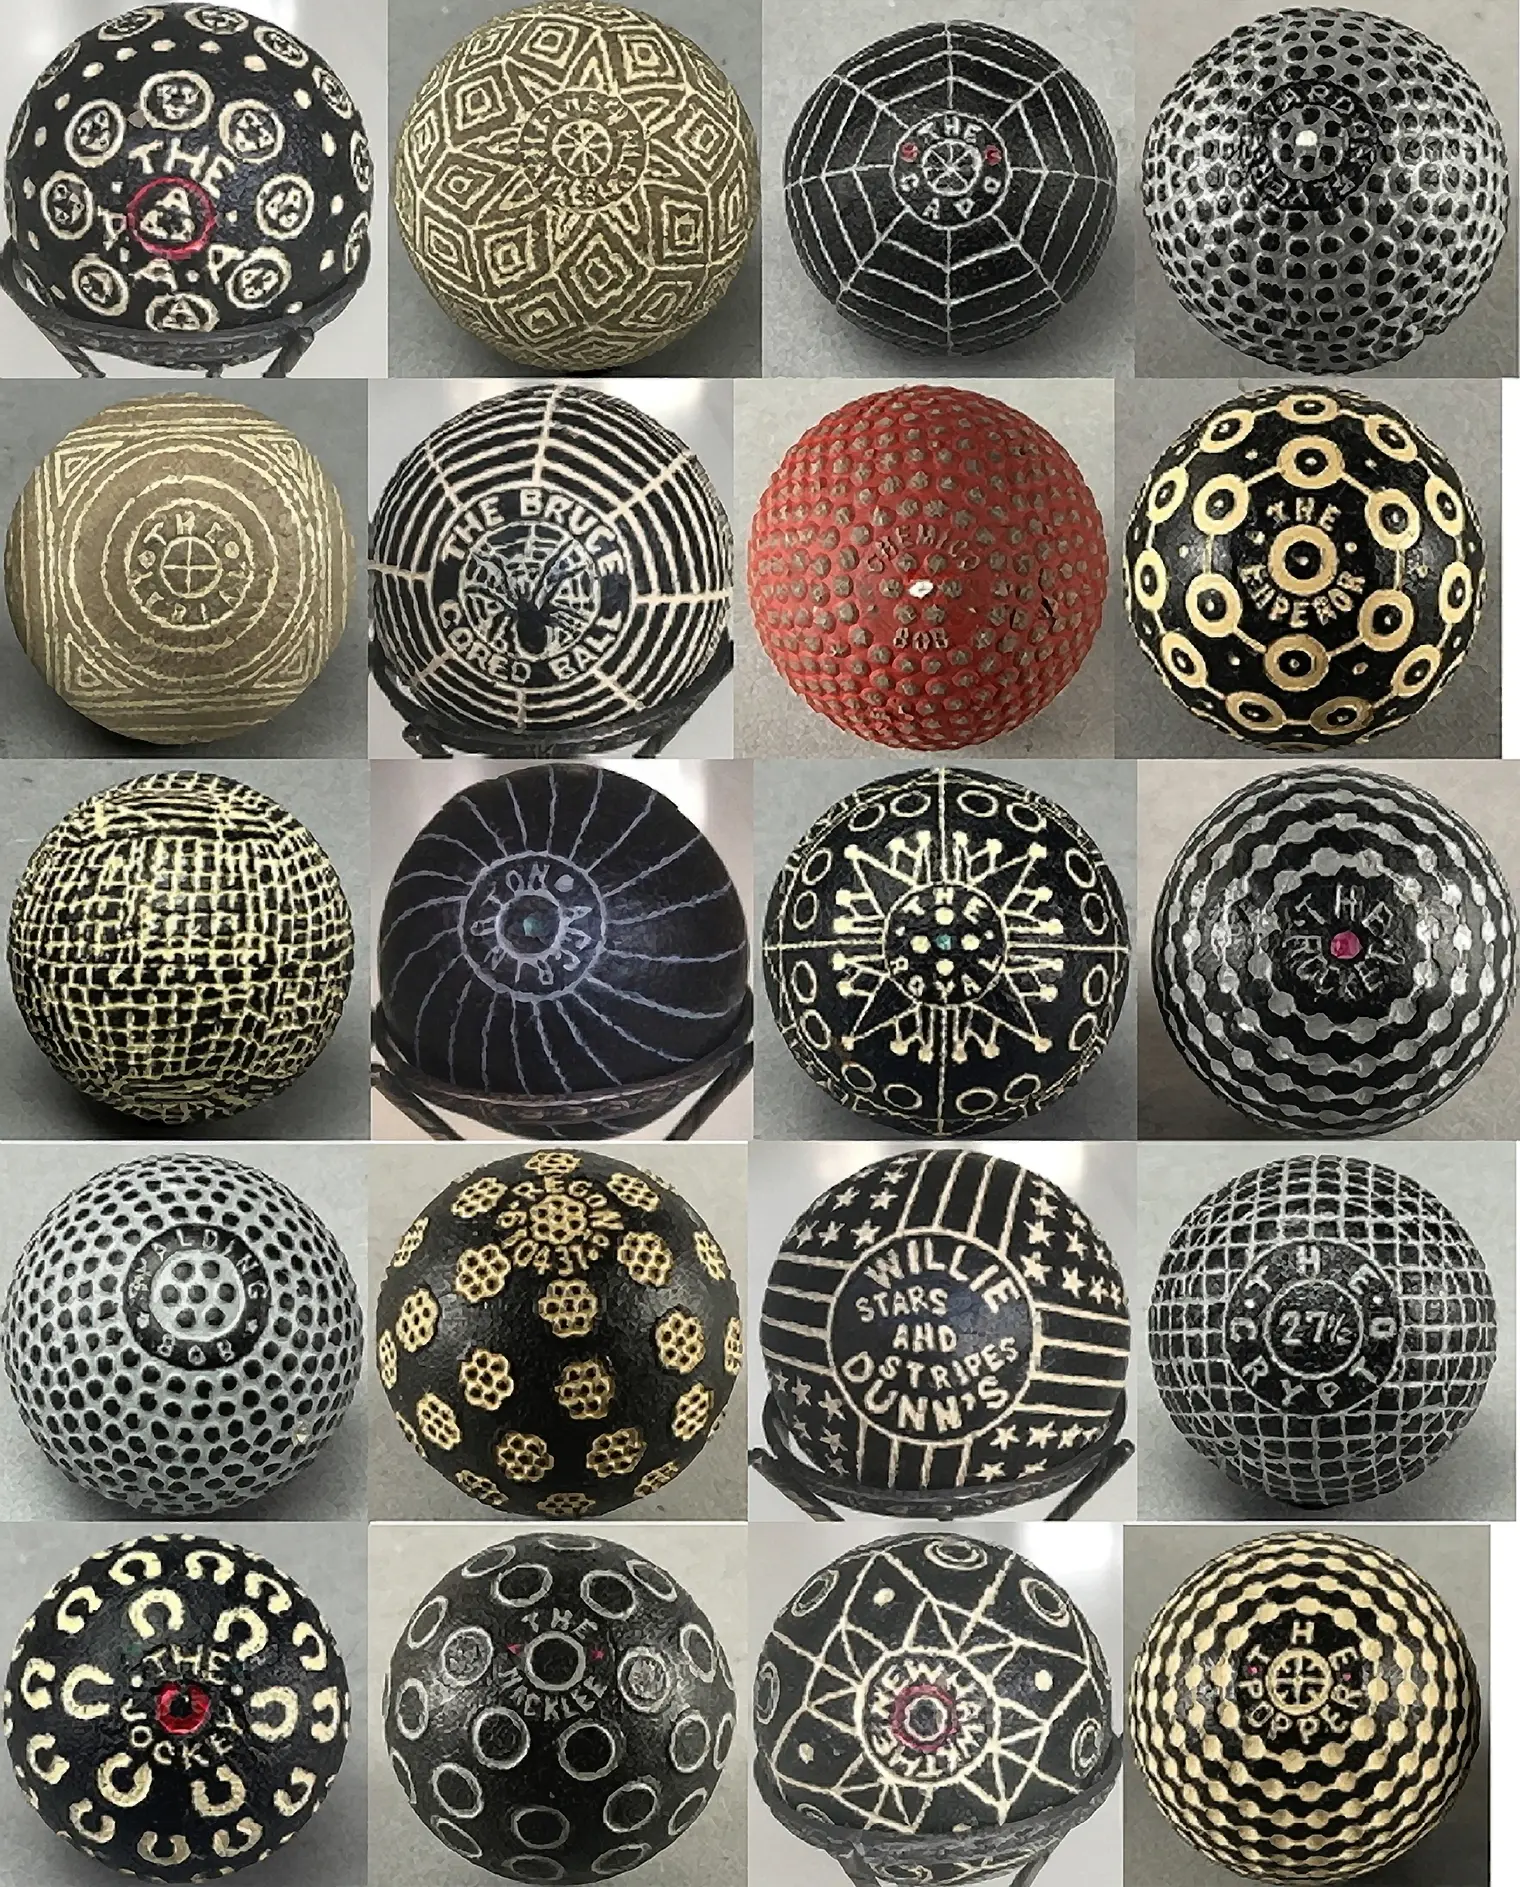
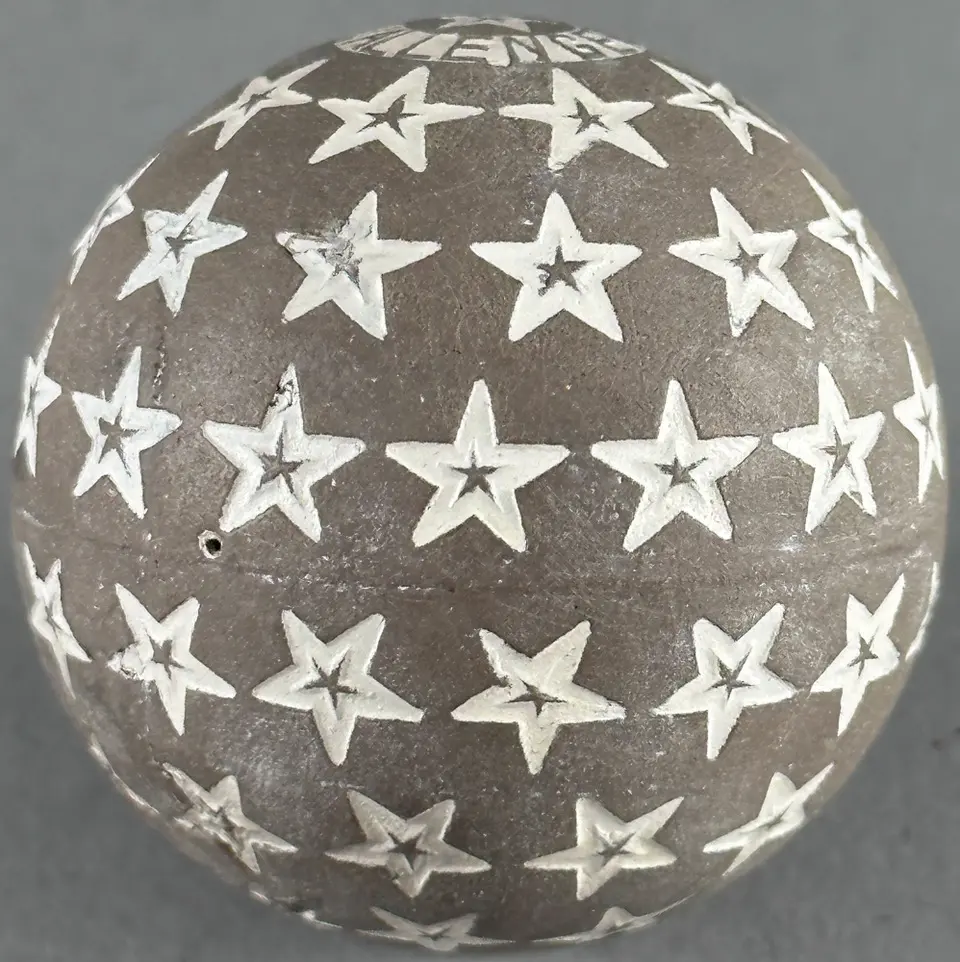
I included the statement above because several decorated balls I examined were, in fact, made with a small hole molded into their covers—as shown in the collage image of 17 decorated balls (including the star Challenger ball) below. According to the people in the molding business that saw some of these balls, the hole was made to support the core during the process of molding a new rubber cover onto an old core, so the core would not settle to the bottom of the mold before the casting cured. For more about this anomaly, see Section 5.1.
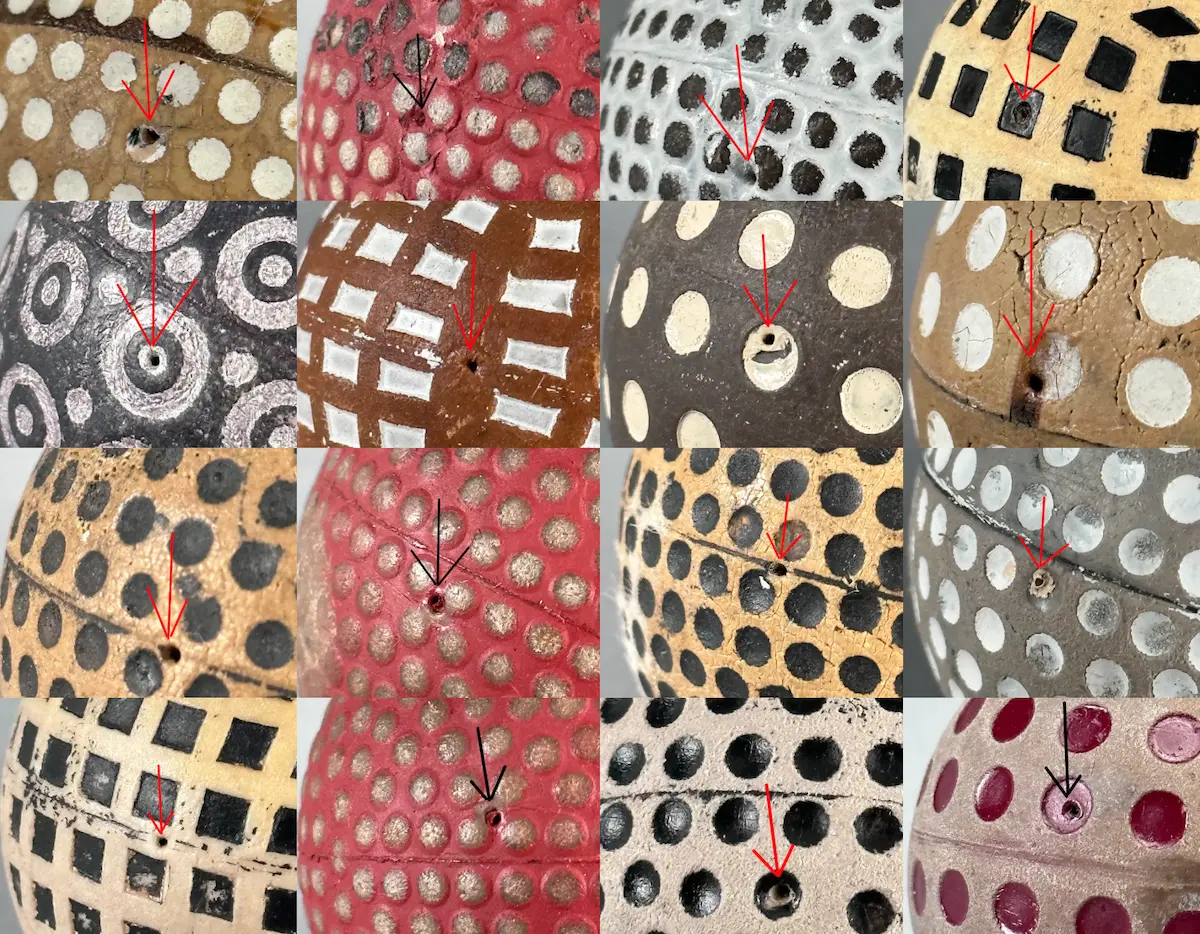
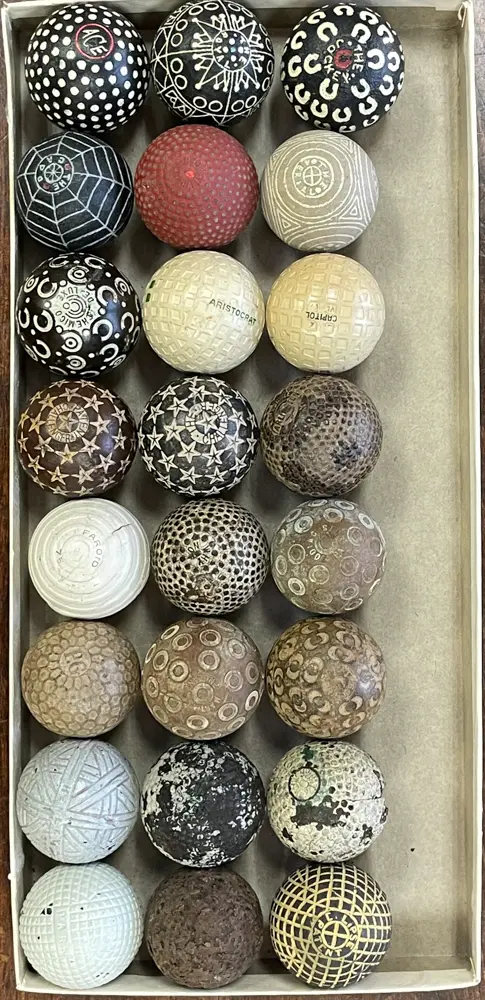
The top three balls on the right display the names Ace, The Royal, and The Jockey. Below them in the next row is The Capo, The Challenger (center red bramble) and The Aerial. Of the six balls in the top two rows, only the Ace, Jockey, and the Challenger balls have patterns that are documented in the twentieth-century literature of the game. The patterns on the other three (like many of the suspicious decorated balls in question) were purportedly produced between 1900 and 1920, but I am not aware of any 20th-century literature or verifiable examples made during that time that documents their existence.
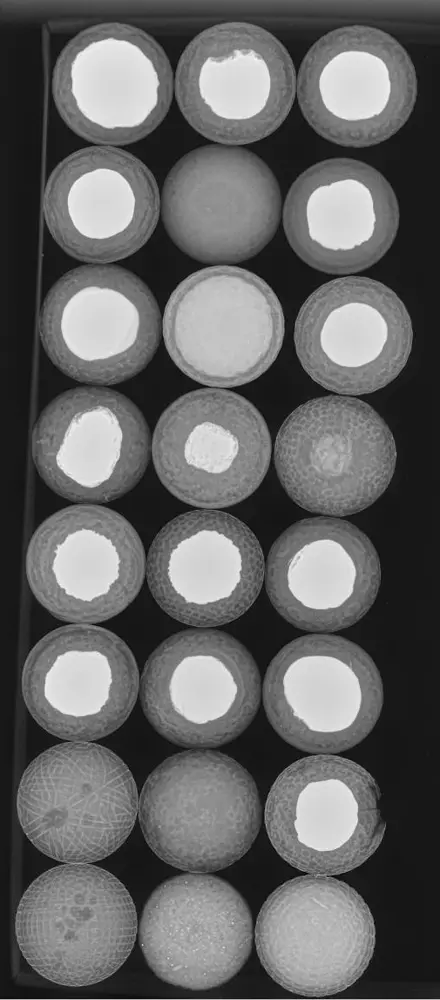
Upon receipt of these six questionable balls, the first thing I did was bounce each of them to determine if the ball was a solid gutta percha or an early rubber core ball given that testing by sound is the quickest and easiest way to begin to ascertain that answer. Not one made the expected clicking sound consistent with gutta percha. However, all of the other pre-1920’s genuine balls shown in the lower six rows did. Consequently, to better understand the nature of those six balls, and the genuine balls below them, I had them all x-rayed as demonstrated on the corresponding image above left.
Let me begin with some of my impressions about the genuine balls in the lower four rows: The first two balls in the next to bottom row and the first two balls in the bottom row, are solid gutty percha, although the middle ball in the bottom right is a heavily deteriorated 1890s mesh gutty ball.
The third ball to the right in the next to bottom row is a 1913 Wright & Ditson Blue Circle rubber core ball with a large piece of its gutta percha cover missing on its right-hand side. The third ball to the right in the bottom row is an 1889 Eclipse—a solid composition ball that uses gutta percha mixed with other material. All the other balls have rubber cores and either gutta percha or balata covers. The whiter the core in the x-ray, the denser the material.
In each image above, a star “Patent Challenger” and a star “The Challenger” are the first two balls in the fourth row from the top. As shown by the x-ray, they have different core sizes. According to the May 24, 1912, issue of Golf Illustrated (UK), there were four different star Challenger balls, and the Patent Challenger was designed to be “full sized and weighted [italics mine].” The core is where a ballmaker could vary the weight the easiest. A larger core that is denser than the surrounding winding, as shown in the x-ray, would make the ball heavier.
As shown above, the recently painted red challenger bramble in the middle of the second row and the Kempshall Arlington ball in the fourth row have cores that are not as dense as the cores in the other rubber core balls. The core in the Arlington ball is advertised in the April 23, 1903, issue of Golf Illustrated (UK) as something special:
“The Kempshall ‘Arlington’ Ball embodies the carefully tested results of much study and experimenting, and is made upon a totally different principle compared to any other ball. The core is composed of a highly flexible centre, over which is drawn a flexible sheeting. The cover is of a specially resilient gutta-percha, which it is practically impossible to break or cut…”
I do not know anything about the core material in the red Challenger bramble.
Returning to the six balls in the top two rows, each made a muted sound when bounced which is not consistent with early gutta-percha-covered rubber cores. From the x-ray, however, I could see that they all had wound rubber cores that were consistent with the other genuine early rubber core balls in this x-ray. Note: I also x-rayed other decorated balls whose x-ray’s confirmed that the decorated rubber-core-era balls were made with rubber core centers and the decorated gutty era balls were made from solid gutta percha, so those fundamentals were correct.
As I became more invasive in my study, it became clear to me that more and more of these decorated balls had old rubber cores but modern covers. As mentioned in 1.2, recovered golf balls were produced in large numbers during the early 20th century, and it remains a relatively simple process to tear a cover off an old golf ball and install a new one. For a more detailed accounting, see 3.3 The Aerial.
It should be noted that not all pre-1920 rubber core golf balls sound the same. I have bounced a few that sounded quite muted, unlike the typical pre-1920 rubber core ball. A number of lattice pattern balls made in the 1920s and 1930s, however, will sound more like rubber. Even so, I found it significant that, when bounced, none of the six decorated balls in the top two rows above sounded like a typical pre-1920 golf ball with a cover made from gutta percha or a gutta percha compound.
One thing this written article cannot sufficiently convey is the sound made by the different antique golf balls and their components. To fill that void, I have prepared these videos so people can hear the different sounds made by various balls and their components for themselves.
Sound, however, is only a small part of the wide spectrum of information and elements that are presented in this report. Because the videos are supplementary, they do not need to be watched before reading the rest of this report. The stories and images are where the full sum and substance of these decorated balls is found.
The genuine white Willie Dunn’s stars and stripes (Image 1), shown above in its original white paint, was patented in 1897. The black painted ball (Image 2) is different. The gap between the start and end of the word “Stars” is different between both balls. The angle of the word stars is different between both balls.
The circle, letters, black stripes, and white stars on the black ball are larger than they are on the white ball. It’s as if a 2-D image was scanned into a CAD program and then enlarged so it could be output as a stencil/template that would cover half of an actual ball, the surface area of half a ball being much larger than it is on an image of half a ball. Given an overlaid template or stencil, most anything can be traced/engraved and look more or less like the original, although tracing/engraving is much harder to execute on a curved surface and there will typically be slight variations from one to the next.
“Oversized name badges” larger than the name badges on original examples are also found on the following additional decorated balls: Henley 2.9, Bruce 3.1, Vaile 3.2, Shamrock 3.9, PG 4.3, and Resiliant 4.12. Genuine examples of those seven balls and the Stars and Stripes are among the most valuable, unusual, and rarest balls that exist. All eight balls are quite expensive to buy if, and that’s a big if, you can locate one. Images, however, are exponentially easier to find and download.
Above (Image 2), we see the same picture of the black stars and stripes ball presented earlier, this time next to a different black stars and stripes ball (image 3). The difference in the size of their center circles are not the only differences between the two balls.
The red lines draw attention to the difference in location where the “W” and “E” in “Willie” and the “S” at the end of “Stripes” are found, in relationship to the line closest to each letter.
The green lines call attention to the different spacing at ends of the word “Stars” as well as the different lengths of the word itself.
A green arrow at the top of each ball calls attention to the difference in spacing between the line and the stars.
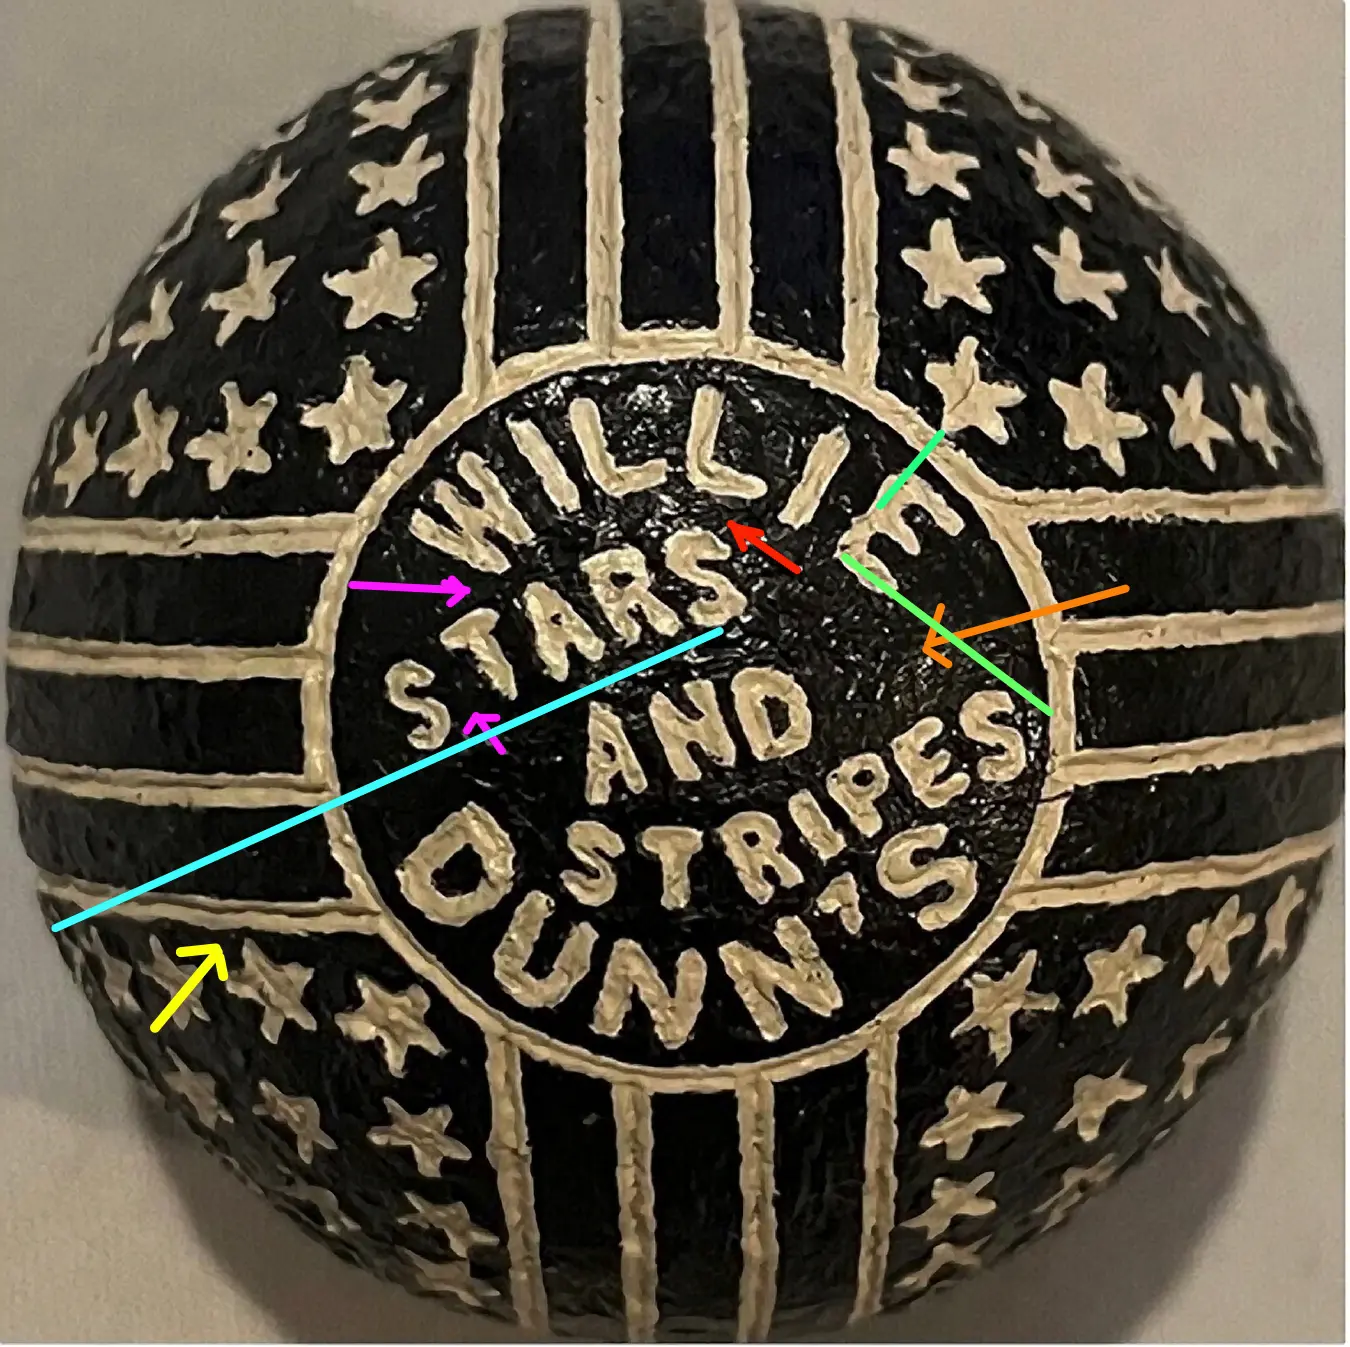
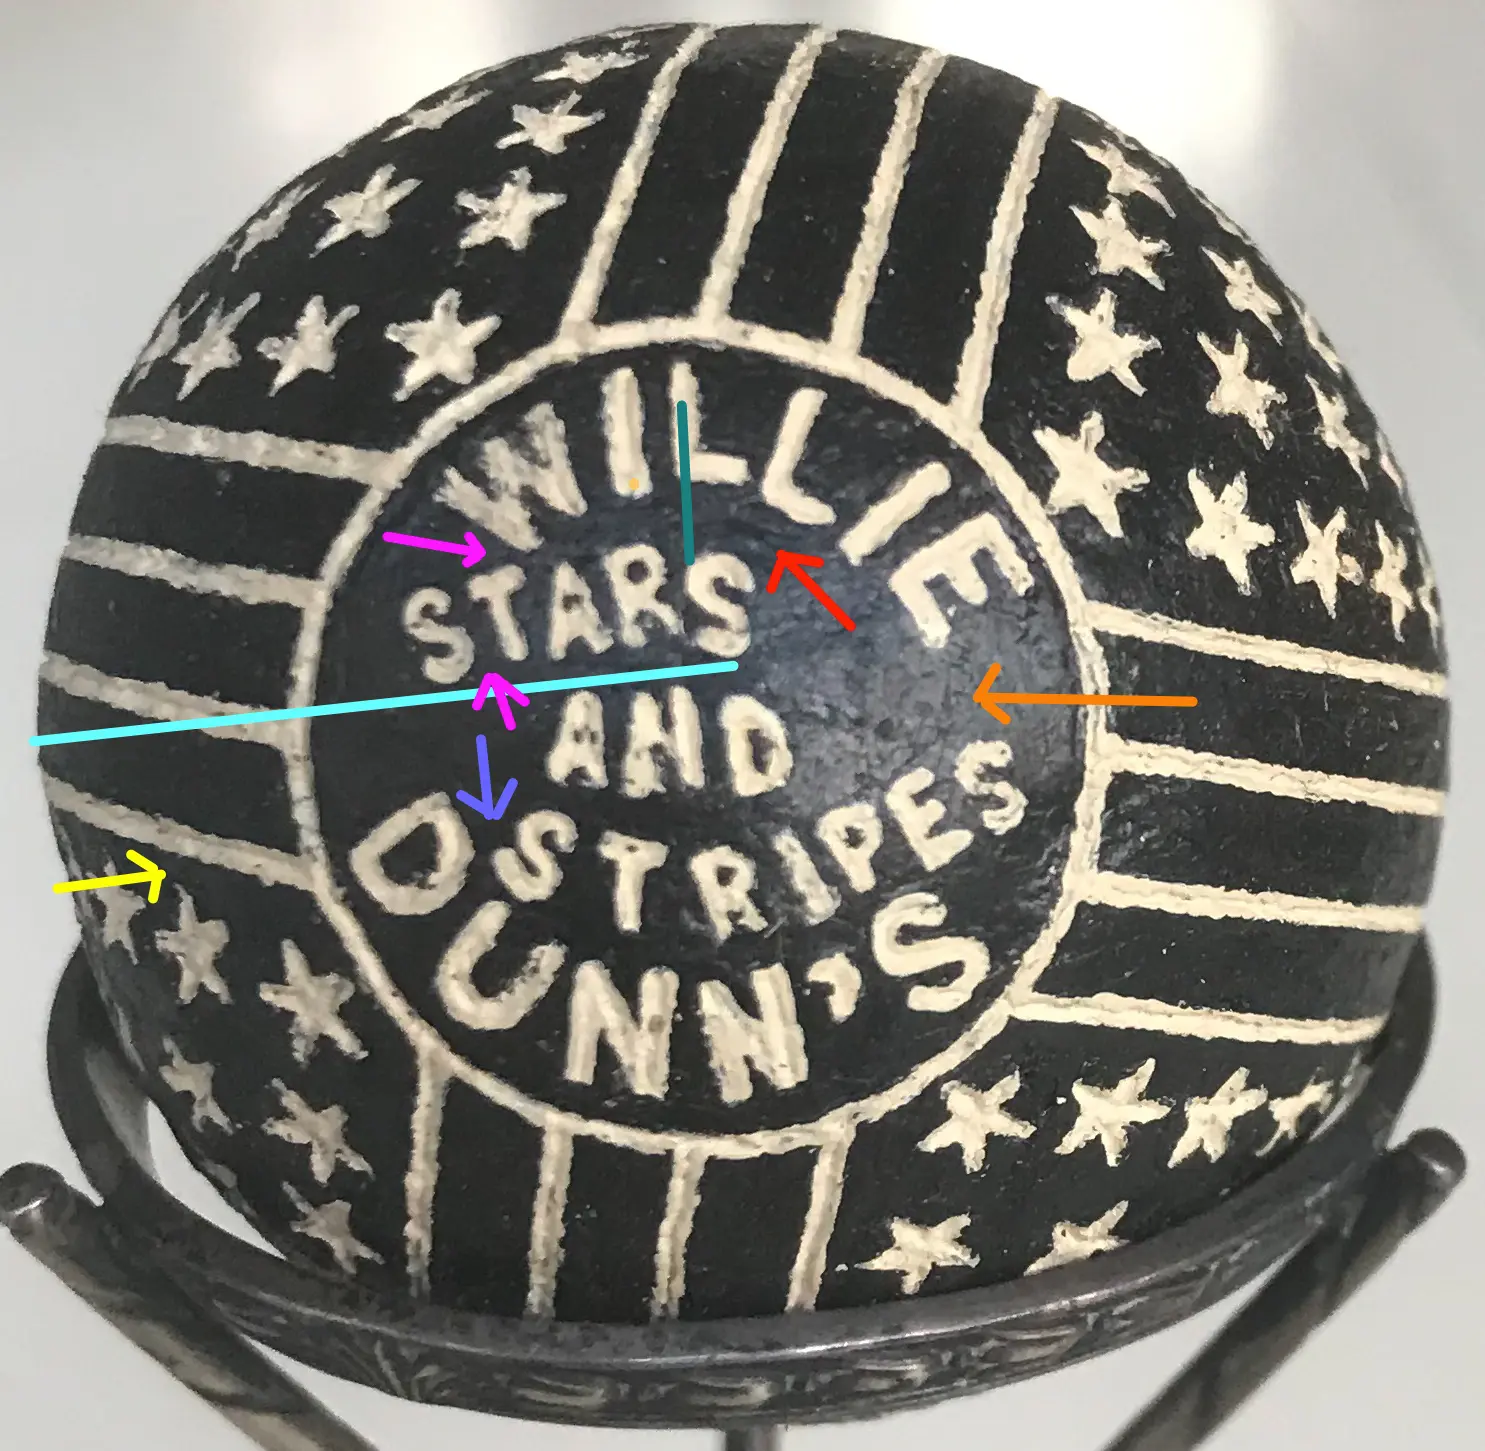
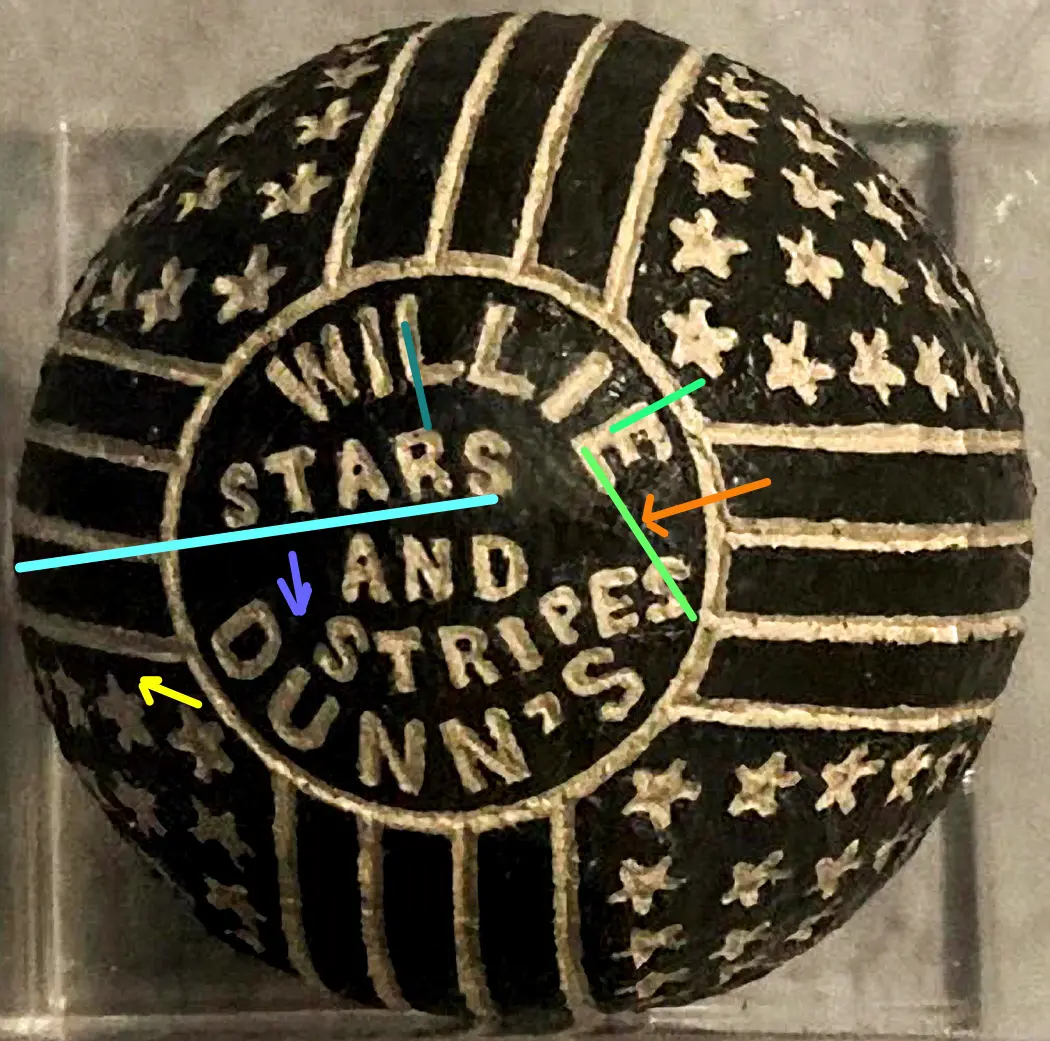
A third black Stars and Stripes is shown here (Image 4), along with the prior two pictures of black balls for easy reference and
comparison (Image 2 and Image 3)
I have drawn various color matching lines on each of the covers to point out differences between the three balls, none of which have patterns
that match. They each have unique differences that set them apart from each other and it goes beyond the painting.
Stars and Stripes balls are marked with their patent number on their opposite pole, not their name. Hence, it’s clear that the three balls above are separate and distinct, and one ball is not shown twice.
In short, none of these three recently painted black Stars & Stripes balls have an identical pattern. Many anomalies become apparent when one takes the time to make close comparisons. In the images above, I have used colored lines to mark anomalies that are unique to each ball. These anomalies indicate to me that either:
Below a genuine Stars and Stripes ball in its original white paint is positioned directly above one of the black painted Stars and Stripes.
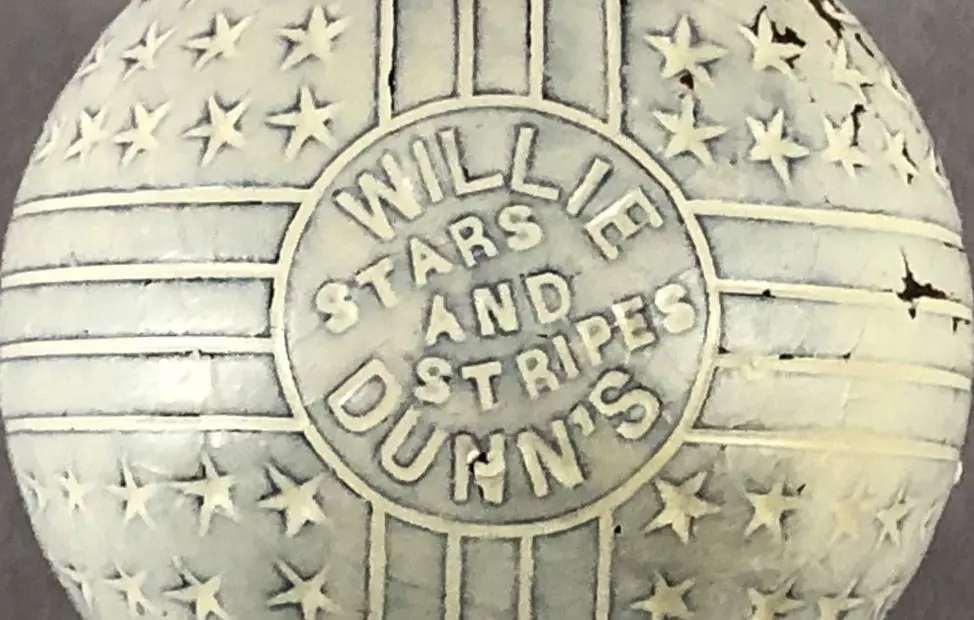
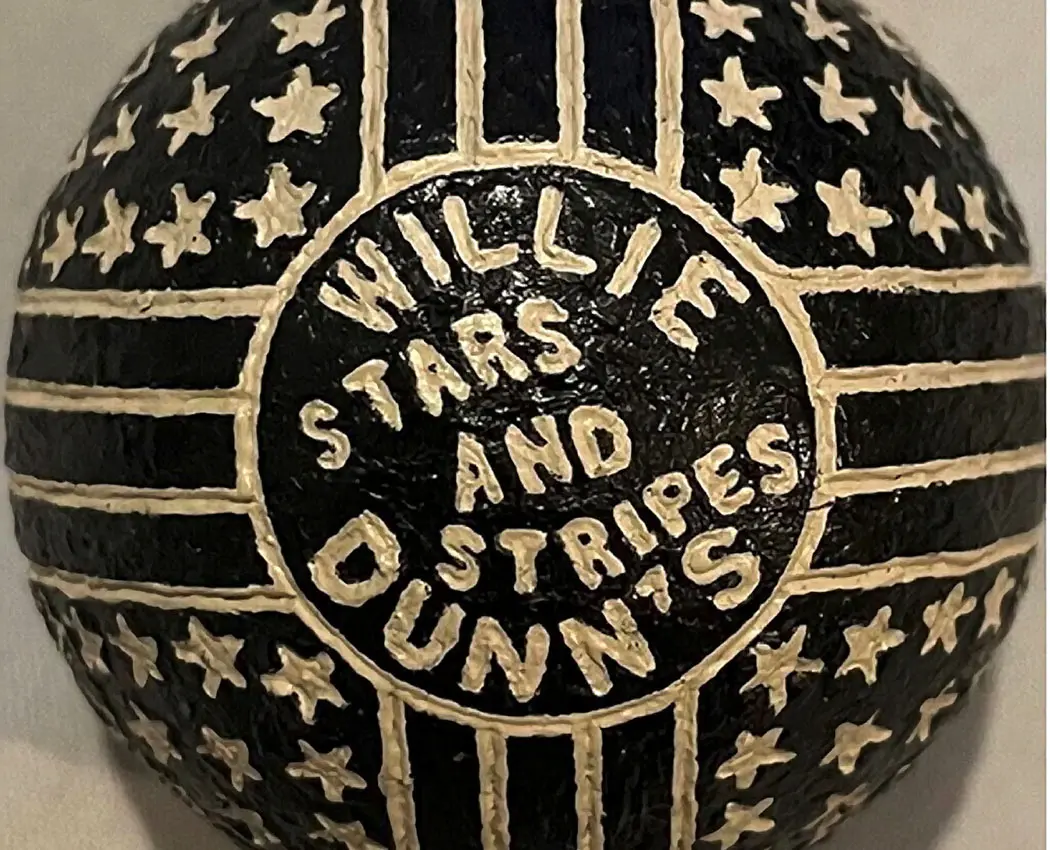
Matching in distance side to side as shown, these two balls are equal in size so that the viewer can see the differences in the patterns and writing between the two balls, and there are many. The more time you spend looking at the ball in its original white paint and the black Stars and Stripes balls shown, the more differences you find. For starters, the size of their name circles and printing inside do not match. The size of their stars is different as is the spacing of their stripes.
The construction of the stripes is also different. The genuine ball has straight uniform lines that are as wide as the paint that fills them. These lines were molded in place. The lines on the black ball are inconsistent, neither straight nor uniform in depth, and appear to be engraved in place and painted by hand.
Smooth gutties date to the late 1840s, the earliest days of the gutta percha golf ball. While they can be found in original red or white paint, the ball itself, in every instance that I am aware of, was made from dark black-brown gutta percha.
Red gutta percha was not quite as durable as black gutta percha. By the 1870s, red gutta percha was nevertheless being used to make the occasional patterned gutty ball.
To my eye, this ball looks like it originally had a pattern, likely a mesh pattern. Today it’s a smooth gutty, a blank canvas in a sense, and it serves as evidence of how easy it is to sand down and remove the pattern from a gutty ball.
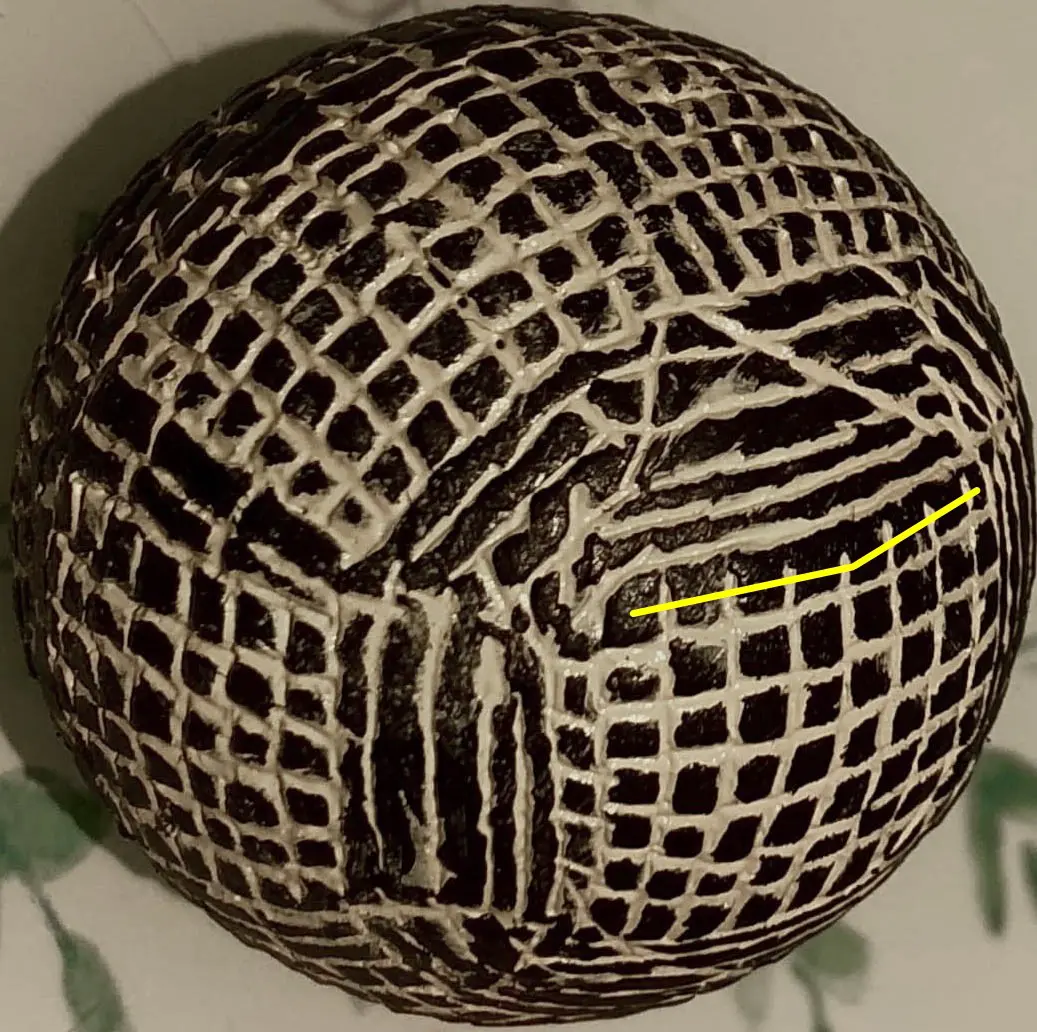
Both of the balls at the top of this segment make the sound of solid gutta percha when they are lightly bounced on a hard surface. The circa 1870s ball on the top right bears a hand-hammered pattern with some of its paint worn off and its gutta percha exposed. The ball on the left is entirely covered in modern paint—solid black with off-white “hand-hammered” lines—only the hammered lines are not consistent with the lines I have seen on genuine hand-hammered balls that still retain some or all of their original paint. Instead, they appear to be engraved. Such is also the case with the ball directly above. Many of the lines on these two black-painted balls are short, disjointed, meandering, and in some instances distinctly crooked and even “L-shaped.” They are not long like the distinctly cut lines made with a hammer claw on the ball to the right in the 2-ball image above and on the unpainted and white painted gutta percha balls at the end of this segment.
A set of lines on the poles of both black-painted balls as pictured (so far) stop identically short of the perpendicular bordering line (as shown by the yellow line below), and the lines appear engraved. Again, many are short, disjointed, and crooked.
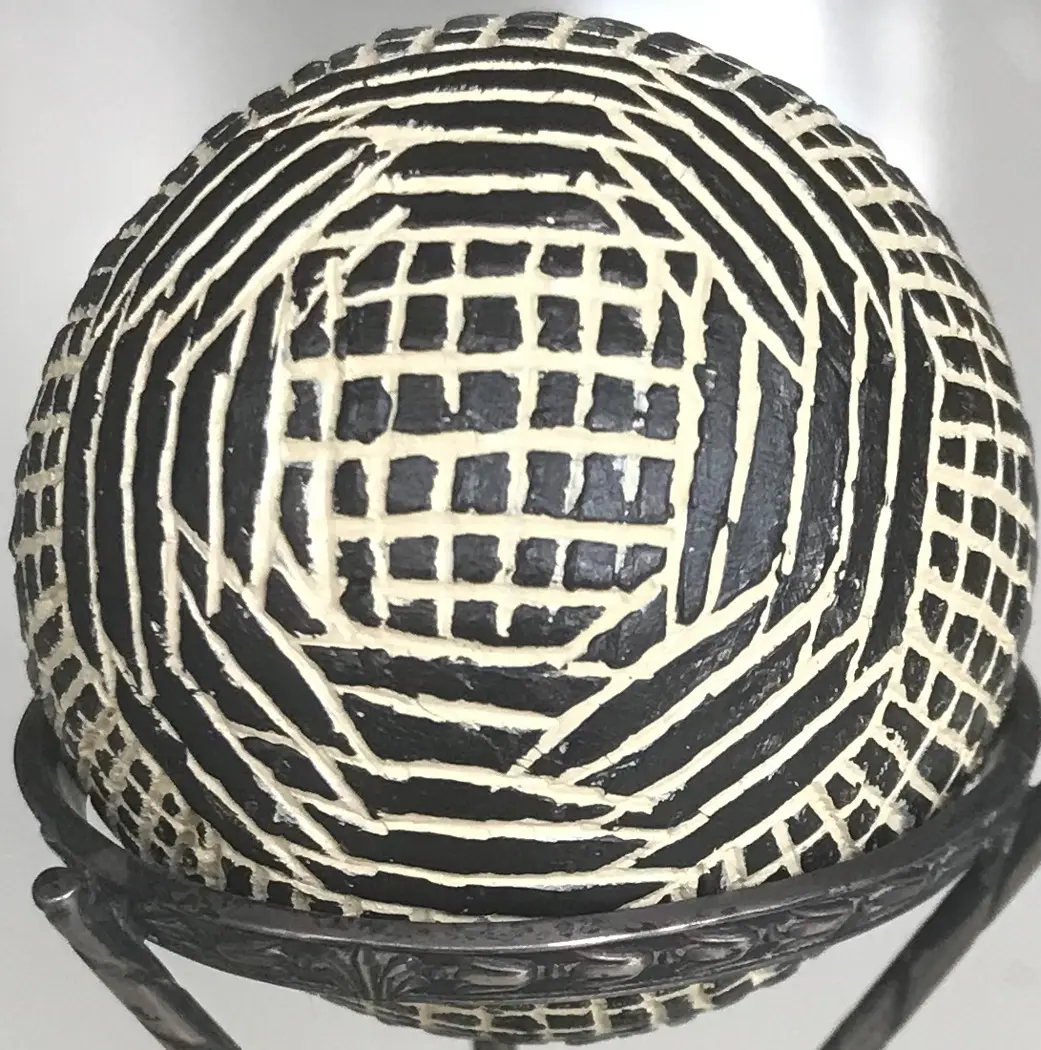
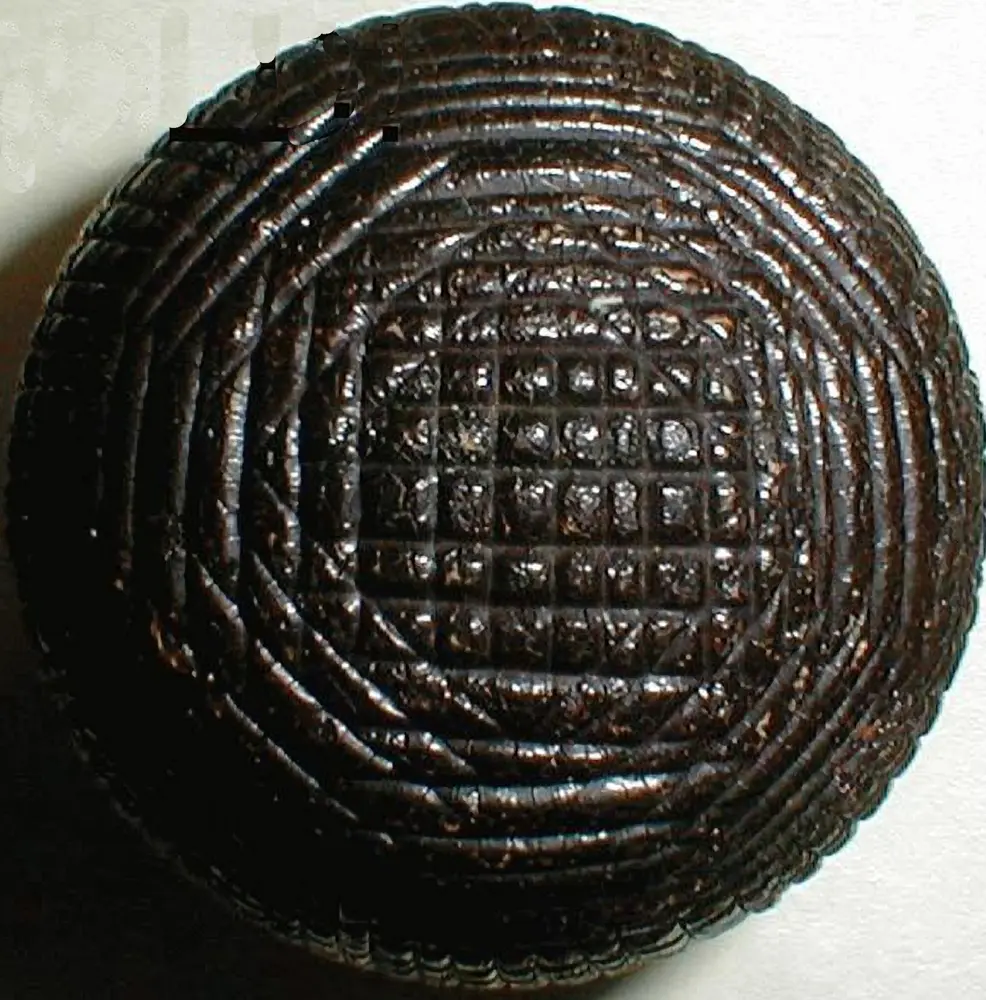
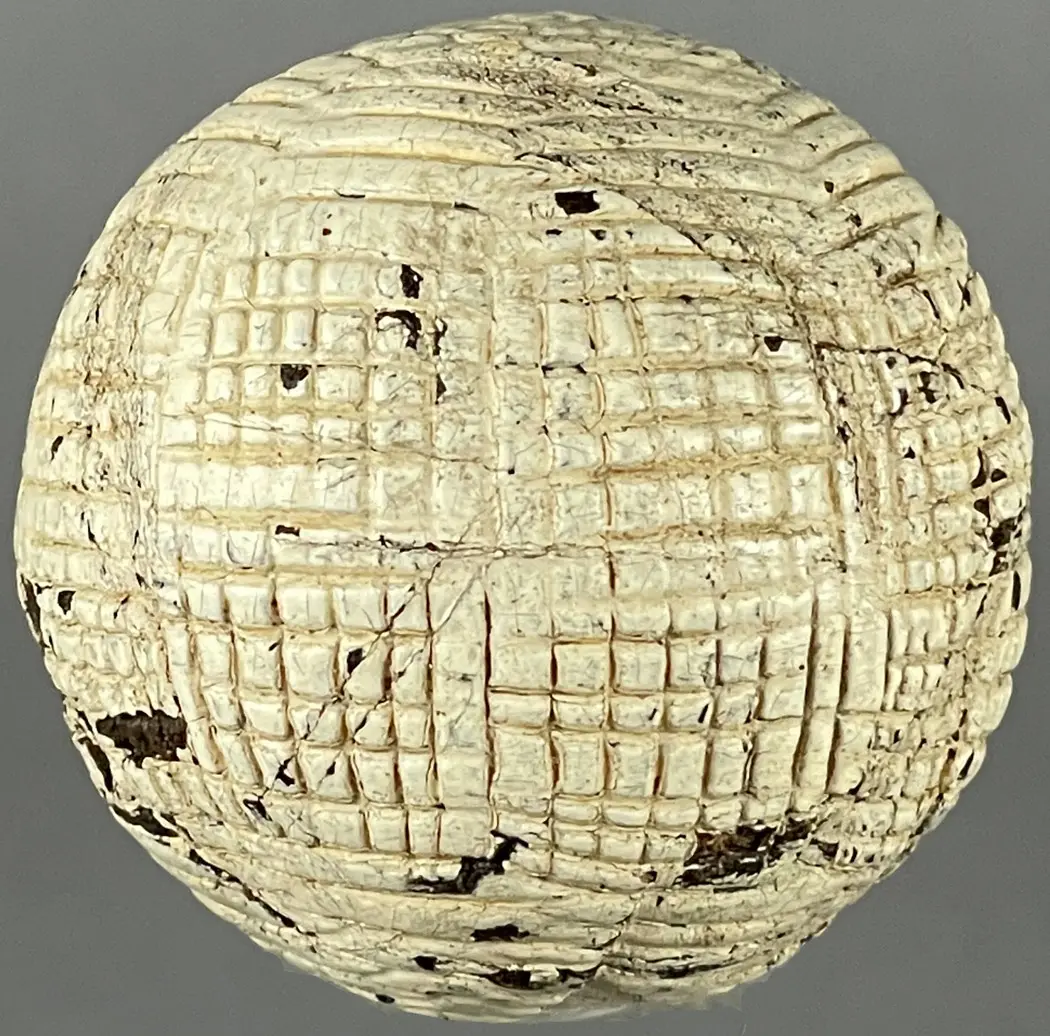
The first image below is a third black-painted ball with a hand-hammered pattern (Image 1). To its right is a solid brown gutta percha hand-hammered ball that was never painted (Image 2). Underneath those two balls is a hand-hammered ball that is still in its original paint (Image 3). The surface of this third black ball appears to be much smoother than it does on the other two balls below. Its lines are longer, more consistent with hand hammering, but they are much shallower than they are on the unpainted and white painted hand-hammered balls shown below and the partially painted gutty ball to the right at the top of this segment.
Hand-hammering gutta percha left larger ridges as opposed to the shallow lines. These ridges are readily apparent on the unpainted and white-painted hand-hammered balls below. The squares formed by the hammering have rounded edges and appear as if they are raised.
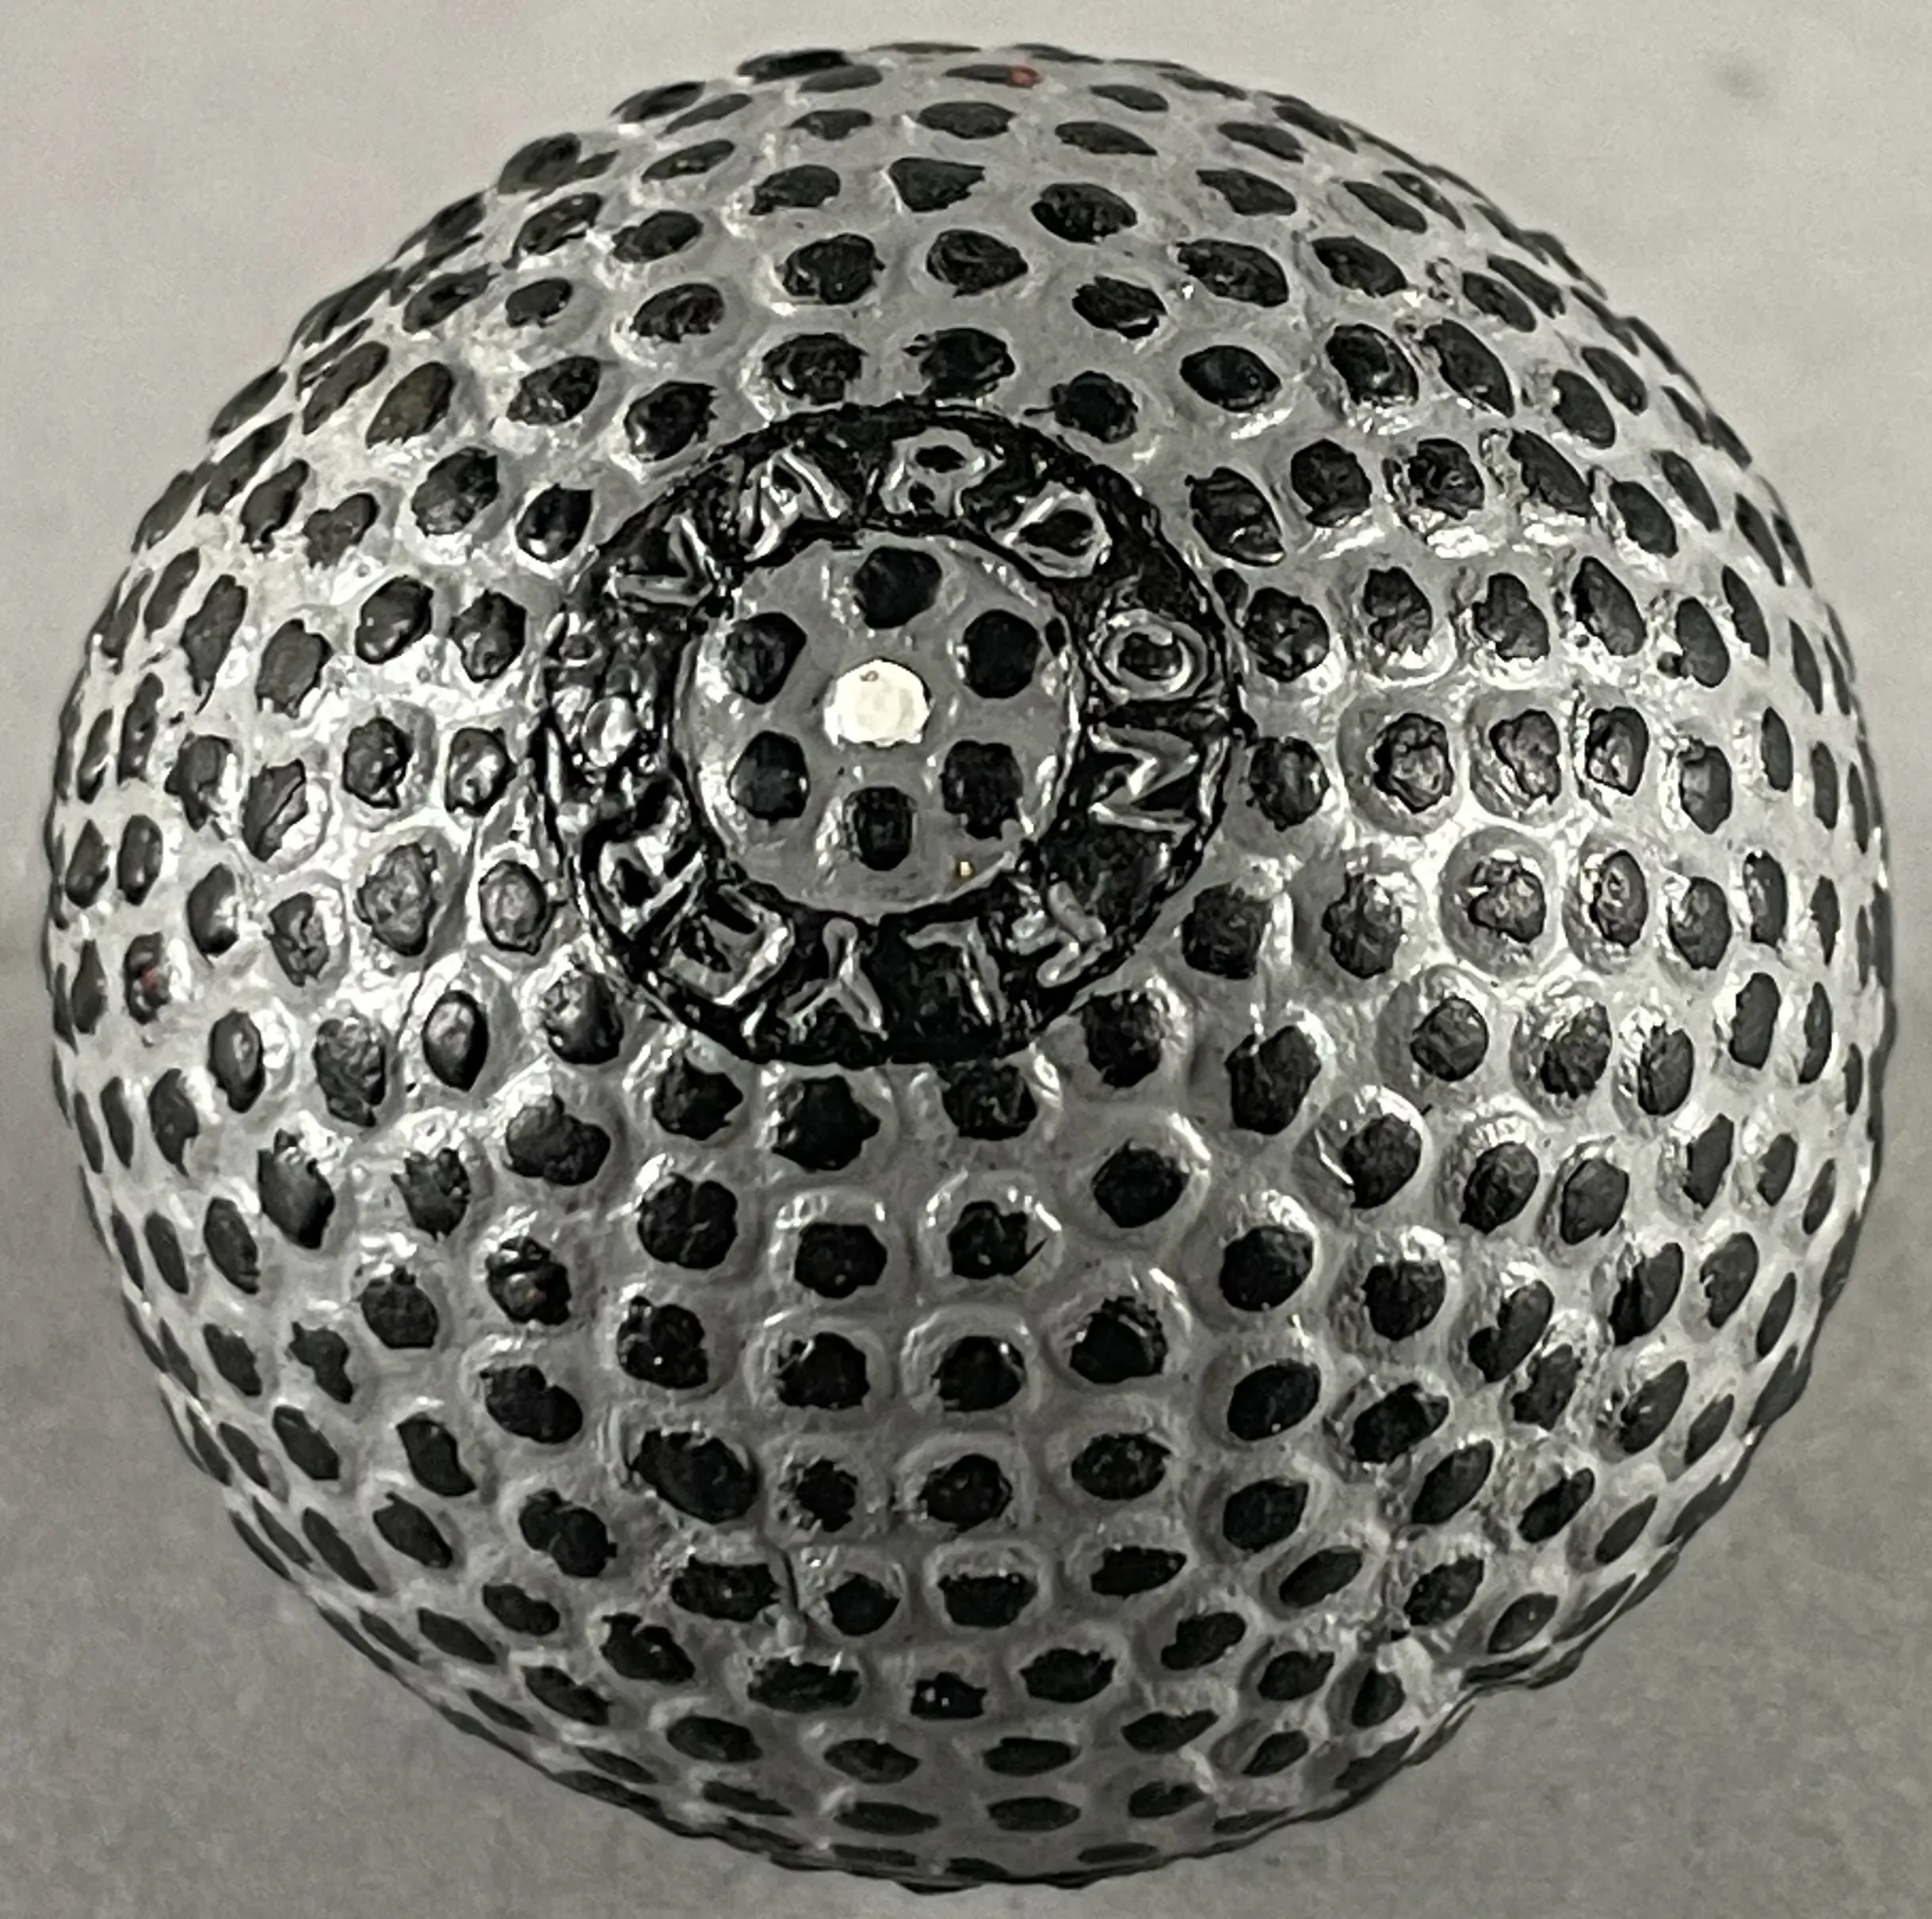
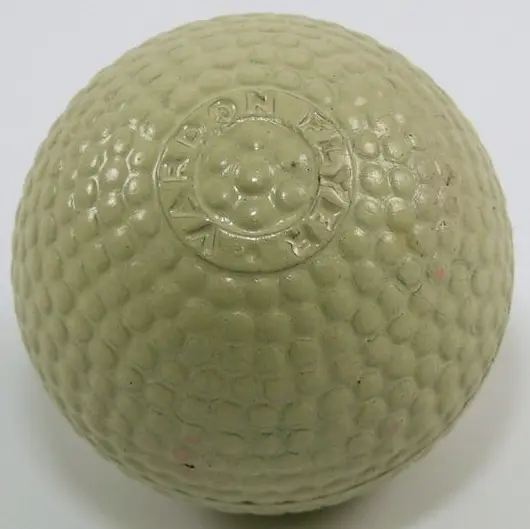
The first image is a Vardon Flyer that has been painted gray. The tops of the brambles and the name ring have been painted black. Originally produced in 1899, the Vardon flyer is a solid gutta percha golf ball. This gray ball is also made from gutta percha. It appears solid when x-rayed and sounds like gutta percha when lightly bounced. On the right, this white Vardon flyer is in its original paint and has never been used. It is also solid gutta percha, but the two balls have major differences.
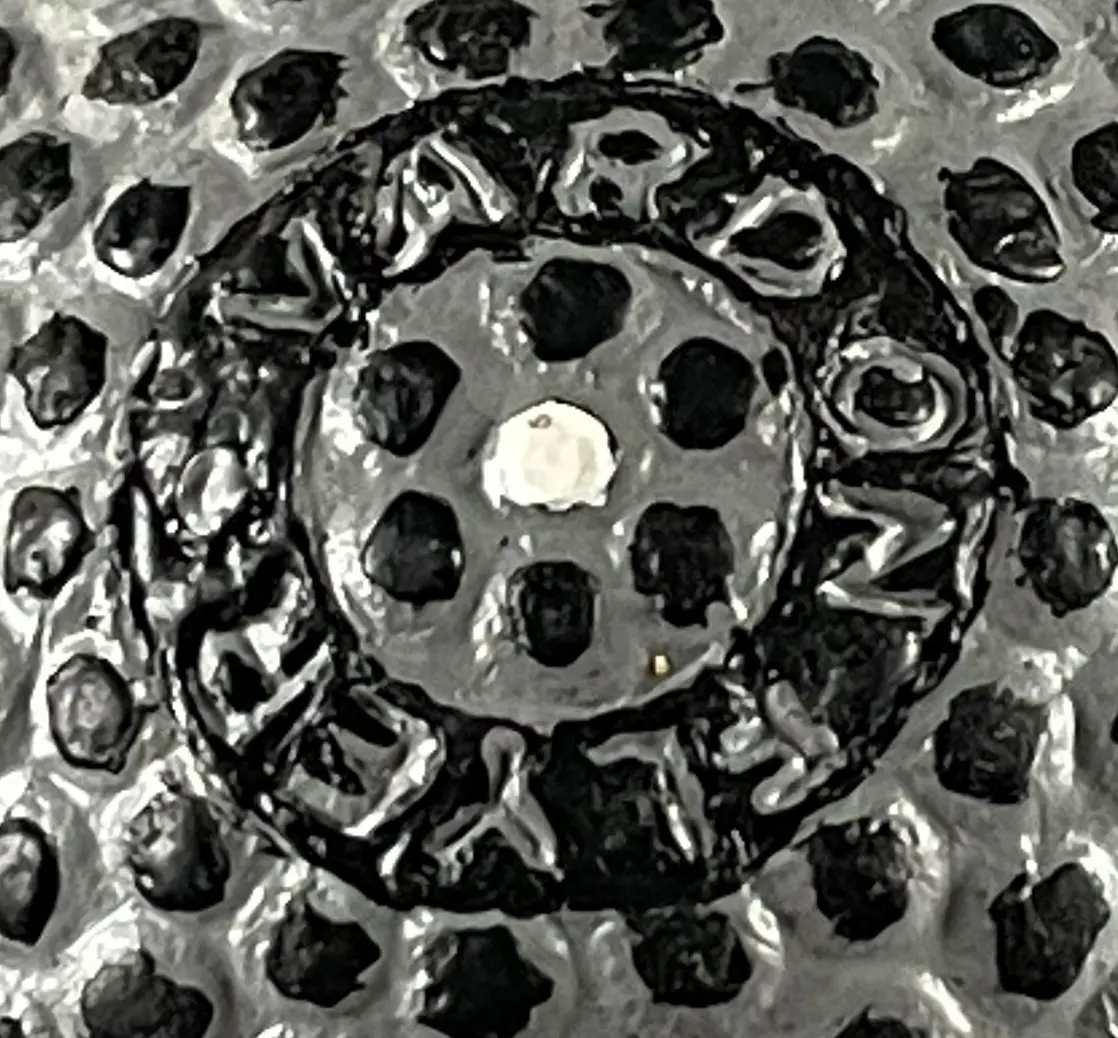
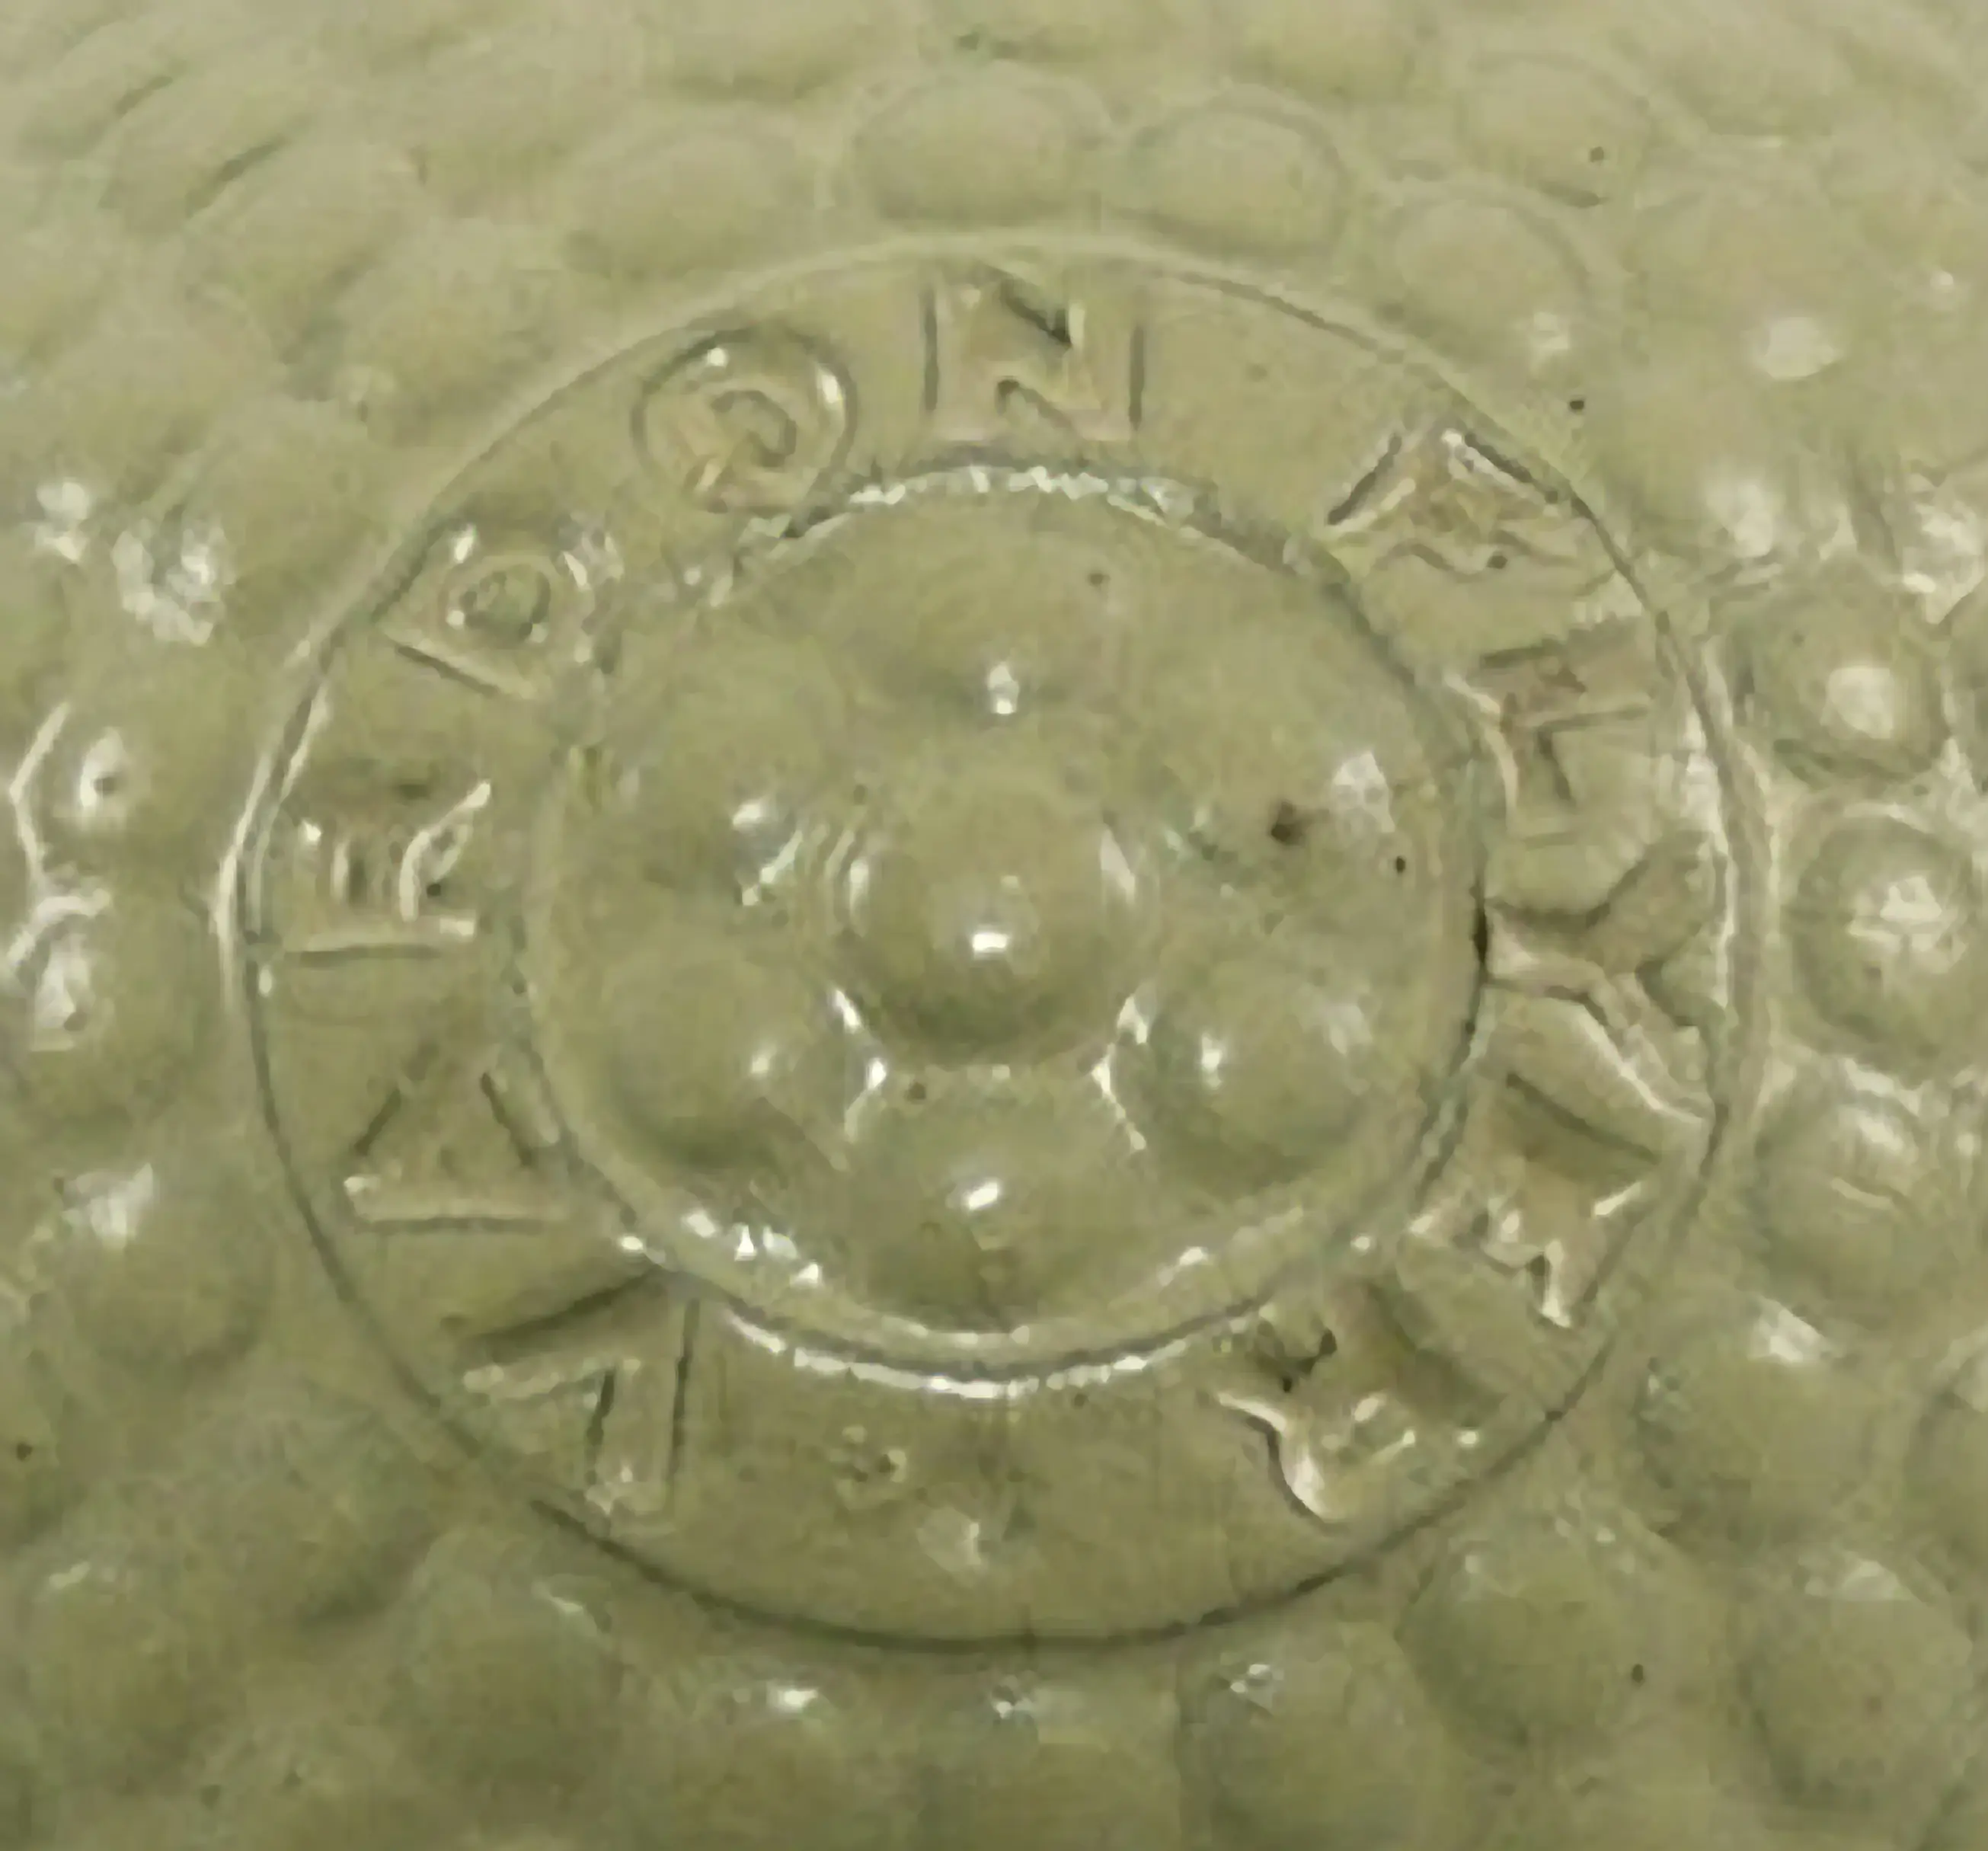
Shown side by side, the name rings are not the same. The ring on the Vardon ball in its original white paint is raised above the surrounding surfaces of the ball, and the top of the ring is flat. It was formed in a mold as were its letters. The black name ring on the gray/black painted ball is not raised. The ring is simply painted on the undulating surface of the ball, and the Vardon Flyer name appears to be etched in place, lacking the evenness and width of the letters found in the molded Vardon name shown.
This image better shows the bumps under the letters engraved in the black-painted ring. For starters, notice how the “Y” is elevated above the neighboring “E,” etc.
Two more black-painted balls with pole lettering anomalies follow.
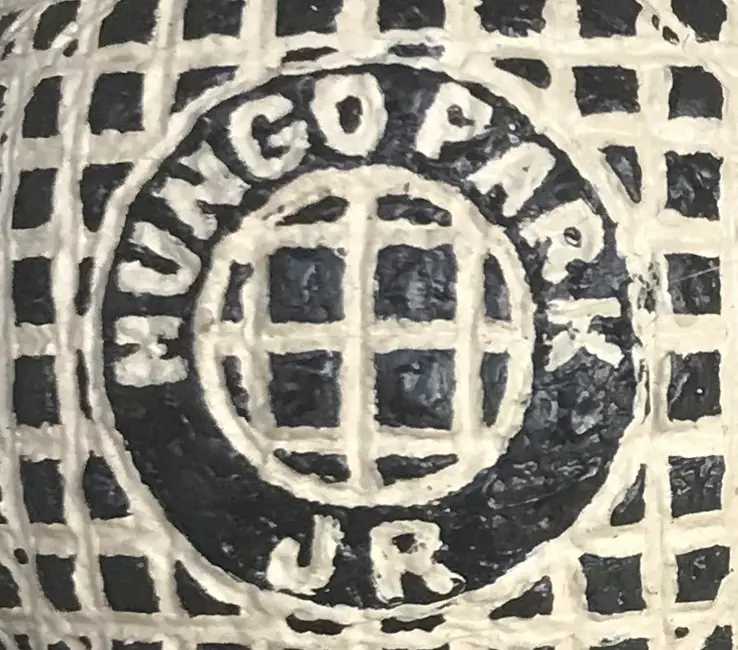
The letters in the “Mungo Park Jr” stamp do not appear to be flat. Instead, they appear to be painted/installed on an undulating surface. The names on antique golf balls were typically installed on flat, smooth surfaces. The lettering on this pole is not consistent with molded lettering.
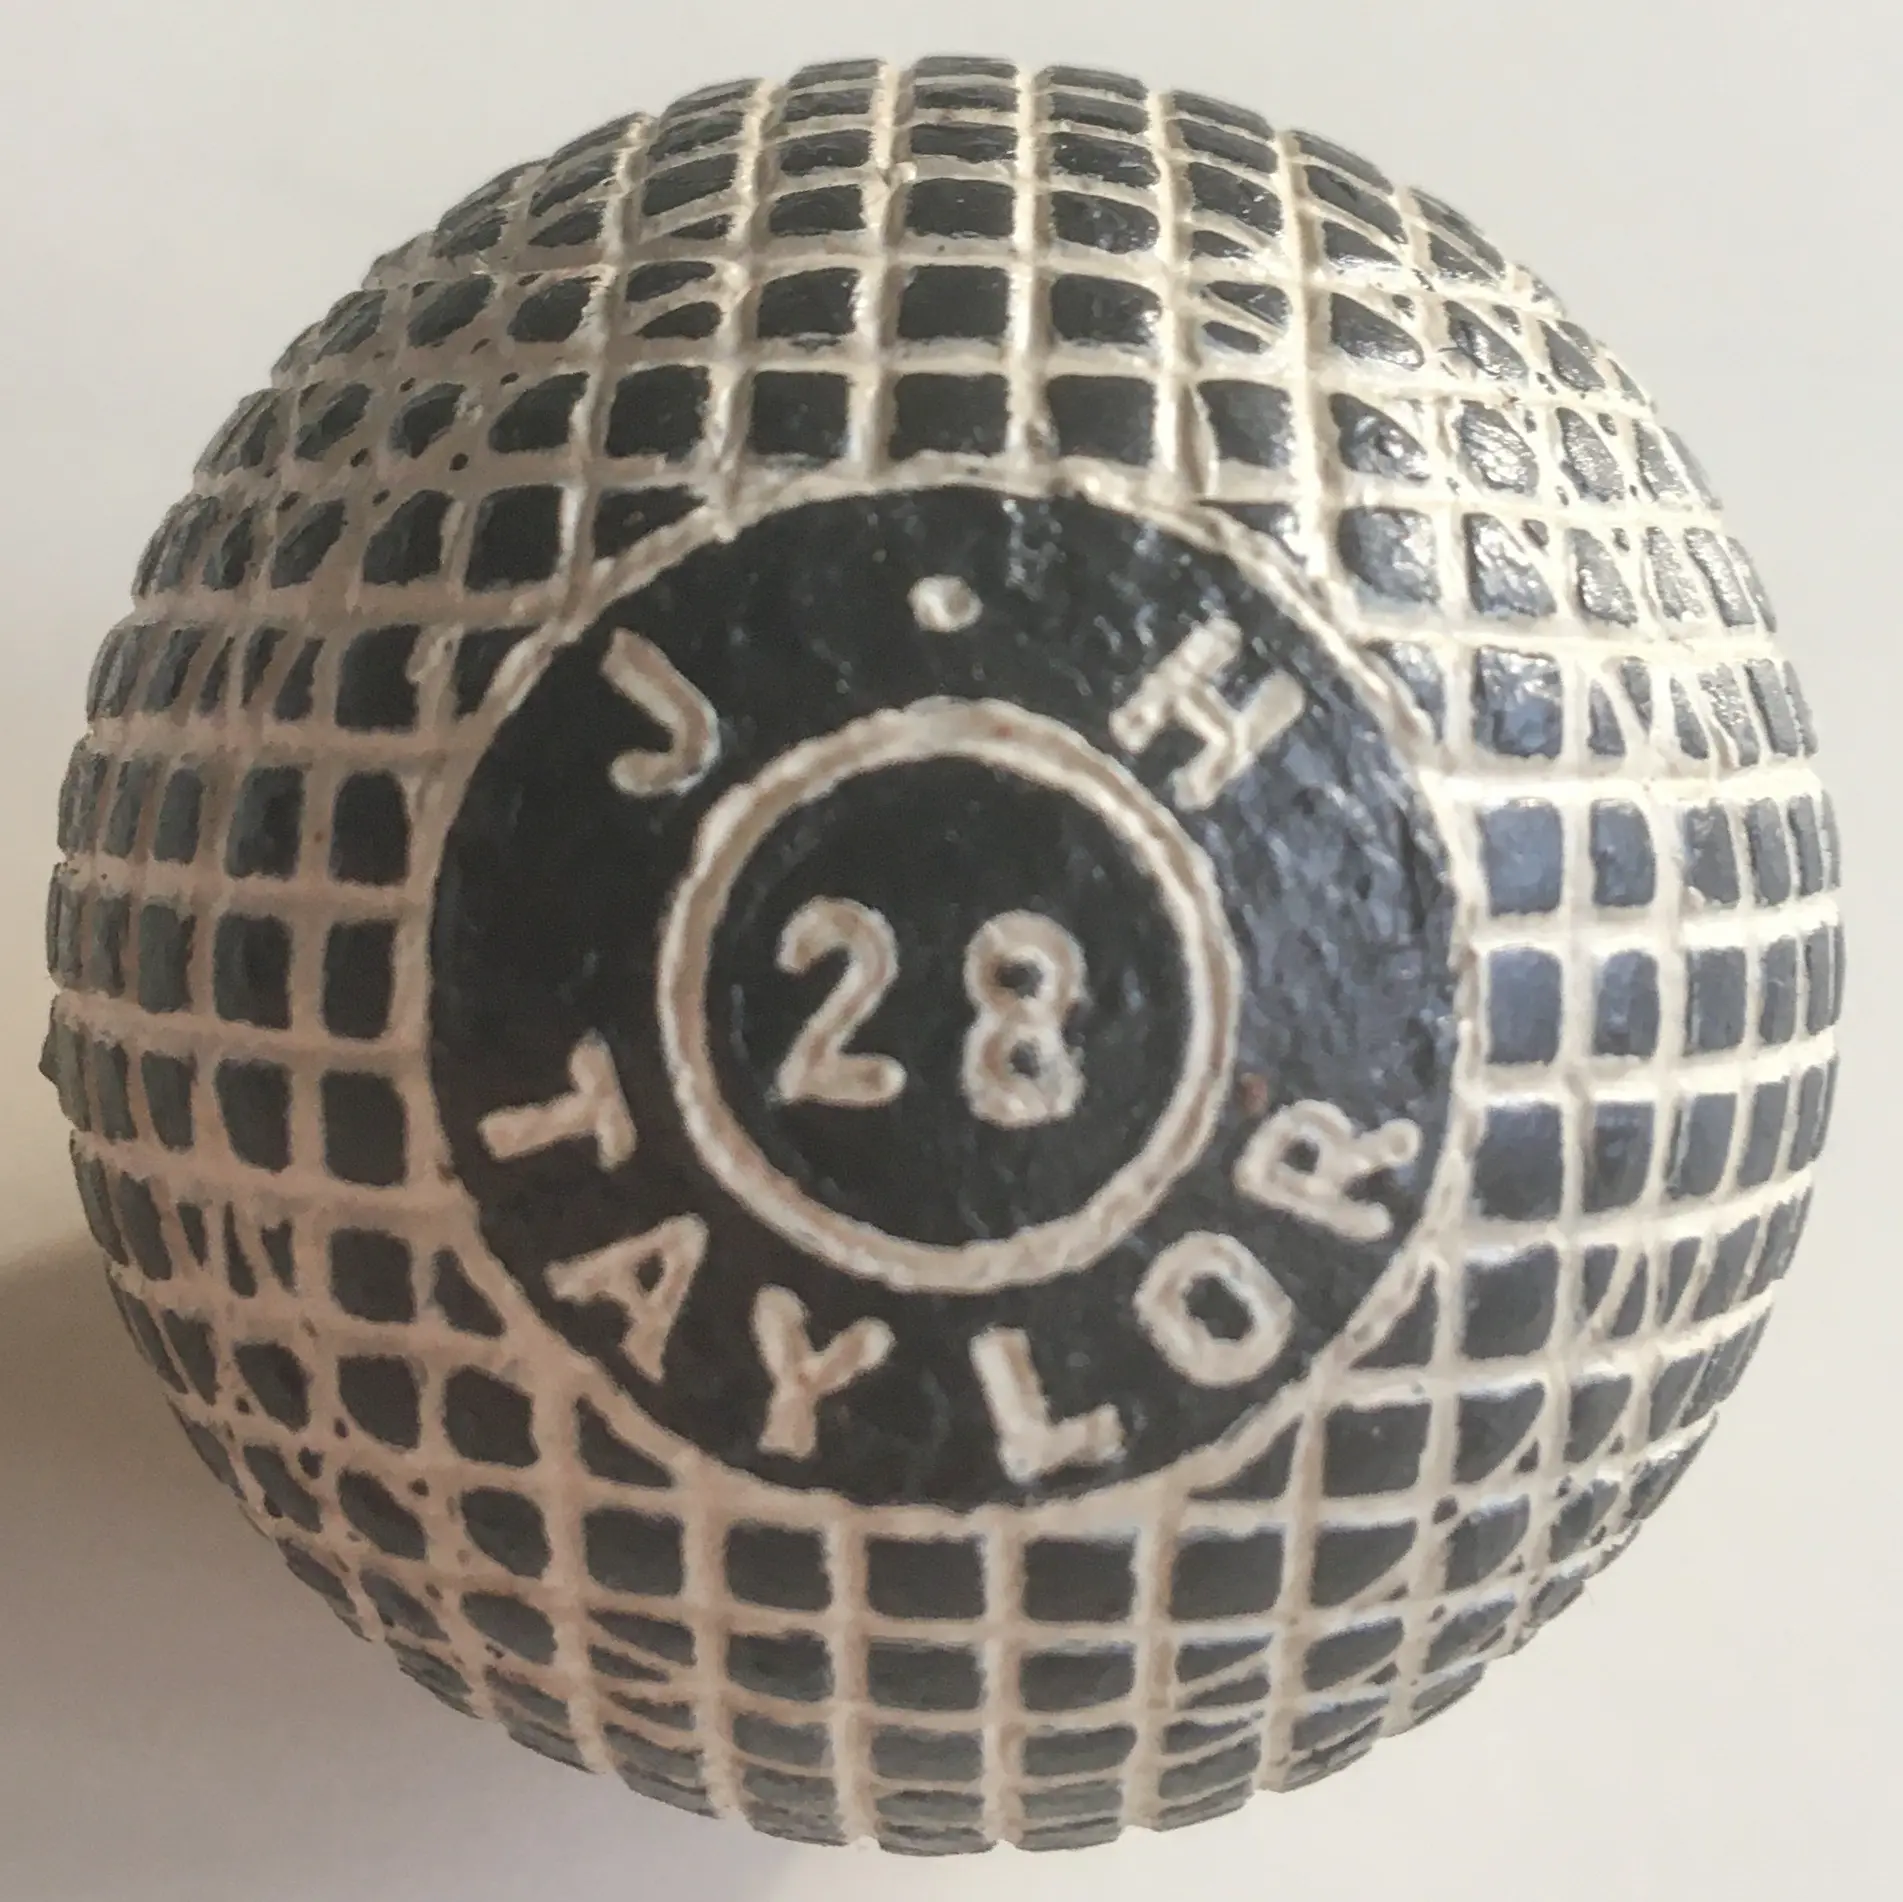
The spacing of the letters on this JH Taylor ball is uneven. The “H” is much closer to the center dot than the “J”. The “H” is also closer to the inside of the name circle, while the other letters are closer to the outside of the circle. The letters “OR” are closer than the closest parts of the letters “YL”. The “28” in the center is not centered either vertically or horizontally. This is not consistent with the work of a late 19th-century ballmaker.
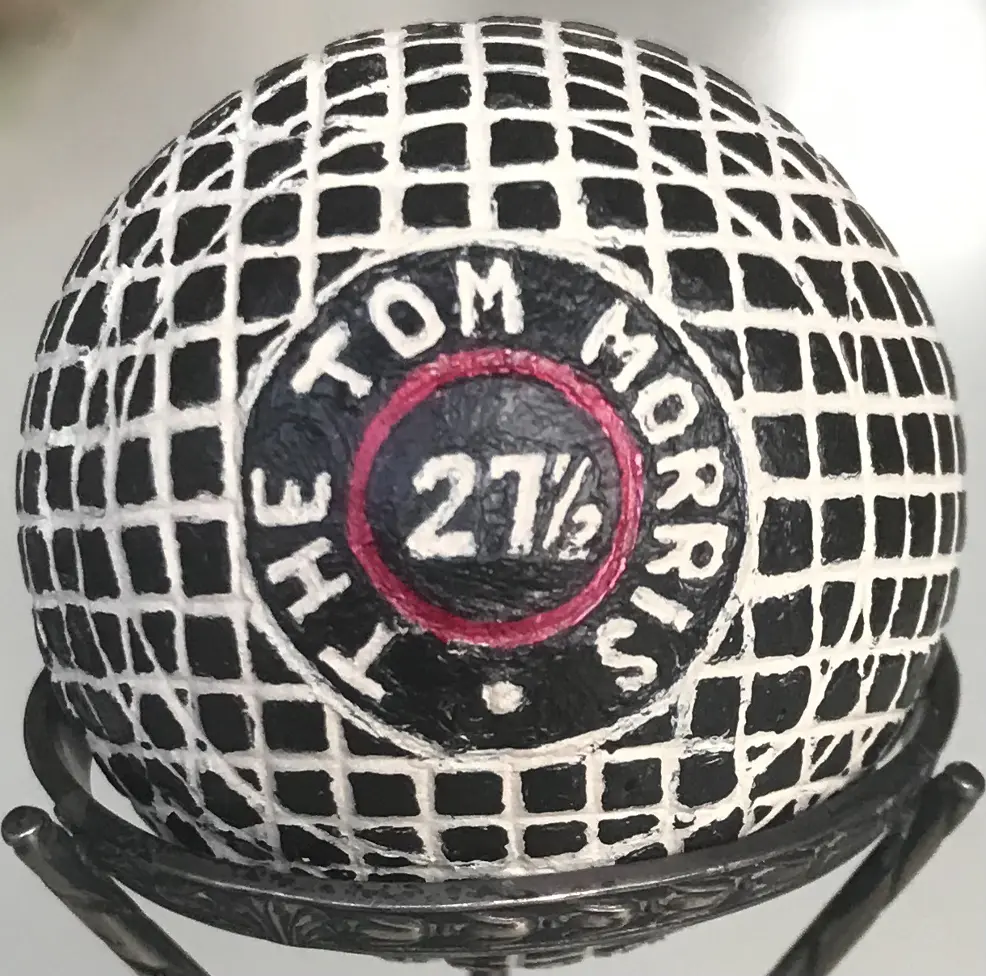
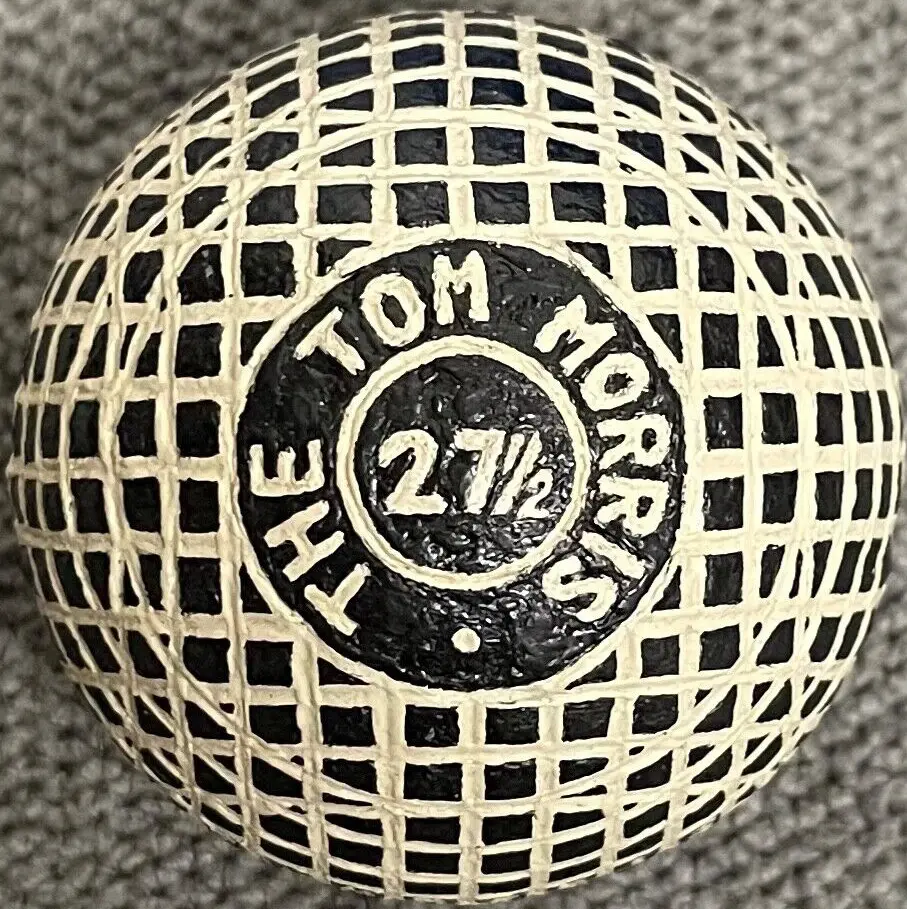
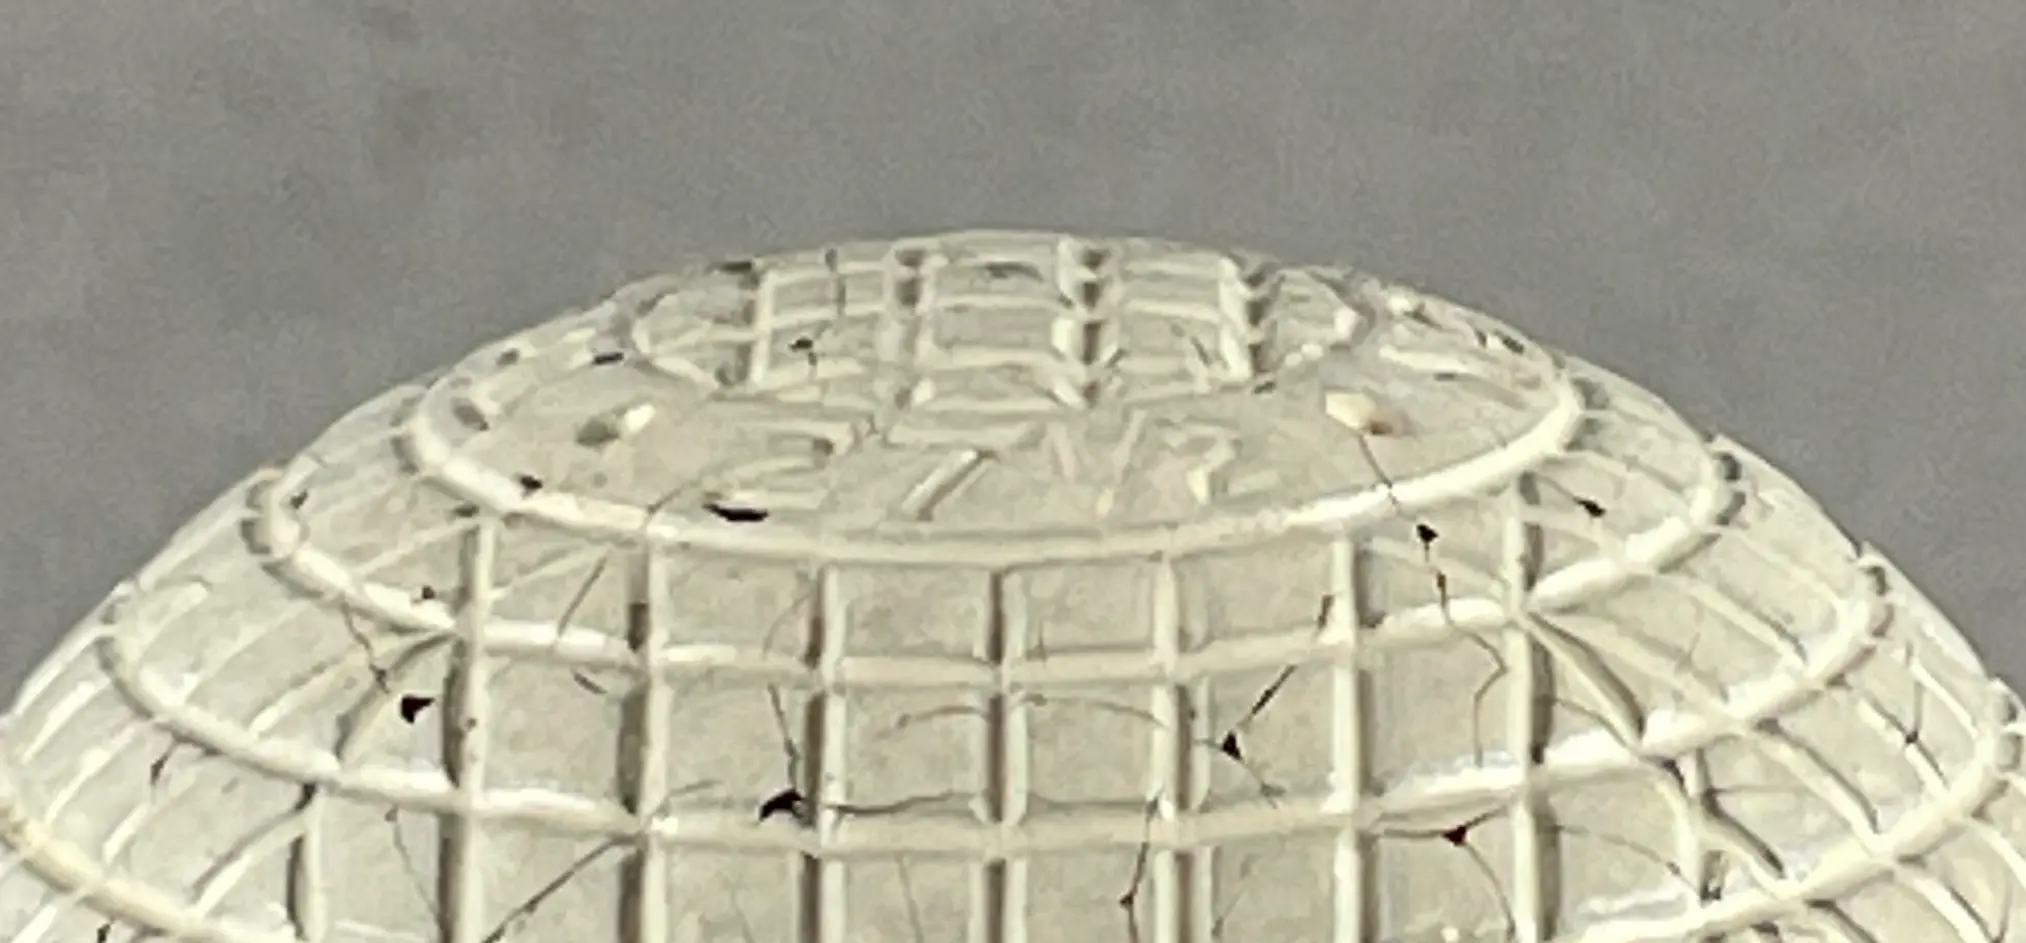
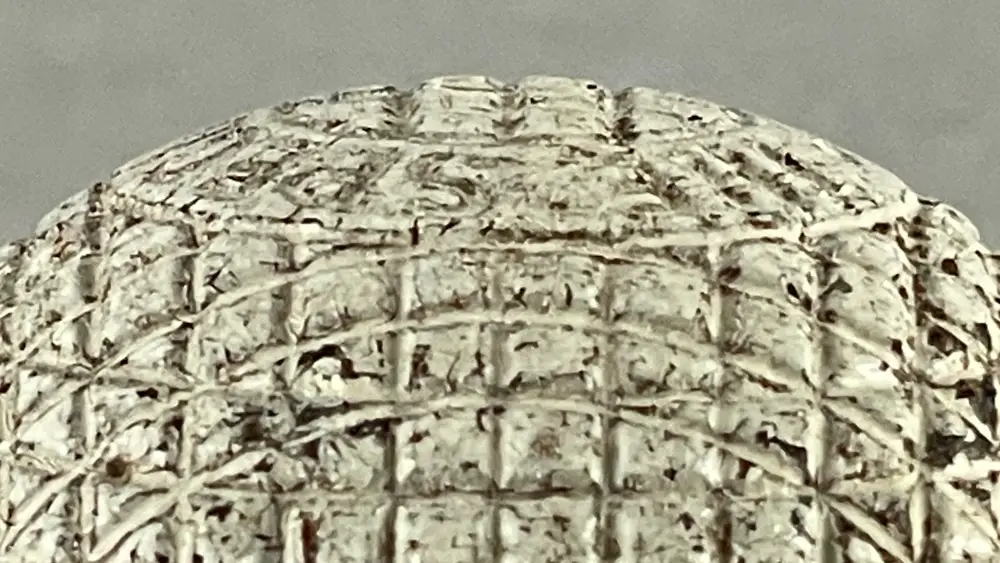
With all the black and white paint on its cover, there is nothing that proves the “Tom Morris” name is original to the ball. One can’t tell if the lettering is molded or not. All the white paint obscures the letters, and they could be engraved. The fact that this ball does not have clear, uniform molded letters sunk into its surface—which is how every named gutty ball of this design was made— is not good. But since the ball has obviously been hand-painted in recent years, a person could carefully strip off the paint and restore the ball to its original, unpainted gutta percha.
Not only do unpainted gutty balls bring prices comparable to original painted examples (all other things being equal), but they are also worth far more than repainted ones. It makes no sense to put modern paint on a genuine gutta percha ball, a ball that is already dark brown let alone one that bears the name of Tom Morris. Doing so would conceal if not lose key elements of its historical value. Then again, if stripping the paint off this ball reveals “Tom Morris” is etched in place and not molded, what does that tell us about the ball?
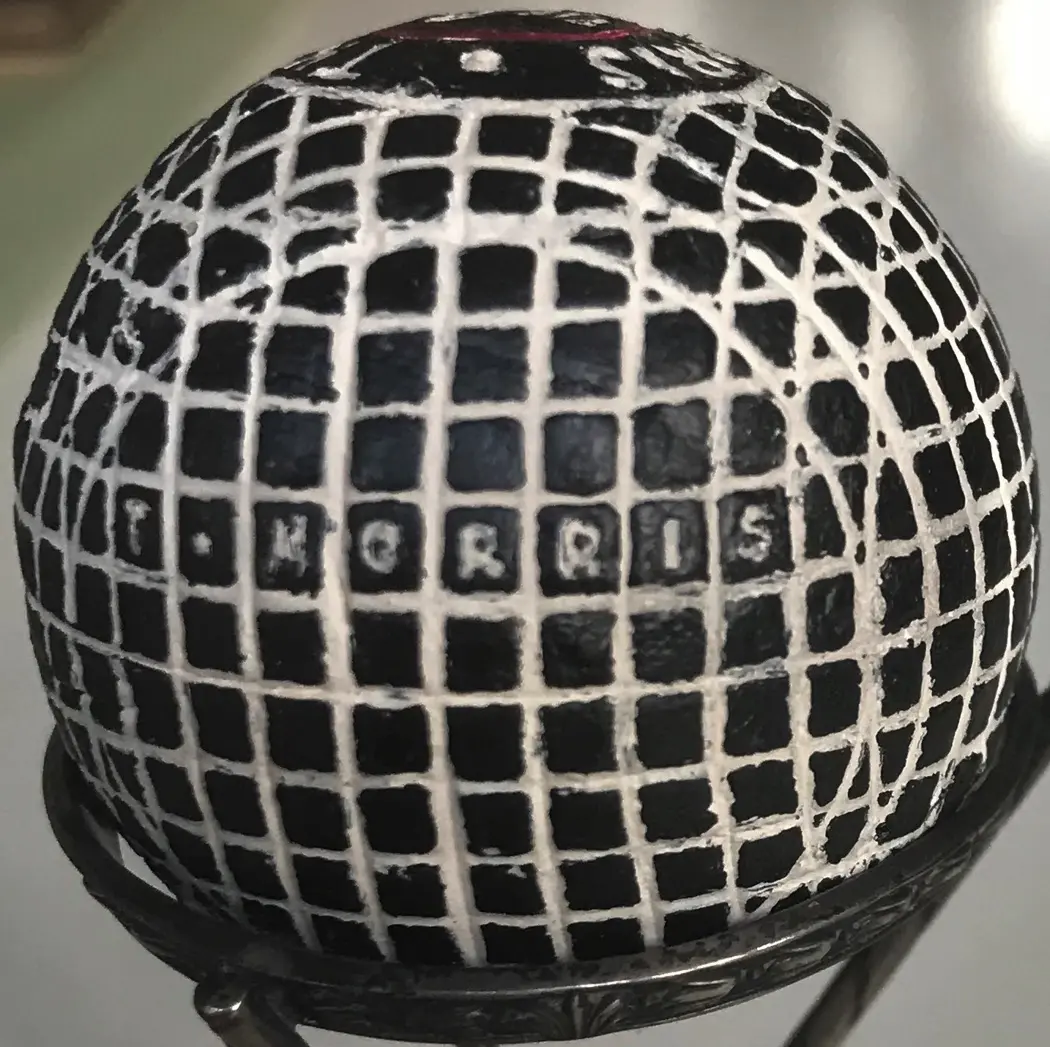
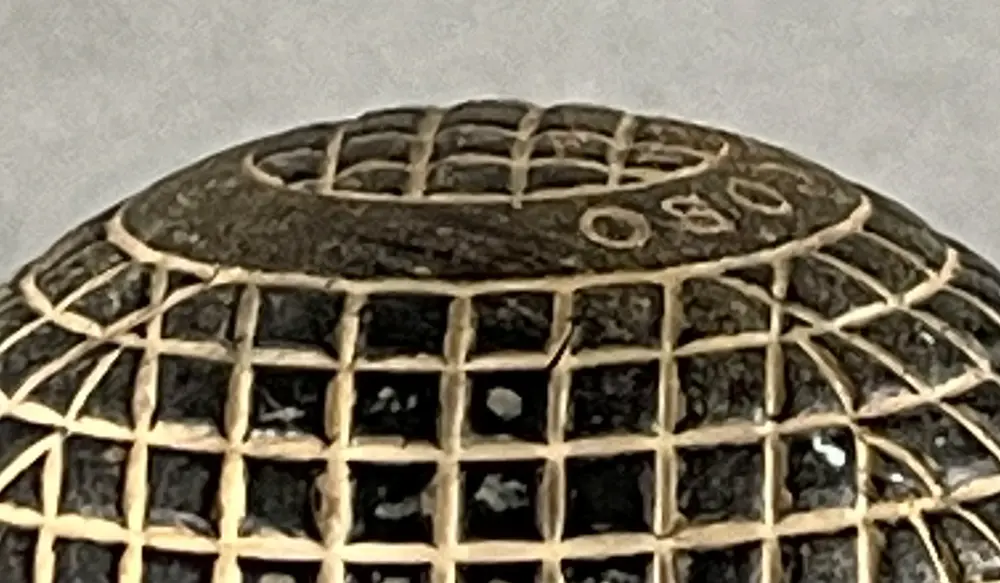
Because this entire ball is painted with modern paint, there is no way to know if the name stamped on the side is old or recently stamped in place. Anybody can stamp a ball and then paint it. This ball is the mesh gutty ball shown two pictures above, stamped “The Tom Morris 27 ½” on the pole.
Next, let's compare these four images. The first (Image 1) is the same Tom Morris ball shown earlier. Next is a second black-painted Tom Morris ball (Image 2). The other two images are the left (Image 3) and right (Image 4) poles of a third black Morris ball.
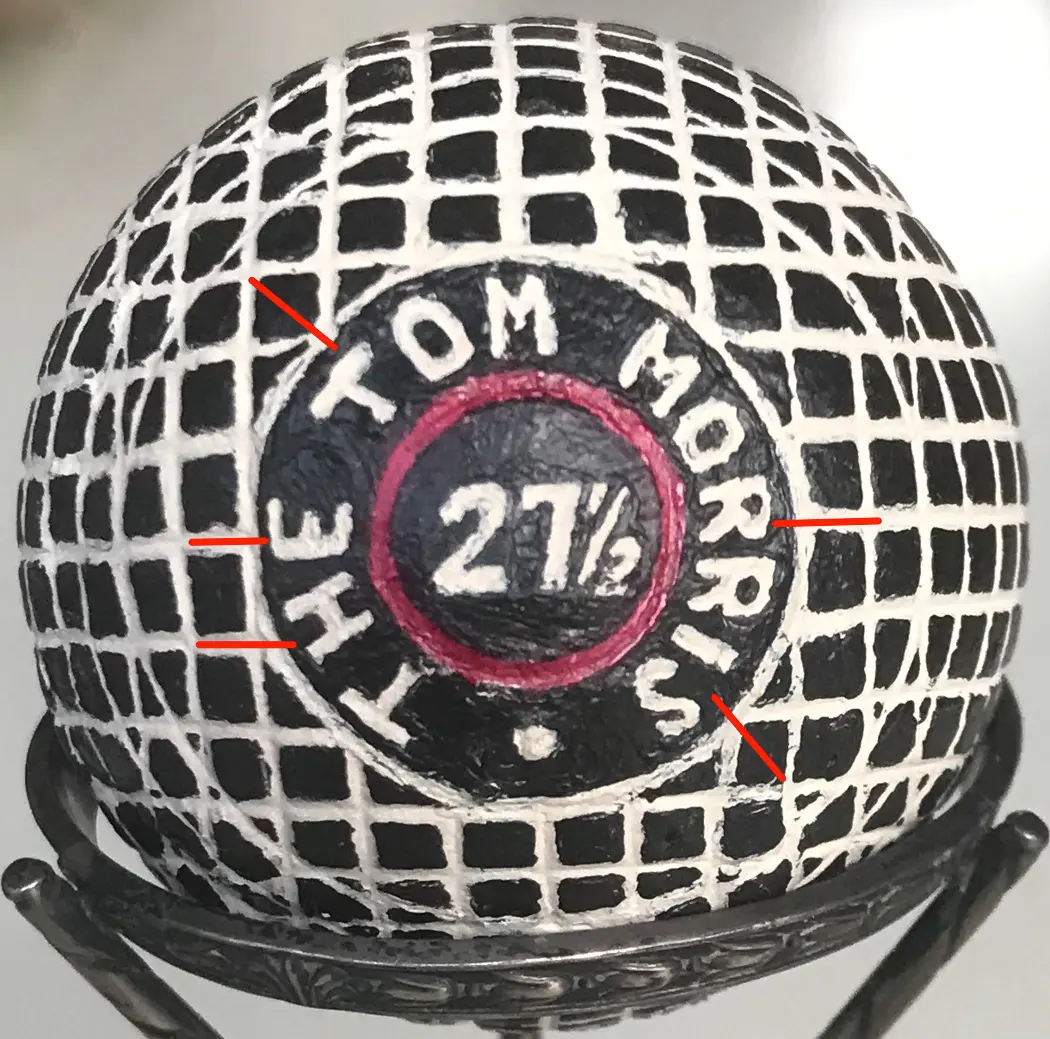
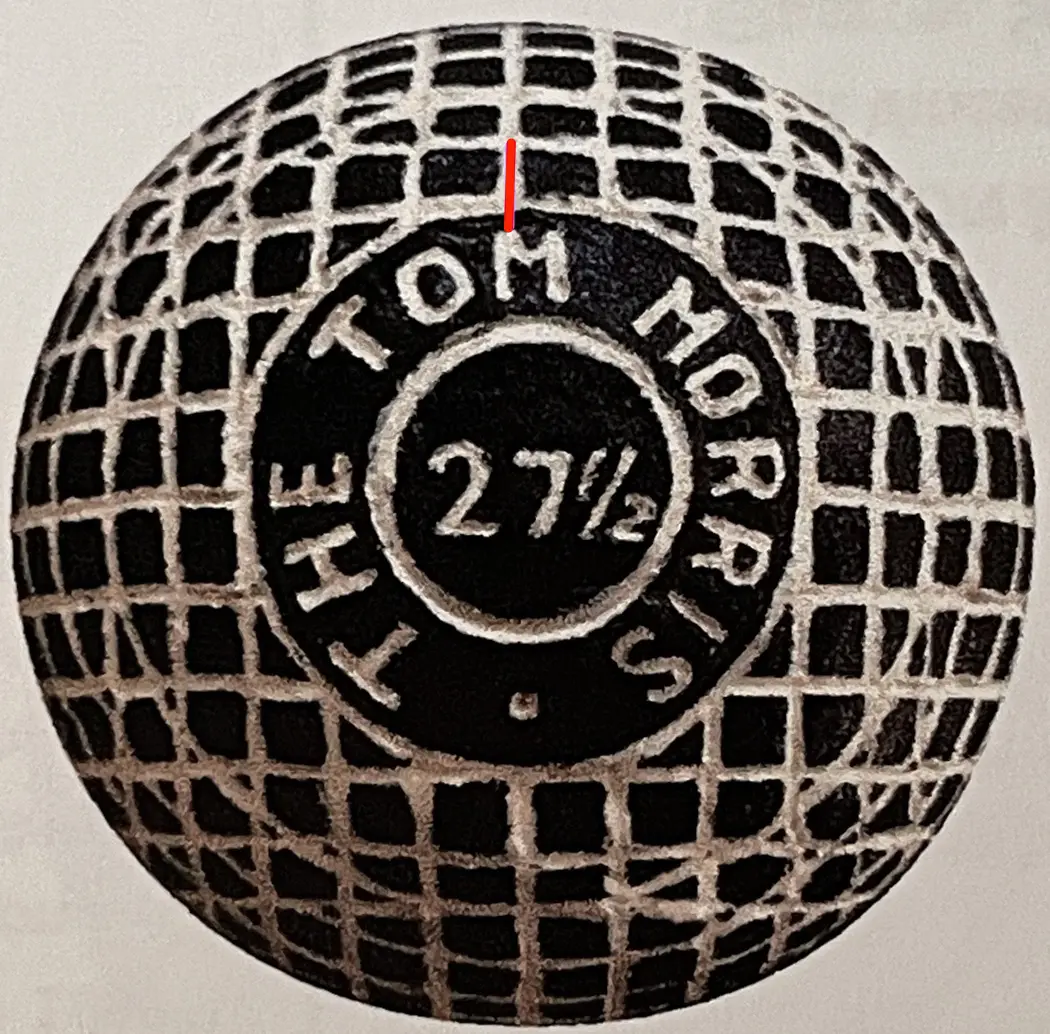
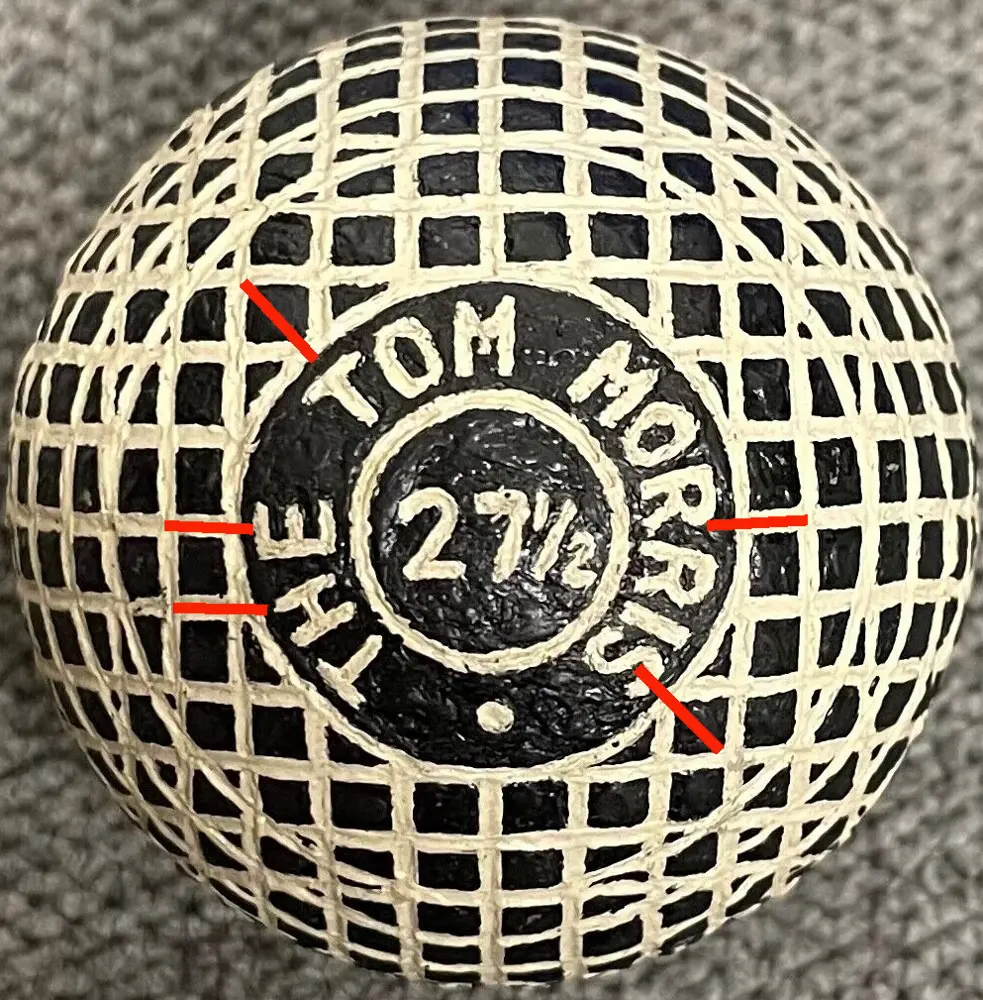
These three balls have notable differences. In Image 2, the ball has a larger “name badge” on its pole when compared to the other two balls. Because of that there are only three circular rings between the badge and the equator, as shown in the image. Because the other two balls have smaller badges, there are four circular rings between the badge and the equator.
In addition, some of the letters do not match up. Red lines have been inserted to show a few specific areas where the locations of the letters are different. On the ball in Image 2, a red line has been inserted to show how the “M” in Tom is in a different location from the same letter on the other two balls. The “T” in Tom on the balls in Image 1 and 3 are off, as is the “RR” and “IS.” The “H” in image 3 is in a different location than it is in images 1 and 2. The distance between the “T” and “H” in “The” in images 1 and 2 is not consistent with the spacing of said letters on either pole of the ball in Images 3 and 4.
Not just the spacing between some of the letters is off, so is their orientation. Two examples are the “RR” in “Morris” on the balls in Image 1 and Image 2. The space between the bottom of those letters on both balls is roughly the same, but the ball in Image 3 has a much larger gap between the top of the letters than 1. In like manner, ball 1 has a large gap between the top of the “IS” and ball 3 does not.
Next up is an image of a bramble ball marked “Tom Morris.” The “T” and “O” in “Tom” are quite close together and apart from the “M.” Also, the
TO is oriented in one direction and the M in another. Plus the “IS” in “Morris” is off.
It looks like white paint was stripped off the cover. The cover itself, however, is not consistent with a typical c.1900 gutta percha cover
(bramble balls were popular during the late 1890s and early 1900s). It is not dark brown like the overwhelming majority of covers used on early
rubber core golf balls. Furthermore, to my eye, this cover looks like it is made from rubber. It does not have the depth or “plastic” look that
a gutta percha cover in the same unused condition will have. While this cover stripped of its paint does not match up well with typical c.1900
bramble ball covers (see below), it’s rubbery look and color fits in well with the stripped portion of the covers on the heavily painted
decorated bramble balls shown below.
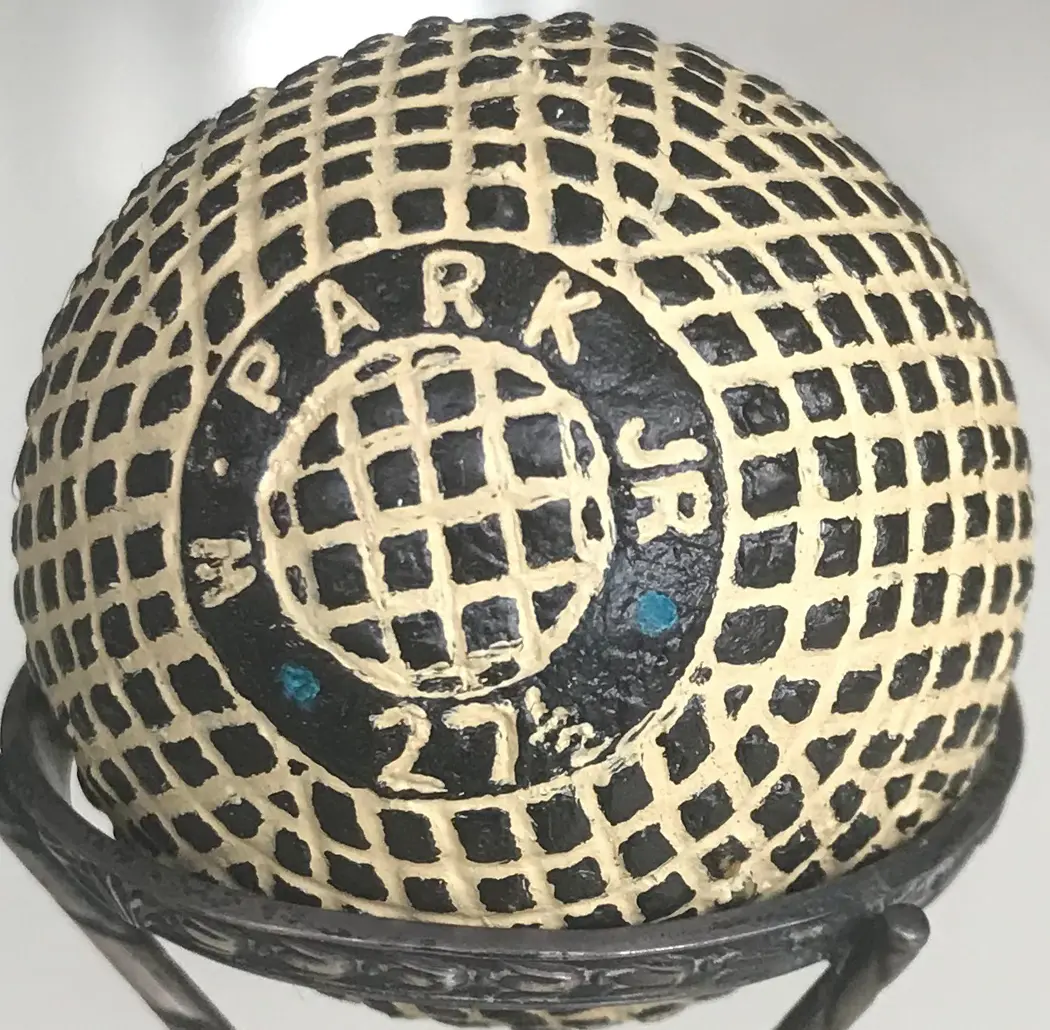
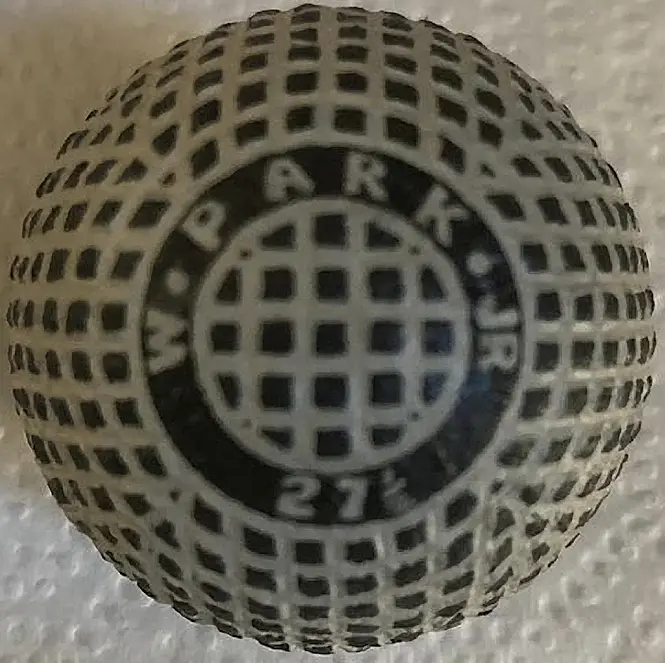
The two W. Park Jr. 27 ½ balls above, while they initially might look alike, have major differences. The first ball (Image 1) has five vertical and horizontal lines in the center section while the second ball (Image 2) has only four vertical and horizontal lines in the center section. In addition, the width of their name rings is different, not to mention the spacing issues with the lettering on both balls. I believe both balls, however, are made from gutta percha. But, again, because these balls are heavily painted and their lettering is not consistent with molded lettering (the “27” on the ball in Image 1 has obviously been engraved), nothing remains to prove that these balls have not been modified.
It would not be beyond the realm of possibility to take either of the solid gutty balls below, made originally with no name, and engrave it “W. Disney World.” Next just paint away and done. If the ball below left were to be modified, possibly the trickiest part would be to make an inner circle for the name ring as neat and clean/symmetrical as its existing outer circle.
It is worth noting that the ball on the right has a raised name ring at each pole, although the ring is not marked with any names. The ring needed to be at the same height as the top of the mesh squares so the ball would roll correctly. In addition, the top of the ring needed to be smooth, so the letters of the name (if the ball was to include a name) would be clean and sharp, and easily accomplished during the molding process.
Note: other solid gutty balls similar to the ones below were made without names.
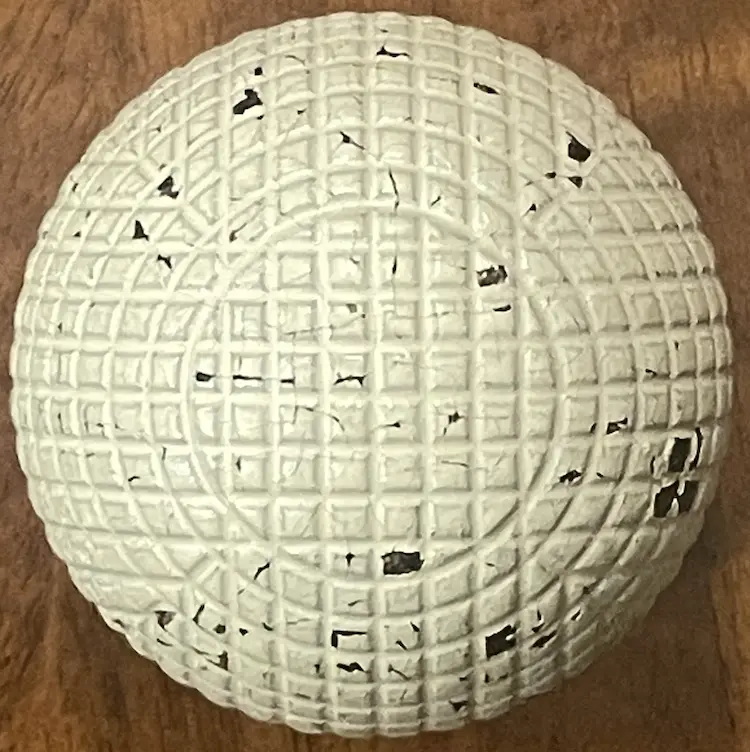
According to the Merriam-Webster Dictionary (merriam-webster.com/dictionary/crypto), the word “crypto” was not used as a noun until 1940. It was used as an adjective, meaning, “not openly avowed or declared—often used in combination: crypto-fascist” beginning in 1681. Consequently, a solid gutta percha ball with a name that made no sense would not be enticing to the market in the 1890s.
However, the interest in a one-of-a-kind 125-year-old ball bearing a name that is all the rage in the investment world today would be quite different.
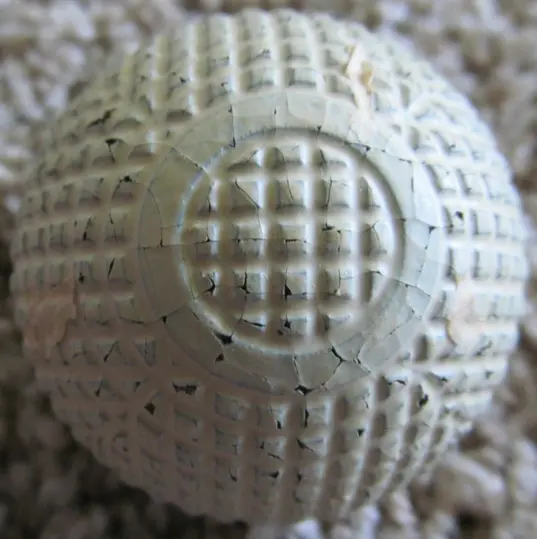
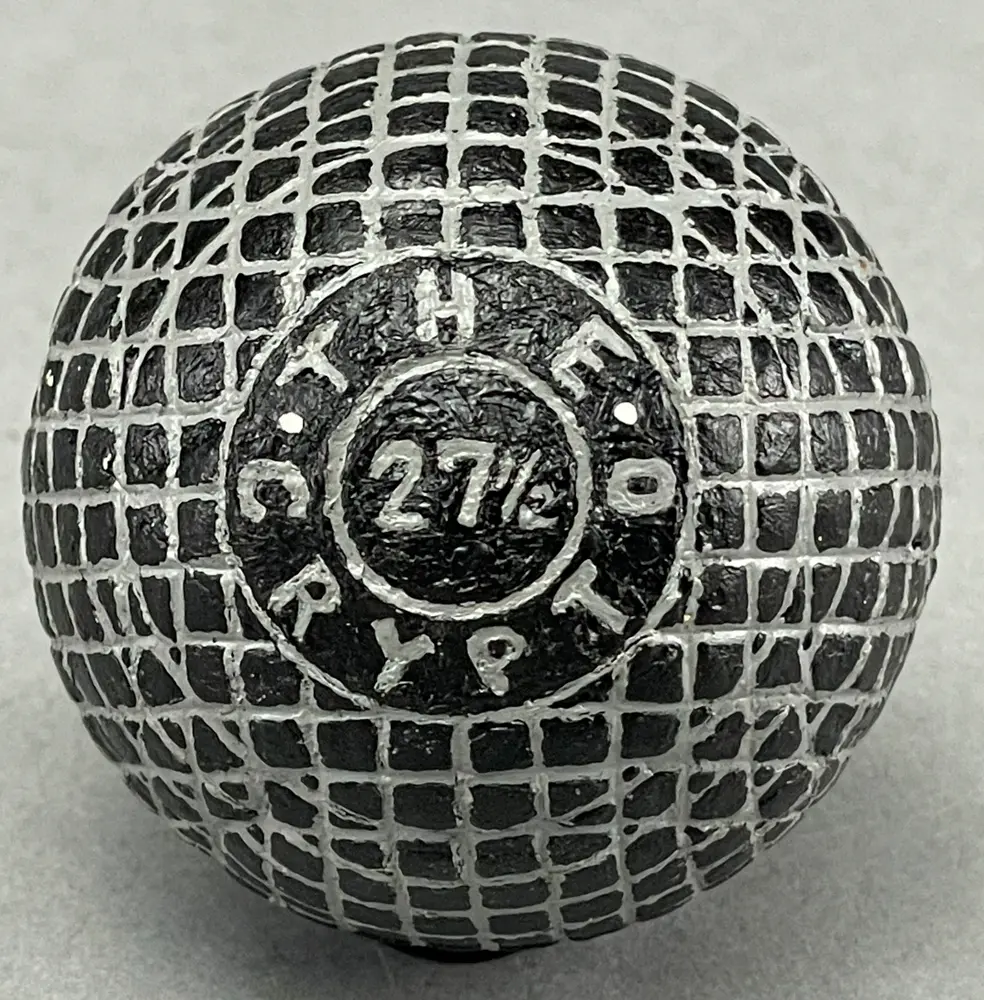
When viewing the name on the pole above, one can see that the surface around the letter “P” on the left-hand side curves inward a tiny bit. These small depressions or flat areas exist with some of the other letters, but they can be hard to see unless viewed close up from just the right angle. The numbered top of the pole appears uneven as well.
Simply put, the pole on the ball shown above is not consistent with the poles on the three named 1890s gutty balls of the same design (Argus, Paragon, and Ocobo) shown below. The first two of these balls still display their original paint. The third has an unpainted gutta percha surface but with gold-painted lines. Painting just the lines preserves the authenticity of this ball. The dark brown gutta percha is clearly on display, and there is no evidence of sanding or engraving around the lettering.
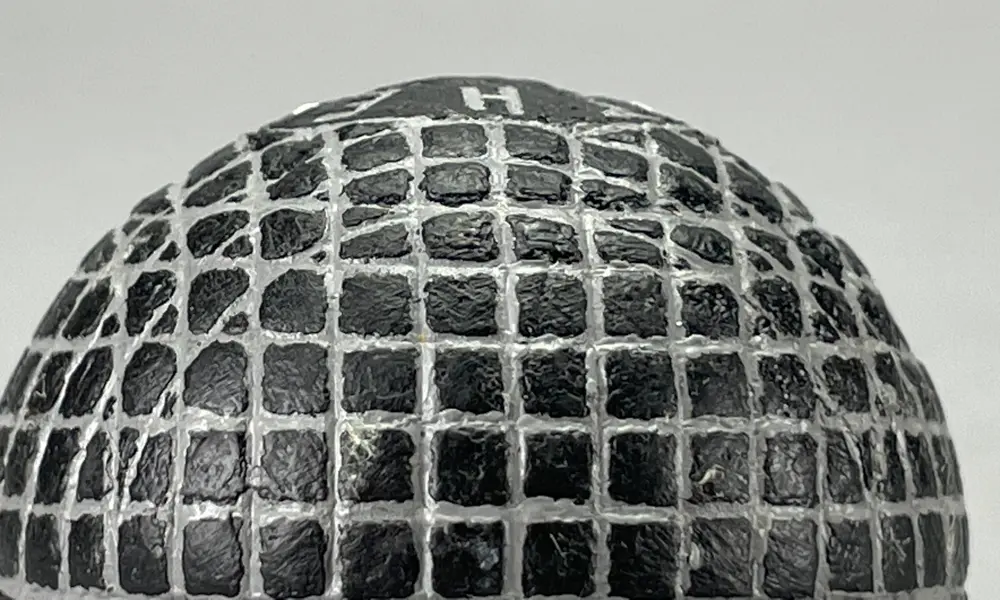
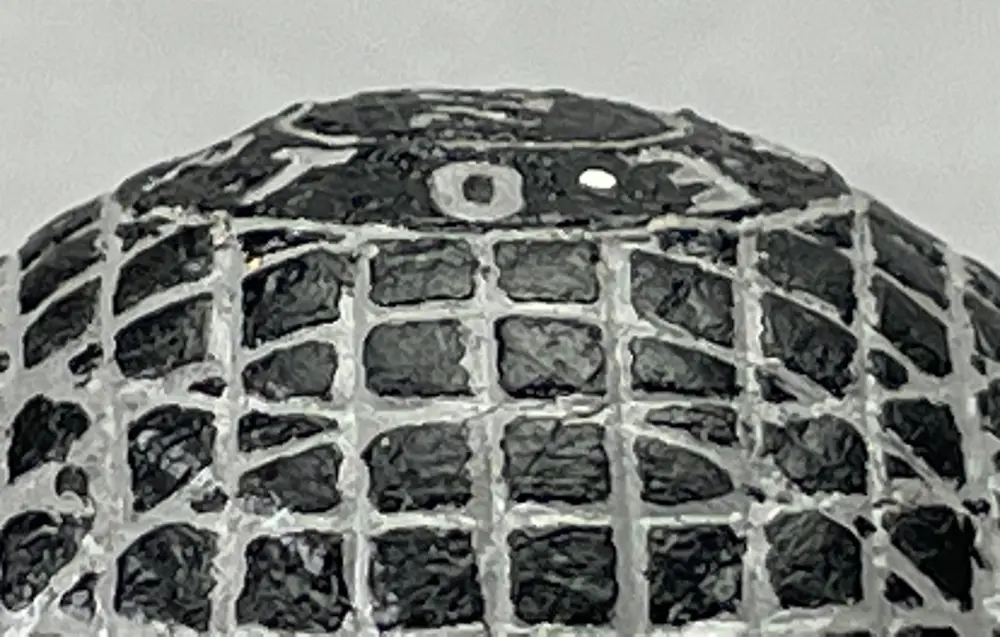
Directly above is the other pole of The Crypto. The “H in “THE” is on a different plane/angle than the “T”, and the “E” is on a different plane of its own. This is evidence that the original letters were sanded off the ball and new letters installed. The lettering on the prior three balls shown above are all on the same plane.
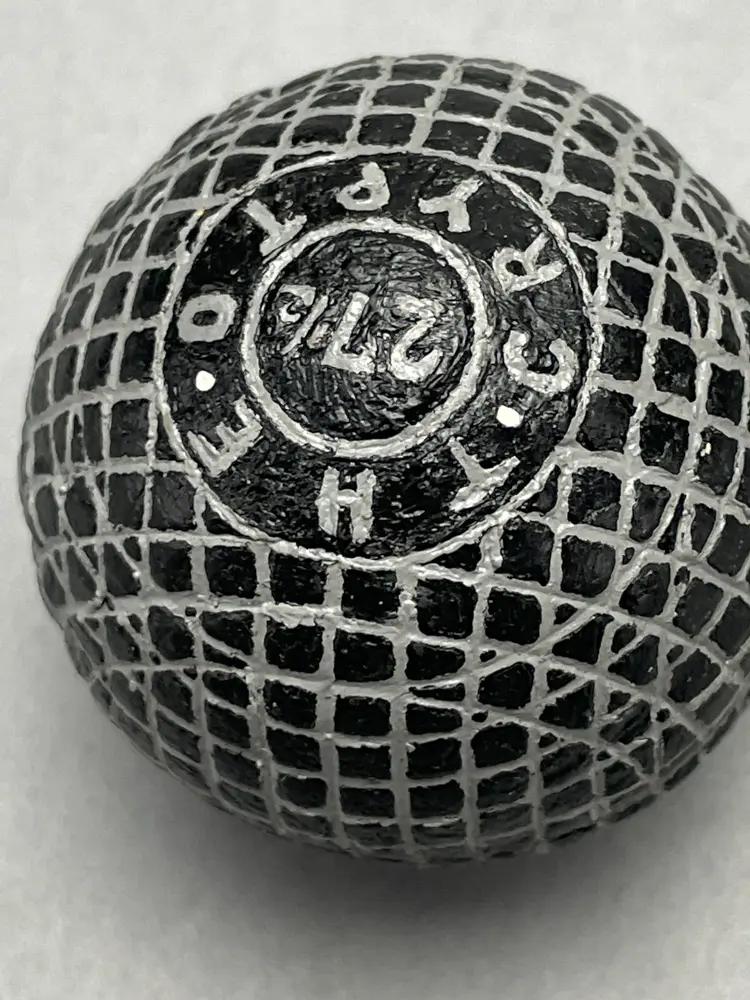
The lettering on this pole is not uniformly level because the pole under the lettering is not uniformly curved. If you take time and study the letters, their undulations become more obvious as does the poor spacing in the word Crypto. The “O” is off on its own, etc. To my eye, this ball has been doctored.
When a ball has been repainted in recent years, anything could be underneath the paint—filler, a sanded surface, remains of a different pattern/name, or even a new 21st-century cover. Black paint and fresh white engraving hide the original impression of the letters and pattern made by the mold, so those things are no longer available for inspection. They have been destroyed. Why do that to a genuine antique ball?
For the record, I have never seen any reference to a Crypto ball in either the 19th or 20th-century literature of the game, nor have I ever seen or heard of such a ball that was not painted black.
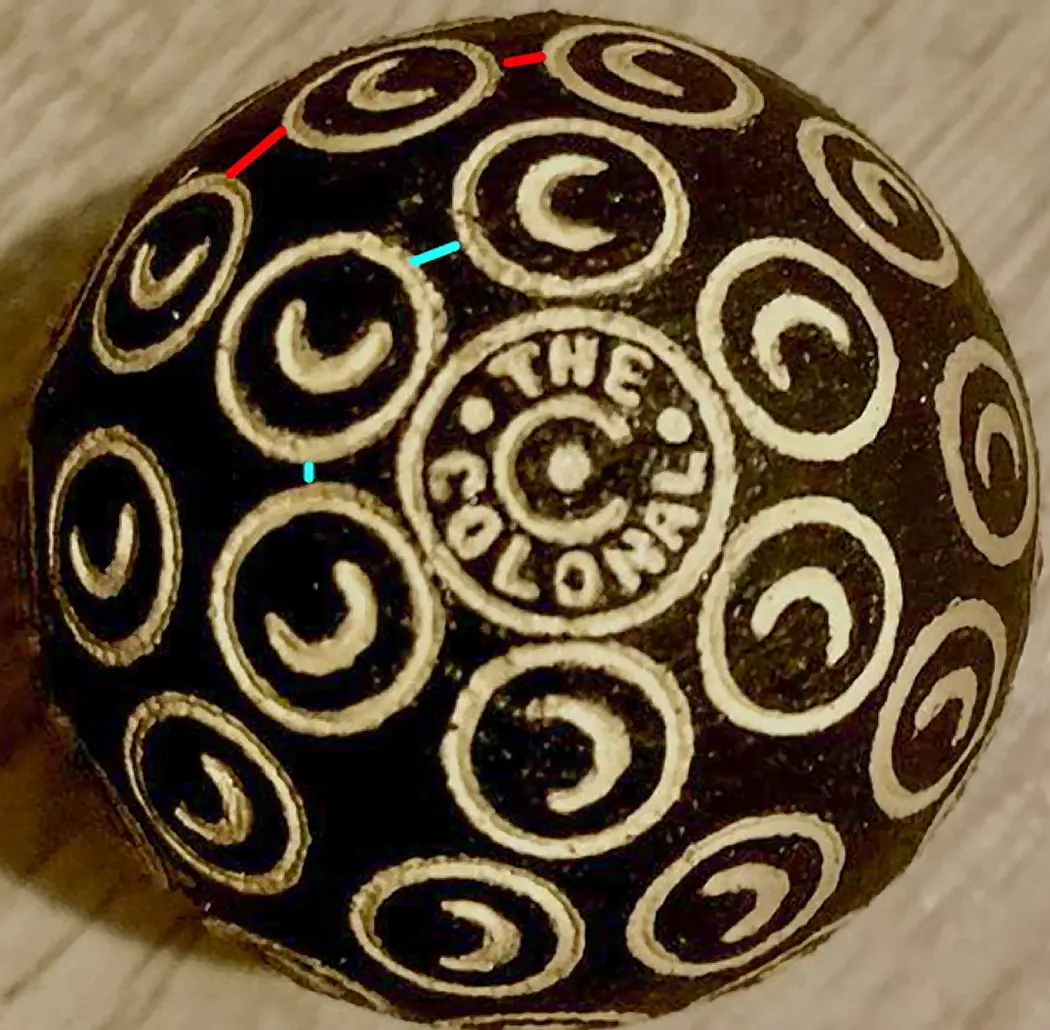
The what? … The “Colonal”??
And so, we come from a black ball bearing a name that made no sense in the 1890s to a black ball with an engraved title that was never a word! As shown above with red and blue lines, this ball has spacing inconsistencies that are not typical for an early 19th-century ballmaker.
Given that all the letters are deep and strong, the paint could be removed from the ball. After all, antique golf balls covered in modern paint are worth much less that the same ball in its original painted or unpainted condition, all other things being equal. Besides, it’s not like the ball can’t be repainted if a modern paint job, for whatever reason, is preferred. Then again, given the modern black paint, misspelled name, asymmetrical spacing and etched letters, it’s a good bet that the cover of this ball would be found sorely lacking in authenticity if the paint were to be removed.
For the record, I have never seen any reference to a Colonal ball in either the 19th or 20th-literature of the game nor have I ever seen or heard of any ball with a misspelled name that was not painted black.
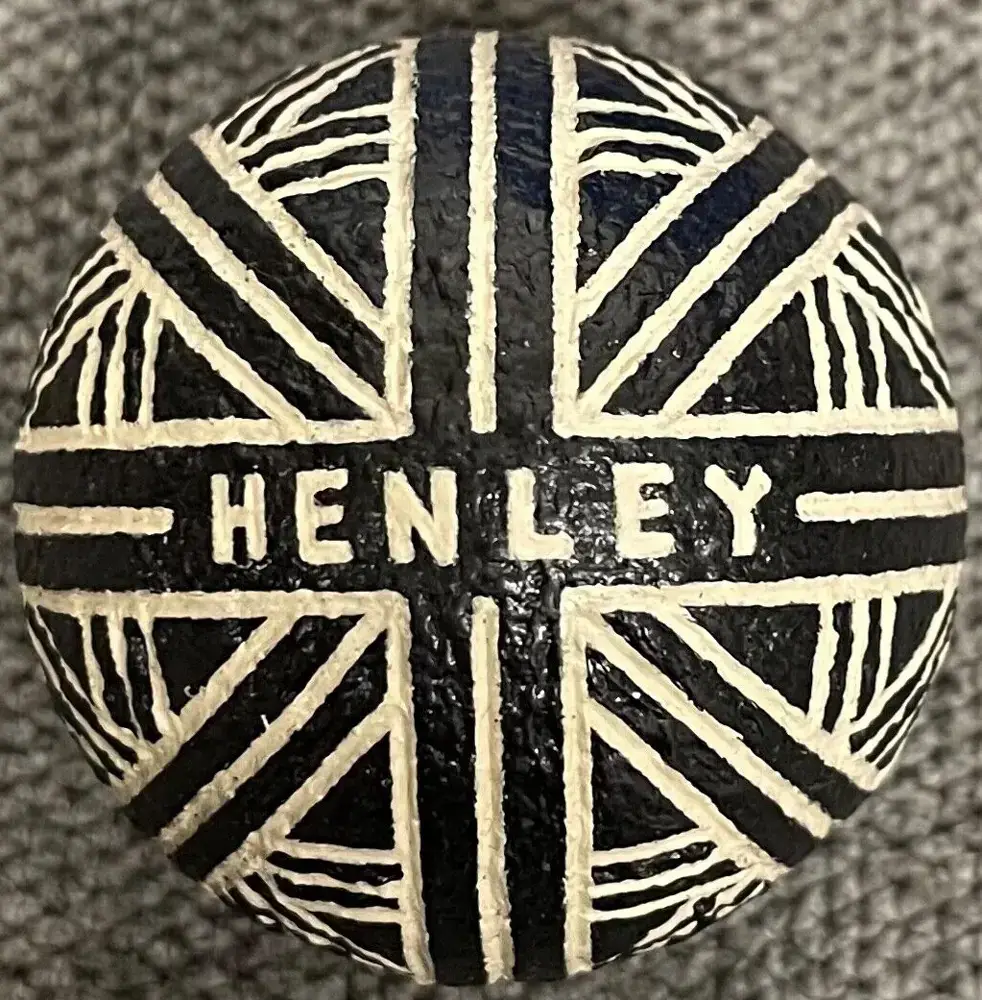

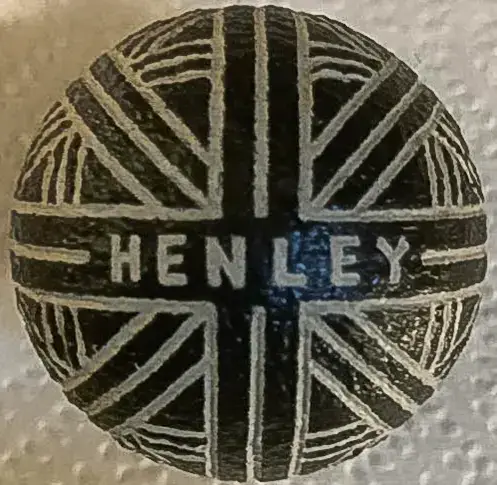
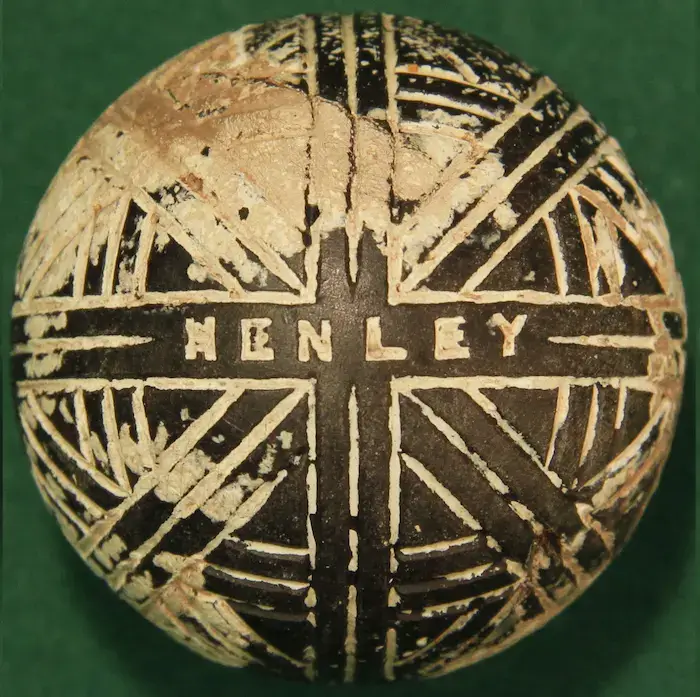
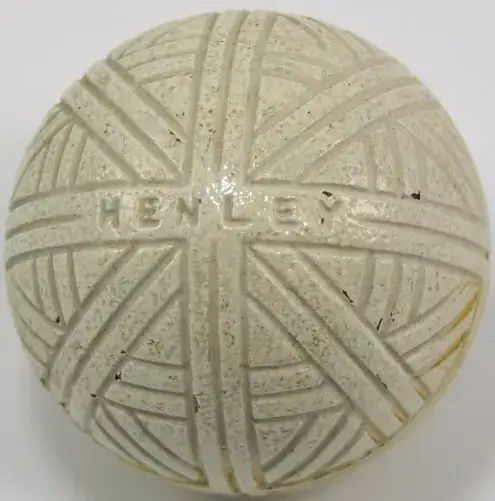
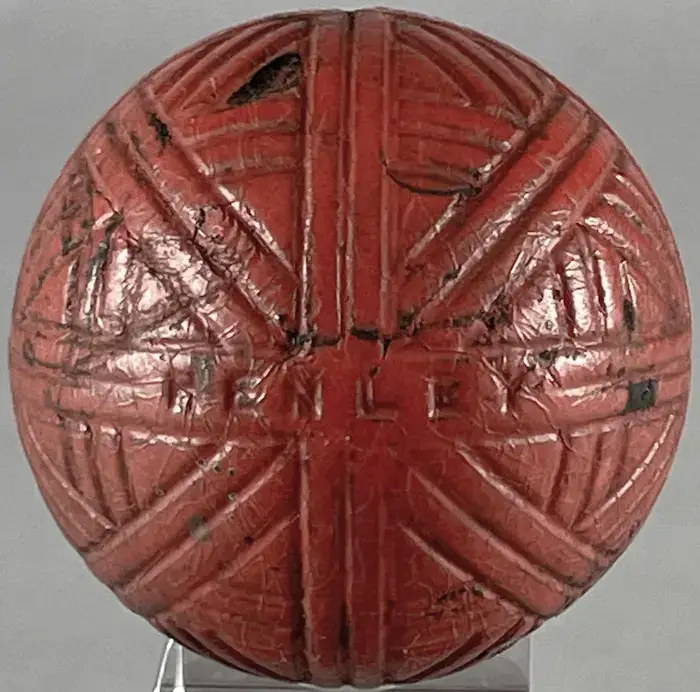
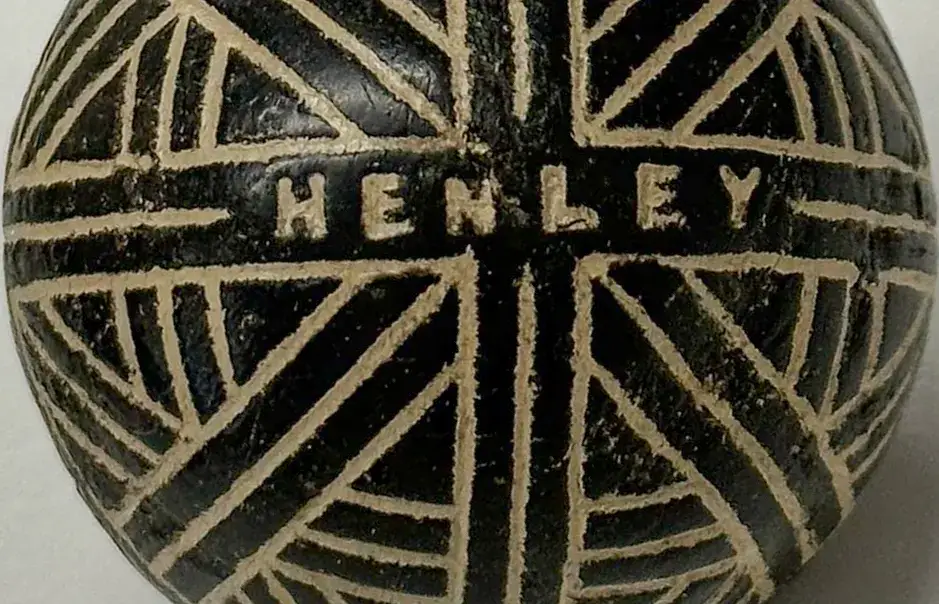
The two black Henley balls above (Image 1 and Image 3) are shown next to two Henley balls that still retain various amounts of their original white paint. It’s easy to see that both the Henley name and the stripes on the black Henley balls are much bigger than they are on the Henley balls that still retain much of their original white paint. In addition, the lines on the black-painted Henleys are not consistent with the lines on the genuine Henleys in their original white paint.
Notice that all the Henleys in their original red or white paint in this section have the same smaller lettering and closer lines, and gutta percha is visible where the paint is worn or chipped. Henley “Union Jack” pattern balls were made from solid gutta percha in 1895. For more on name/pattern size differences, see 2.1 Stars & Stripes.
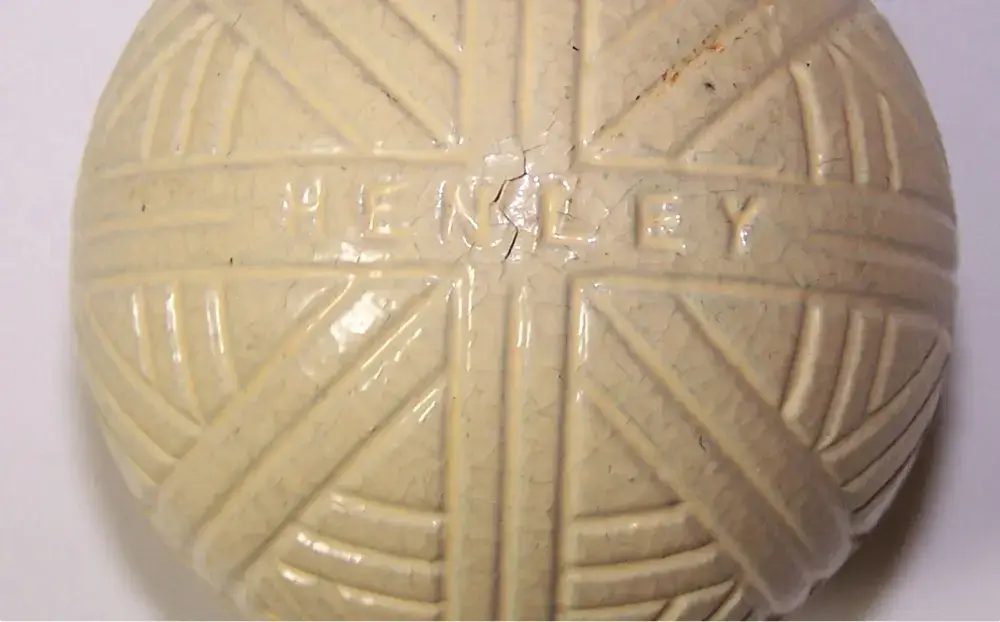
Directly below is a close-up of a genuine mint Henley in its white paint. Upon close inspection, the crazing in the original paint can be seen. Directly below it is another black Henley. This one has the correct size letters, or so it appears. I believe this is a gutta percha ball, only all the black and gold paint makes the ball impossible to vet in its current condition.
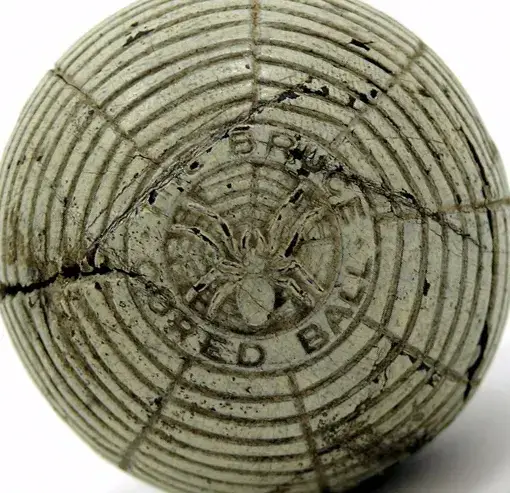
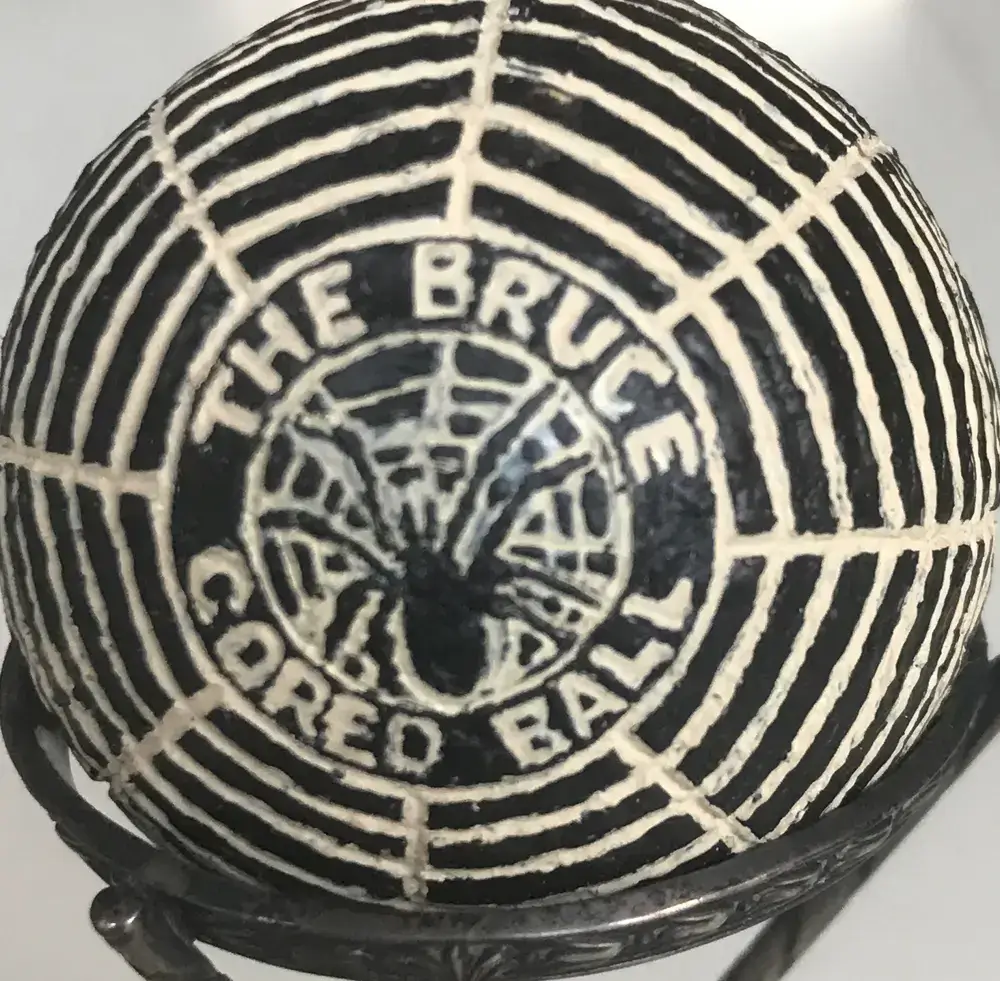

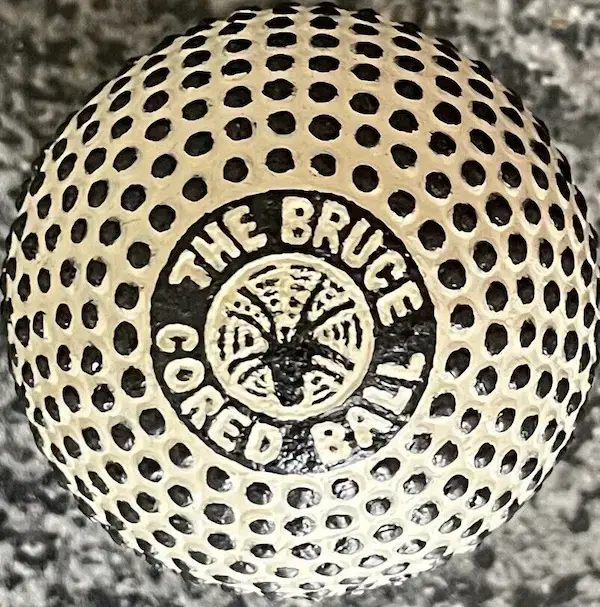
The two white Bruce Cored Balls were made in 1904. The black-painted ball is clearly different. On the white balls, the spider is in relief—raised up. On the black ball, it is simply engraved into the surface. Also, on the black ball the shape of the spider’s body and legs is different, the circular ring around the spider is bigger, it’s lettering is bigger, and its web is not as tight, etc. (For more on such name/pattern size differences, see 2.1 Stars & Stripes.) Also note: On the white balls the web pattern inside the name circle is recessed. On the black ball, it is not.

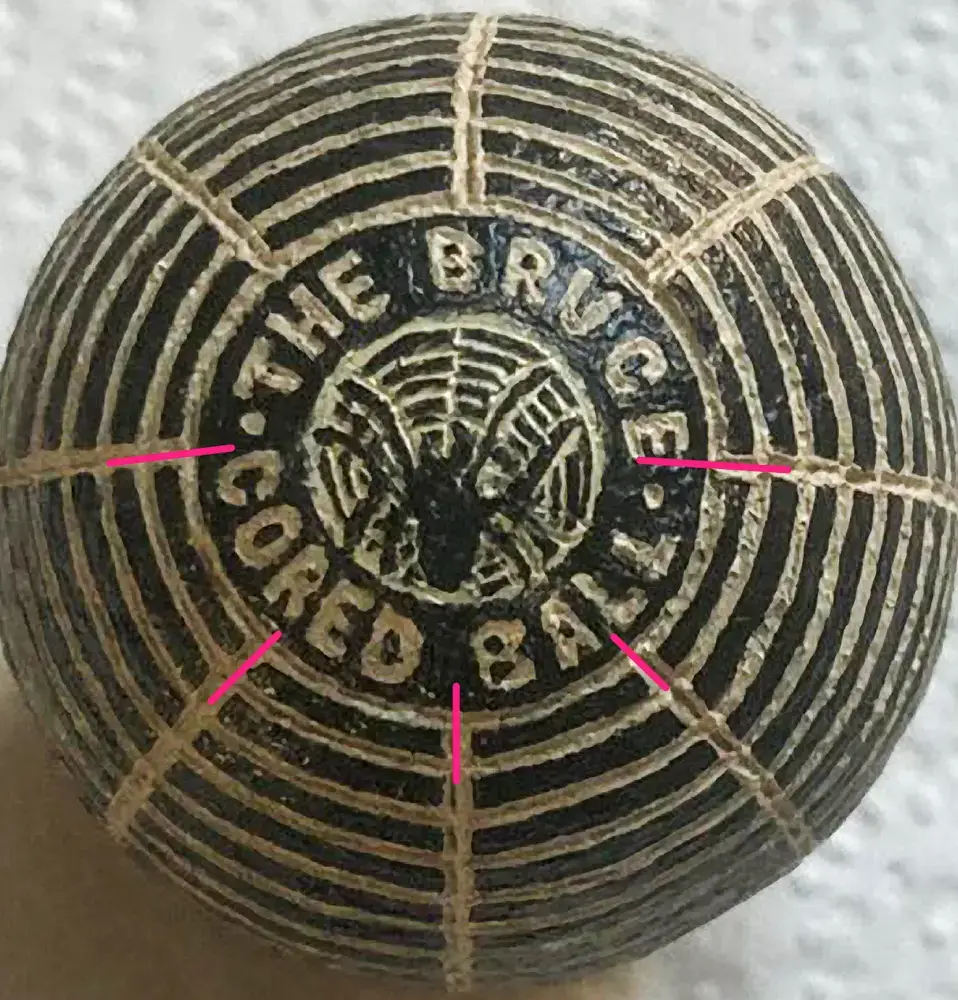
These two black-painted Bruce Cored balls are different from each other. The red marks call attention to the relationship between the perpendicular lines that extend out from the name circle and the letters inside the circle. Notice how the “H” and “B” letters under the lines at the top of the circle are in the same location on the two balls. However, when you compare the letters to the other lines around the circle, as shown by the red marks, the letters are in different locations.
The web pattern inside the two name circles is decidedly different, as is the body of the spider. Also different is the size of the name circle itself. The amount of space above and below the letters on one ball is different from the other. Only one ball has spacing dimples in the name circle.
When compared to the two original white Bruce Cored ball shown earlier, the spider on both black balls is engraved in place, not raised up in relief, and the web pattern inside the name circle is not recessed.
Again, neither of the black balls above match each other nor do they match the genuine white Bruce Cored balls shown earlier, both of which do match.
Moving on, the modern painted black and yellow Bruce Cored bramble ball below is not consistent with the second Bruce Cored bramble ball in its original white paint. The differences between the two balls are many and easy to see. This second ball is a genuine Bruce Cored ball from the Harry B. Wood Collection assembled early in the 20th century.
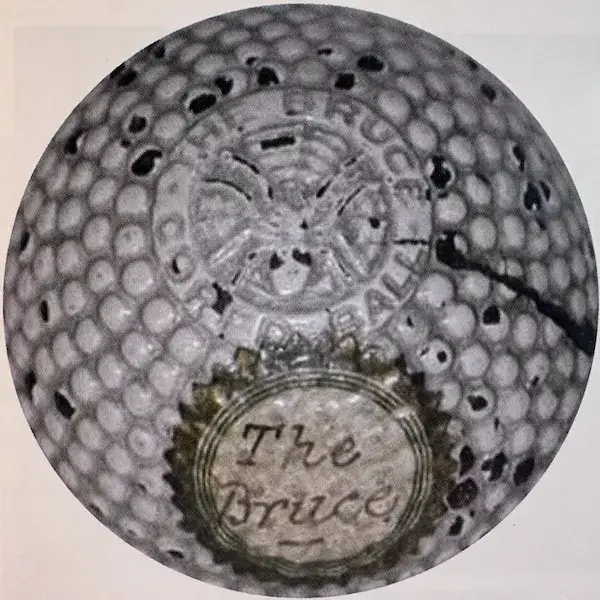
The imposter ball is quite different from the genuine ball. The name ring is thicker. It is not elevated to the height of the brambles. The lettering is much larger. The spider and web do not match in shape or elevation. The name ring, the spider, and the web on the yellow/black painted ball, however, are a much closer match to the spiders and webs and name rings on the poles of the other two decorated black Bruce Cored Balls shown earlier.
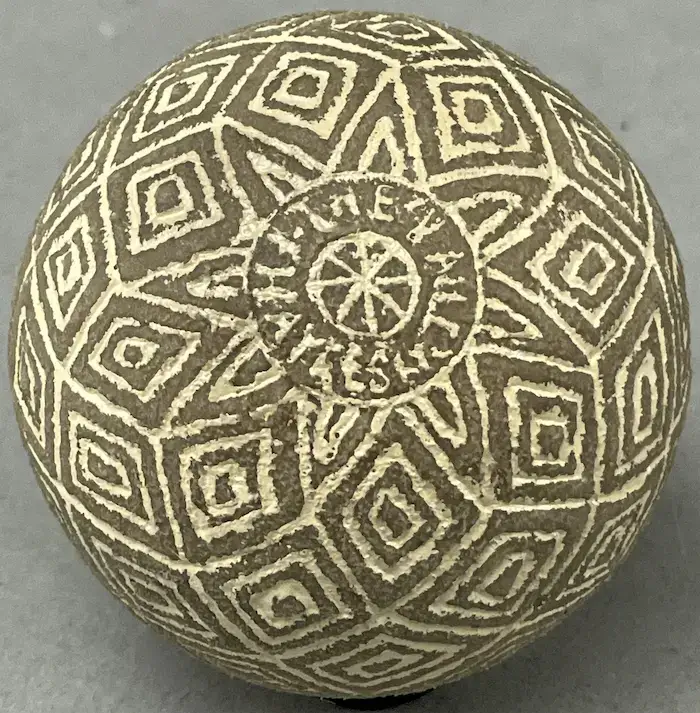
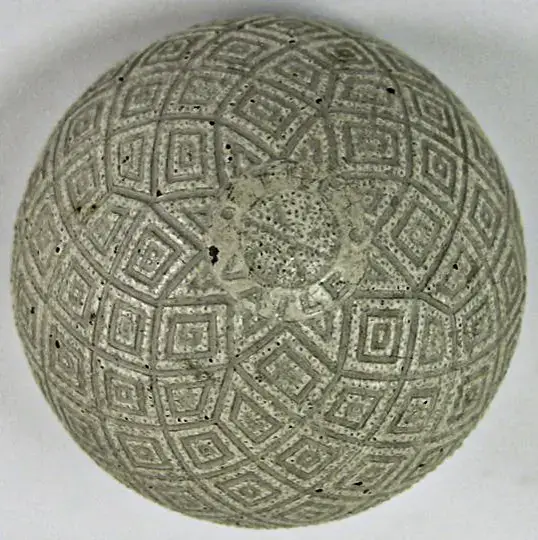

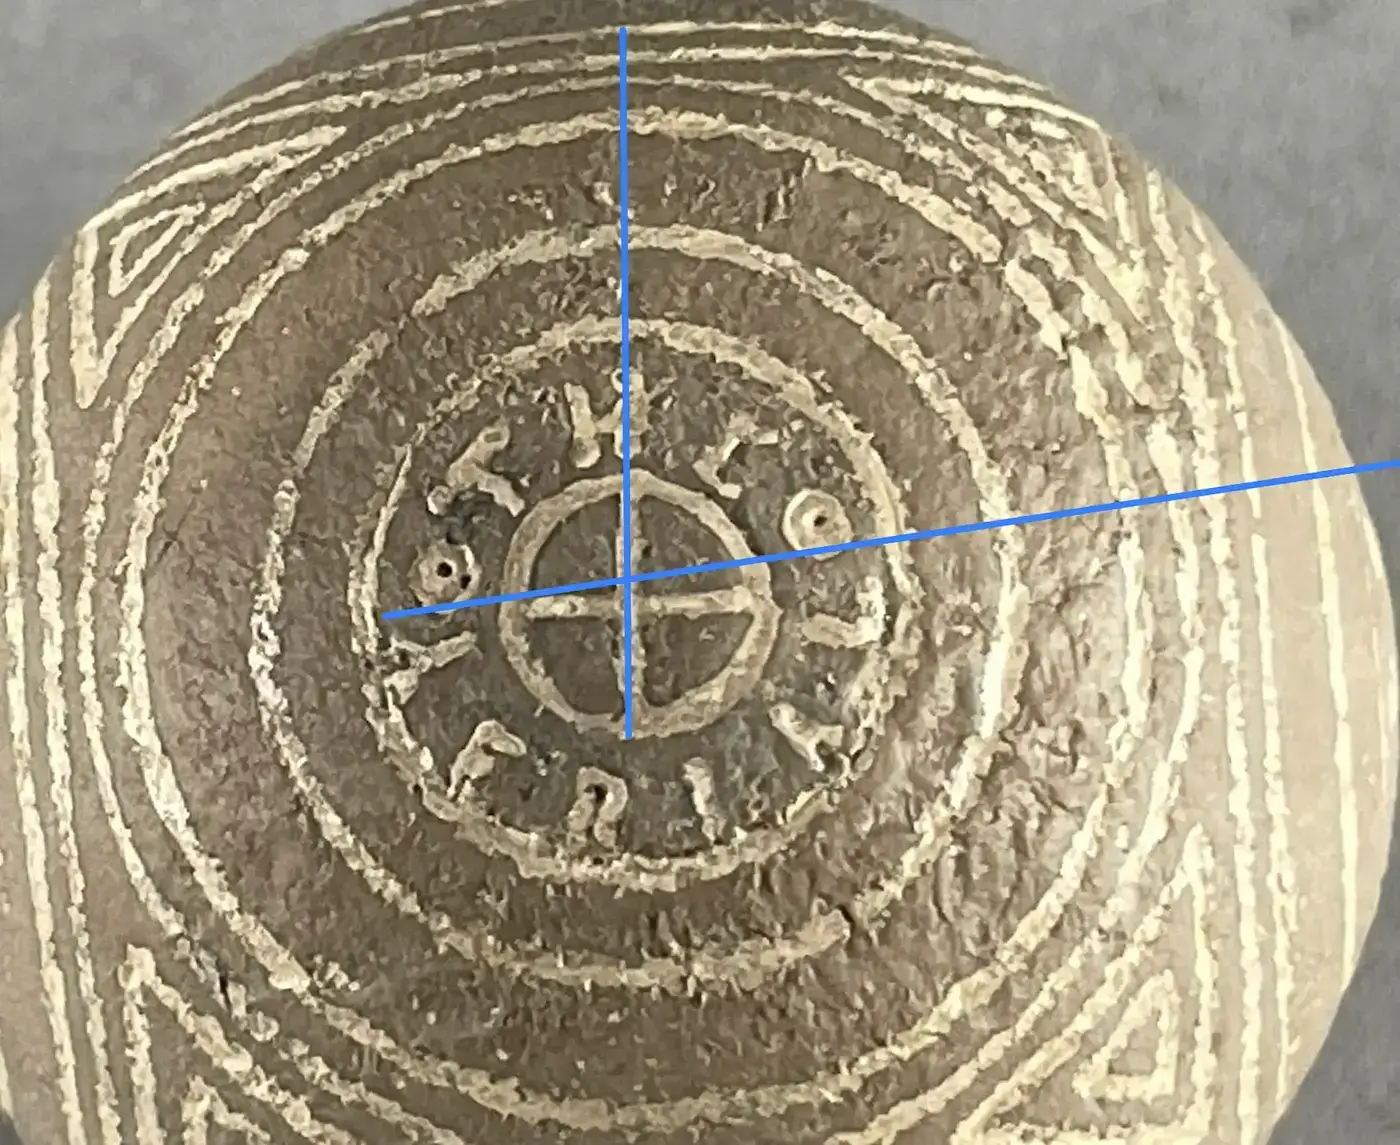
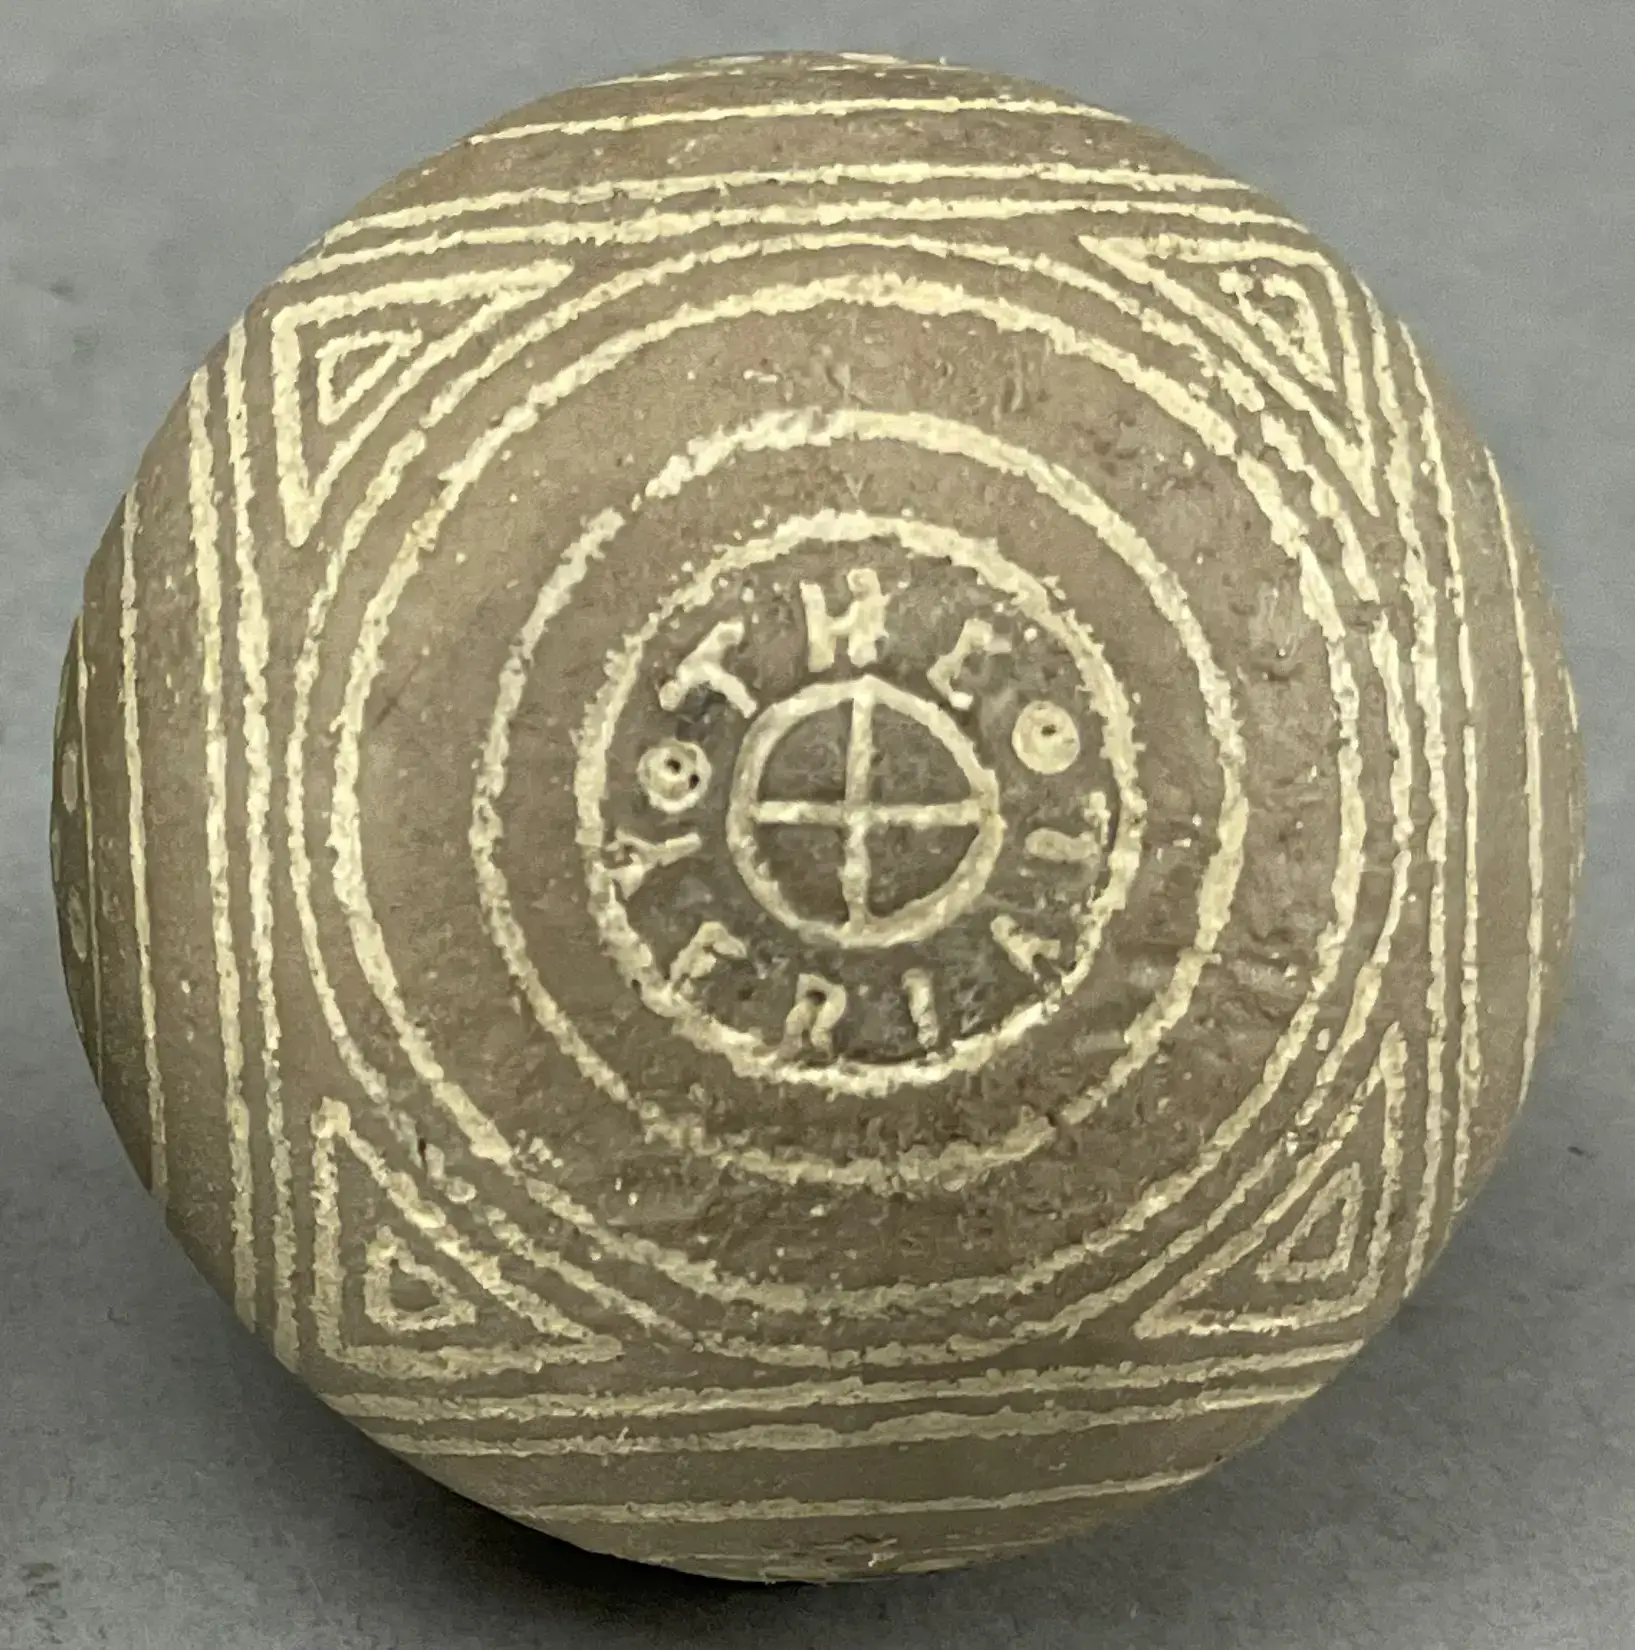
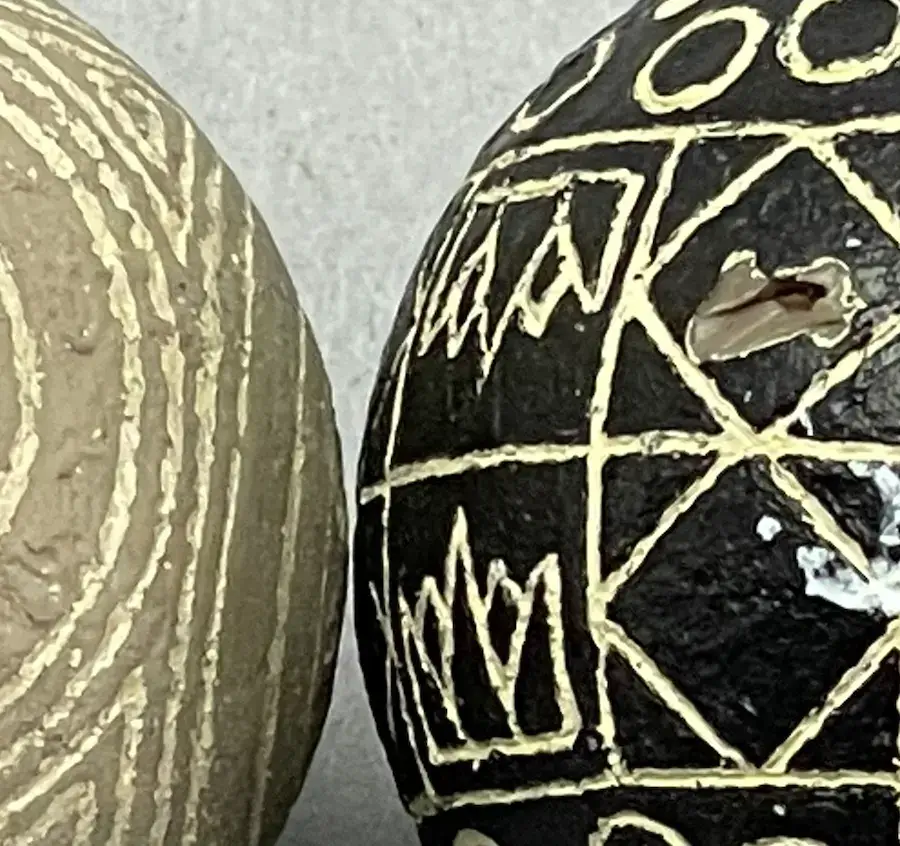
In 1909, Percy Vaile received a British registered design for his Vaile golf ball cover pattern. The first ball—beige colored (Image 1 & Image 3)—is marked “The Vaile, F.H. Ayres,” although it is difficult to read. The second ball (Image 2 & Image 4) is a The Vaile ball still in its original paint. The lines on the beige-colored ball are not consistent with the lines on the ball in its original paint. They are deeper, disjointed, and create larger diamonds. The execution of the pattern on the beige ball is not consistent with the pattern on the ball in its original paint. The name circle on the beige ball is larger and the spokes inside it are small when compared to the ball in its original paint. (For more on such name/pattern size differences, see 2.1 Stars & Stripes.)
Genuine Vaile balls were made with gutta percha covers. The dark gutta percha can be seen where the paint has been chipped on the painted Vaile ball.
Because the beige ball is only painted in its lines, it is easy to view its cover material, which is not consistent with gutta percha in its color or texture when compared to a typical gutta percha cover. When the beige Vaile ball is bounced it sounds muted. It also feels somewhat tacky when handled. Gutta-percha-covered balls typically give off a distinctly resonant click when bounced, and they feel sleek and solid when touched.

Both the Vaile and Aerial balls in the image above are unpainted and appear to be made of the same material, but not gutta percha.

Above right is a second unpainted-except-for-its-lines F.A. Vaile ball. Red arrows show inconsistencies in the lettering and pattern size between the two balls directly above as do the different sizes of the name rings and inner spokes. Not only are the patterns different between these two balls, they are also inconsistent on each ball. Their covers appear different in color and texture. The cover on the beige ball does not appear to be as smooth as it appears on the brown ball. In addition, the letters and lines on both balls above are consistent with hand engraving, although the material engraved (especially in the unpainted beige Vaile and Arial balls) does not appear to engrave well.
The Aerial is on the right in the accompanying two-ball image. Shown on the left is the back of the Vaile ball already discussed. Both Balls have never been painted except for the paint in the pattern lines. On November 18, 2022, the Scientific Materials Testing lab of Tempe, AZ, tested the beige surface of the Aerial ball using Fourier Transform Infrared Analysis and detected only polyisoprene and no paint nor any other organic matter, confirming that the Aerial ball does not have any paint or dirt etc. on its beige polyisoprene surface. The Aerial is shown here with the Vaile ball because their covers appear to be made from similar material. Both are the same beige color, uneven and rough across their surfaces, and the covers of both balls sound muted and soft, like they are made from rubber, when they are bounced. None of these characteristics are normal for molded rubber core balls with gutta percha covers made in the 20th century.
Both balls have been x-rayed and there is a wound rubber core inside each one. It is a relatively simple process, however, to tear a cover off an old golf ball and install a new one. Recovered and remade golf balls were produced in large numbers during the early 20th century. Back then, either gutta percha or balata was initially molded into thin, smooth shells. Each shell would cover half a golf ball. After the shells were formed, a used wound rubber core was placed inside a pair of shells and the shells were melted/molded/fused together around the core inside a heated ball mold. The exterior of the new cover bore the pattern on the inside of the mold.
One way to install a new cover and pattern on a wound rubber core today is to thickly coat the inside of each half of a two-part soft mold with rubber molding material. Then set the core into the mold, close the mold under a bit of pressure, and let things cure. If the mold had a pattern, it will be reproduced in mirror image on the ball. If the mold did not have a pattern and the ball came out with a perfectly smooth cover, then a pattern could be engraved and/or stamped in place. Of course, in this digital world we live in, complete with 3-D printers, CAD programs, laser engravers, stencils, and much more, there are other ways (see section 5.1).
Given that genuine Vaile balls date to the early 1900s and were made with gutta percha covers—as were the vast majority of all the balls made prior to the early 1920s—and this Vaile does not have a gutta percha cover, it appears to be a recovered ball. While there is no known Aerial ball with this pattern in an original early 1900s white paint, nor is there any record of such a ball in the 19th and 20th-century literature of the game, nor are there any other known early 1900s golf balls sans paint that match the texture and color that these two balls share in lockstep, the evidence indicates to me that both balls have old cores and new covers, and that their cover patterns were not created in a mold.
This is further confirmed by the closeup image with the blue arrows. These arrows show how the dimples on the Aerial ball were formed by something like the flat tip on a metal punch that was pressed into and then displaced the rubber, thereby creating the raised rings around the dimples as they appear in the accompanying image. Such raised rings have never been seen on any of the myriad of genuine balls with dimples that I have seen.
The blue lines in this image show how the lettering is incorrectly oriented to the crosshair design inside it. Also, “Aerial” almost touches its surrounding outer circle while “The” is much further away from the outer circle. Such asymmetry is not consistent with the work of an early 20th-century ballmaker.
This closeup image also shows how the cover itself is uneven and rough, and the lines marked on the surface of this ball are not consistent with the molded lines on an unused early 20th-century ball.
As mentioned earlier, on November 18, 2022, the Scientific Materials Testing lab of Tempe, AZ, tested the beige surface of the Aerial ball using Fourier Transform Infrared Analysis and detected only polyisoprene, not paint. Furthermore, after the ball was wiped with isopropanol and tested again, FTIR did not detect dirt, organic matter, or water on the cover of this ball like it did on the unpainted covers of five well-documented early 20th-century balls that also had their covers prepped and tested at the same time. This ball is clearly unused and exactly as it was made. Neither the rough surface nor the shallow-to-non-existent etched lines on the cover are the result of any sort of deterioration, nor are they consistent with early 20th-century golf balls.
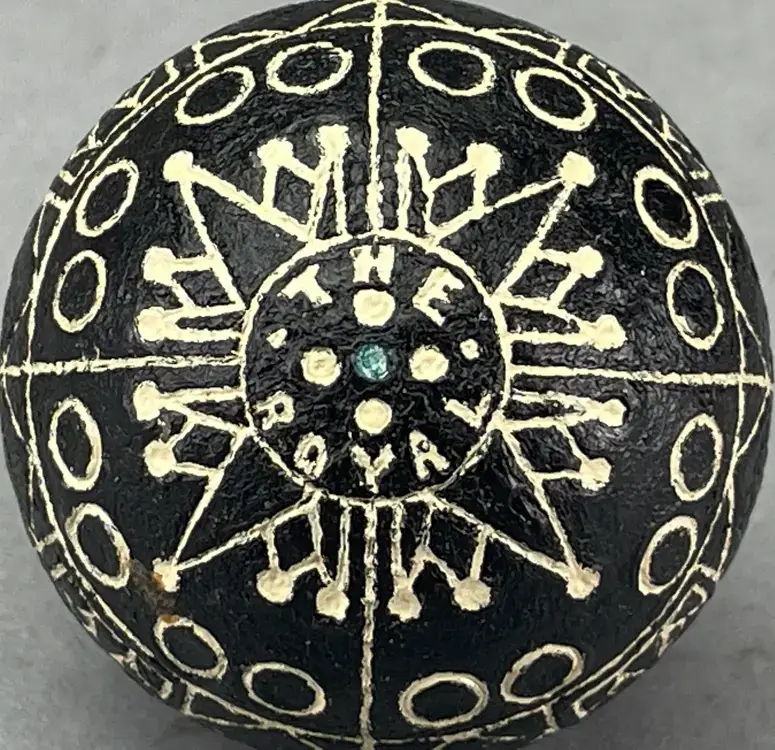
This black-painted Royal ball—which I have never seen in original white paint and was unable to locate in any 19th or 20th-century literature of the game—possesses several elements that are not consistent with golf balls made in the 19th or 20th century.
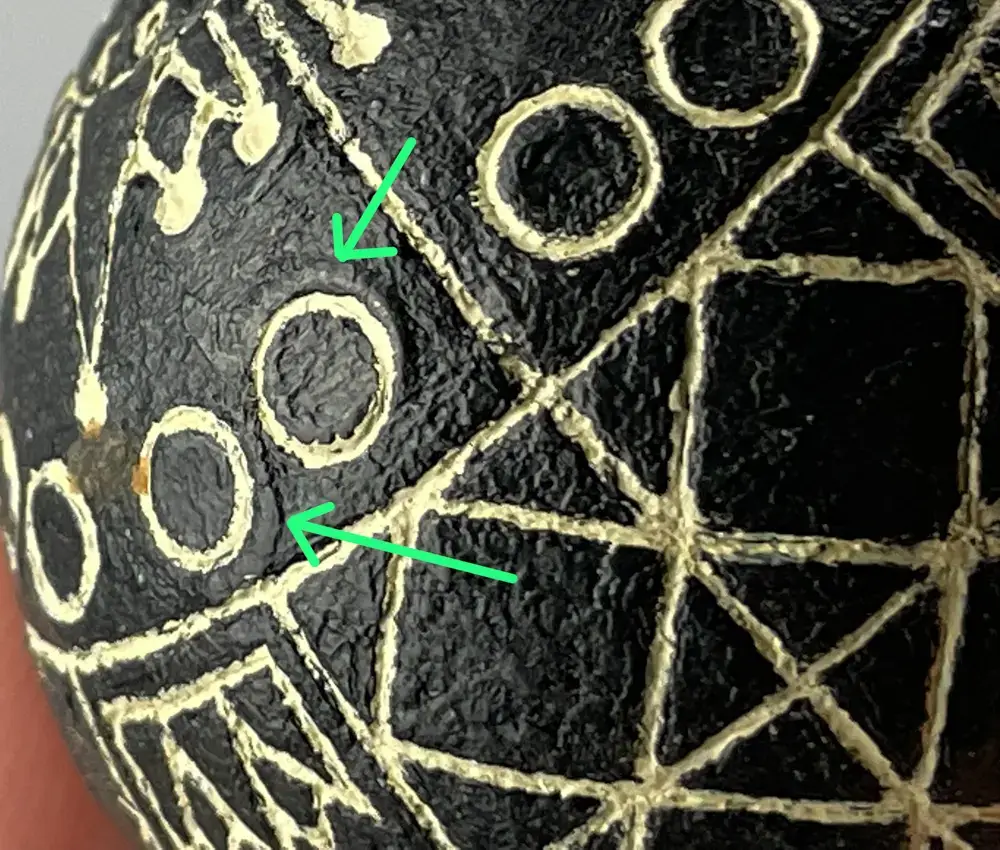
As pointed out by the green arrows above, there are raised circles next to the incised circles on the cover. This is consistent with stamping/engraving, not molding. As the stamp or engraving tool presses into the ball, it displaces the material underneath it which then rises around and above the perimeter of the stamped/engraved design. And that needs to be dealt with because it’s not normal. On a molded ball any excess material is forced out of the mold when it is closed under pressure, and the cover where it borders the pattern is always perfectly smooth when it comes out of the mold. Hence, some of the raised circles on this Royal ball appear to have been flattened—pushed back down after they were formed.
The light needs to be just right to see these raised circles, but they are definitely there and consistent with other raised perimeters on other black painted balls yet to be presented (see Section 3.8, 3.9, 3.10, 3.11, and others.) Note, also, that the raised but flattened circles are often off set from the perimeters of the incised circles that remain. I believe this is because some of the first circles stamped/engraved into the ball were out of position, so the heated material was pressed back down in an effort to make the circle disappear and a new circle could be more accurately installed in the cover. The Jockey ball in 3.8 also has similar issues with its pattern—horseshoes that were stamped out of position. Instead of covering them over, however, the worst horseshoes were simply stamped again, over top but slightly offset from the initial stamp, in an effort to hide the overall asymmetry of the pattern.
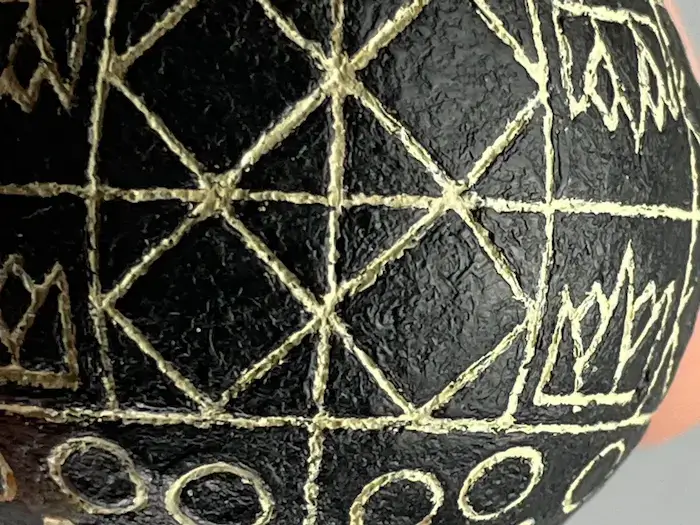
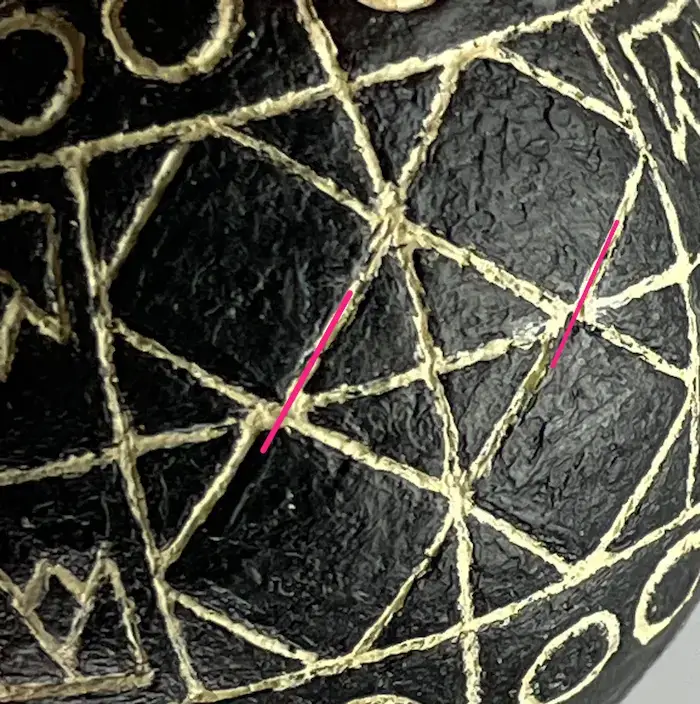
The image above left shows the relatively symmetrical lines that form the 5 diamonds on one quadrant. The image above right has two red lines that show the misaligned pattern lines used to form the diamonds on a different quadrant of the ball. These two images and the one above them show closeups of the painted surface of the ball. Its rough surface is not consistent with the smooth surfaces on early 20th-century golf balls.
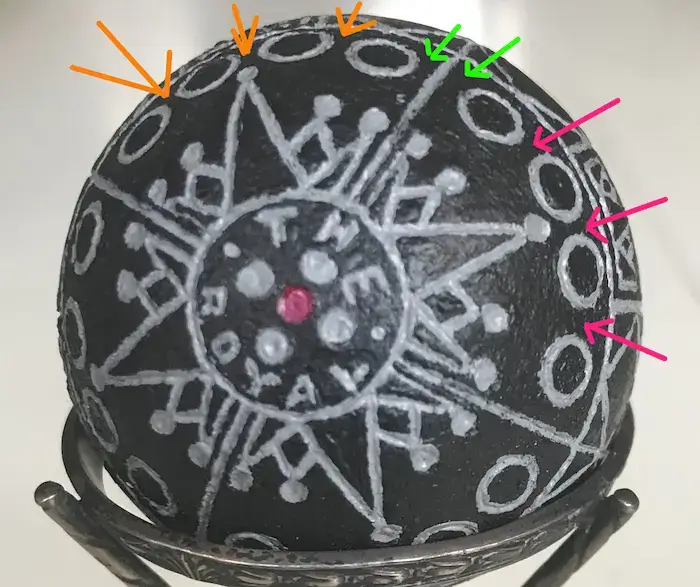
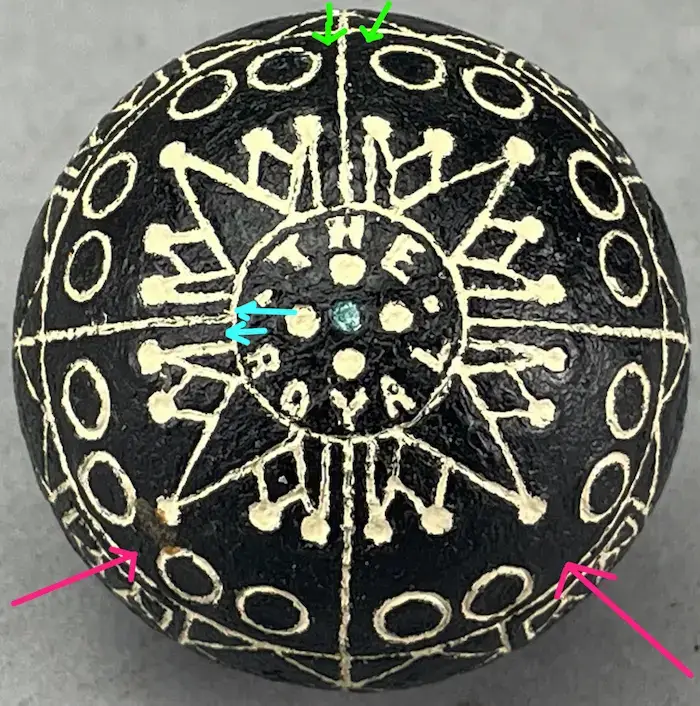
Also, as can be seen in the first of the two images above, the spacing of the circles around the perimeter of is neither consistent nor even as shown by the red and green arrows. On the second image, the blue arrows call attention to the inconsistent spacing of the spires in relation to the lines that divide the ball into four quadrants.
When the first Royal Ball above is viewed next to the second, the first ball has completely different spacing inconsistencies. On the second Royal, efforts were made to evenly space the perimeter circles as opposed to the first ball where the circles are spaced in groups of two. The “R” in Royal in relation to the crown underneath the R is different between the two balls. Plus, there are more inconsistencies.
In short, the decorative pattern on the two balls does not match, so they did not come out of the same mold. Furthermore, their patterns and are not consistent in their execution with the molded patterns on antique golf balls.
Placed next to the unpainted Aerial ball, the black-painted Royal ball has a small nick in its side. The exposed material under the paint is not consistent with the dark brown gutta percha used to make early 20th-golf ball covers (see Chapters 1-2). Instead, the material underneath the Royal’s paint appears to be the same beige color as the material used to make the cover on the Aerial and Vaile balls shown earlier.
This Royal and the Aerial and Vaile balls shown earlier all share a muted rubbery sound when lightly bounced on a hard surface.
On November 18, 2022, the Scientific Materials Testing lab of Tempe, AZ, tested the black-painted Royal ball using Fourier Transform Infrared Spectroscopy. FTIR analysis showed acrylic paint on the surface. FTIR showed that the white paint underneath the black paint bordering the chip was also acrylic paint “suggesting an acrylic primer and acrylic topcoat.” The material under the paint tested as part cis and part trans polyisoprene.
According to the report, “The Royal interior spectrum contains characteristics of both cis and trans polyisoprene.” A mixture of both cis and trans polyisoprene is most commonly consistent with synthetic isoprene per Comprehensive Polymer Science and Supplements written by Frank Bovey. In other words, according to the mixed trans/cis spectra documented by FTIR analysis, the cover on this ball is most likely synthetic rubber. It should be noted that FTIR cannot identify the difference between natural and synthetic polyisoprene, because both natural and synthetic versions have the same chemical structure.
Where FTIR testing leaves off, physical testing can take over—and there are major physical differences between organic gutta percha and synthetic polyisoprene as found in the golf ball covers I studied, specifically how they look, sound, feel, erase, cut, flex, melt, burn and smell, to say nothing of their color. Synthetic polyisoprene is petroleum-based, and the decorated cover samples that I stripped and heated up (in a spoon held by a vice) with a small propane torch, smelled like burning oil, and it was strong.
Penny Couteur, PHD, and Jay Burreson, PHD, write about cis and trans polyisoprene and golf balls in their 2004 book, Napolean’s Button’s: How 17 Molecules Changed History
“The trans isoprene polymer occurs naturally in two substances, gutta percha and balata. About 80 percent of gutta percha is the trans polymer of isoprene. (When harvested, gutta percha also contains resins, pigments, moisture, and impurities with little to no cis present, JBE.) Both gutta percha and balata can be melted and molded, but after exposure to the air for some time, they become hard and hornlike. As this change does not occur when these substances are kept under water, gutta percha was used extensively as underwater cable coating during the late nineteenth and early twentieth centuries […]
“The peculiar properties of gutta percha and balata are probably most appreciated by golfers…. In 1848 the gutty was introduced. Made from gutta percha that had been boiled in water, molded into a sphere by hand (or later in metal molds), and then allowed to harden, the gutty quickly became popular. But it too had disadvantages. The trans isomer of isoprene tends to become hard and brittle with time, so an old gutta percha golf ball was likely to break up in midair. The rules of golf were changed to allow play to continue if this happened by substituting a new ball at the position where the largest piece of the old ball had fallen. At the end of the nineteenth century, isoprene’s cis isomer also invaded golf when a ball with rubber wound around a gutta percha core was introduced; the cover was still made of gutta percha.” [Penny Couteur & Jay Berreson, Napolean’s Button’s: How 17 Molecules Changed History (Tarcher, 2004), 147-148.]
“Thus gutta percha and balata, trans isoprenes, are hard, inflexible masses, while rubber, the cis isoprene, is a flexible elastomer.” (Ibid, 151)
Synthetic polyisoprene was first sold as a commercial product in 1960 by the Shell Chemical Company. A few years later, synthetic balata (and Surlyn, a synthetic resin) took over for the organic stuff in the production of golf ball covers. Today, synthetic polyisoprene is widely used in the world of molded goods to make tires, rubber bands, engine mounts, belts, hoses, shoe soles, and much more.
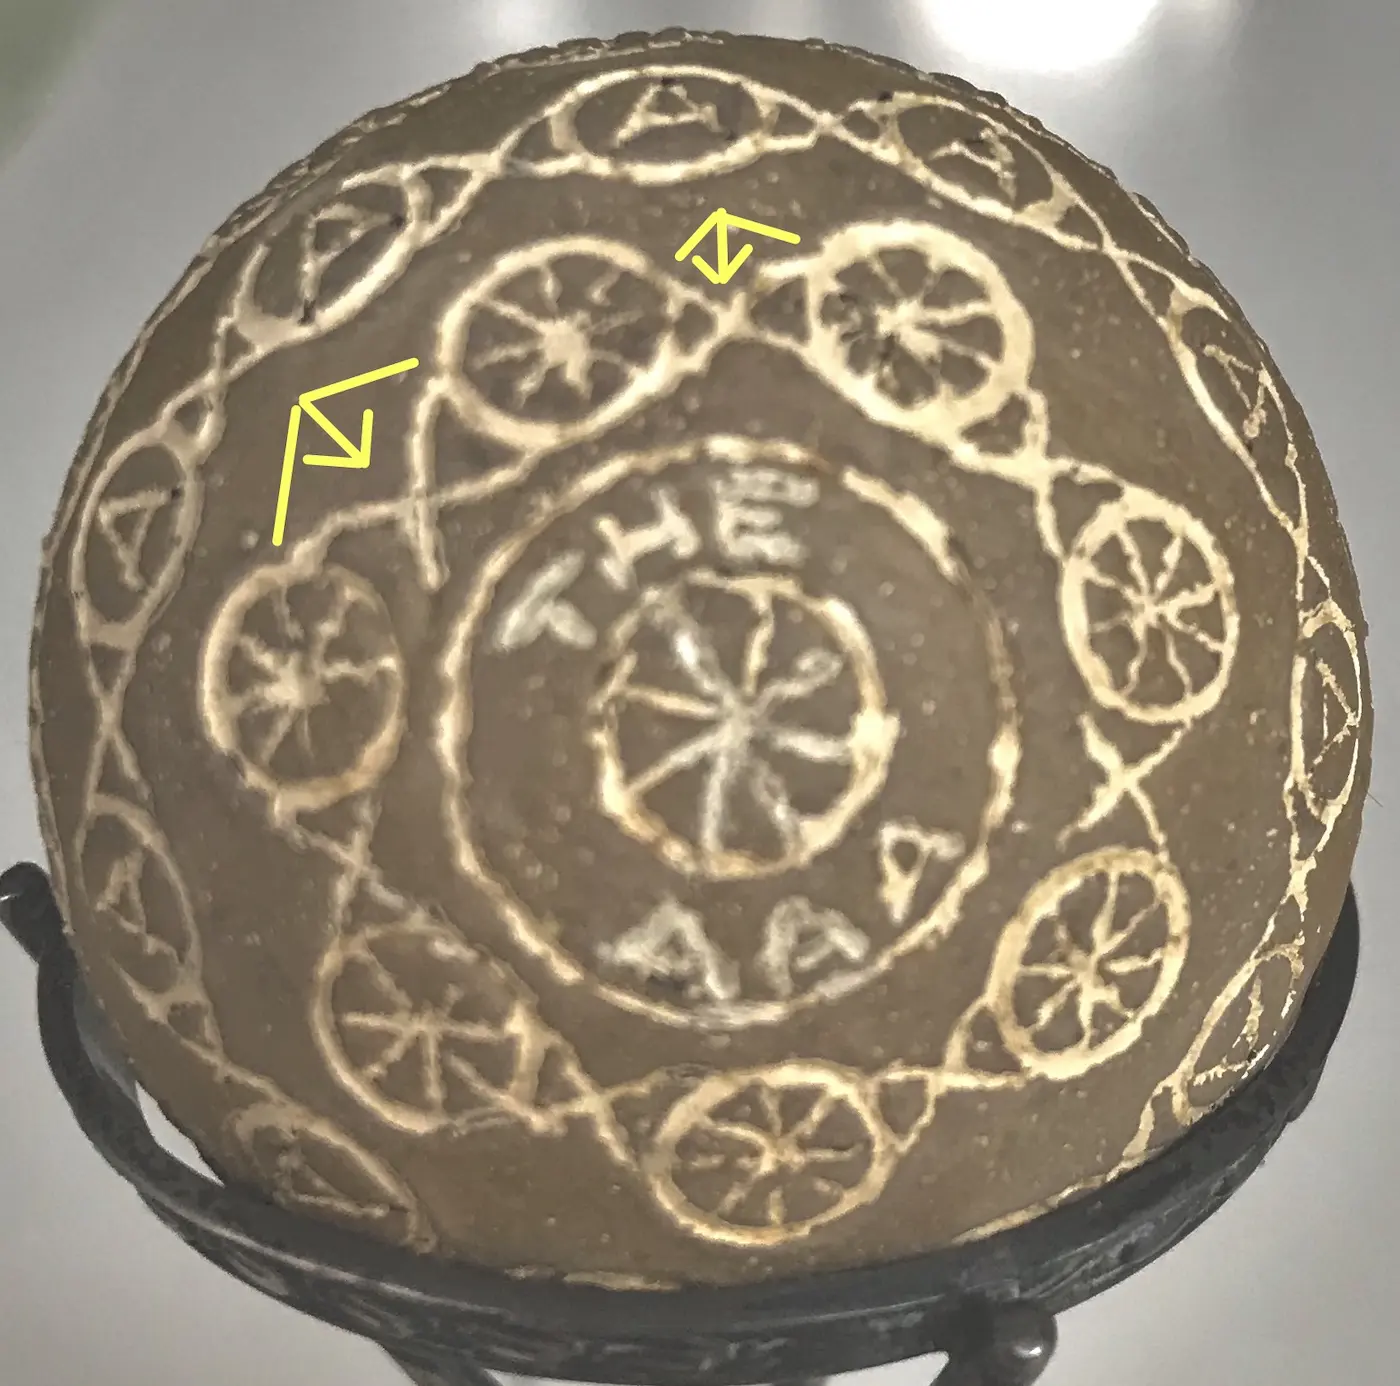
The yellow arrows and lines in the AAA ball shown above call attention to the inconsistent spacing between a number of the wheels. The brown unpainted portion of the surface on this AAA ball appears to match the brown unpainted portion of the surface of a Vaile ball shown earlier and again below.
For the record, I have never seen any reference to an AAA ball with this pattern in either the 19th or 20th-century literature of the game, nor have I ever seen or heard of any verifiable antique ball with this pattern.
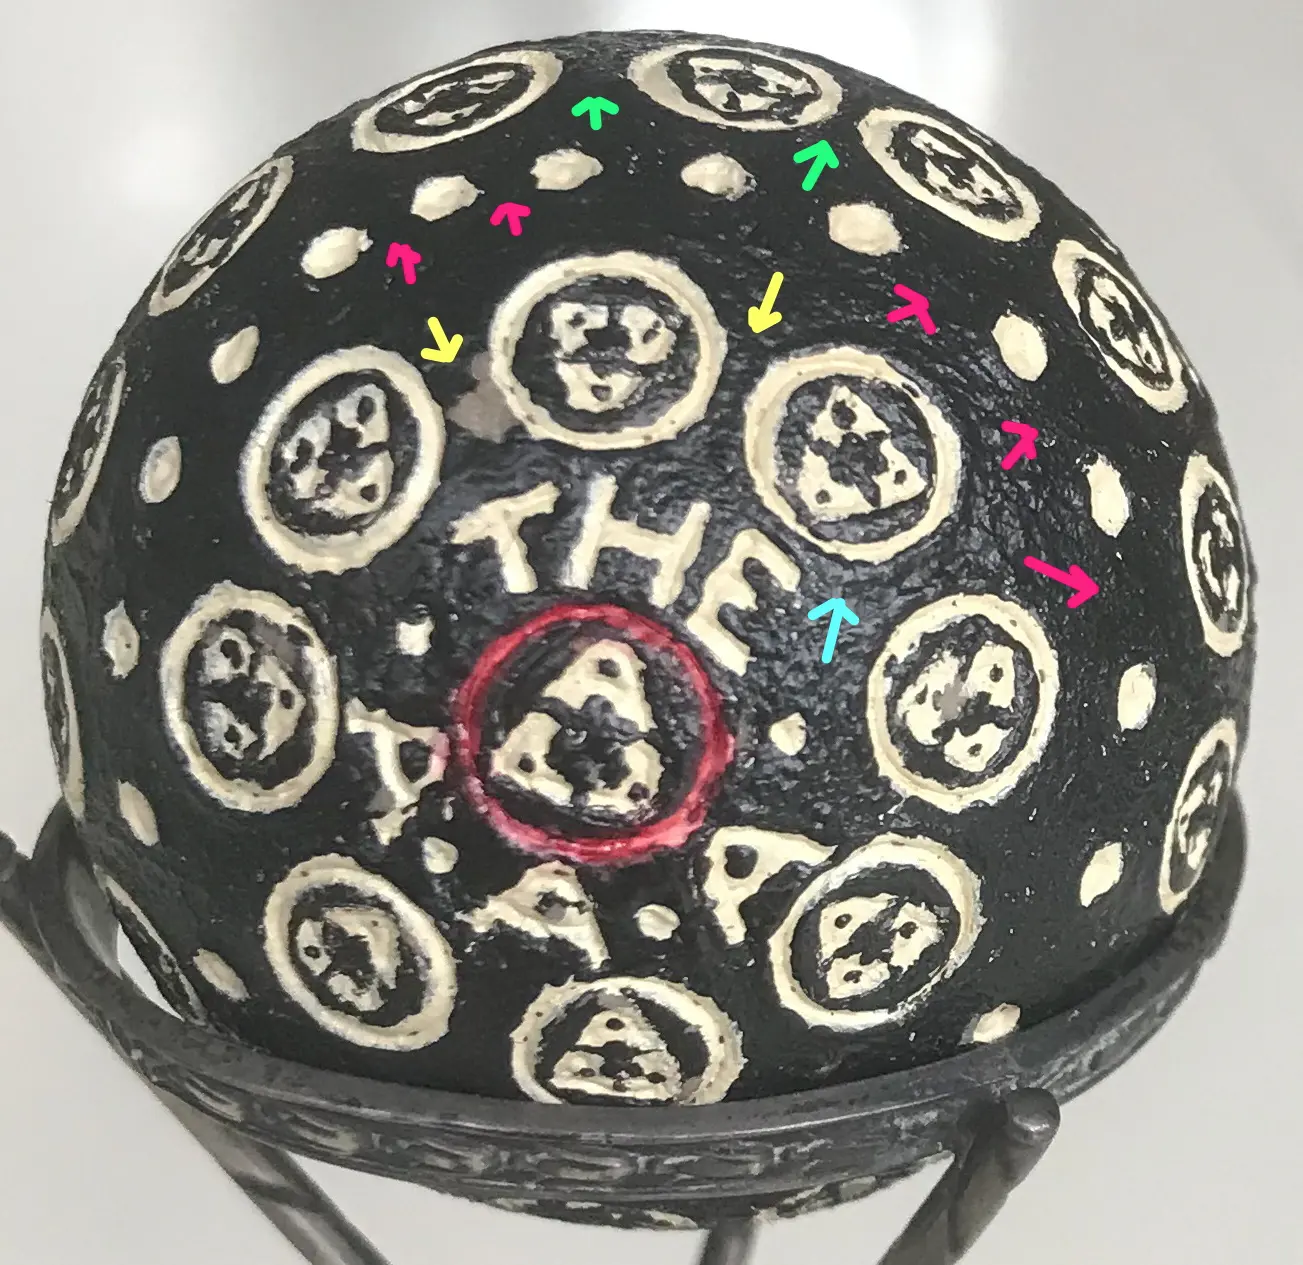
The red arrows on this AAA ball call attention to the uneven spacing between the dimples. The green and yellow arrows call attention to the uneven spacing between the circles. The left yellow arrow also points to what appears to be beige material where the black paint has chipped off. See the New Hawk (exposed chip in paint), Aerial, Vaile, Why Not, and Royal balls for similar beige material.
The blue arrow calls attention to what appears to be a raised surface around the stamped circle. The light must be just right to see such an anomaly as is found on a Royal ball presented earlier.
Below is the same image as shown above without the arrows, so the inconsistent spacing of the dimples is easier to see.
For the record, I have never seen any reference to an AAA ball with this pattern in either the 19th or 20th-century literature of the game, nor have I ever seen or heard of any verifiable antique ball with this pattern.

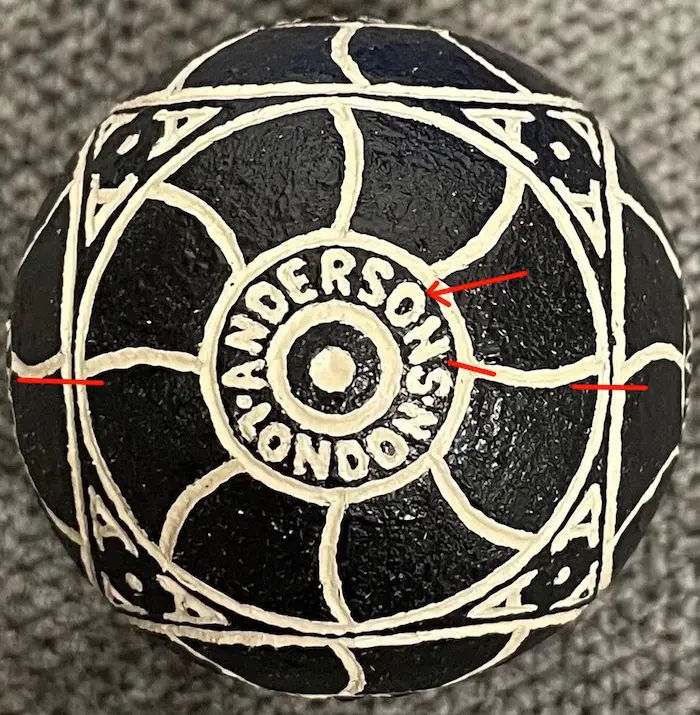
Once again, two different black-painted balls have patterns that do not match. The red lines point out a few of the anomalies that deal with more than just paint. Underneath the paint the lines on the first ball (Image 1) do not appear to be as deep or wide as those on the other ball (Image 2). The ball on the left sold on eBay in 2019 and the other was offered on eBayUK in 2023.
For the record, I have never seen any reference to an Anderson ball with this pattern in either the 19th or 20th-century literature of the game, nor have I ever seen or heard of any verifiable antique ball with this pattern.

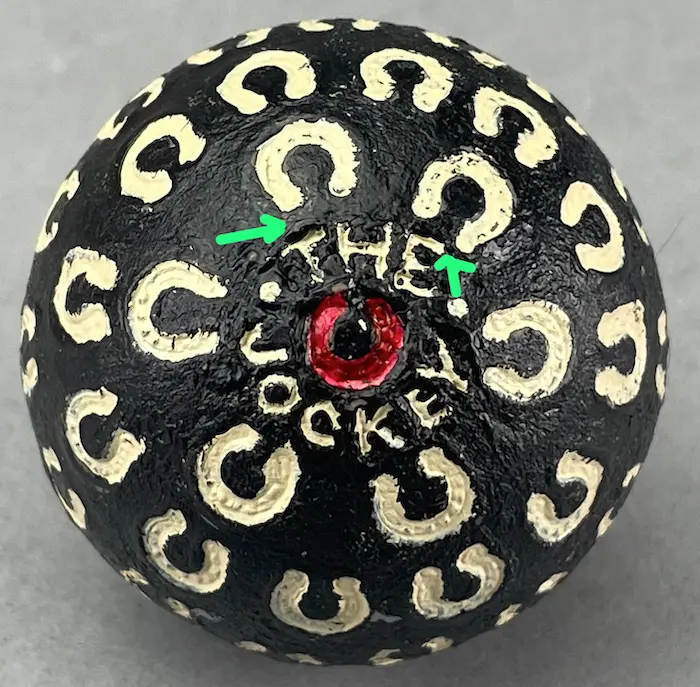
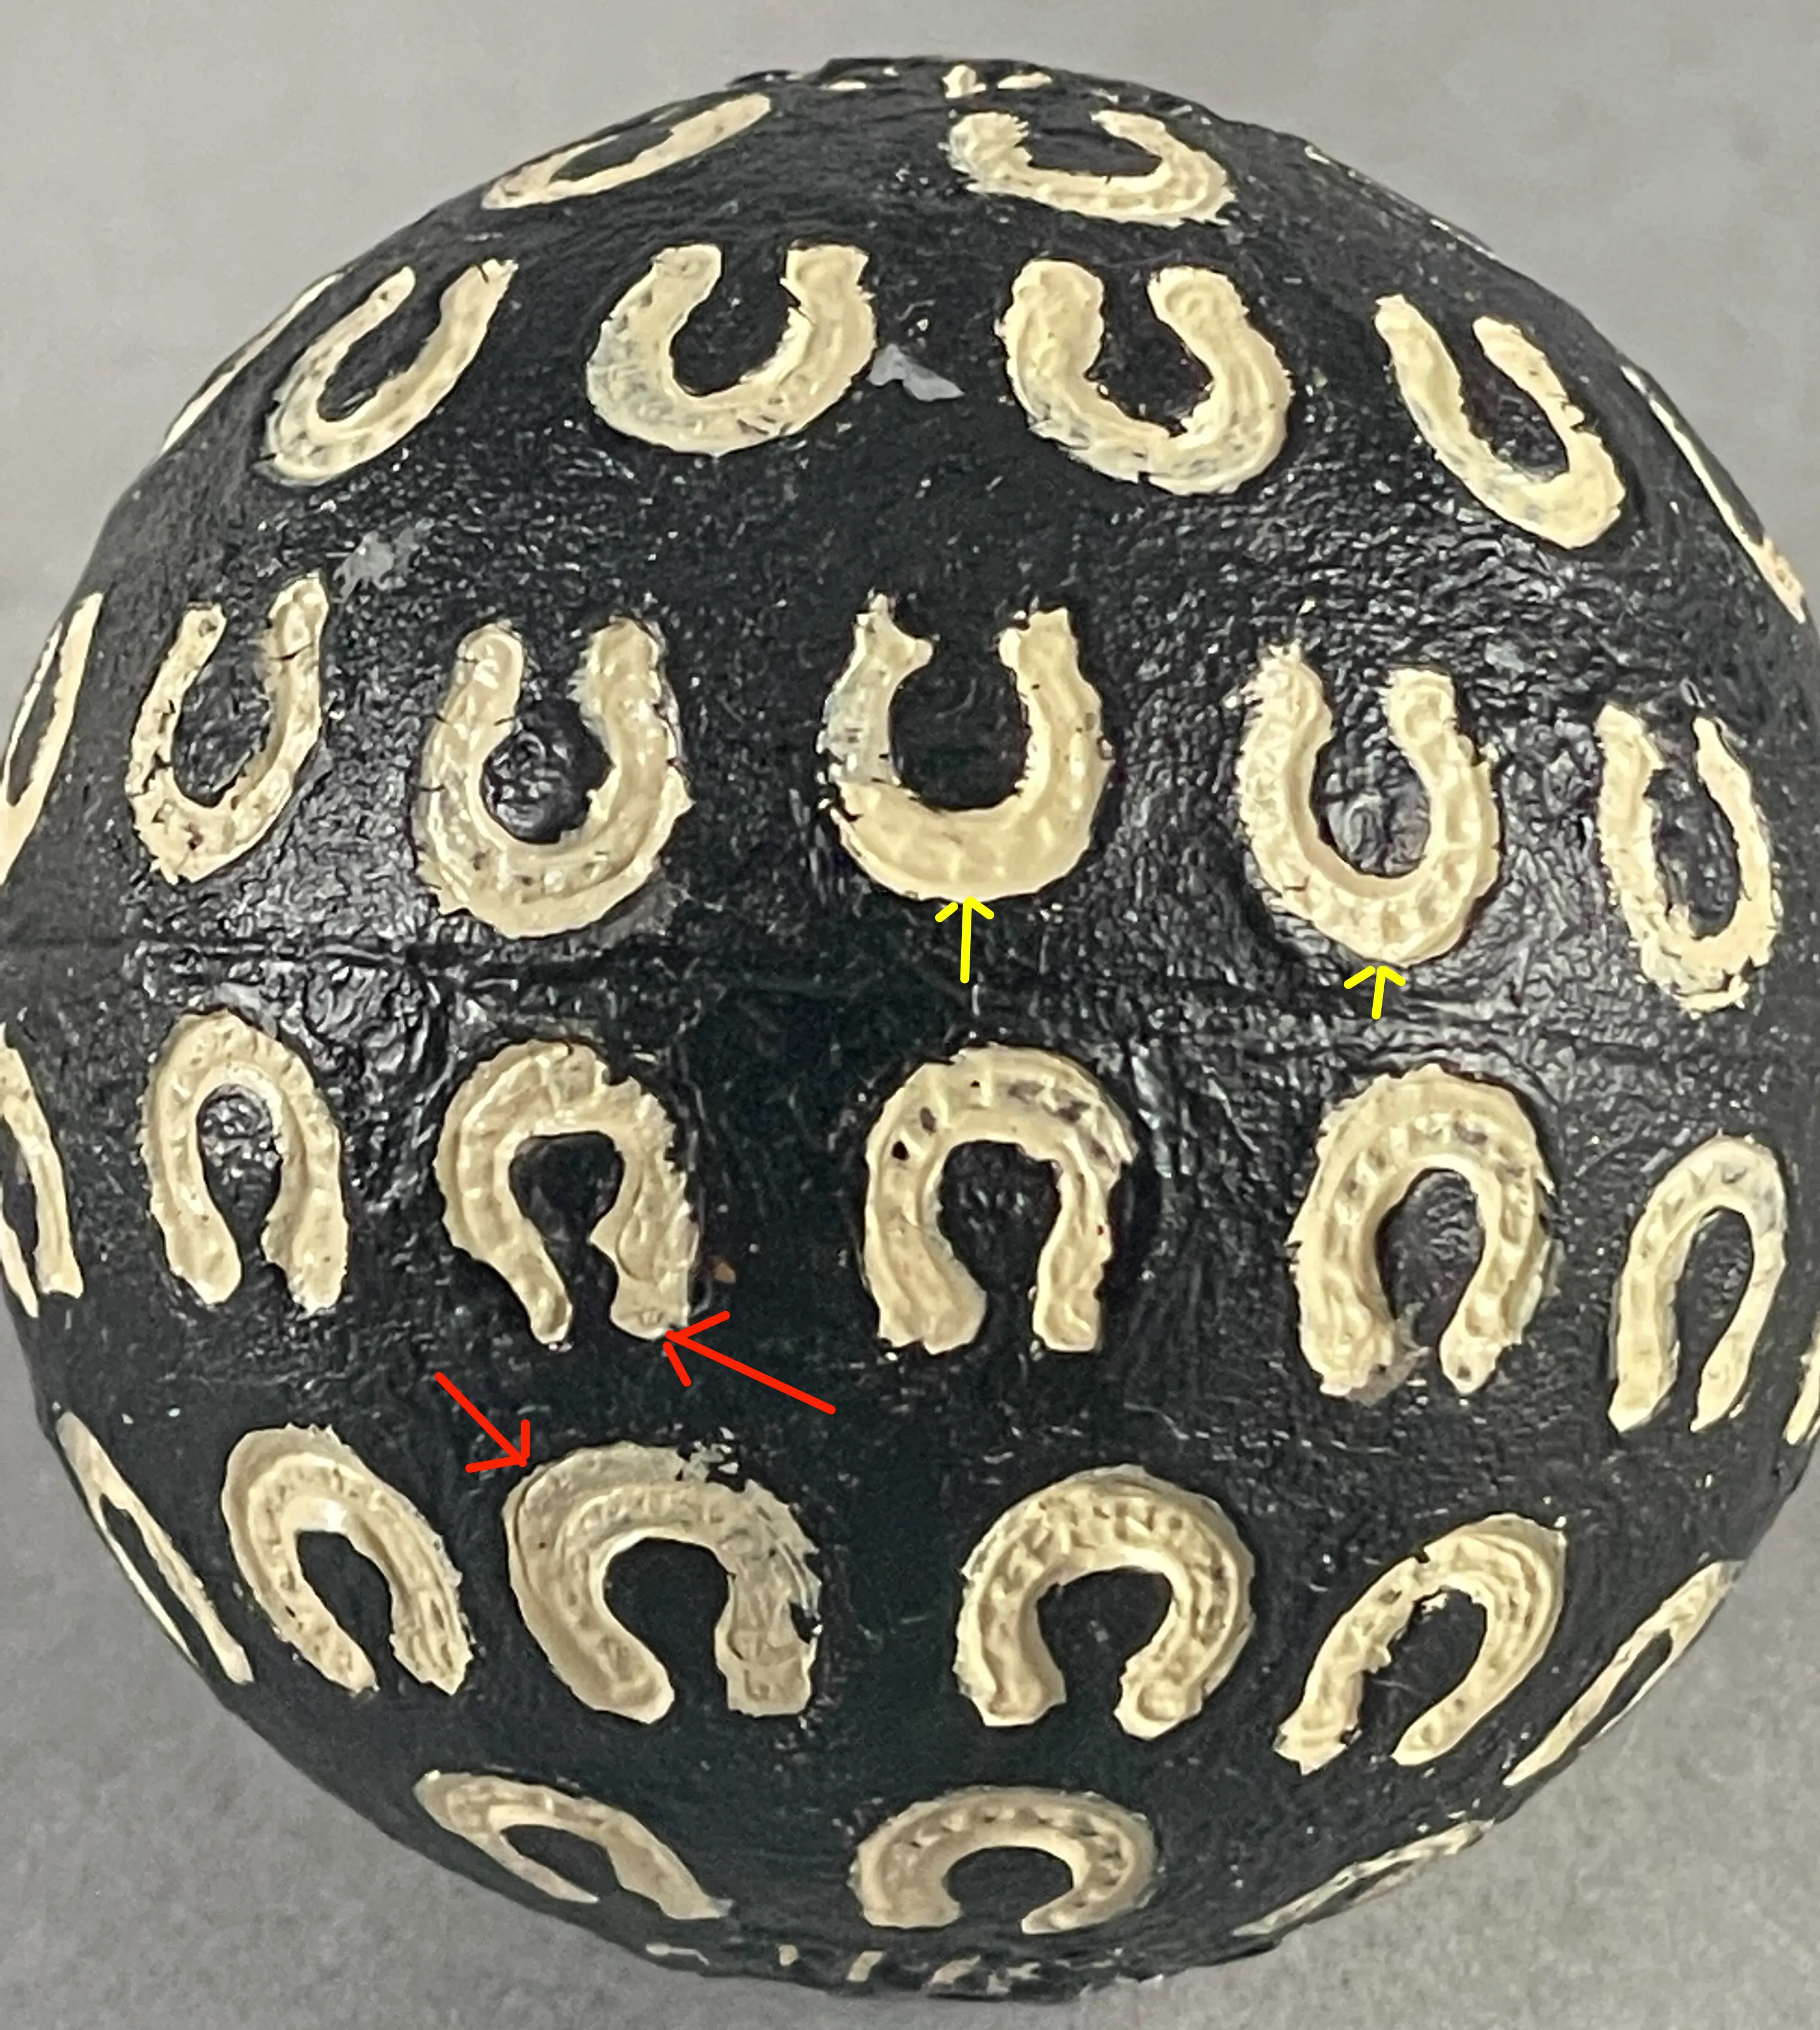
This black ball possesses several anomalies. Both poles have inconsistent spacing between the horseshoes and the lettering. A double-stamped horseshoe is shown second from the left in the image below.
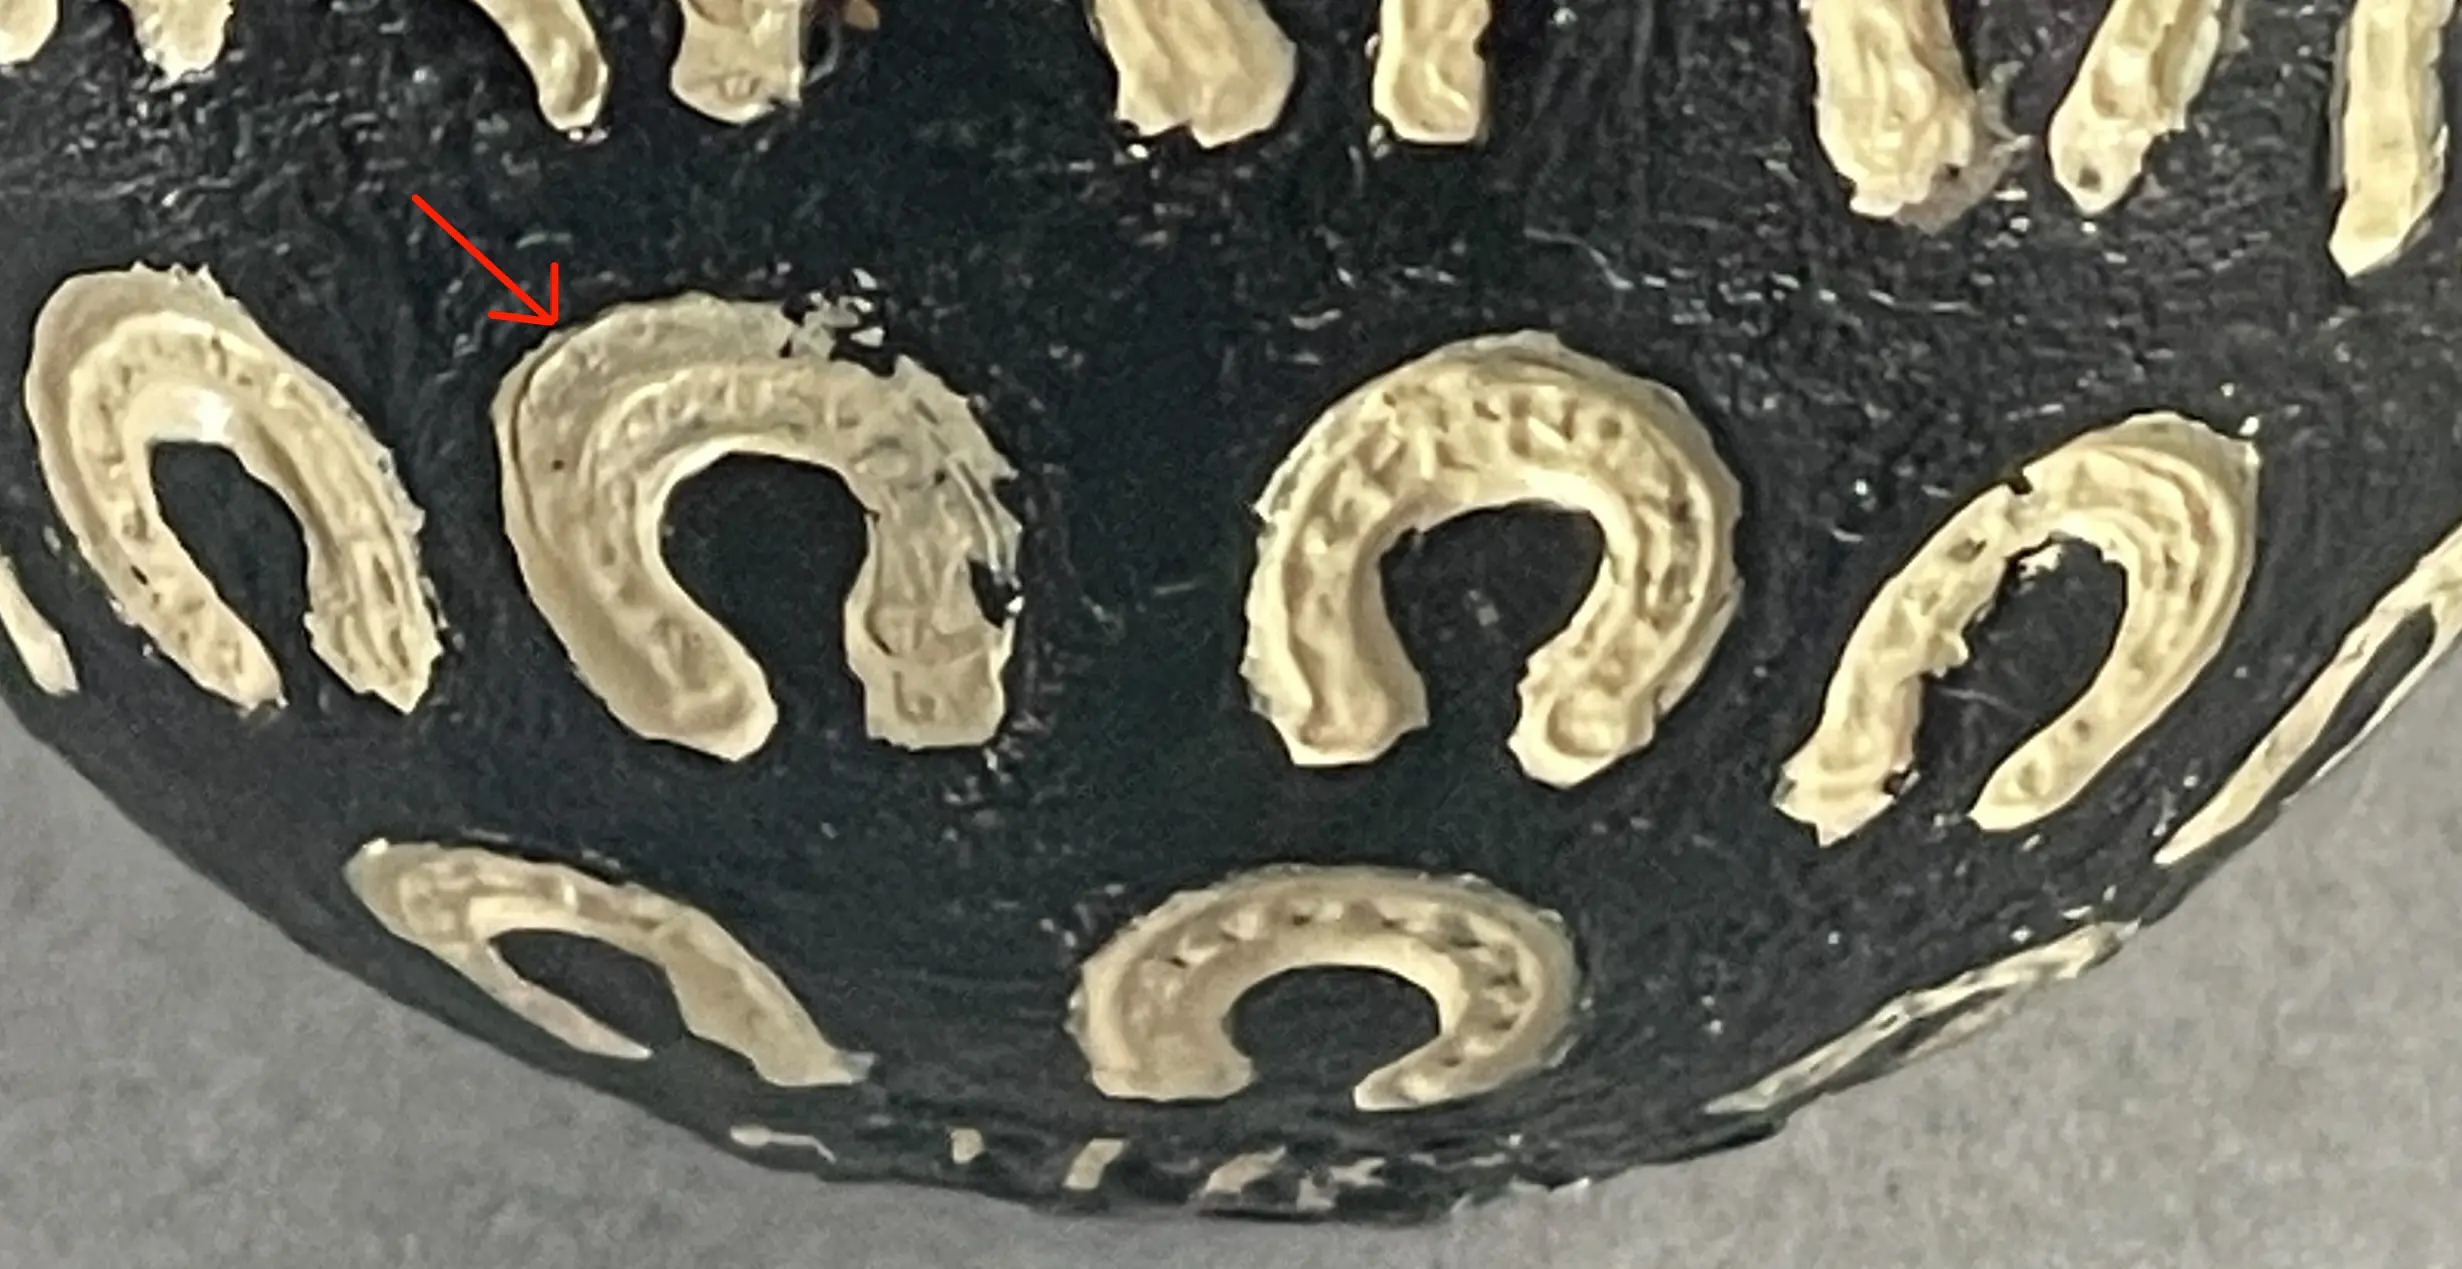
Above and to the right, the horseshoes appear to have a raised outline around them, which can be seen only if the light is at the right angle.
This is consistent with stamping, not molding, a design into the cover. As the stamp presses into the ball, it displaces the material underneath
it which then rises around and above the perimeter of the stamped design.
The horseshoes are not evenly spaced or even at the same height when viewed from one to the next around the circumference of the ball, nor are
they all oriented correctly.
As shown in the image to the right, the two horseshoes third from the left in the second and third row from the bottom have the paint-filled
remains of a second horseshoe stamped underneath.
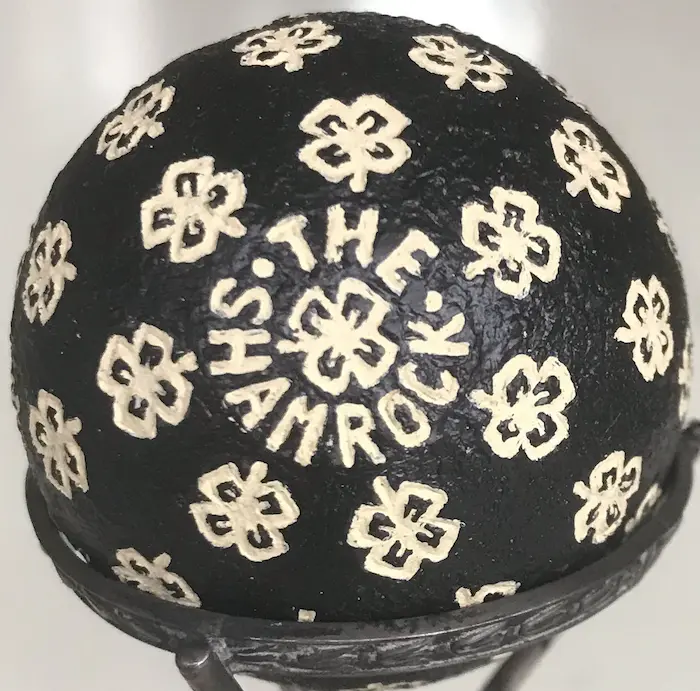
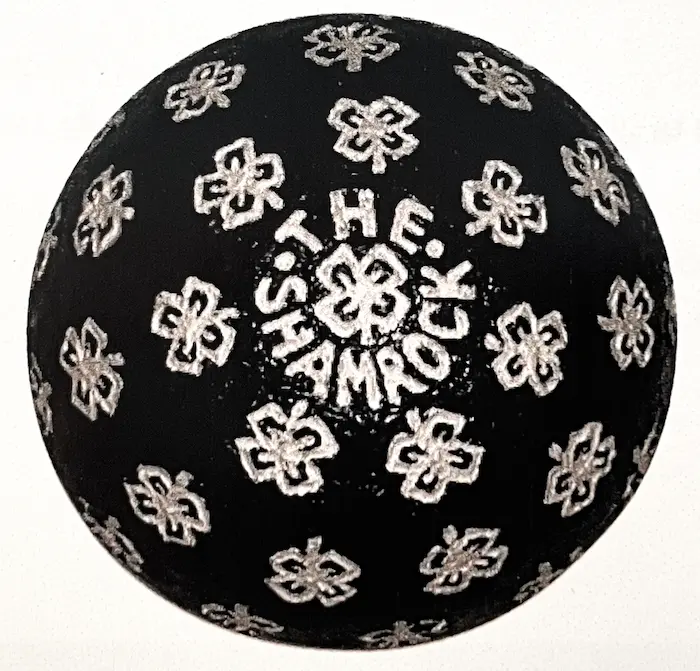
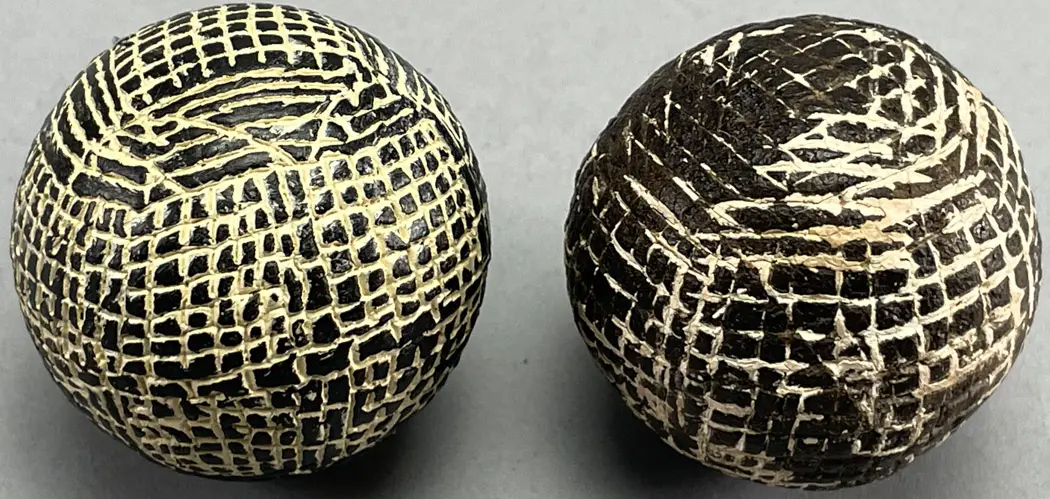
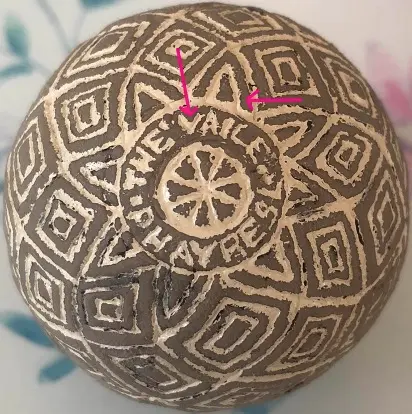
These black-painted Shamrock balls do not match. The 4-leaf clover in the center has its stem pointing to the left while the other has its stem pointing down. In addition, the clovers on each ball are not in the same location. This is easily seen if one just looks at the clovers closest to the “T” and the “H” in “THE” as well as the rest of the letters in the name. Furthermore, the names and shamrocks are different sizes. The name on each ball above is on only one pole.
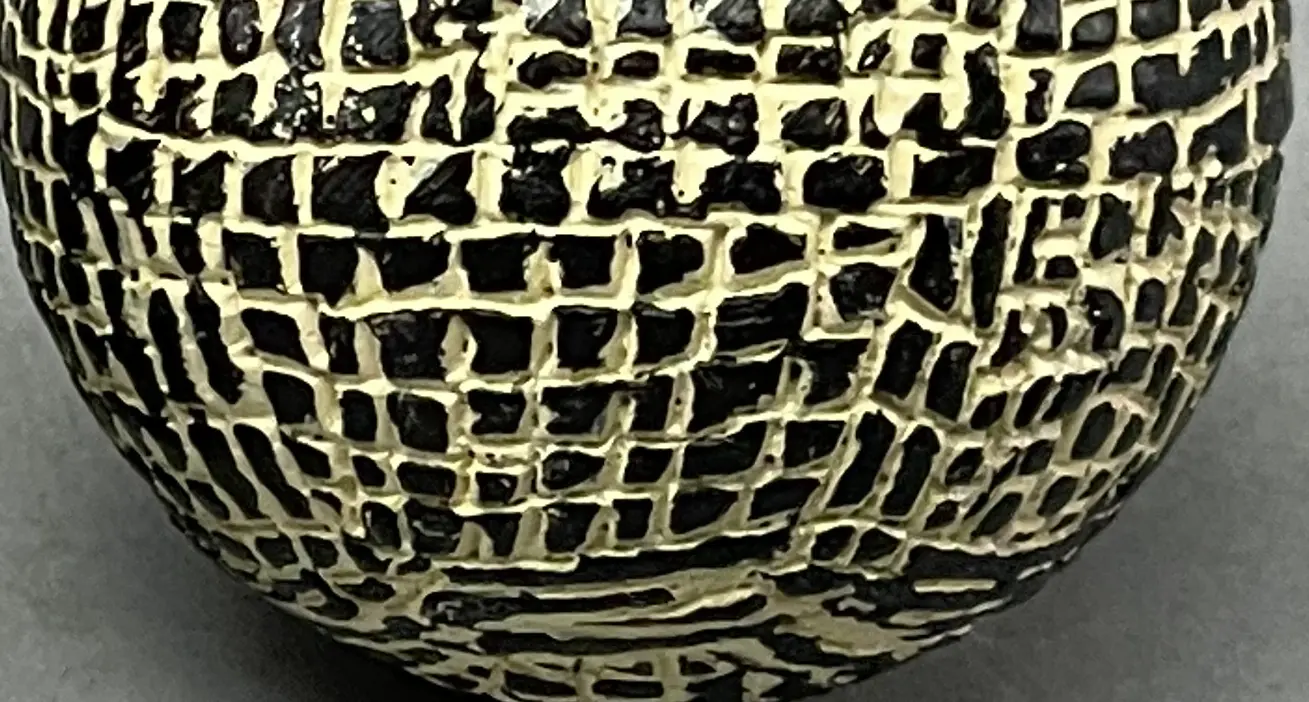
Shown below are the reverse poles of two additional Shamrock balls. The first ball here is marked “Shamrock Ball” in a ring that matches the one on its reverse pole, marked “Mitchell Manchester.” Both balls are different from the two shown above. Notice the raised perimeter around the shamrock as shown by the red arrow below. This is not normal. See 3.4 and 3.10 to learn how this indicates that the shamrock design was stamped, not engraved in place.
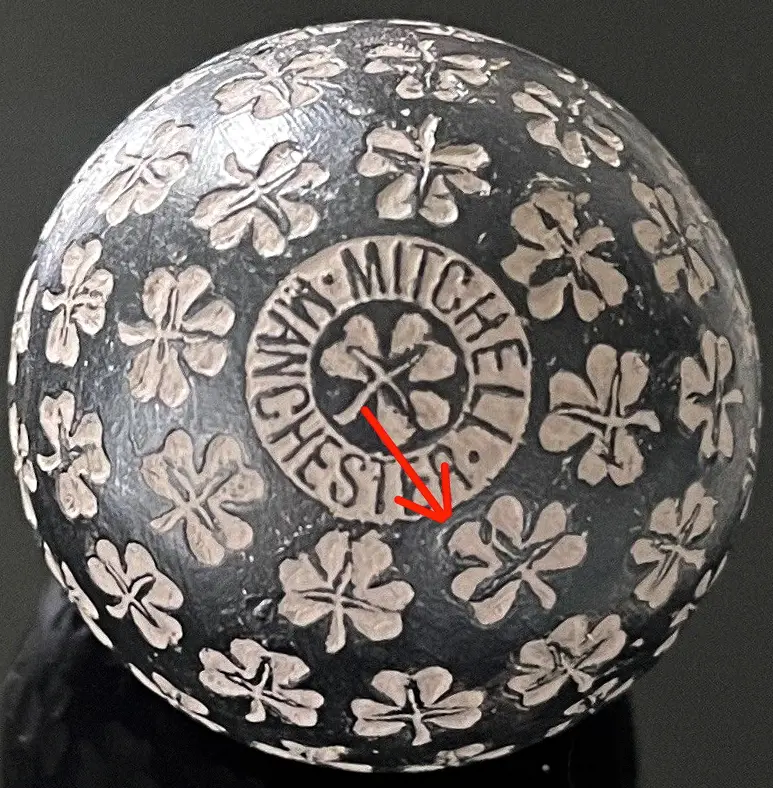

One of these appears to be painted black (Image 1). The other (Image 2) appears to be unpainted “white gutta percha” (white gutta percha is often yellow in color, not white—see 1.2). The crazing and cracking on its surface, easily seen to the immediate right of the name circle given a closeup view, is clear evidence confirmed by the plastic look of the cover that the cover is made from gutta percha. Once again, in keeping with many of the black balls that I have reviewed, the name is bigger on the black ball than it is on the unpainted ball, both of which have the same “Mitchell Manchester” name layout on their respective poles. (For more on such name/pattern size differences, see 2.1 Stars & Stripes.)
To review, the three black shamrock balls all have different patterns and none of them match the pattern on the Shamrock ball in Image 2 with the unpainted gutta percha cover.
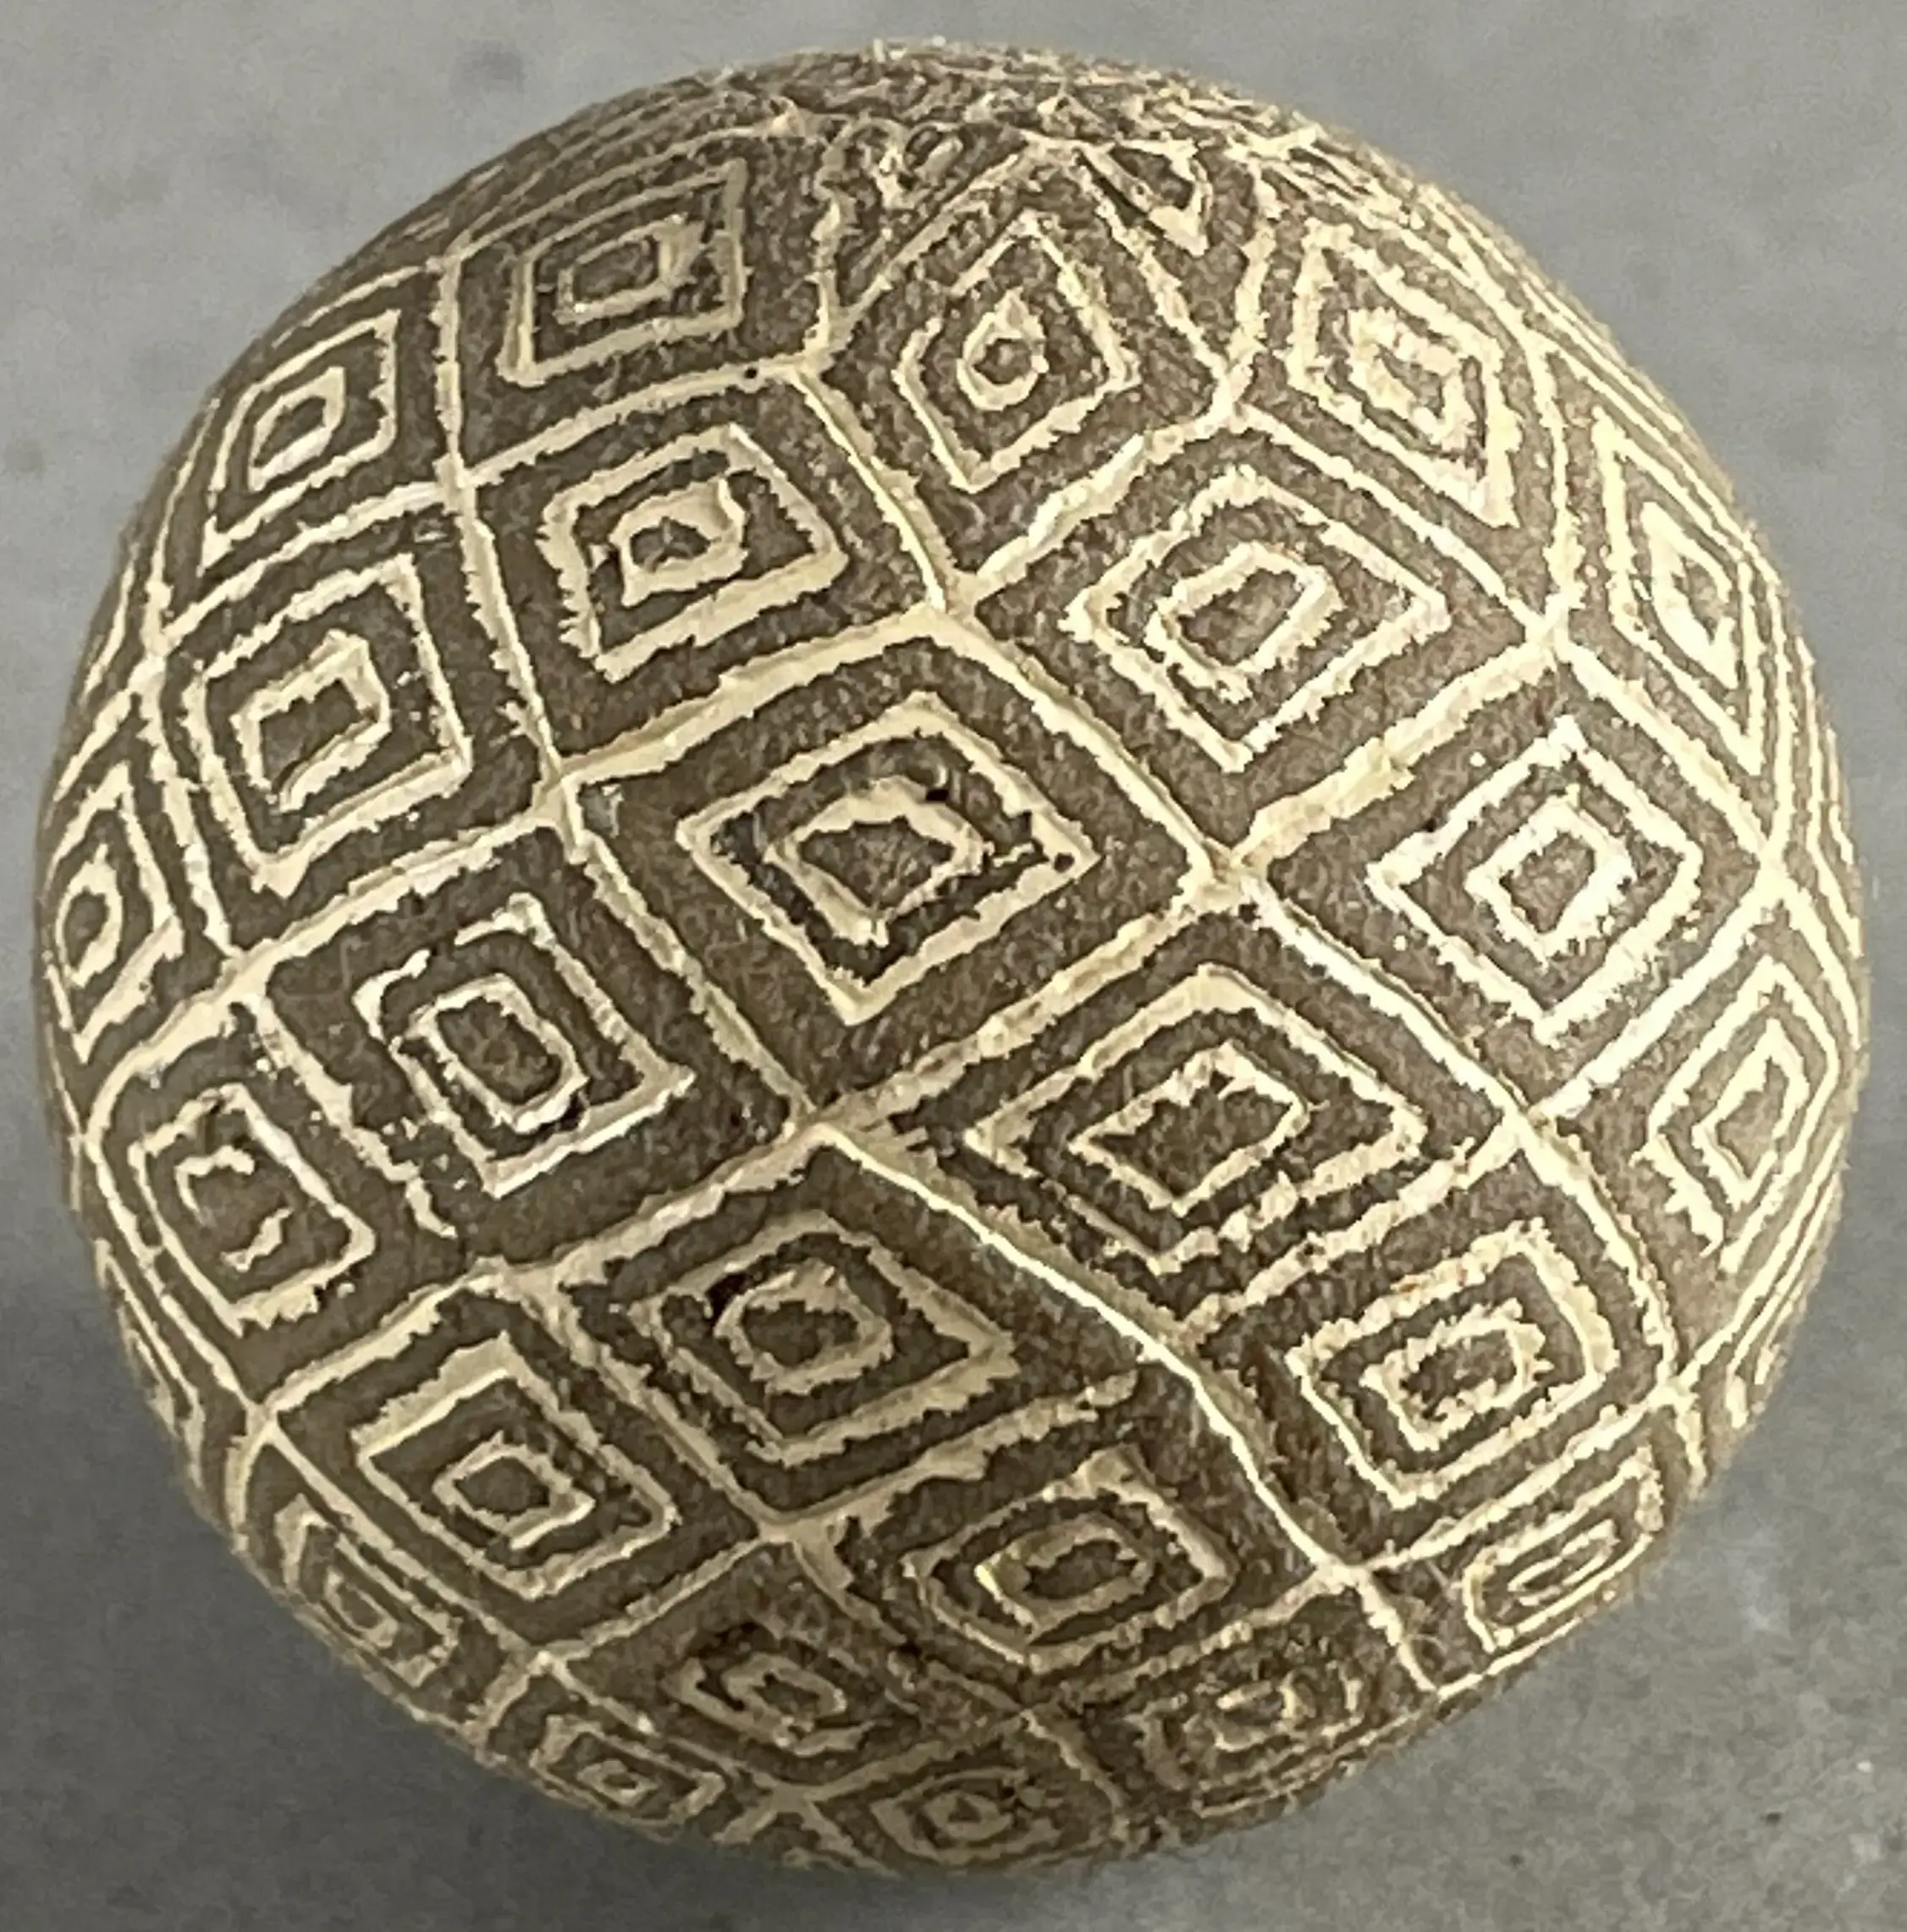
If unsure that a ball is recently painted black, rub that ball on a clean sheet of white paper to see if black paint rubs off. Rubbing a black-painted ball on white paper will usually leave black marks, especially if it has been painted in the last few years. Also, the cover will look like its painted when viewed under a loupe. Worn, oxidized, or distressed gutta percha can leave dark brown marks if rubbed on paper. If in good condition, the gutta percha will leave no marks. If the cover is bare gutta percha, it will typically have evidence of crazing, etc. when viewed with a jeweler’s loupe.
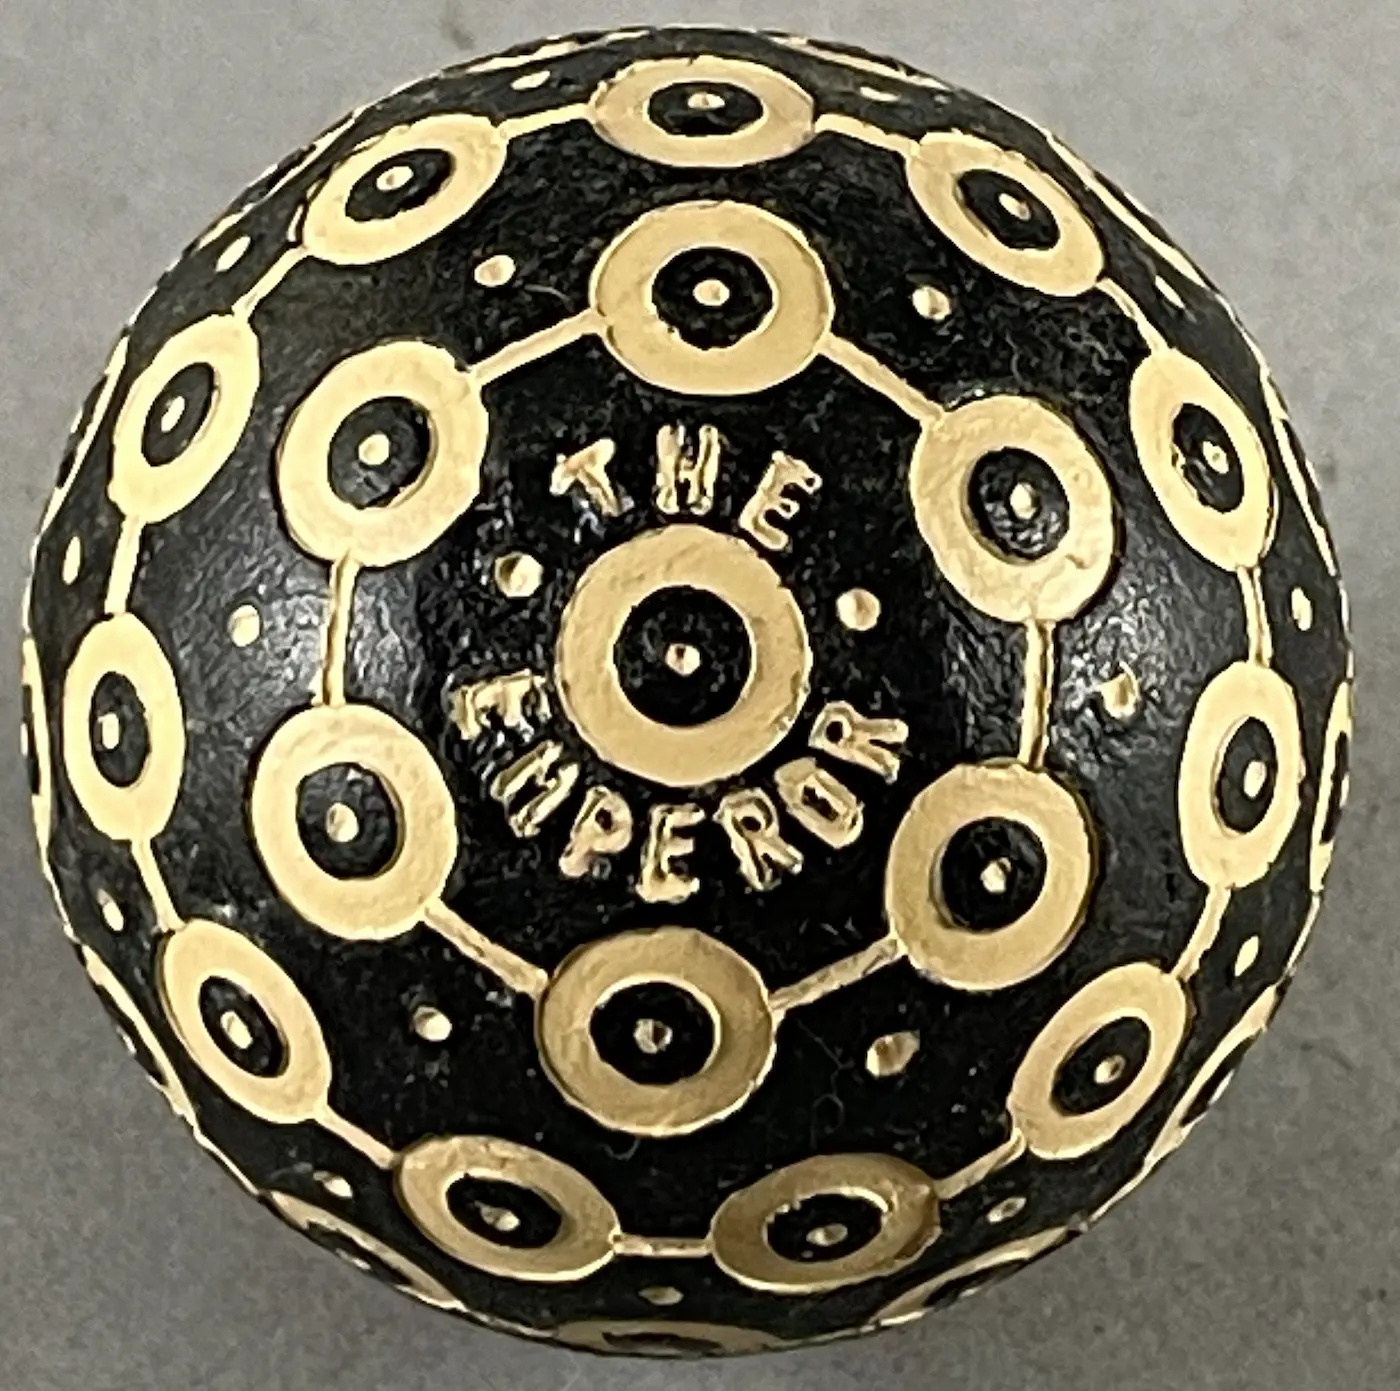
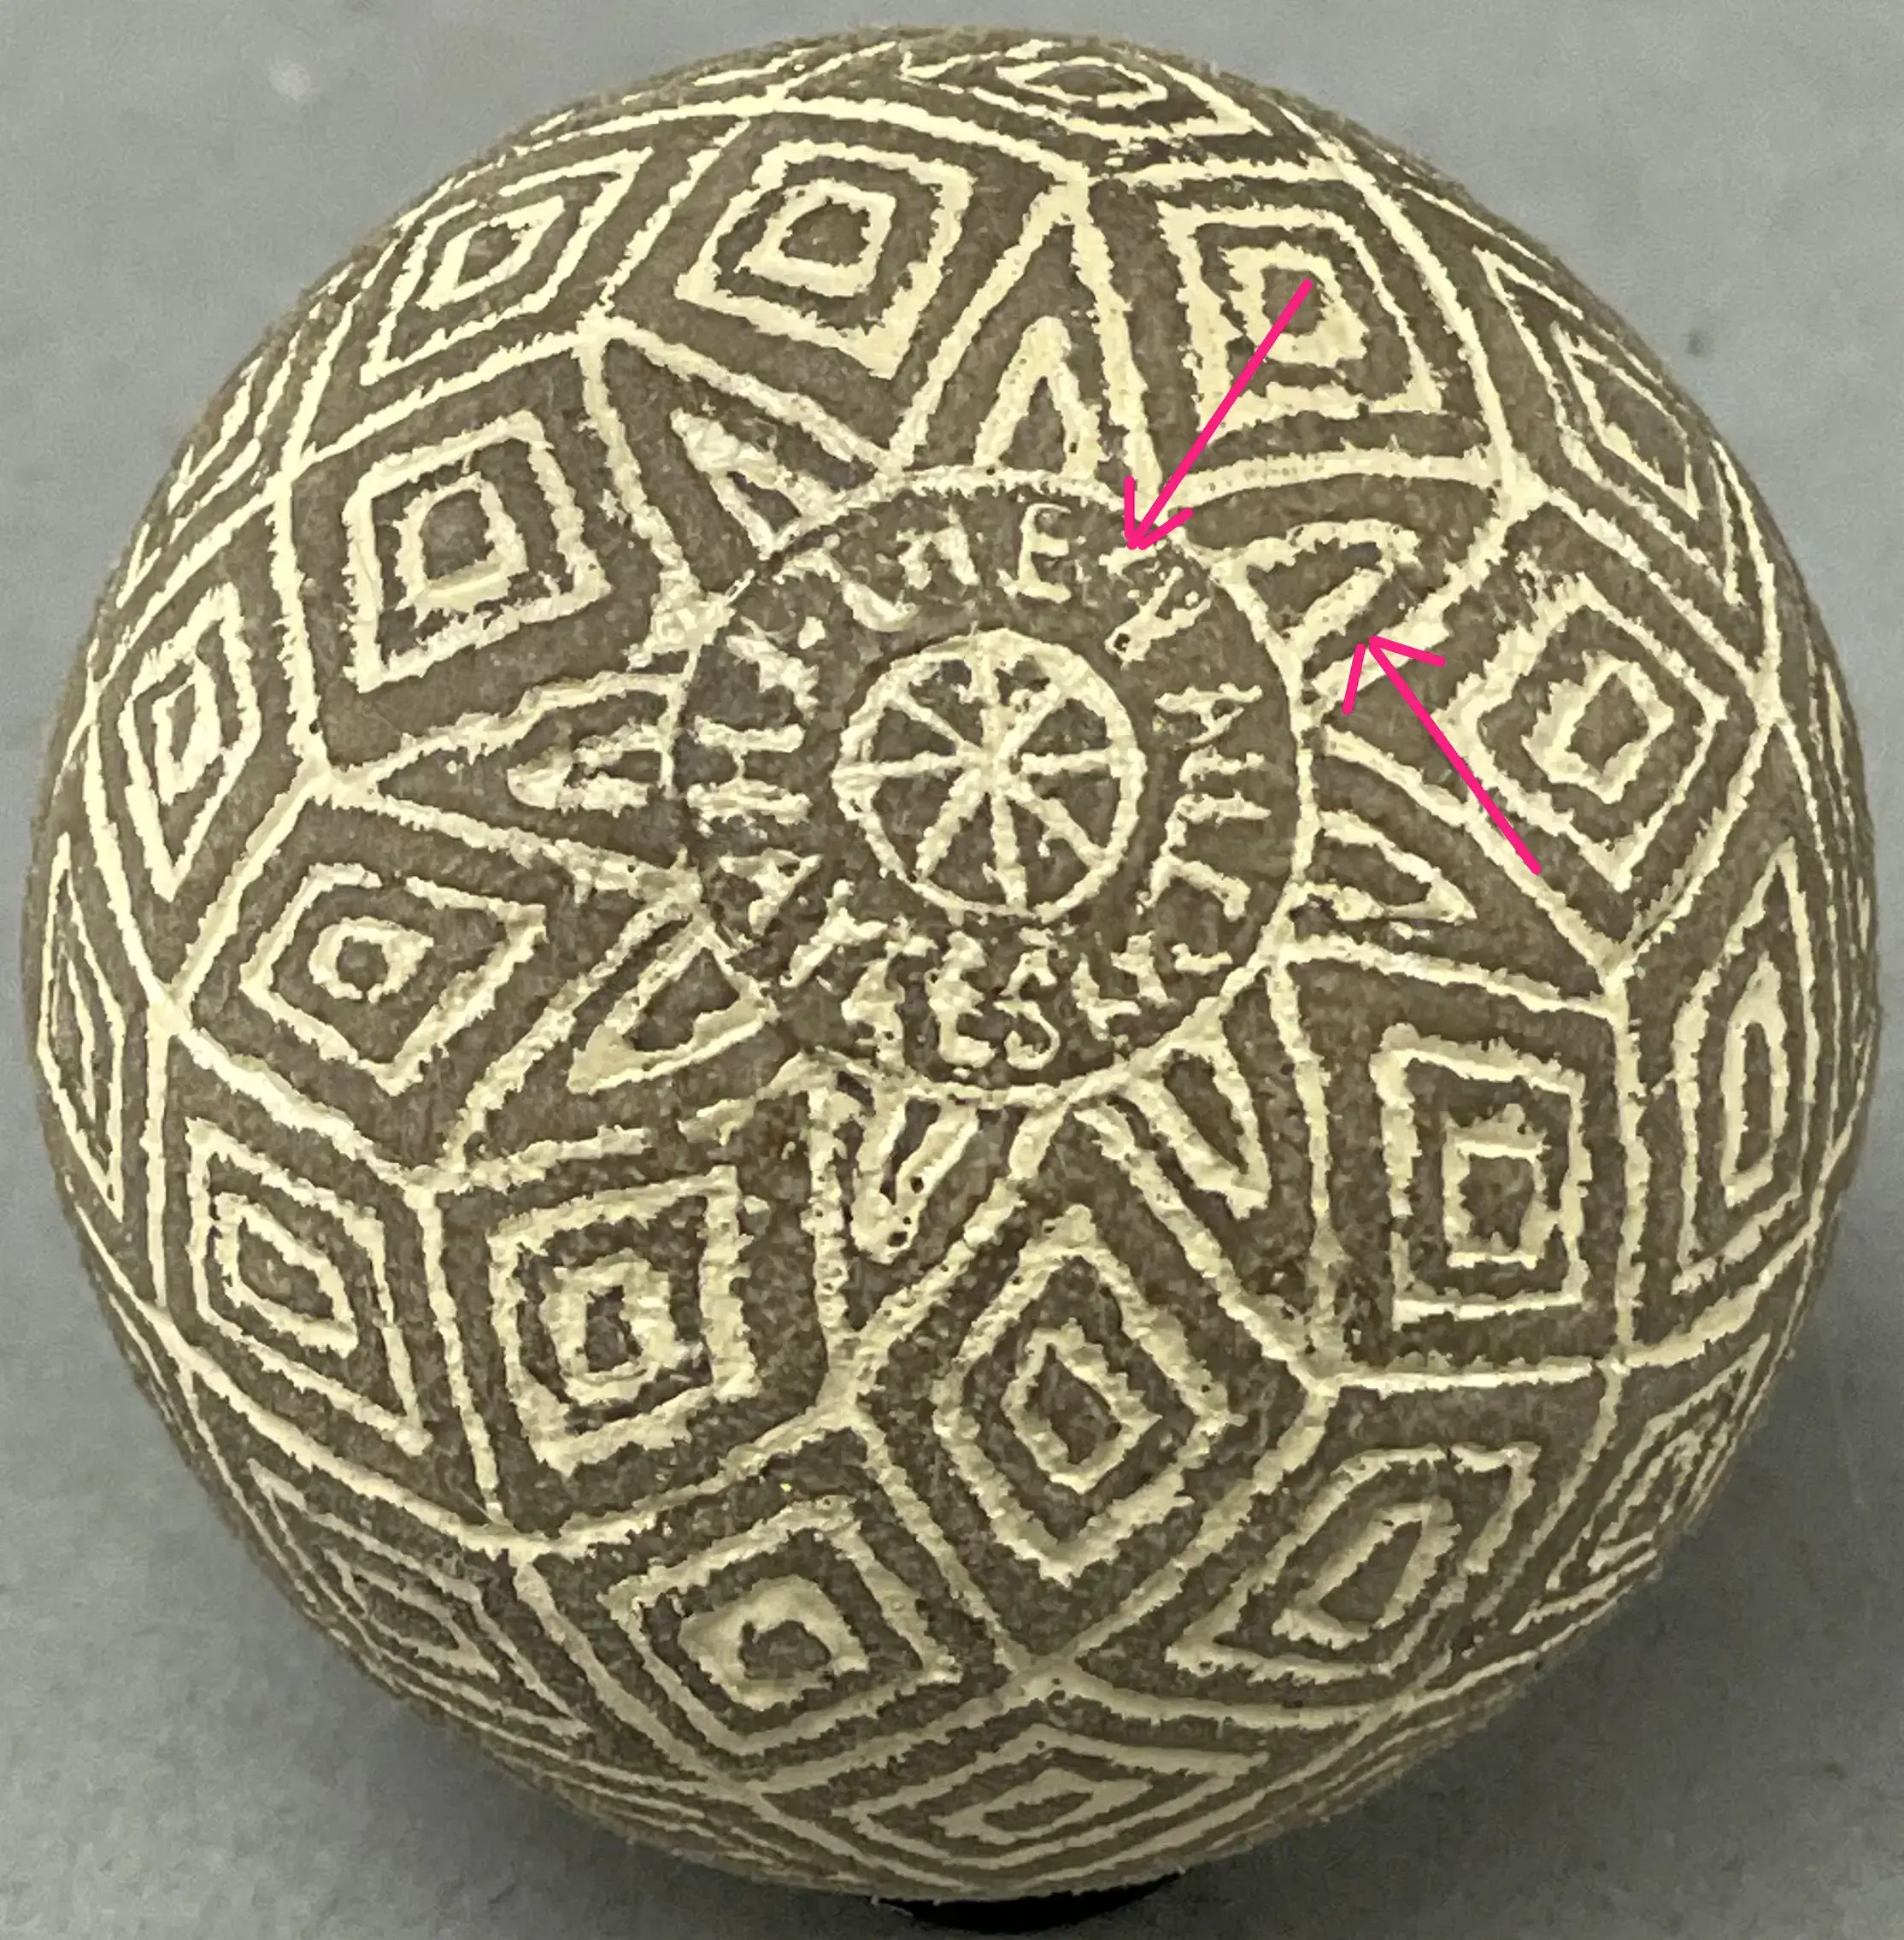
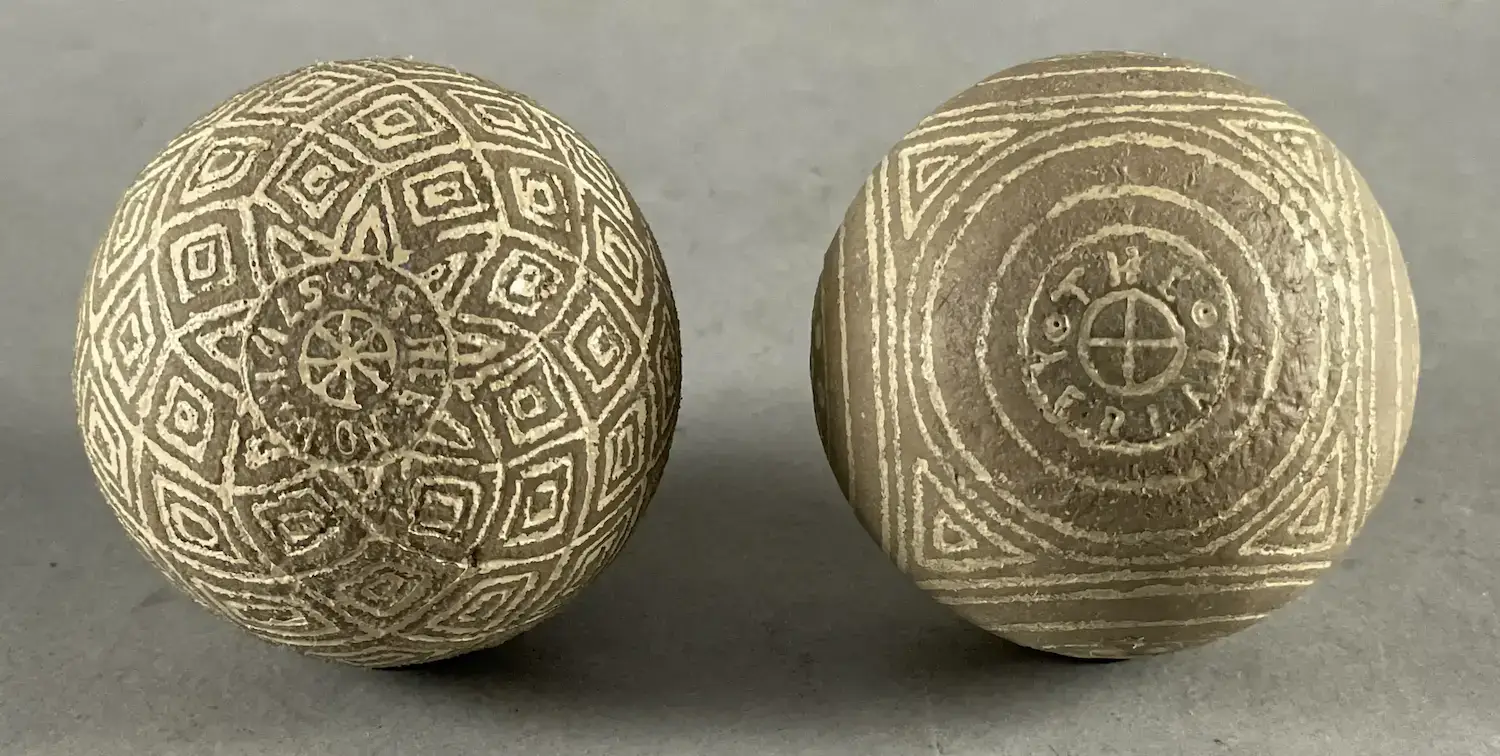
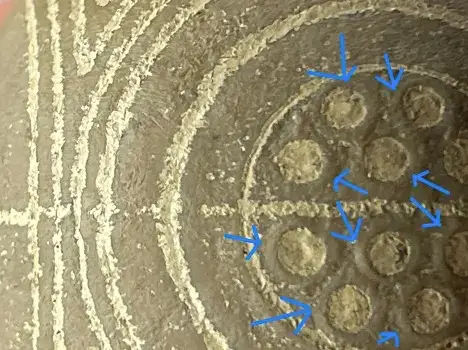
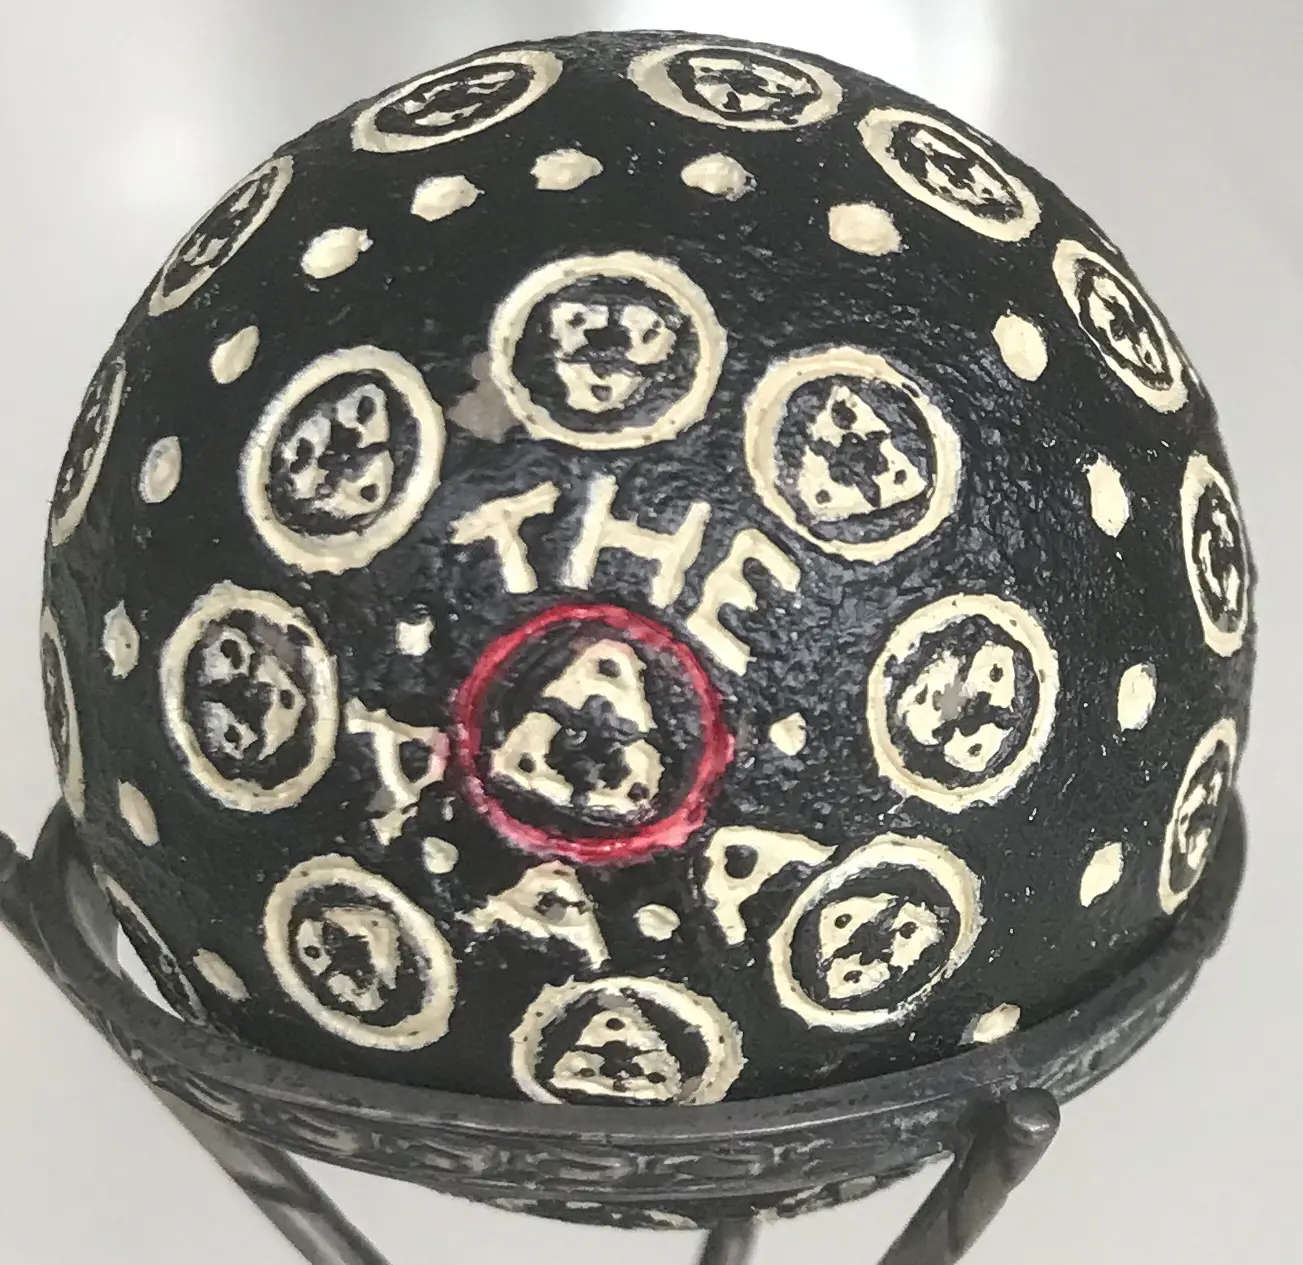
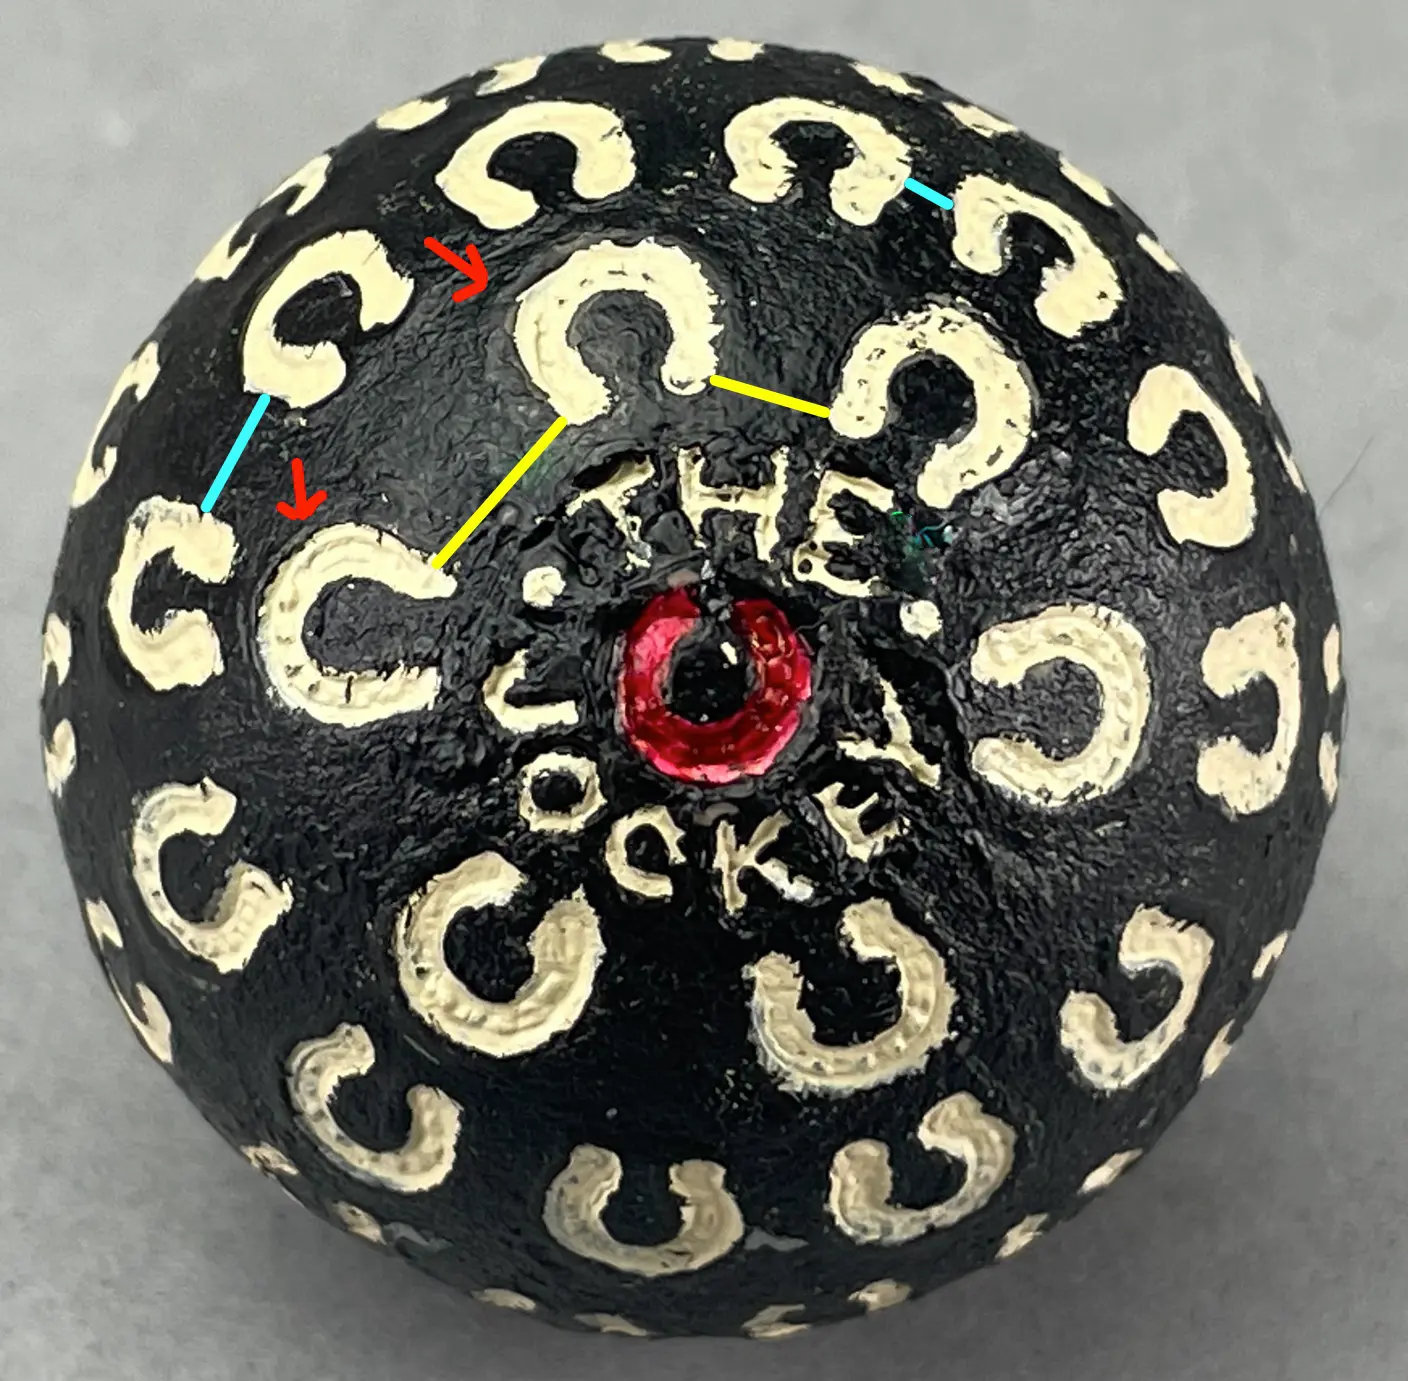
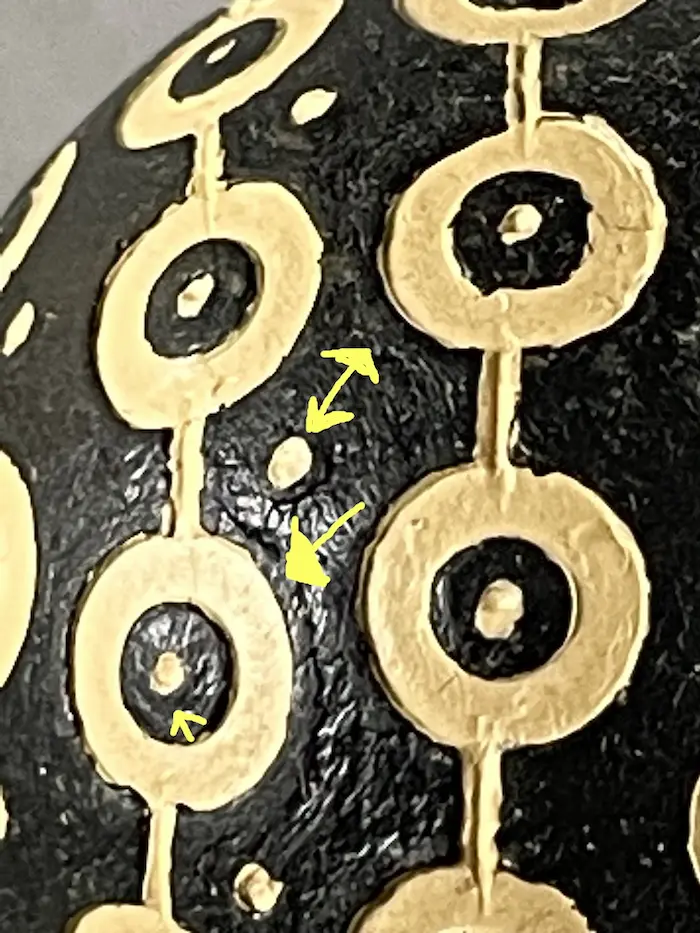
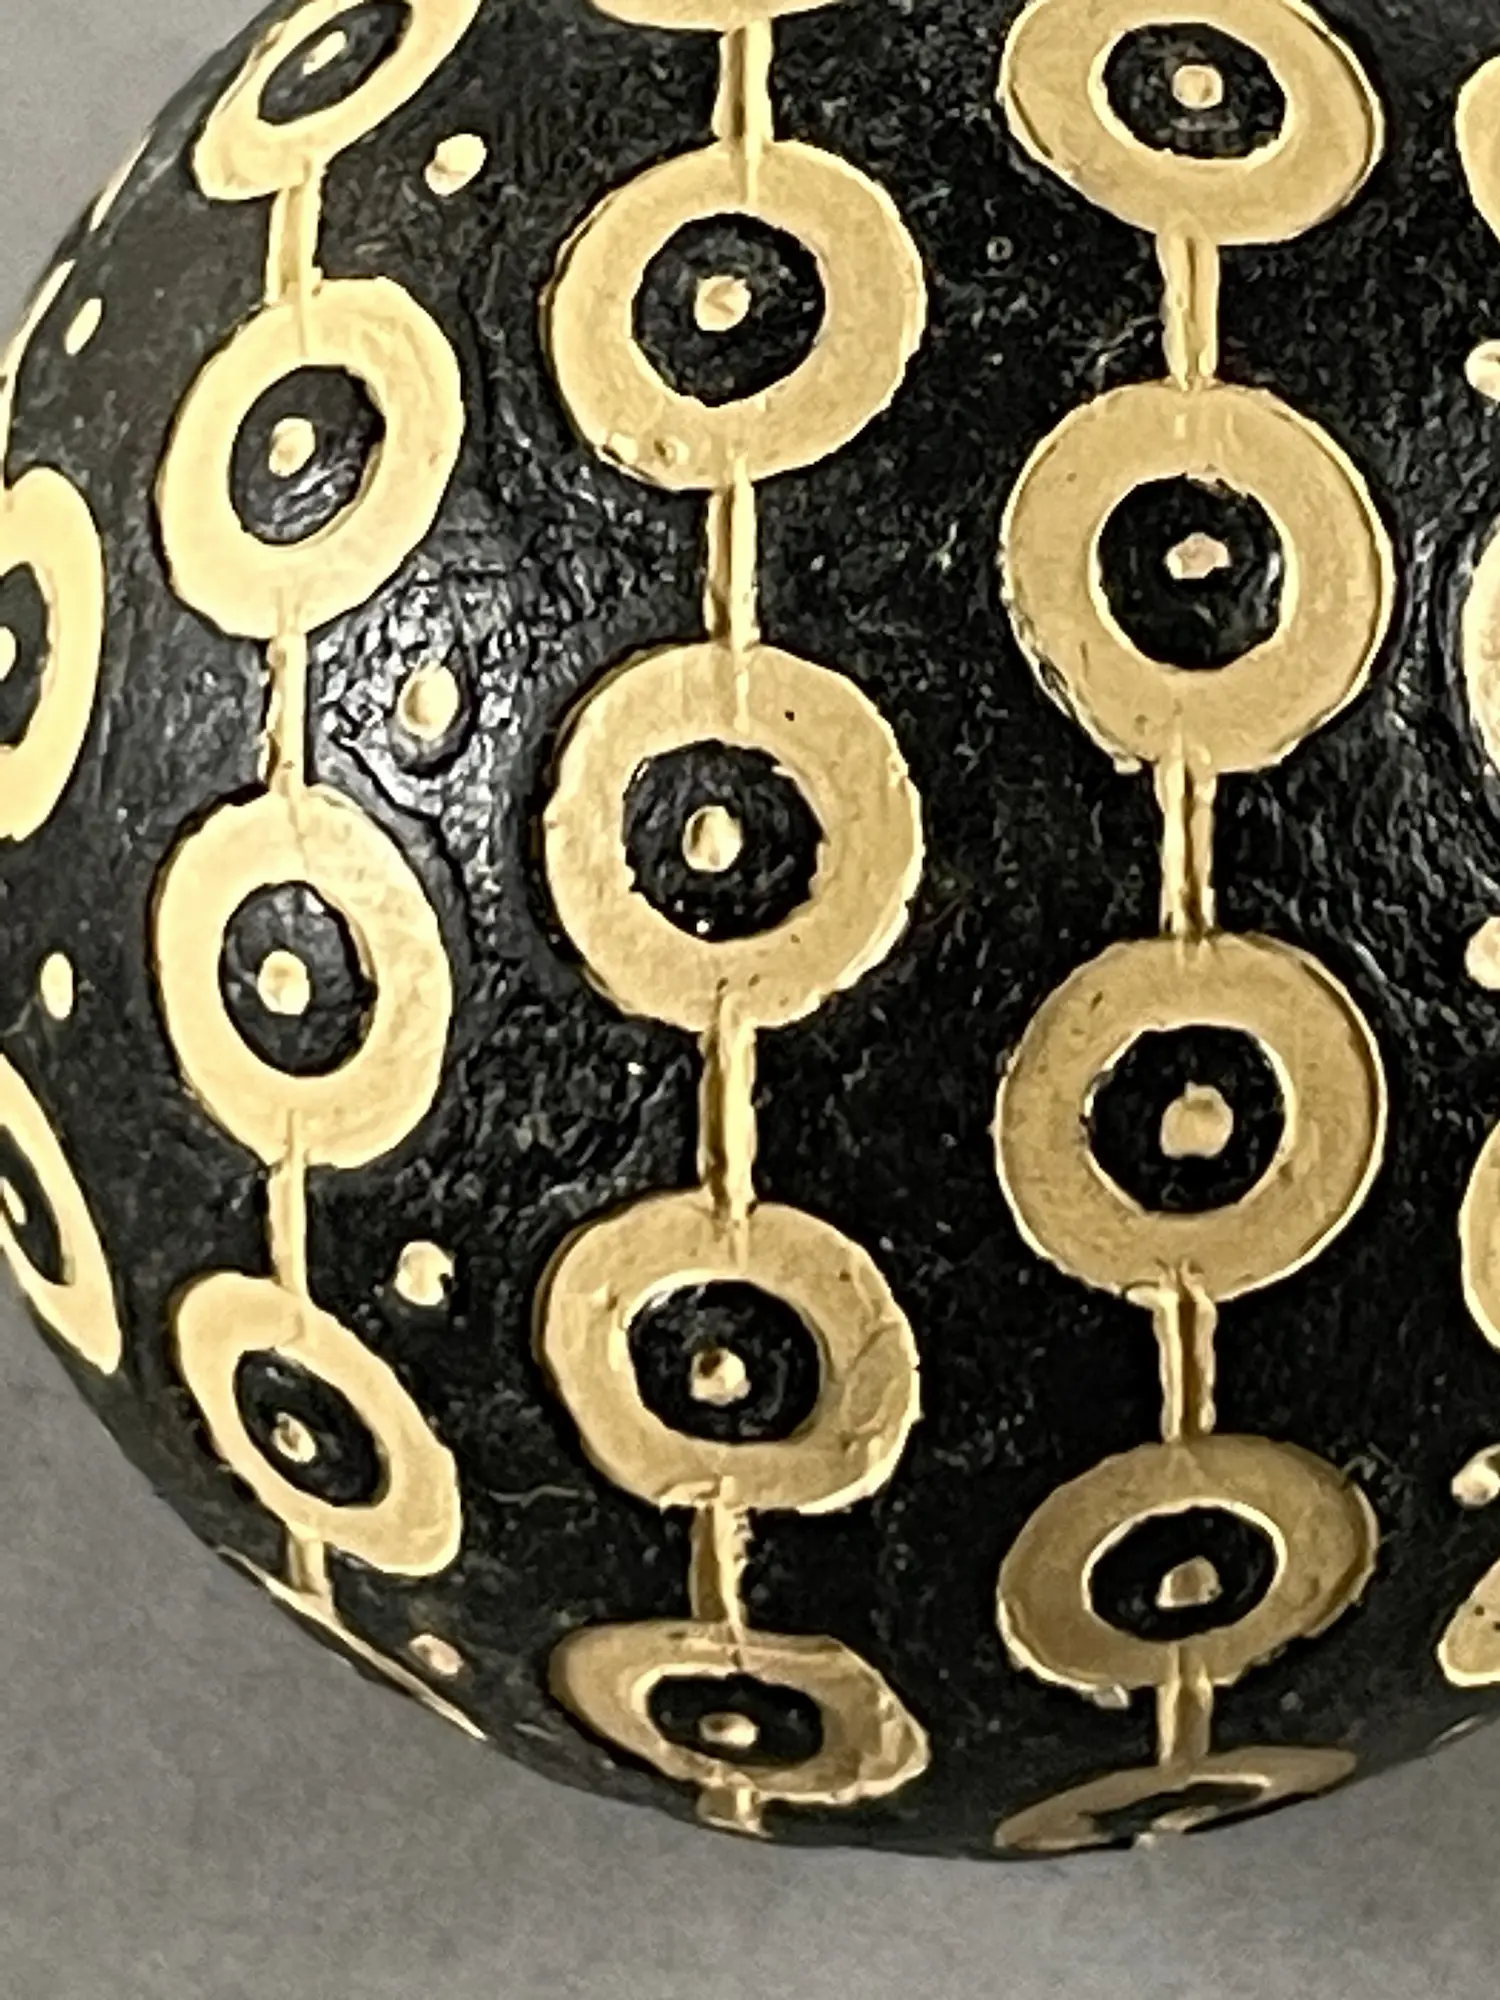
A close-up view shows that the name is engraved. With the light angle just right, raised rings around the large circles and small dimples can be seen. Furthermore, the lines connecting the circles vary in depth and lack symmetry, plus they often cut into and below the circles themselves. None of these things are consistent with a pattern produced in a mold.
A cover with circles, dimples, and lines cast in a mold would look different. Instead, any displaced material made by the pattern inside the mold would exit between the top and bottom half of the mold as it is closed. The flat surfaces of the finished ball would be perfectly smooth, and the lines would be uniform and stop at the exact edge of the circles. The connecting lines would also be the same depth as the circles, not deeper than the circles as can be seen below.

For the record, I have never seen any reference to an Emperor ball with this pattern in either the 19th or 20th-century literature of the game, nor have I ever seen or heard of any verifiable antique Emperor ball with this pattern.
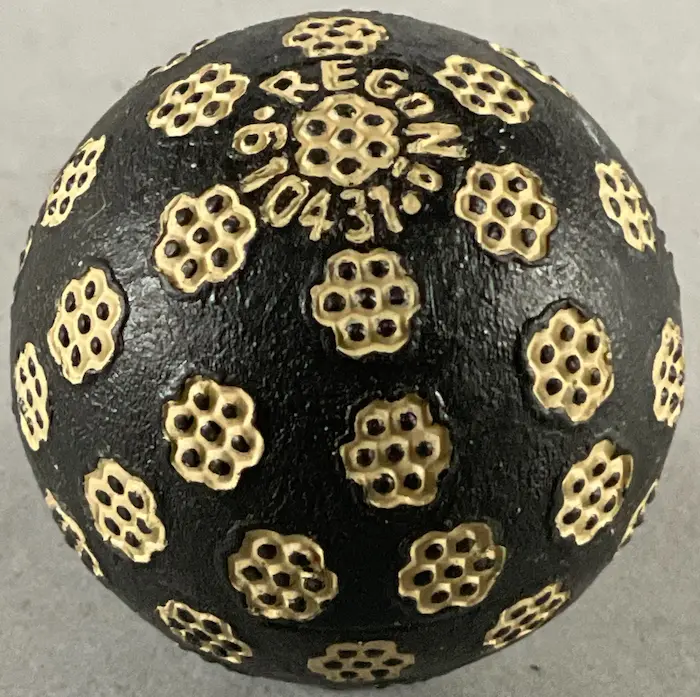
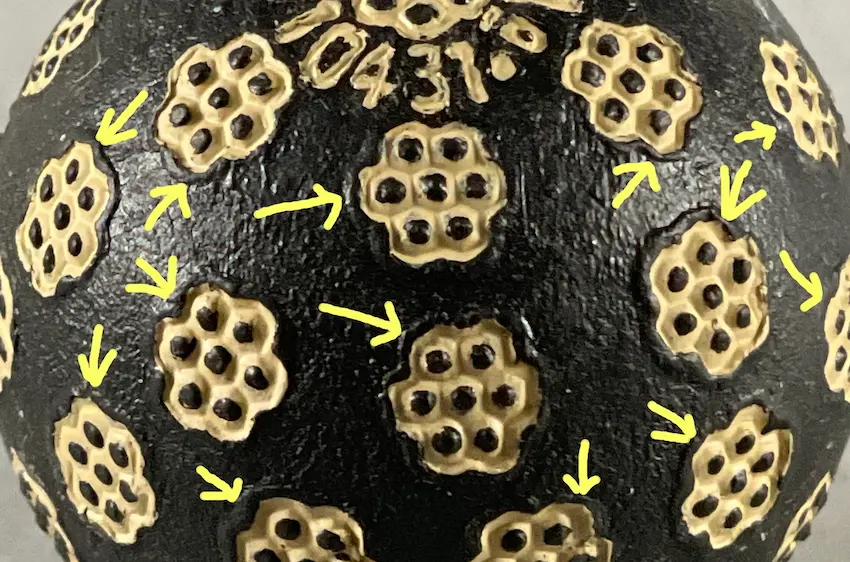
The cover on this Spalding F ball has a raised perimeter around each of the honeycomb or flower designs.
Such raised perimeters are not consistent with antique golf balls in original paint. This is because the patterns on all twentieth-century golf balls were built into the molds and not stamped into the ball after it was molded. Consequently, on some of the decorated balls, such perimeters were pushed down and flattened to a degree, other times they were removed, and still other times they were left untouched and as plain as day like they are on this particular ball. See 3.4, 3.8, 3.9, and 3.10 for more on this.
Below is a second Spalding F with the white fill paint. It does not match the adjacent ball with the cream-colored fill paint:
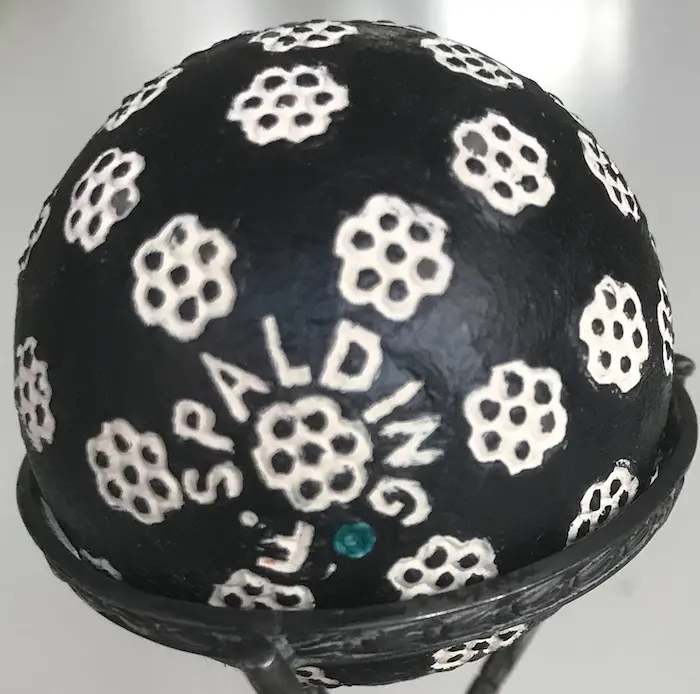
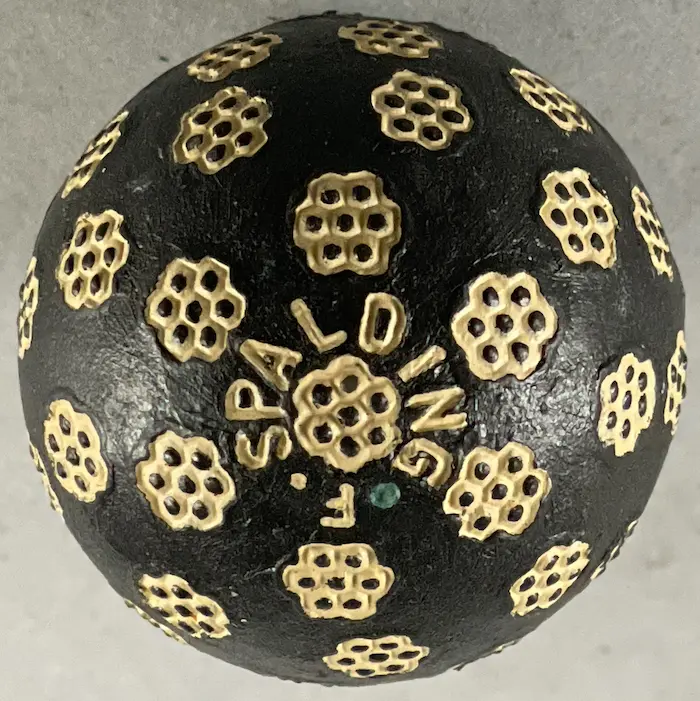
The letters and flowers are larger and the flower designs are not in the same locations (most obvious to see as pictured when looking above the “A, D, and N”). On the second ball, the “ING” in Spalding appears slightly but distinctly smaller than the “SPALD” and the letters “SP” are much further away from the flower underneath and closer to the flowers above the letters. Such inaccurate spacing of the letters is not consistent with 20th-century golf balls. See section 2.
For the record, I have never seen any reference to a Spalding F ball with this pattern in either the 19th or 20th-century literature of the game, nor have I ever seen or heard of any verifiable antique Spalding ball with this pattern.

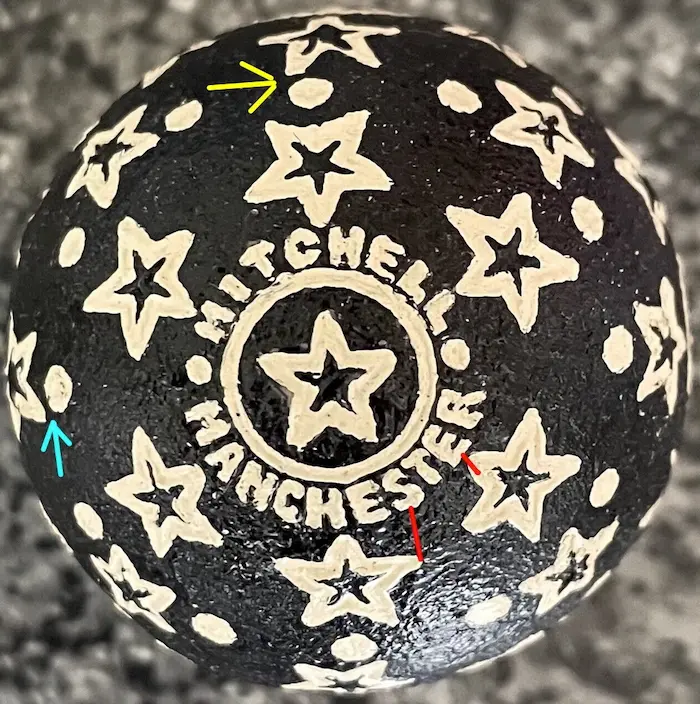
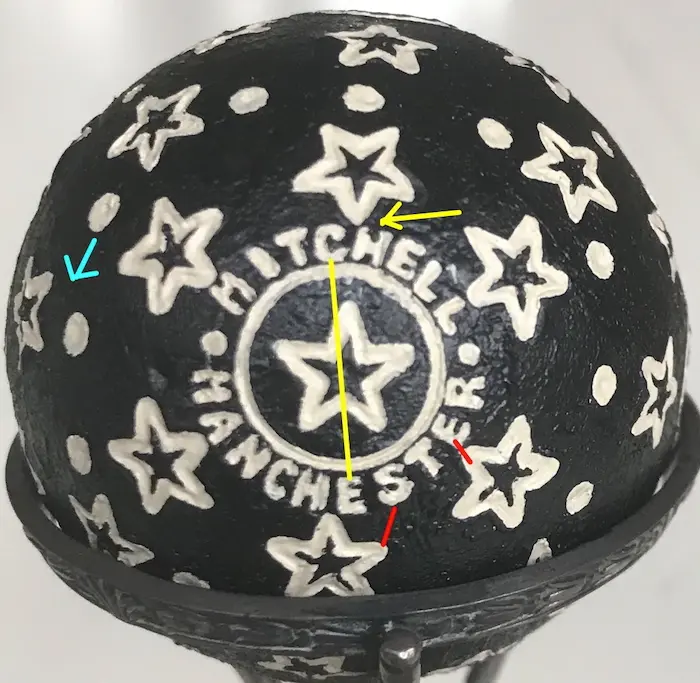
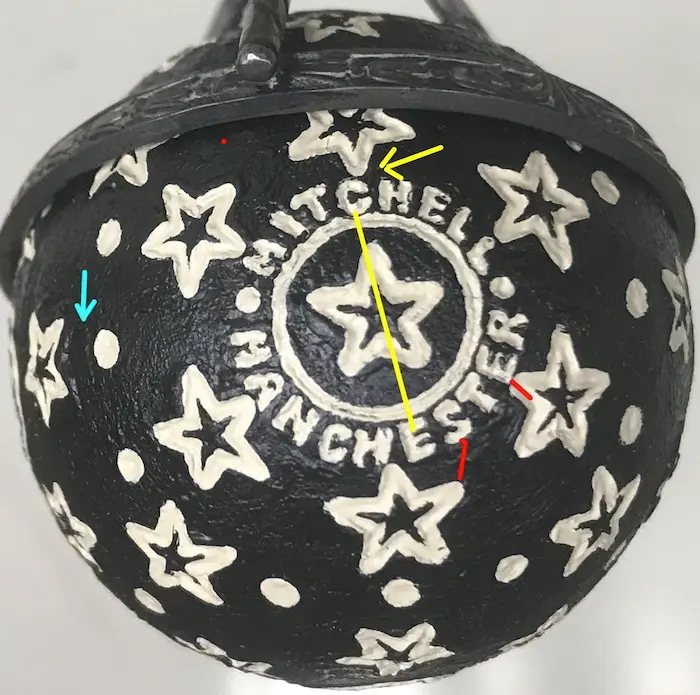
The four images above show two different balls marked “Mitchell Manchester” with stars and dimples. Sometimes the differences between two decorated balls can be attributed to the hand painting of the name and pattern. Other times, the decorations and/or letters on the surface are in different locations. The four images above show a few of the differences in locations. There are differences between the same ball, identified by their matching backgrounds, that show we are looking at both poles of each ball. There are also small but distinct differences between the two balls (for example the dimples identified by the blue lines) that would require separate molds made by different master balls if the patterns were installed by a mold. [Note: one of the images has of course been rotated 180 degrees in order to position the writing right-side up. This ball was originally upside down in its black metal holder when the image was taken.]
For the record, I have never seen any reference to a New Triumph ball with this pattern in either the 19th or 20th-century literature of the game, nor have I ever seen or heard of any verifiable antique ball with this pattern.
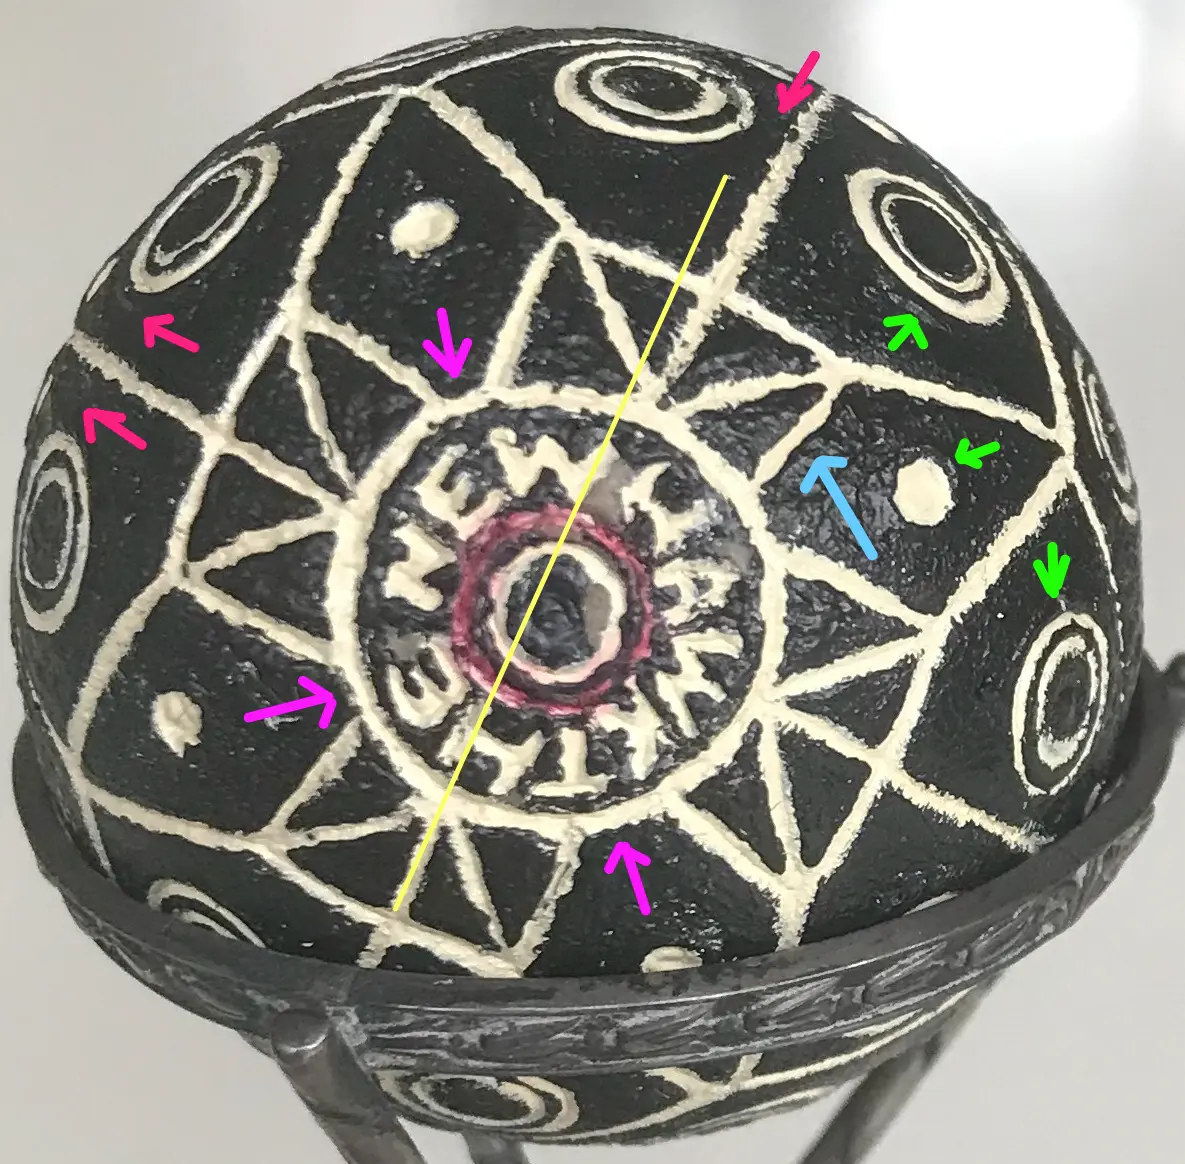
The center circle on this ball Is not centered in relation to the pattern. The pattern itself is not symmetrical. The name looks hand done, with a noticeable space between the word “The” and “New,” a smaller space between “New” and “Hawk,” and no space between “Hawk” and “The.” Such spacing is not consistent with the spacing found on 20th-century golf balls. Either that or the ball is a “New Hawkthe.”
The pattern contains many inconsistencies beyond that of being hand painted. Purple arrows point to the inconsistent spacing between the squares around the perimeter of the circle around the name. The green arrows point to the raised ring around one dimple and two circles in this image (the light and viewing angle needs to be just right to see these raised surfaces, but they are consistent with some of the marks on other black balls already presented). The red arrows point to the inconsistent spacing of the circles bordering the north/south and east/west lines. The blue arrow points to a line that looks even less exact than the others. In addition, there is beige material, not dark brown gutta percha, exposed in the center of the pole and between the W and H in Newhaven. (See the black AAA exposed paint chip, Aerial, Vaile, and Royal balls for more beige material.) This pattern is not consistent with the work produced by early 20th-century ballmakers. (See Chapter 1-2).

For the record, I have never seen any reference to a New Hawk ball with this pattern in either the 19th or 20th-century literature of the game, nor have I ever seen or heard of any verifiable antique ball with this pattern.
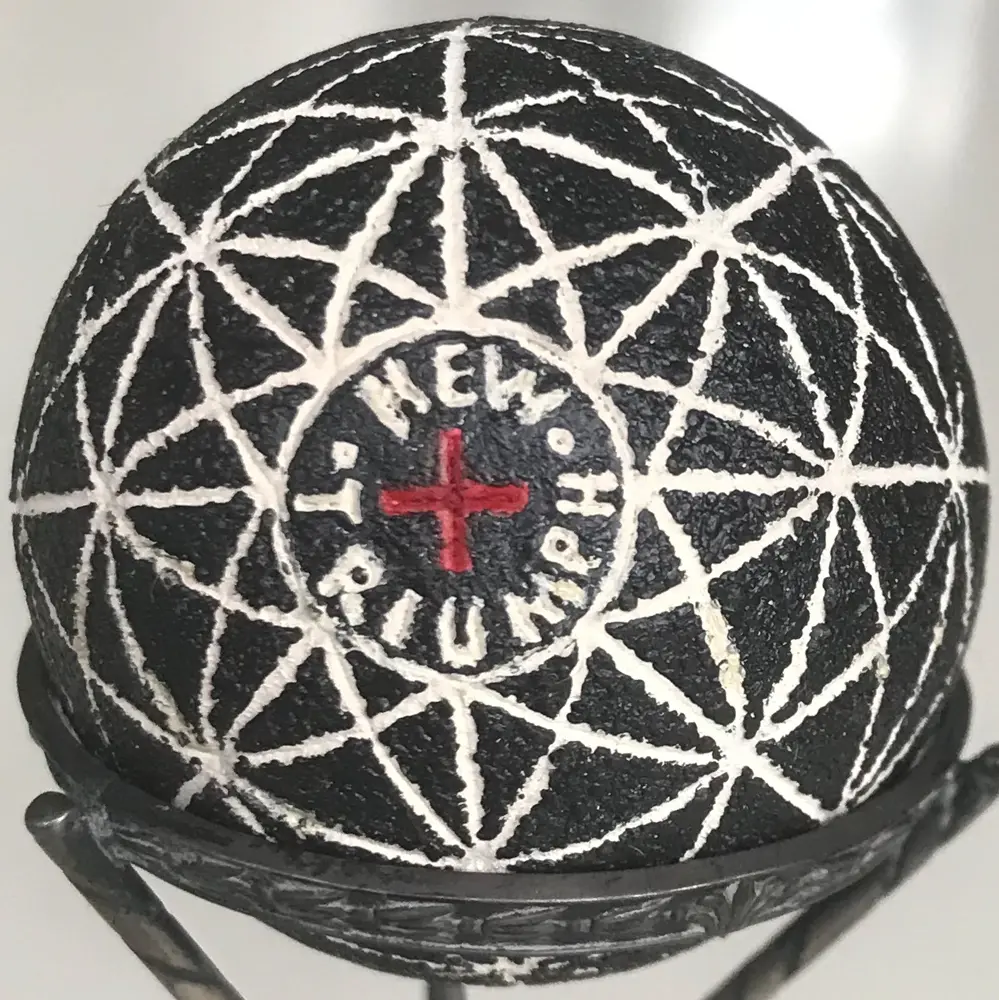
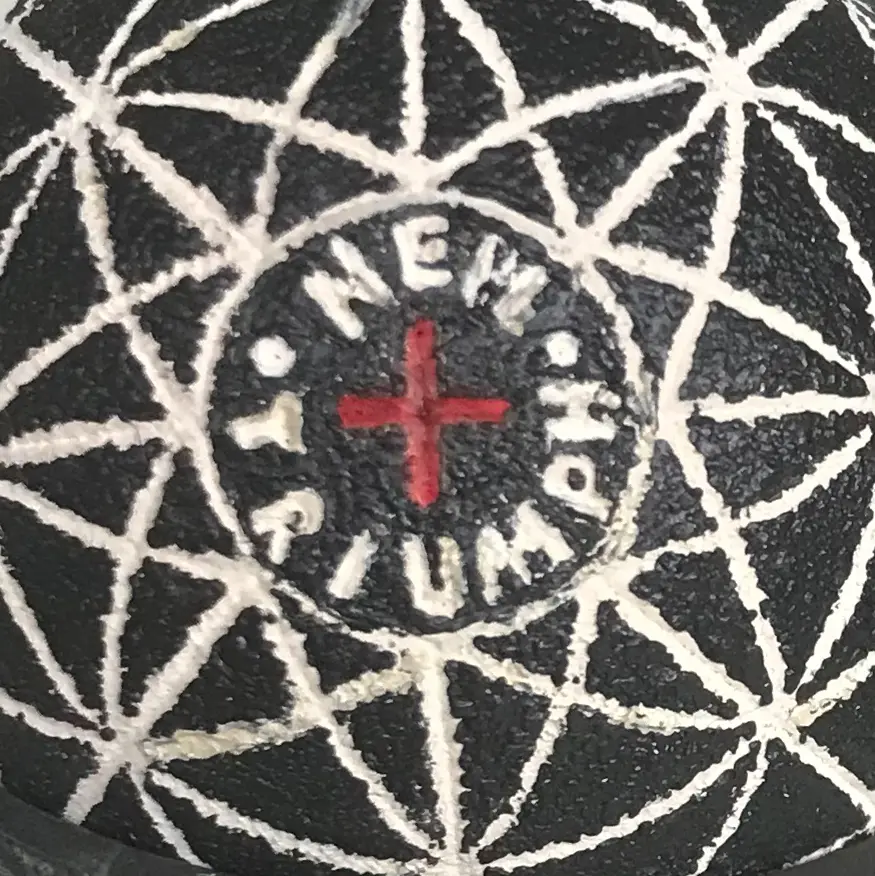

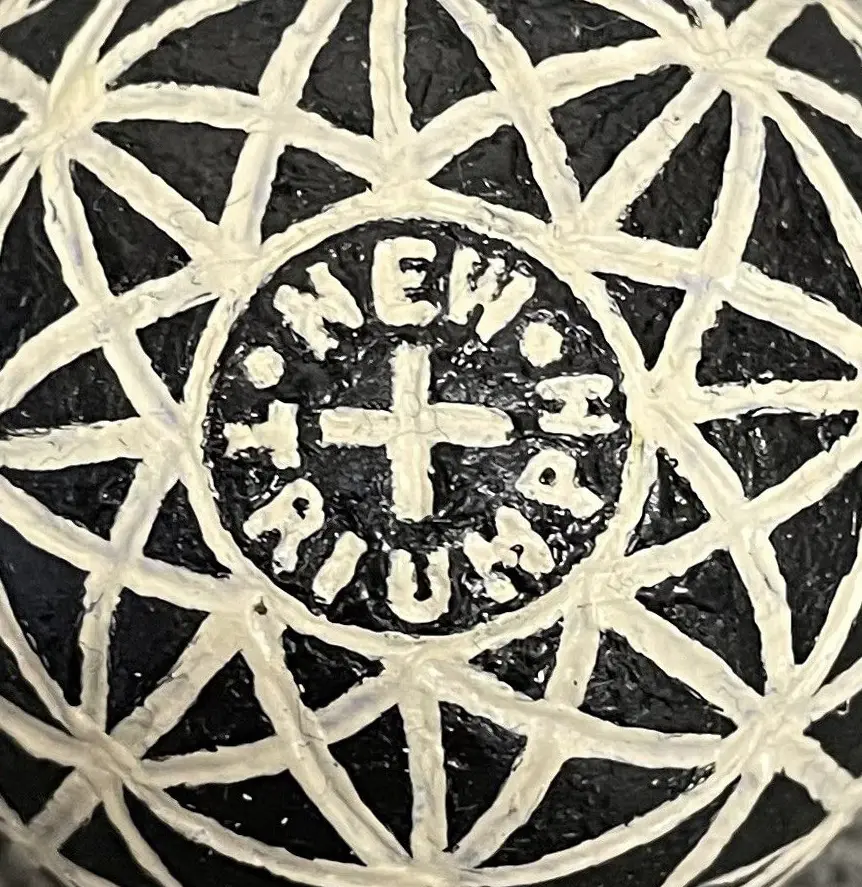
Four different New Triumph balls are presented in this article. They all appear recently hand-painted black with white lines, which appear to be engraved, not molded. I have never seen or even heard of a New Triumph in white paint, and possibly for good reason. Above are four images of the first two New Triumph balls. Their pattern lines are not consistent with molded lines, and the patterns themselves are different. As can be seen in the closeup images above (Image 2 & 4), the ball with the red “+” has thinner/shallower lines when compared to the wider/deeper lines covering the surface of the white “+” New Triumph ball. It’s not just the paint. The unevenness of the lines on these two balls is not consistent with molded lines.
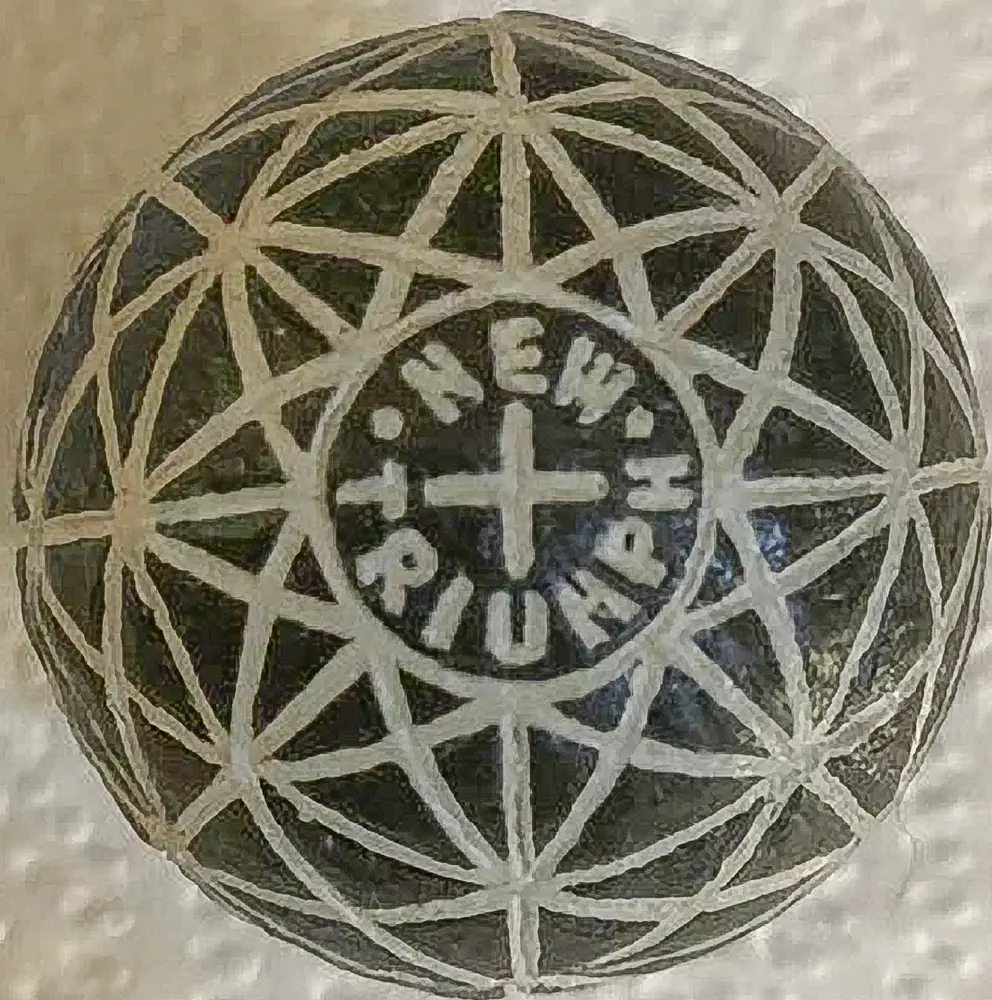


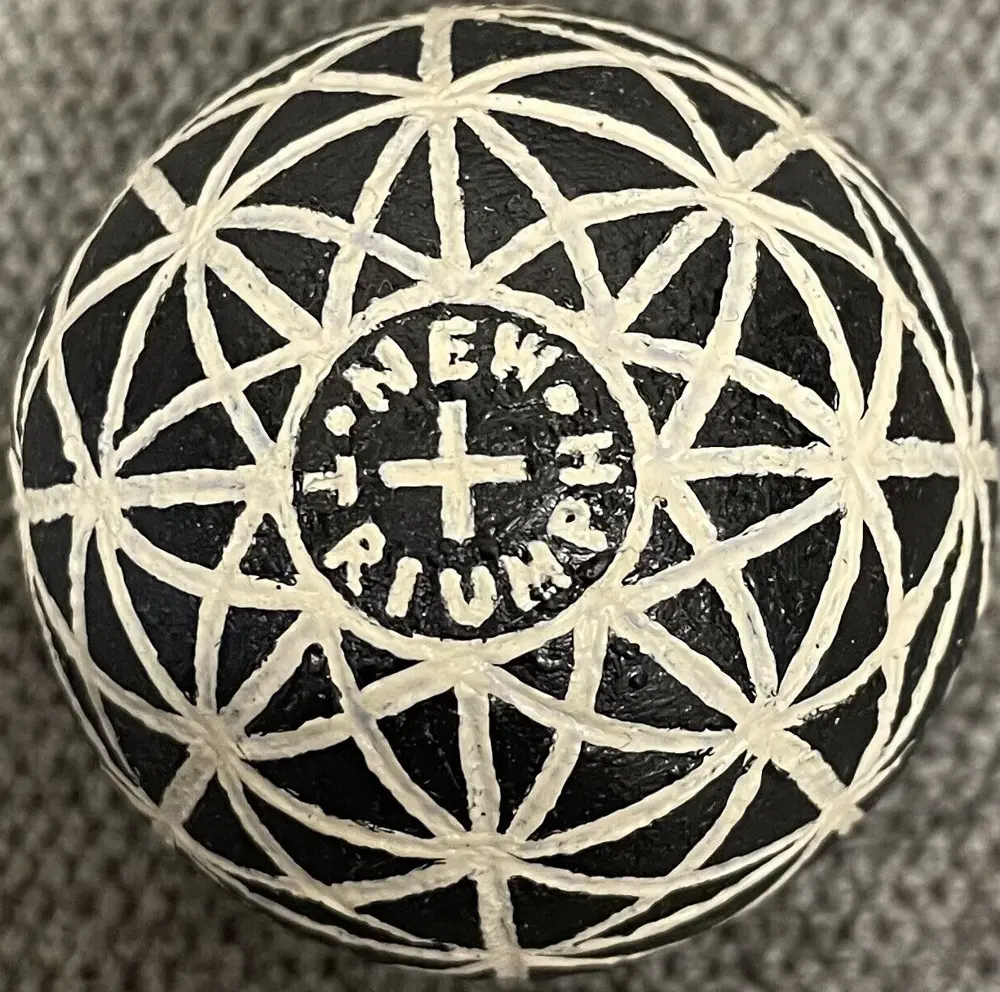
The four images above show the first two “New Triumph” balls just discussed, plus both poles of the third New Triumph. All three balls have significant differences that become apparent when you zoom in and start comparing the name badges, the position of some the lines next to the letters (example: the lines to the right of the “H”), and the lines themselves (example: the vertical lines that extends up from the “E”). The differences in the lines give rise to differences in the triangles they create at various places when comparing one ball to the next (example: the two triangles above the E are different on the three balls, as are the triangles above those two triangles, etc.). It’s not just the paint job.
Regarding the two balls with the white “+”, because the white paint extends to the outside of the incised lines as seen in the images, it hides the detail of the incised lines in the cover. Consequently the lines appear wider than they are. The differences between the lines and the patterns they make, however, are still evident if one looks to the incised lines which are typically centered under the white paint.
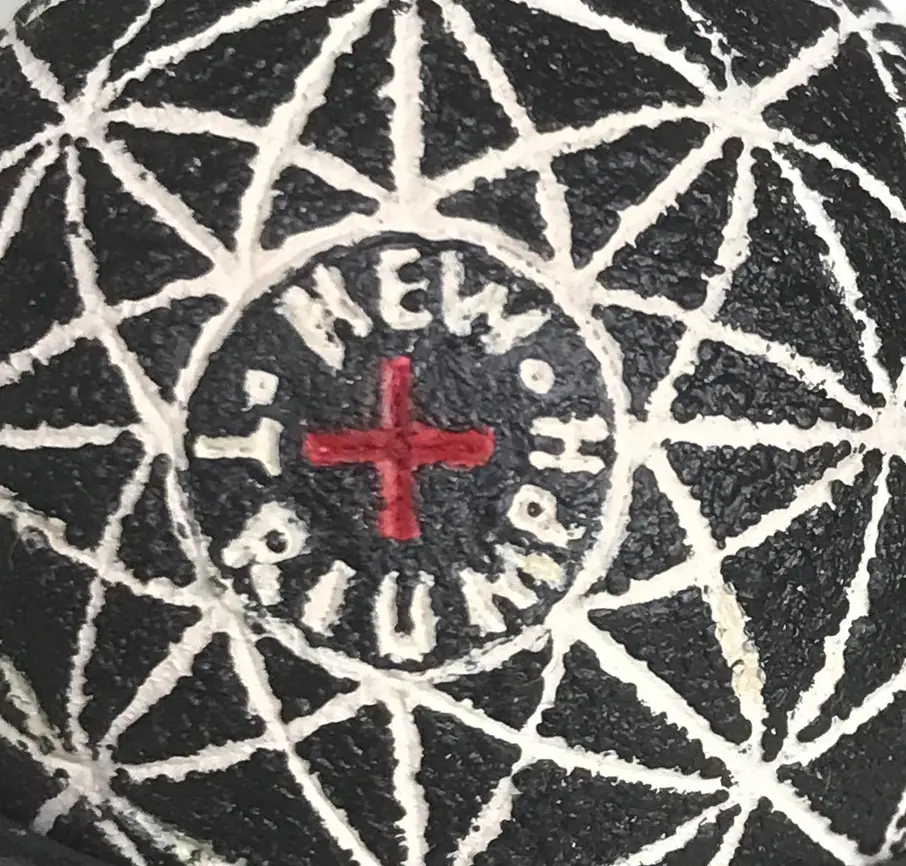
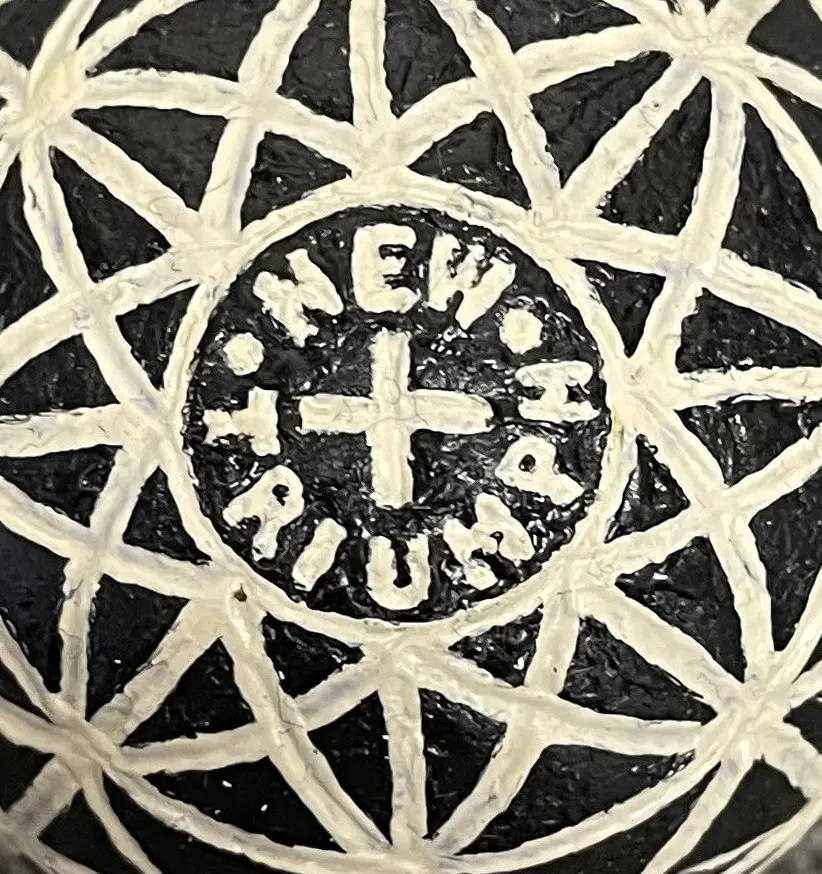
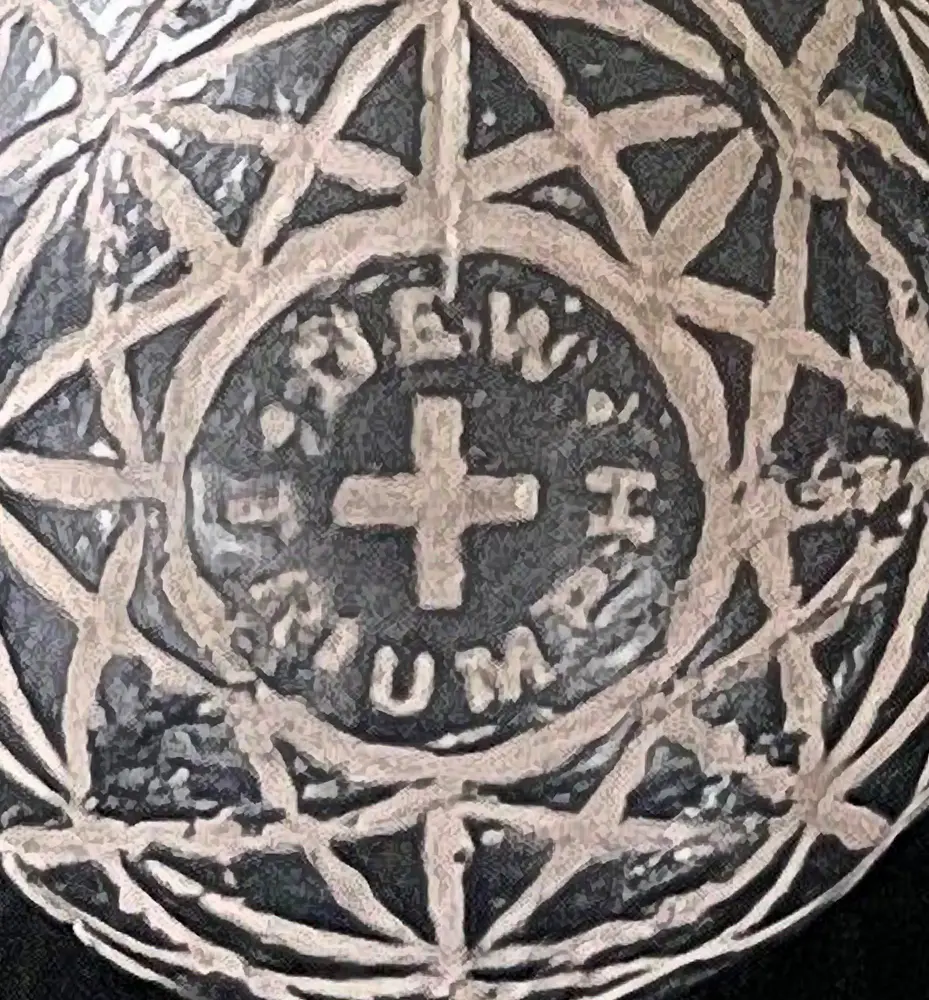
The four different balls above have all been oriented so the vertical line in the “+” is vertical. The orientation of the lines to the + is different on all four balls. The lines on the ball with the red + are not as deep or wide as the lines on the other balls. The position of the “UM” in Triumph is different in the ball directly above right as is the spacing of the letters from the edge of the circle around the name. The dimple to the left on the red + ball is further from the N and closer to the T. Both the line running north and west on the ball directly above left appears a bit wonky.
In short, none of these four recently painted black New Triumph balls have an identical pattern. Many anomalies become apparent when one takes the time to make close comparisons. In the four images below, I have used colored lines to mark some of the anomalies that are unique to each ball. Note the comparatively short length of the red-lined “oval” on the ball with the black background, the difference between the green-lined patterns on the last 2 balls, etc.
Such anomalies are a hallmark of decorated balls with engraved patterns. Nearly all of the duplicate decorated balls with engraved patterns in this report have patterns that do not match. Only the two black Henleys in 2.9 appear to match each other, but they have oversized names and patterns that do not match the name and pattern size of the Henleys shown in their original paint.
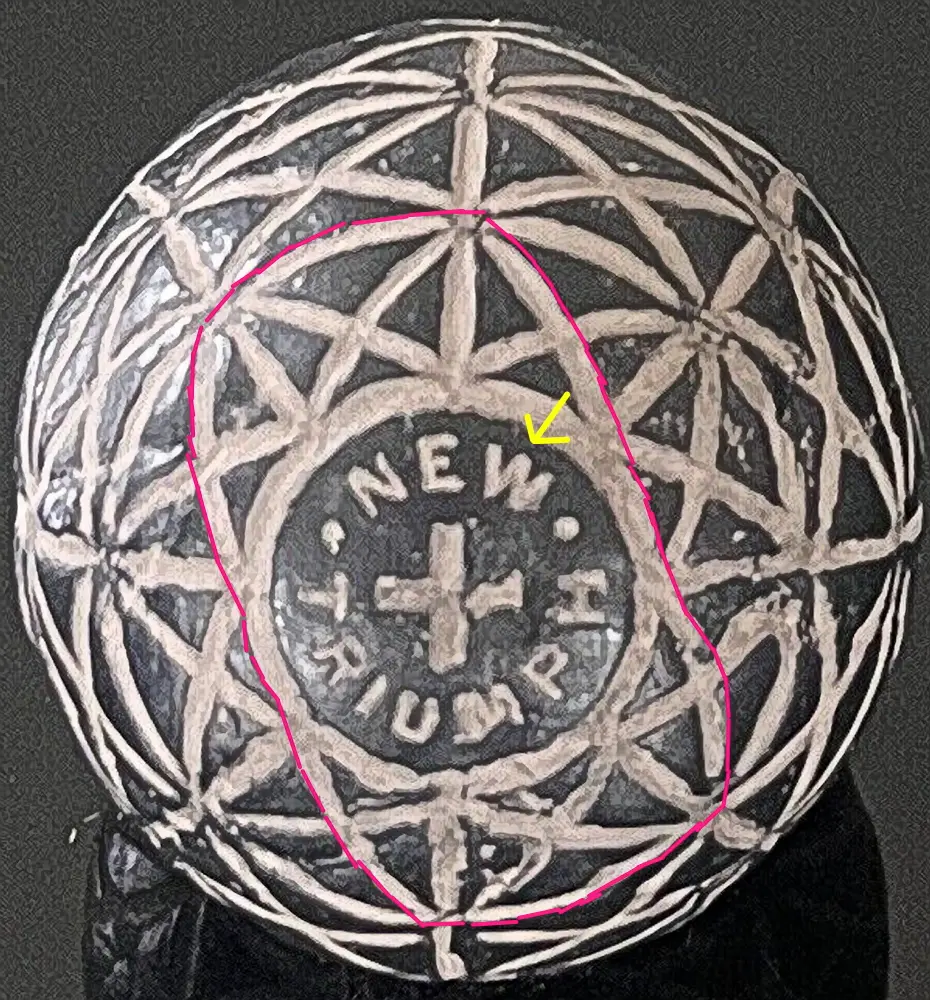
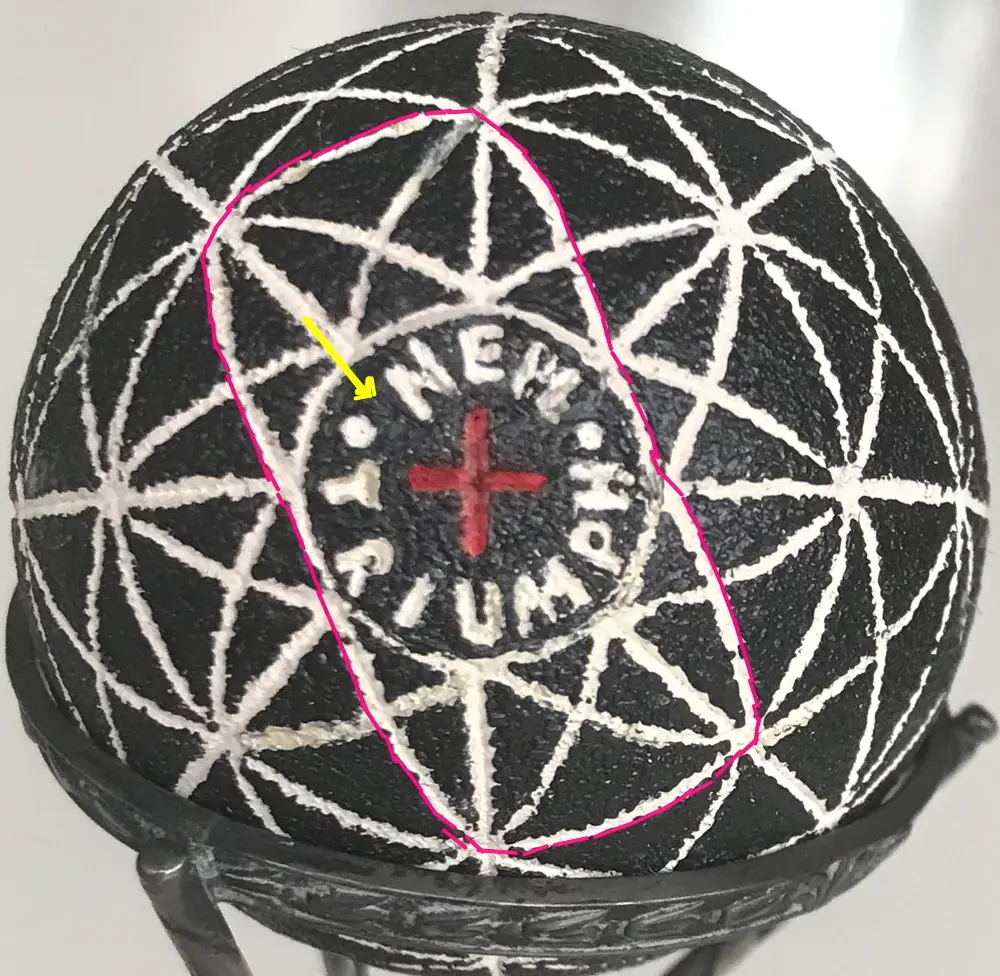
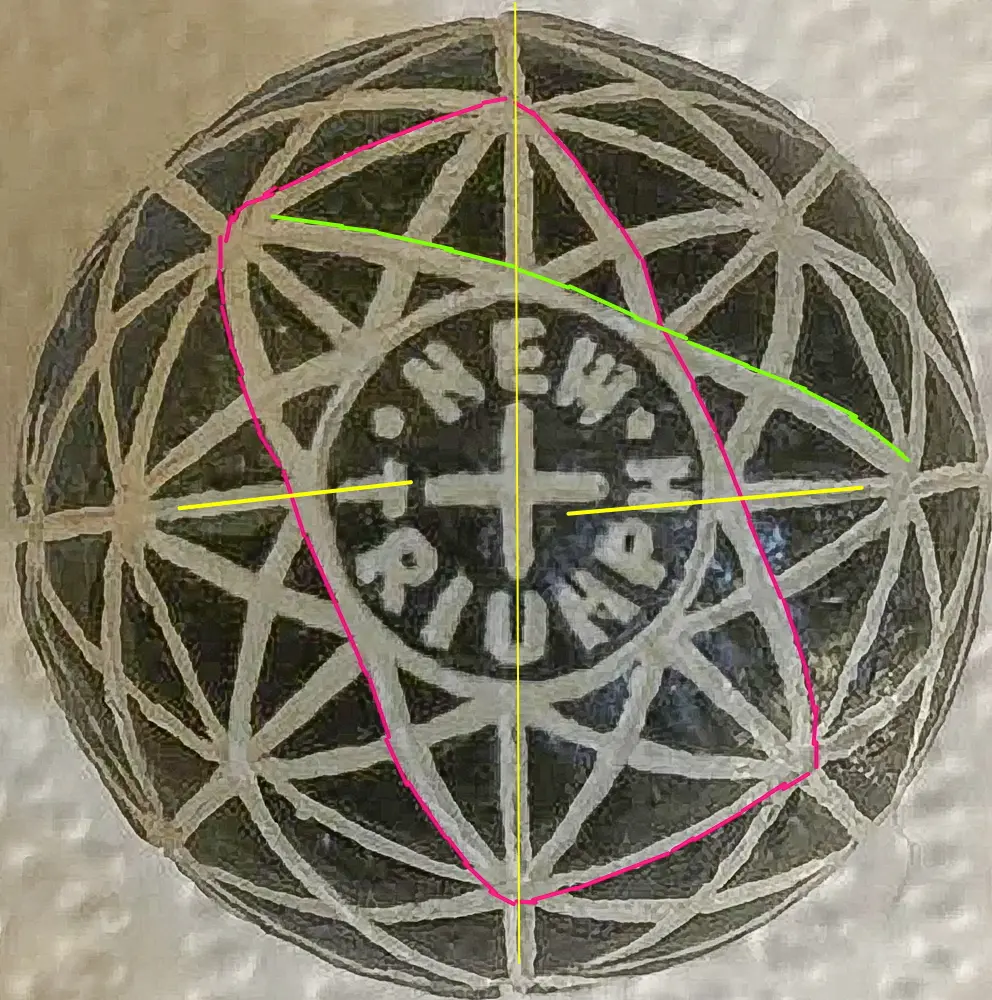
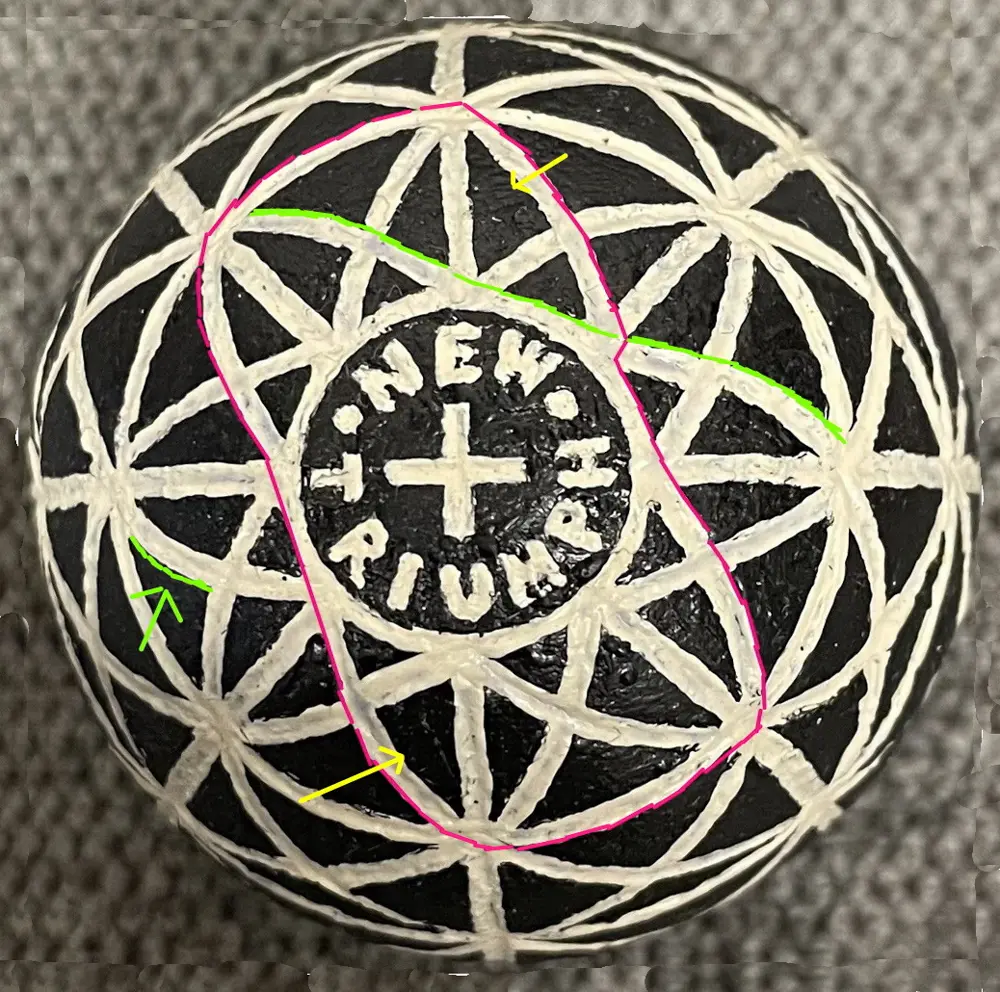
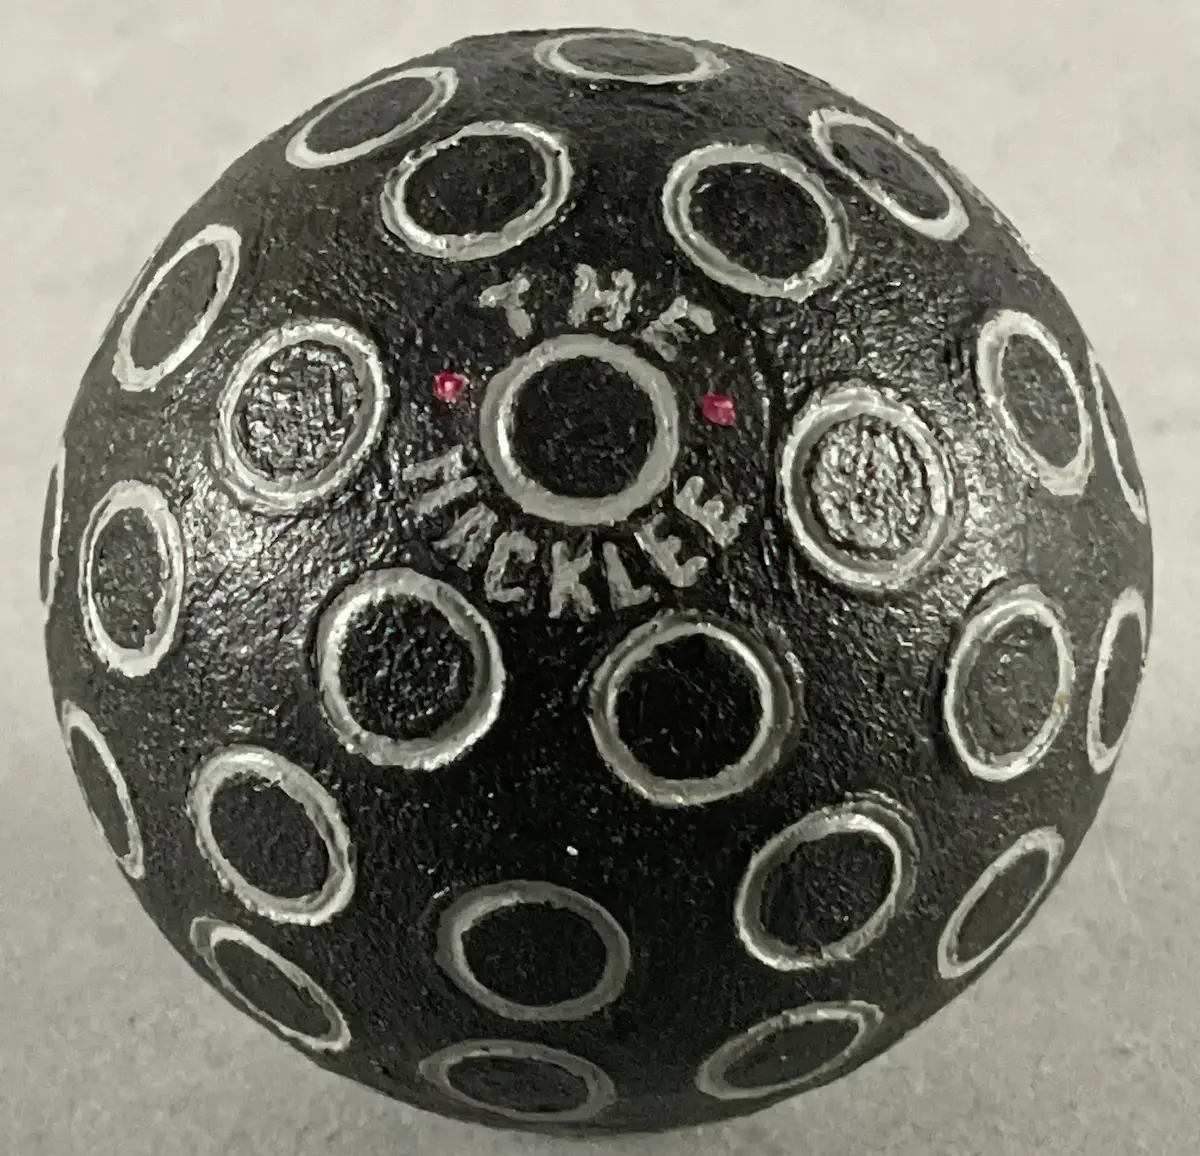
There are raised edges around the perimeter of the circles on this black-painted Macklee ball. When viewed close up with the light angle just right, these raised edges are visible. Such edges are not consistent with the production of antique rubber core balls.
Because antique golf balls were produced in a mold, any excess material created by impressions in the cover would exit the mold around the equator of the ball, when the top and bottom halves of the mold were pushed together under heat and pressure. This is why the edges of all cover patterns on antique balls are never raised and the neighboring surfaces are perfectly smooth. A US Tiger in white paint made in 1930 is shown below right to demonstrate how circles were properly molded on a ball.
For the record, I have never seen any reference to a Macklee ball with this pattern in either the 19th or 20th-century literature of the game, nor have I ever seen or heard of any verifiable antique Macklee ball with this pattern.

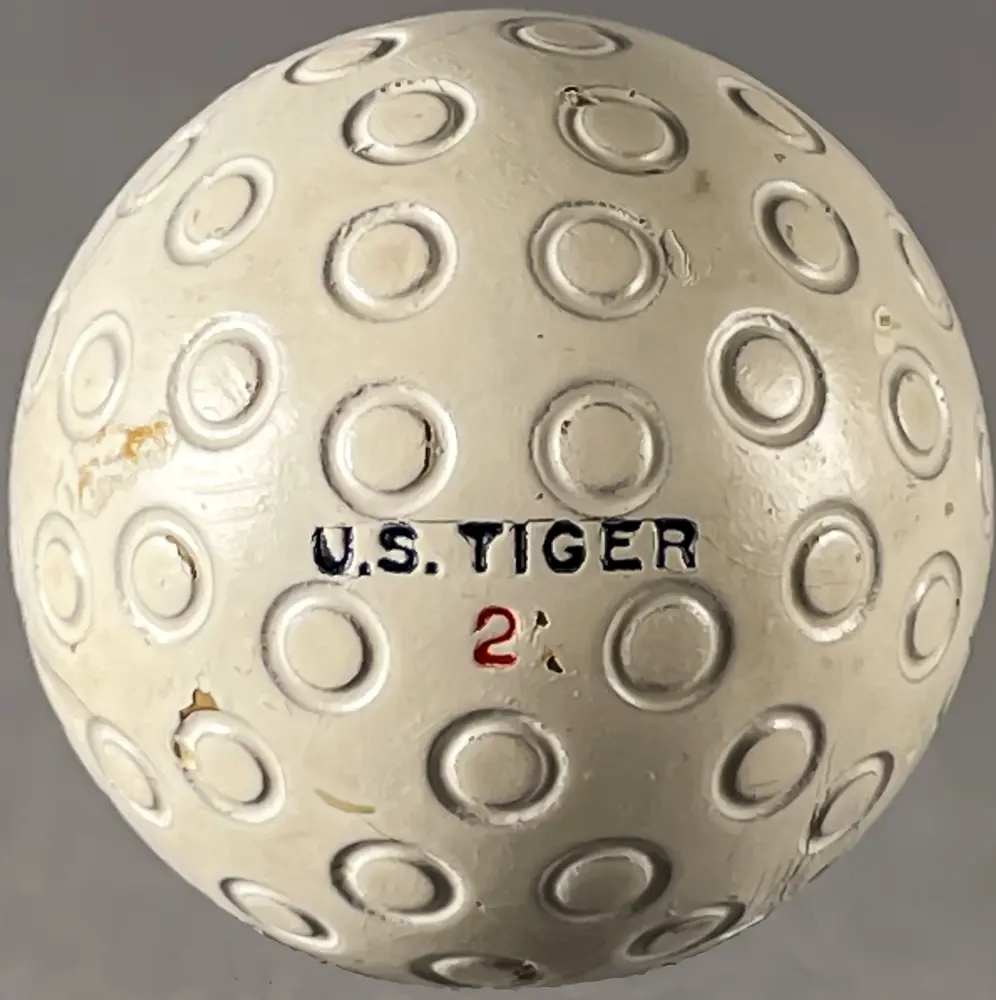
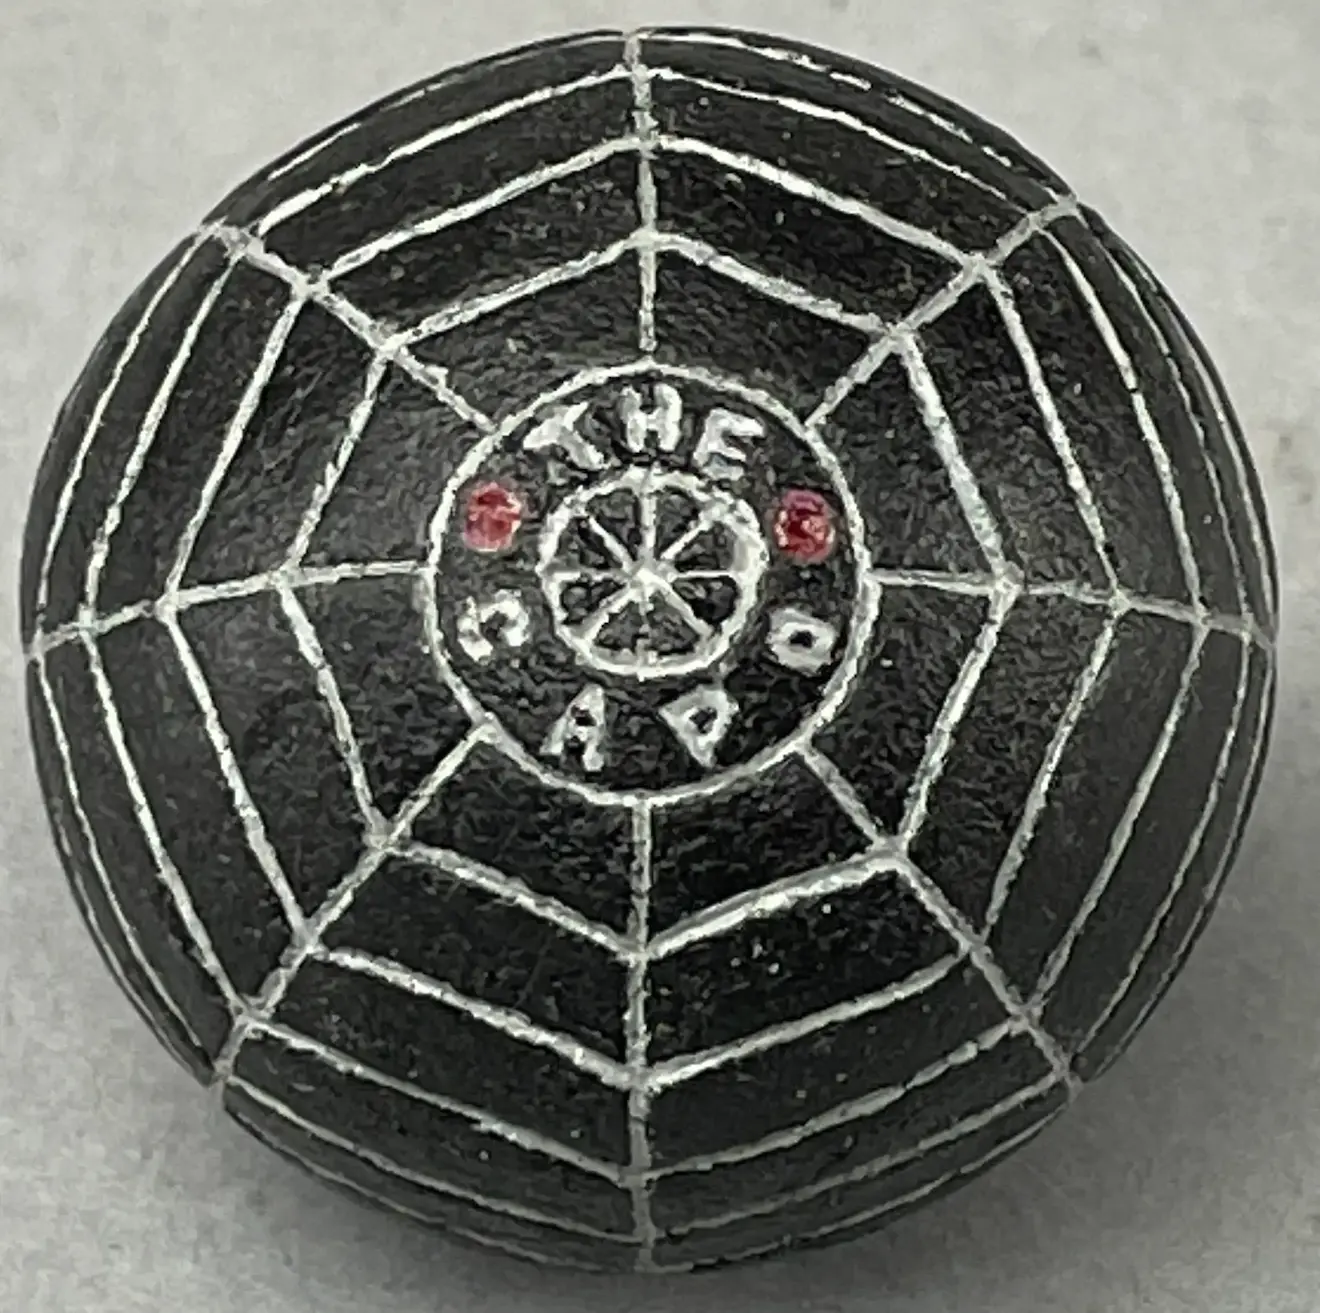
Covered in black paint, this Capo ball possesses several anomalies. To begin with, the north line and the south line as shown in this image are not straight.
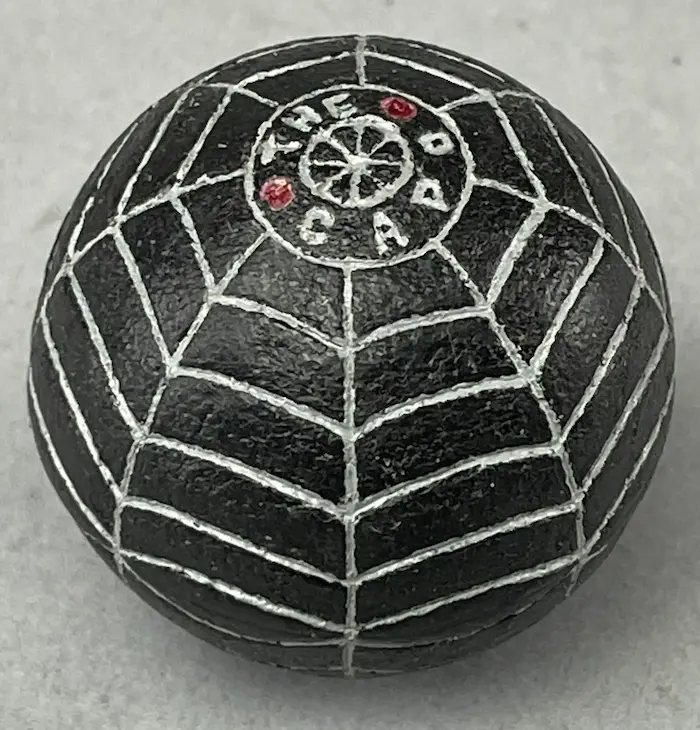
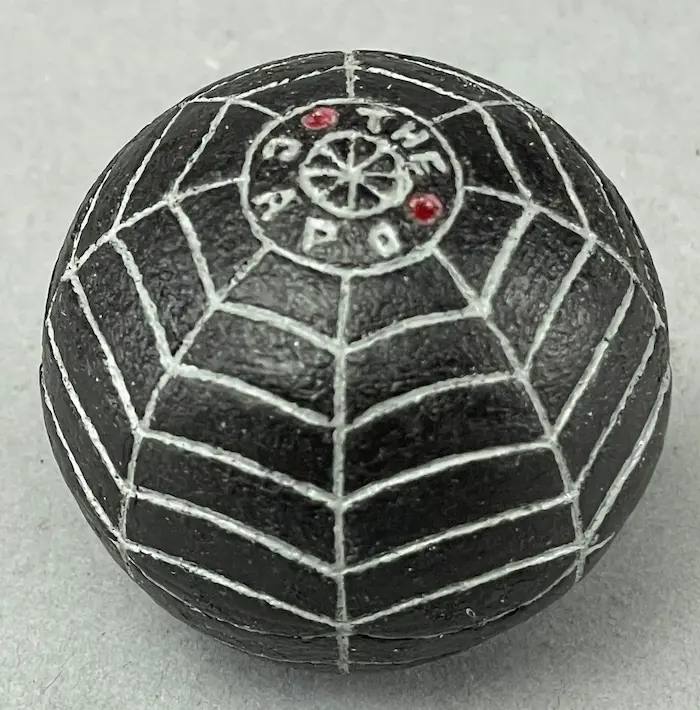
When the ball is rotated counterclockwise, as shown in the Image 1 above, the next set of north and south lines do not line up, either.
Rotated the ball a little more, as shown in the second image (Image 2), and the north and south lines are off in a different way. The asymmetrical execution of the pattern on this ball is not consistent with the execution of the patterns on early 20th-century golf balls, nor are the lines that form this pattern.

The image above shows a raised oval portion of the cover. These raised oval “ribs” run around the entire equator of the ball. Such raised ribs would be counterproductive to hitting accurate golf shots, let alone putts.
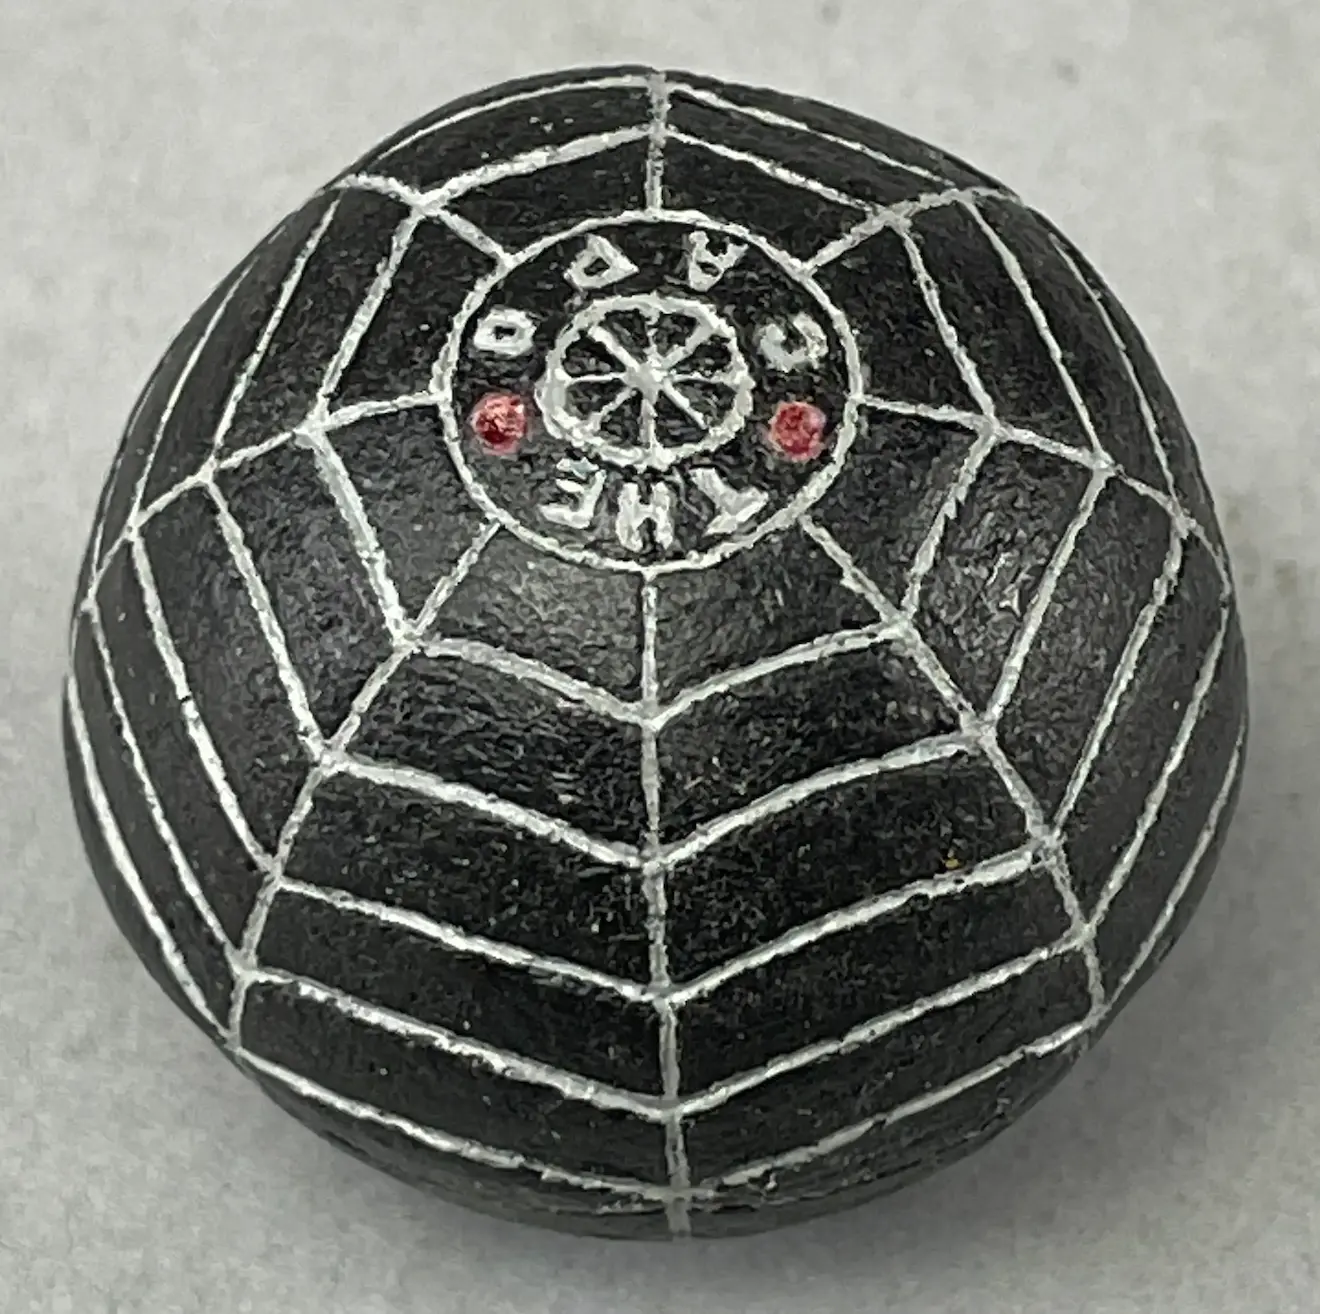
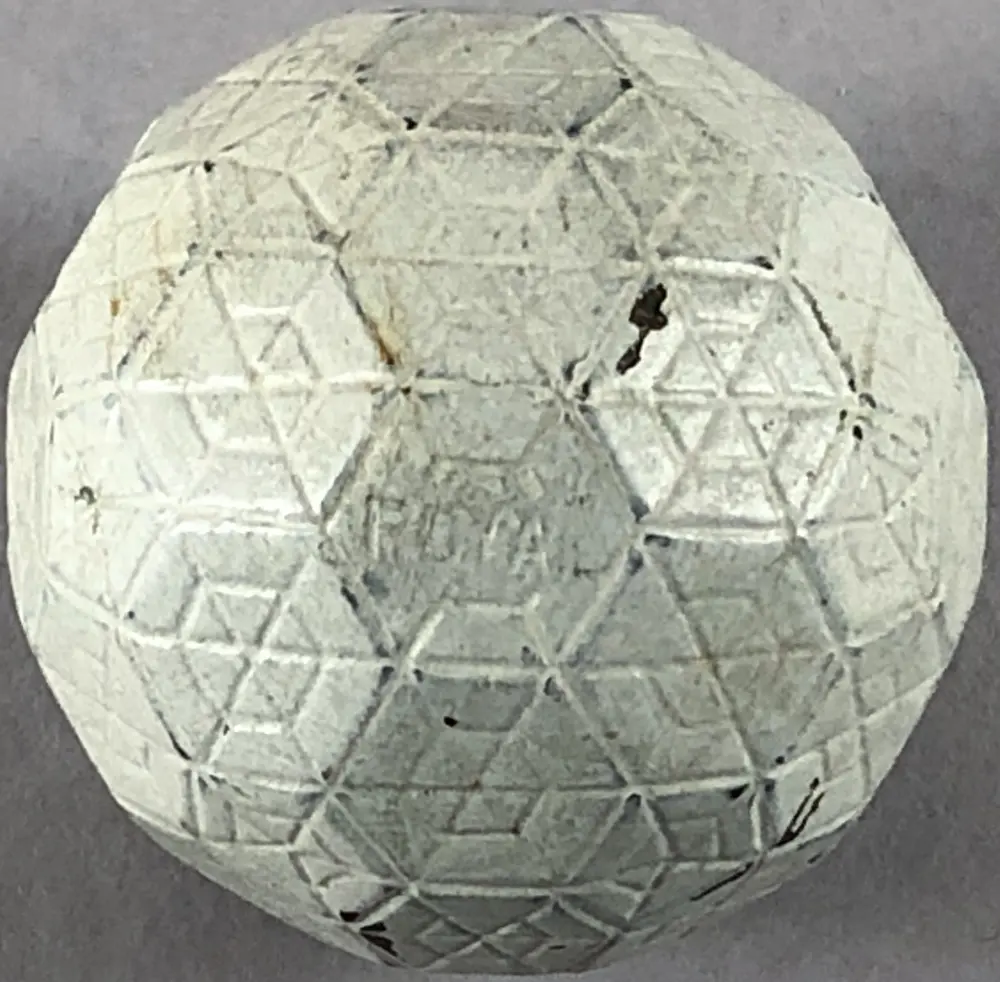
The image directly above left shows more of the asymmetry of this ball. The “web panels” are actually flattened a bit and not consistent with the spherical covers used on a typical rubber core golf ball. The top perimeter of the ball as it is positioned here and in the prior image also shows inconsistencies. Yes, Willie Park’s Royal ball made in 1896 and shown above right had 64 sides, but no matter how that ball is positioned, the orientation of its circumference in all directions is always the same—not so on the Capo.
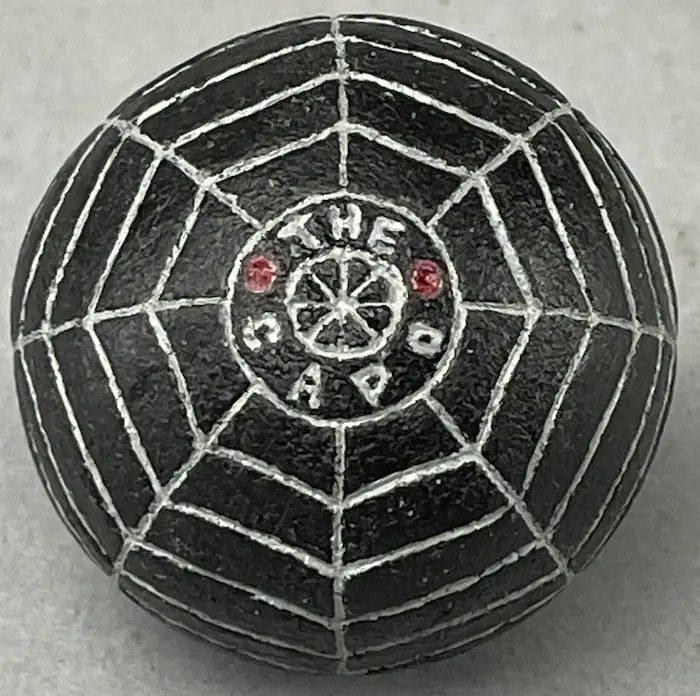
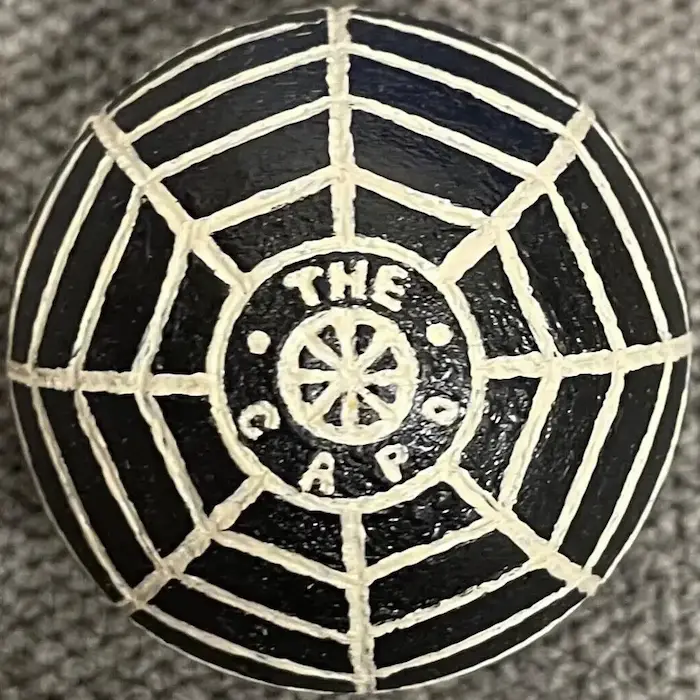
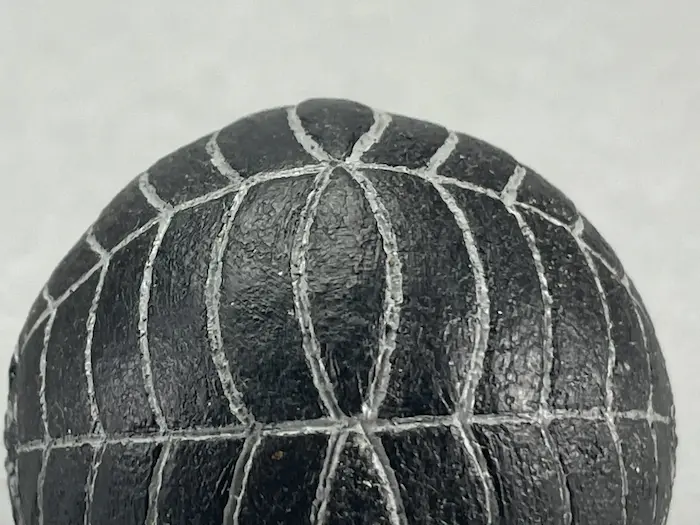
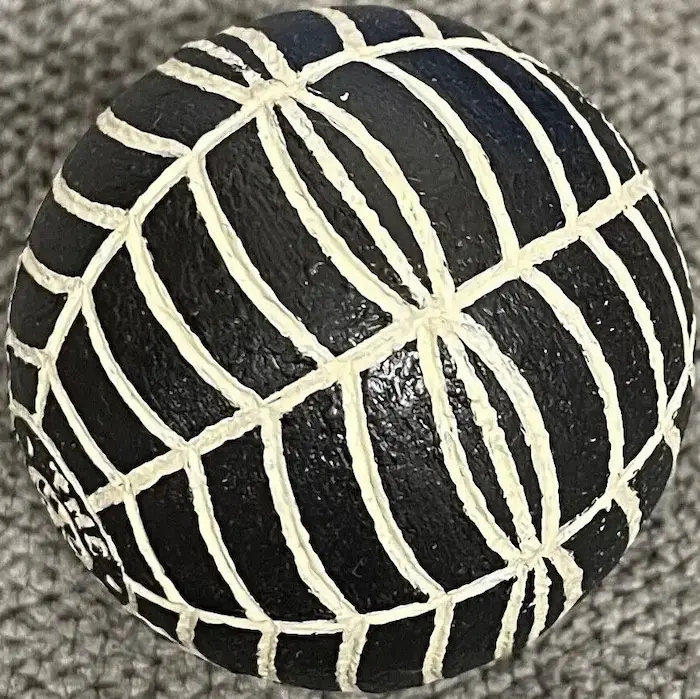
The four images above show the initial Capo ball and a second Capo. The second ball does not match the first. The incised lines are much wider and deeper on the second ball and there is a straight line around its equator. In addition, the raised rib around the equator of the first ball is not there on the second ball, and the north/south lines on the second ball are more symmetrical.
For the record, I have never seen any reference to a Capo ball with this pattern in either the 19th or 20th-century literature of the game, nor have I ever seen or heard of any verifiable antique ball with this pattern.
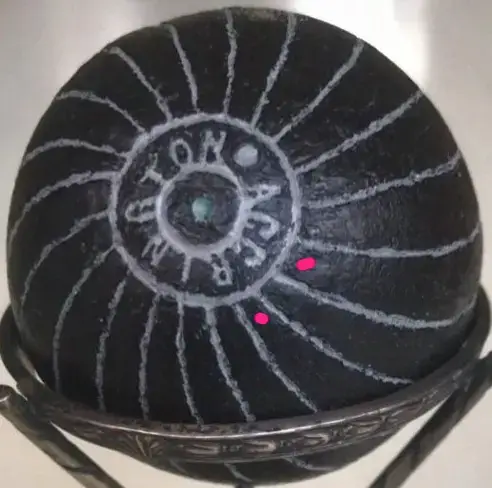
The two red dots call attention to the disparity in line spacing found all around the outer name circle. The execution of the lines and their
spacing is not consistent with the lines and spacing found on an early 20th-century golf ball.
Marked “E.J. Riley” on the opposite pole not pictured, this ball appears as a variation on the theme of Henry’s rifled ball produced in 1903.
Nothing about the execution of this EJ Riley ball is consistent with the execution of Henry’s rifled ball, shown below.
Lest we forget the impeccable workmanship and skills of the artisans who made the molds that produced early rubber core balls, here is a 1903
Henry’s Rifled rubber core ball with its gutta percha cover left unpainted. The ball bears the collection label of Harry B. Wood.
The pattern is made from symmetrically consistent beveled ridges that spiral around the ball from pole to pole in flawless mirror images from
one to the next.
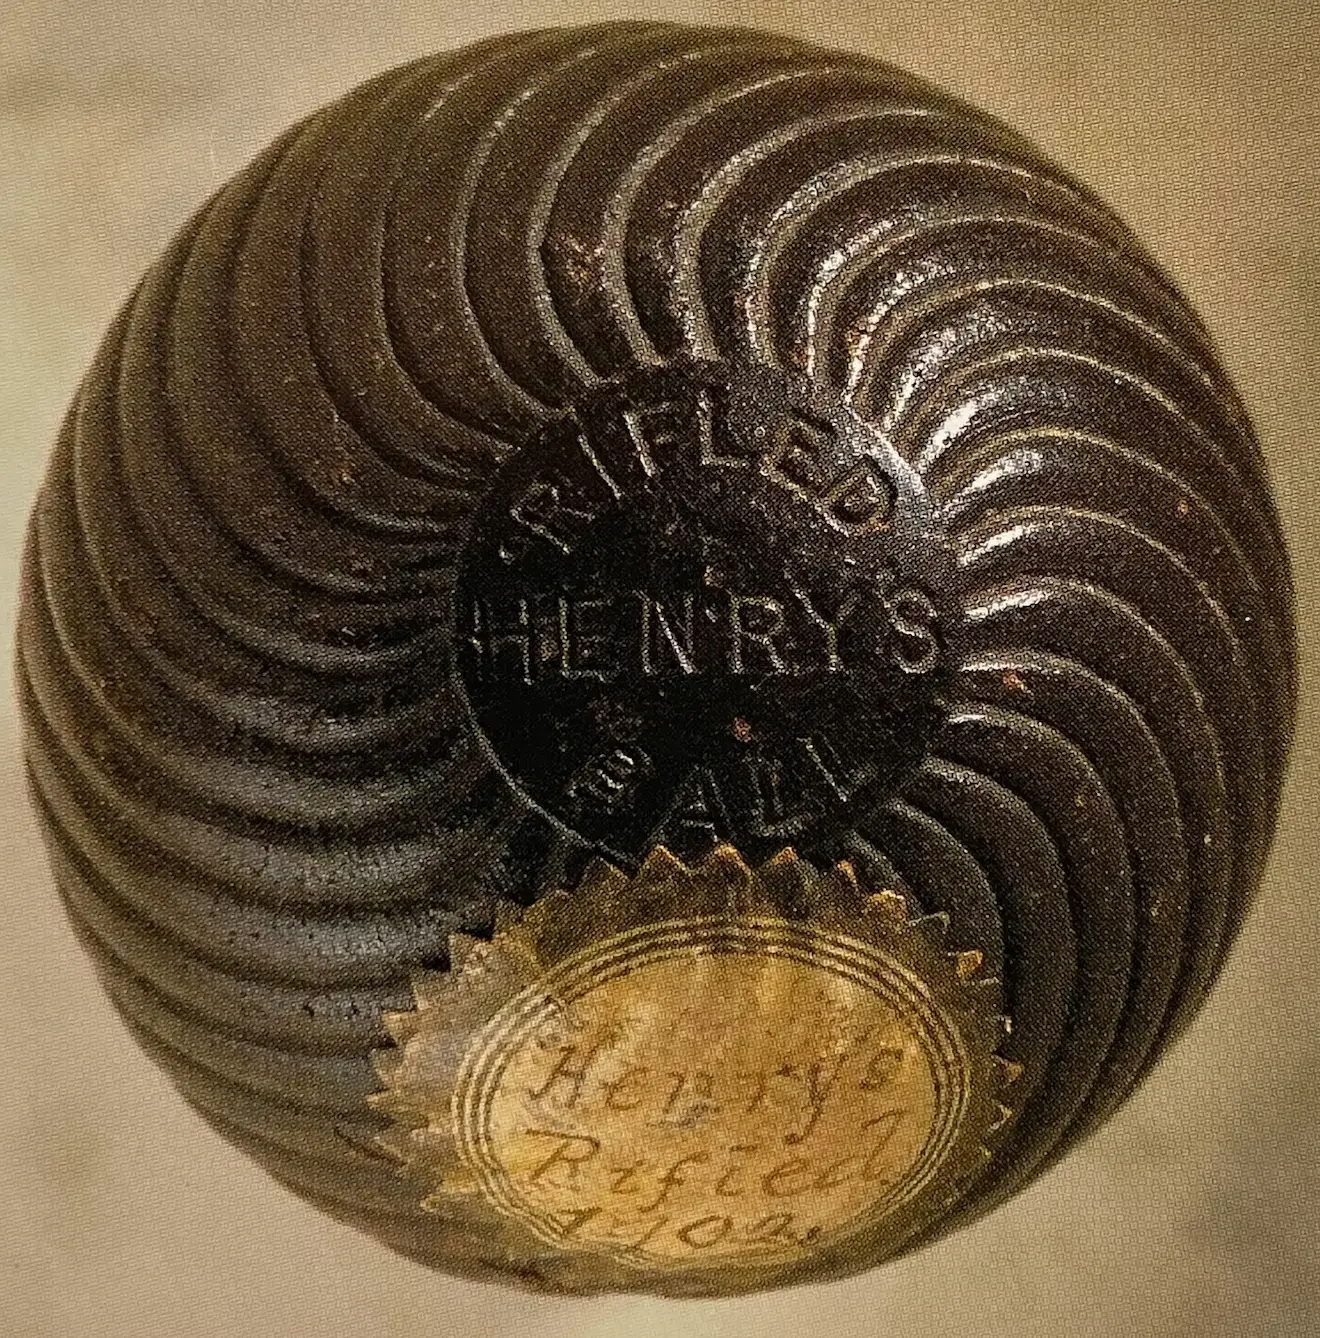
For the record, I have never seen any reference to an E.J. Riley, Accrington ball with this pattern in either the 19th or 20th-century literature of the game, nor have I ever seen or heard of any verifiable antique Accrington ball with this pattern.
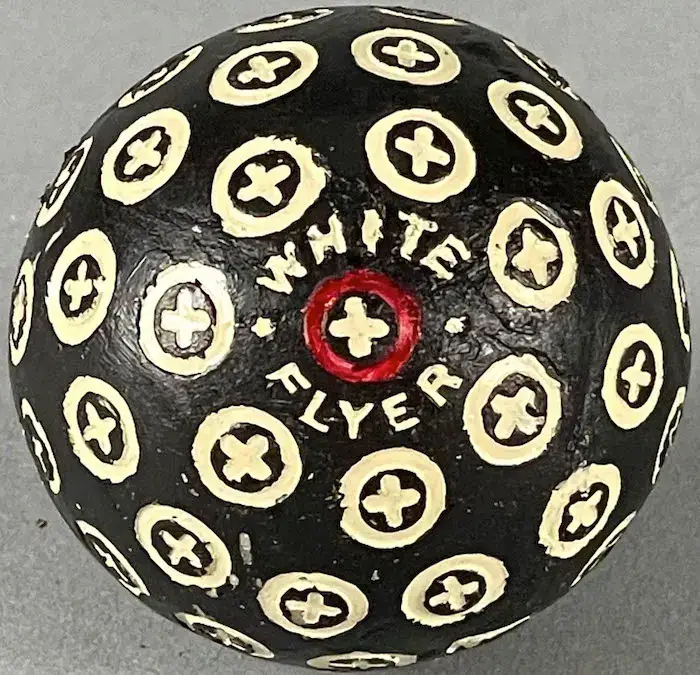
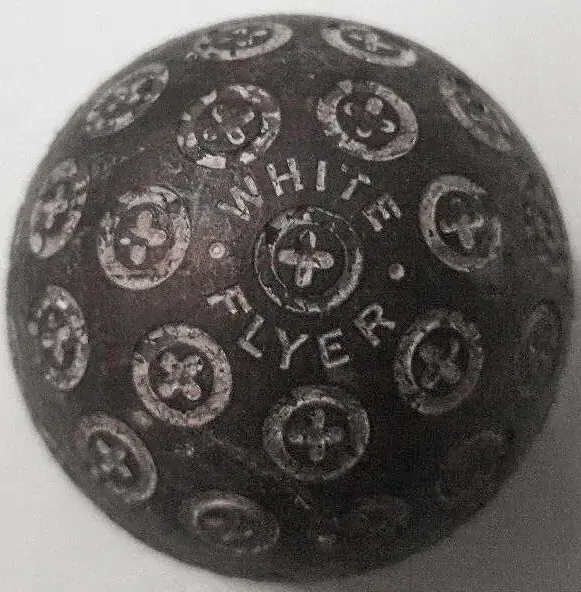
The White Flyer with this indented +/O pattern was advertised in Golf Illustrated (UK) in 1913 and 1914. The pattern on the decorated White Flyer (Image 1) looks good. Except for the “White” name, its pattern matches that of the White Flyer in the second image with the dark brown cover and worn white paint (Image 2).
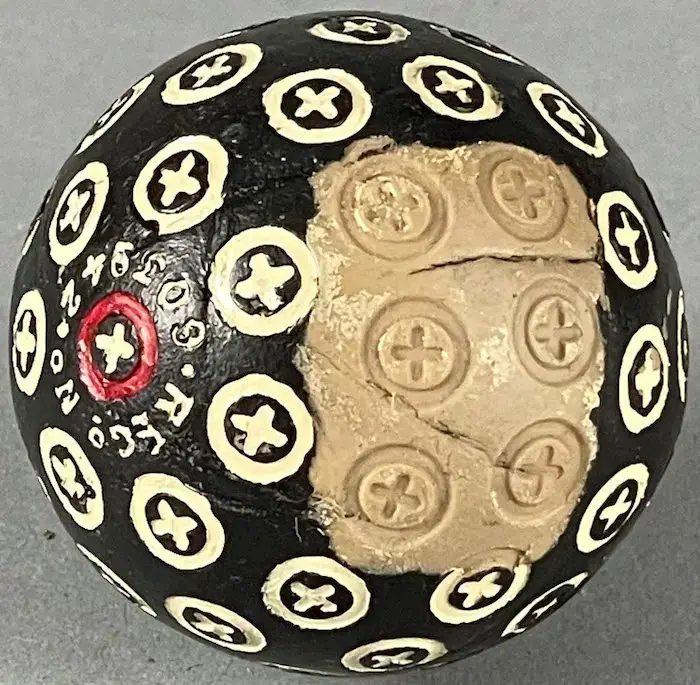
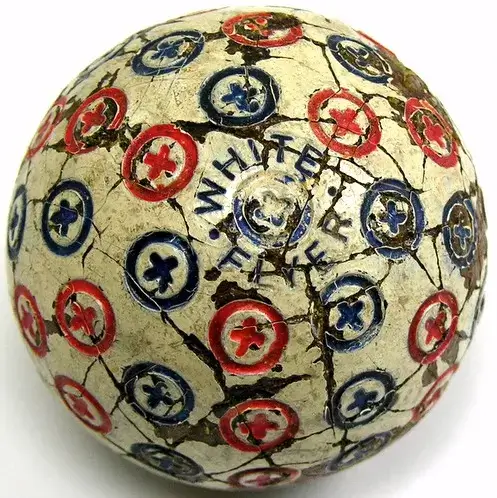
Stripping some of the paint off the black ball (see Image 3), however, revealed that it has a tan cover as shown above. This cover does not look like the gutta percha covers on the other two White Flyers shown above. When bounced, the black ball sounds soft and muted, not like the cover on a typical early 20th-century golf ball. This cover is soft and tacky enough to erase a pencil line on a piece of paper, something that none of the gutta percha covers I tested would do.
The White Flyers shown in the ads for 1913 and 1914 are in white paint with no extra colors. Same with the actual White Flyer balls that I have seen. I have not seen another White Flyer with red and blue paint as is found on the ball above (Image 4). I know that ball is genuine, however, because I can see the gutta percha cover under all the cracks and chips in the paint. Plus, the cover shows evidence of heavy use and significant age. If I were to surmise, I would say the blue and red paint was added to this ball shortly after it was originally sold, as there is no paint down in the cracks. Either way, if the paint is original to the ball or was added, it’s okay in my view because I know the ball is genuine.
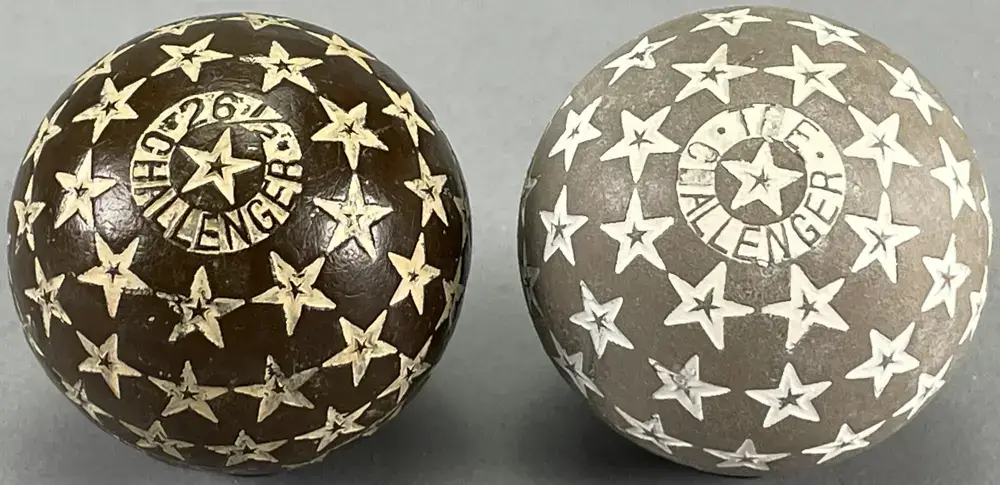
Shown on the left, this Challenger 26 ½ dates to 1912. It has a nice dark brown gutta percha cover typical of those found on balls made during the early 1900s. It will not begin to erase pencil lead off paper. The Challenger on the right has a tan cover that is not consistent with the ball on the left or any other golf ball cover produced in the early 20th century that I am aware of. It can erase a pencil line with great ease, and its color and general appearance is nothing like gutta percha as used on early 20th-century golf balls. When bounced, however, the ball on the right sounds somewhat like an early rubber core ball with a gutta percha cover. This fact shows that sound, in and of itself, is not always an accurate indicator of the nature of a ball. (The core under the cover can be harder than most, and that will help make for a harder sound when the ball is bounced.)
As shown above and below, the outermost surface of both balls is unpainted. The only paint they bear is in their recesses—the stars and name circle. As noted, the colors of the unpainted covers are distinctly different, but there is more. The genuine Challenger 26½ shows crazing, which is typical of a gutta percha cover on an early rubber core golf ball. The tan Challenger does not show signs of crazing. An inexpensive jeweler’s loupe helps to view crazing.
Another difference is the Challenger 26 ½ has a nice shine and depth to its cover while the Challenger cover has a dull finish. The shine, its depth and overall ”plastic-like” look of the Challenger 26 ½ are characteristics of gutta percha, which is an organic thermoplastic. Rubber is not. Consequently, the visual differences between these two covers is dramatic.
The next four pictures show the difference in the surfaces of the materials.
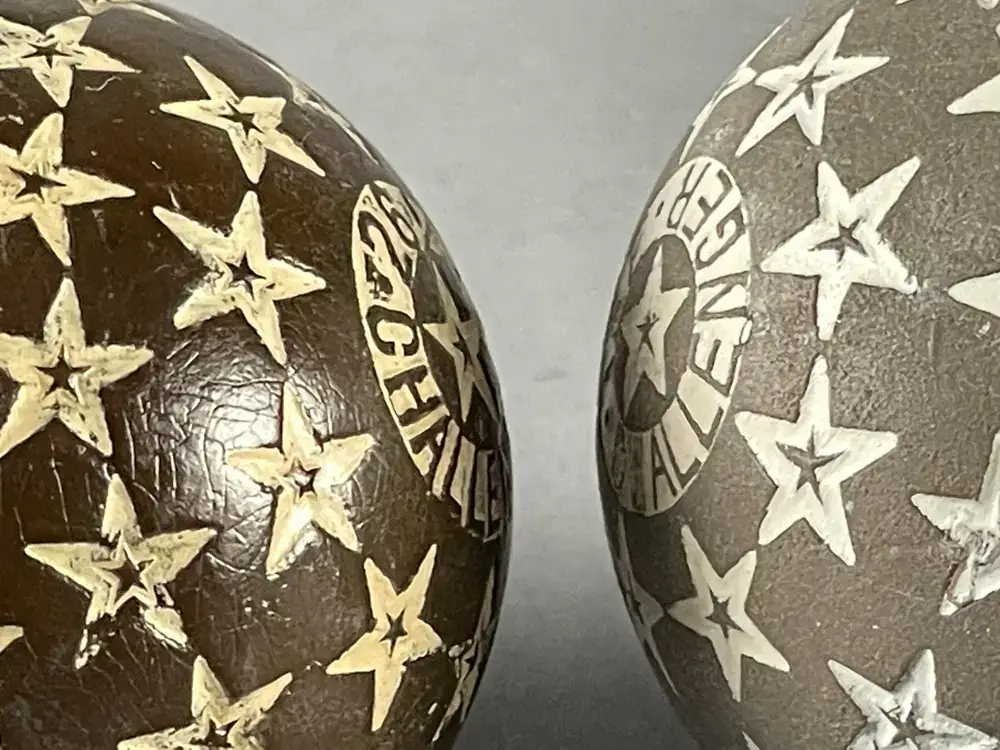
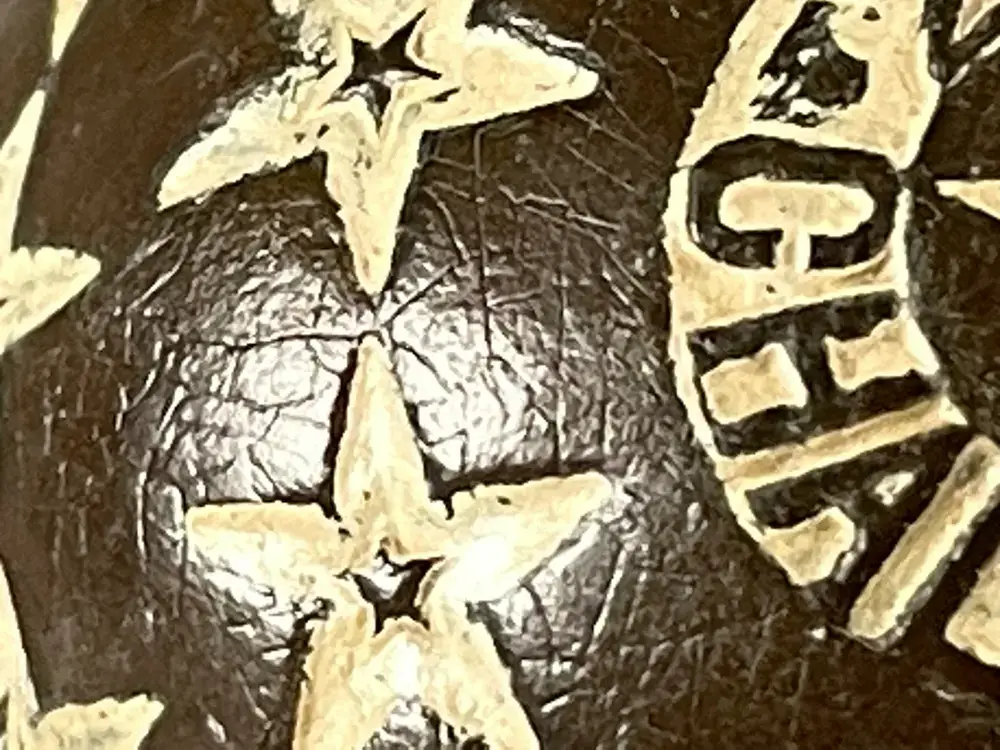
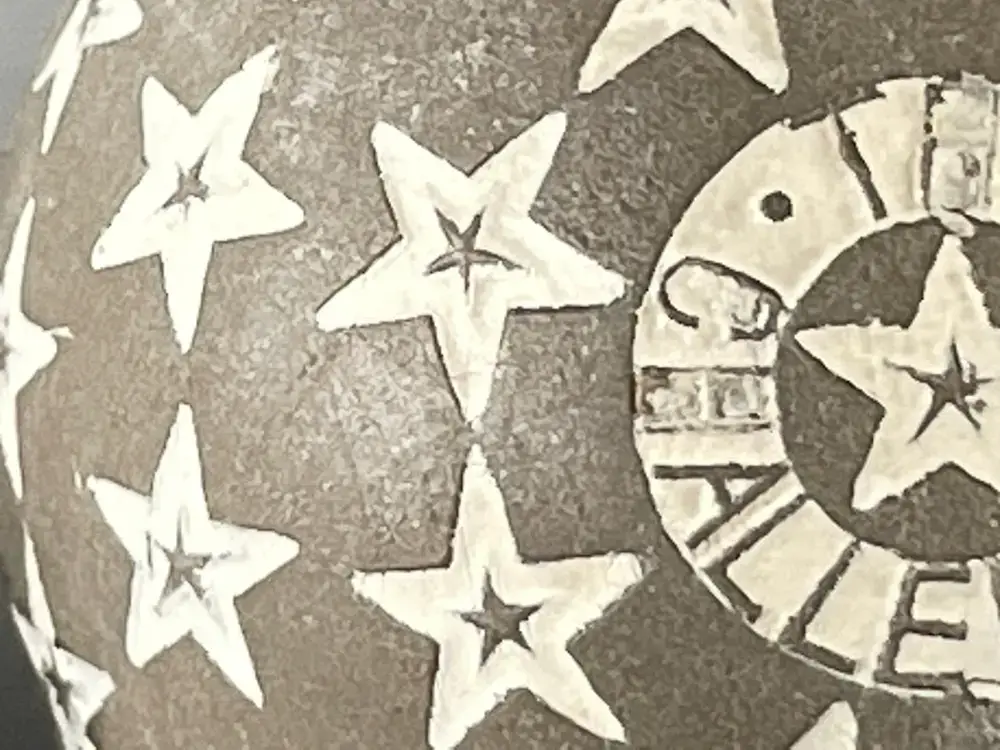
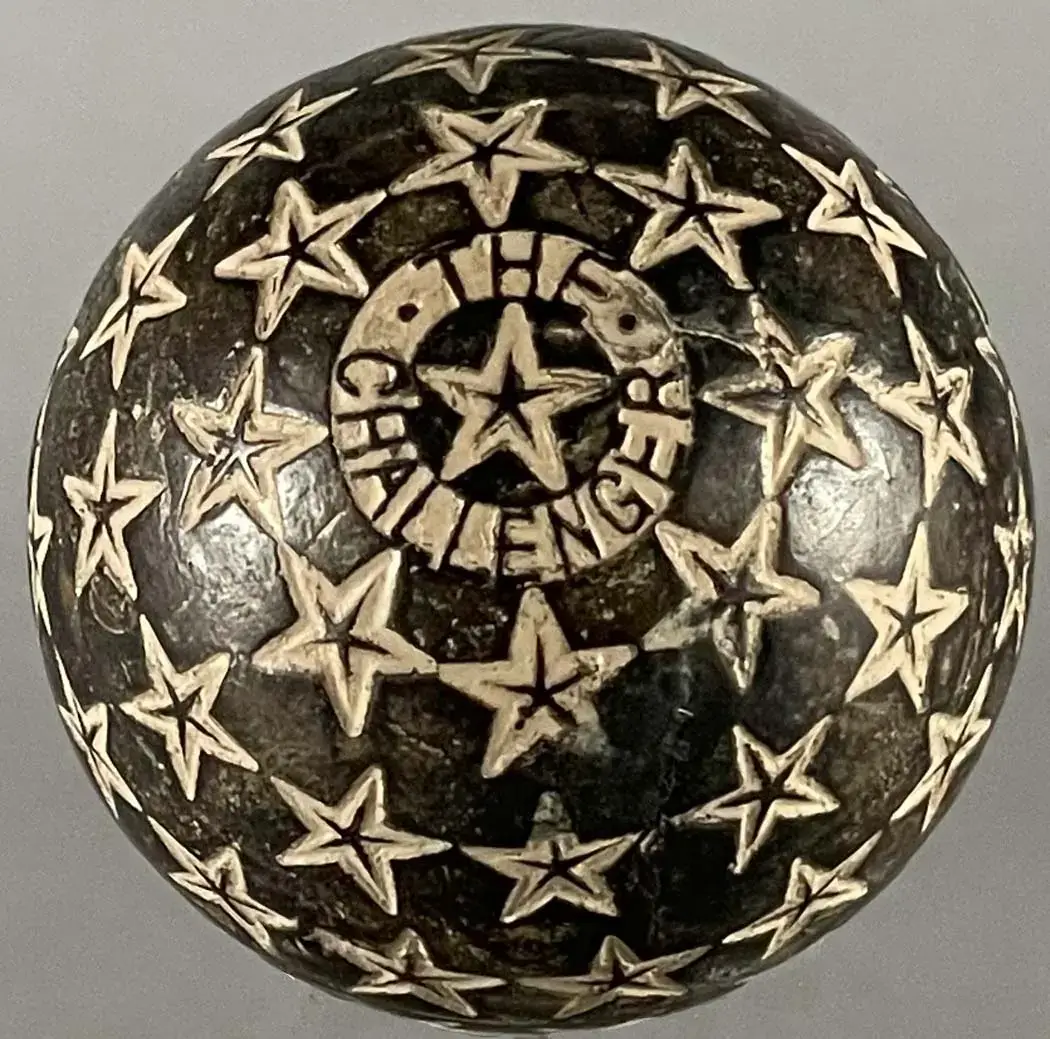
Directly above is a “The Challenger.” The only paint on this ball is in the stars and name ring. Hence, the dark brown gutta percha cover is on full display.
And below, the cover on the first Patent Challenger (Image 1) appears to be made from the same material as the cover on The Challenger shown earlier. A Patent Challenger in its gutta percha cover is shown as well (Image 2).
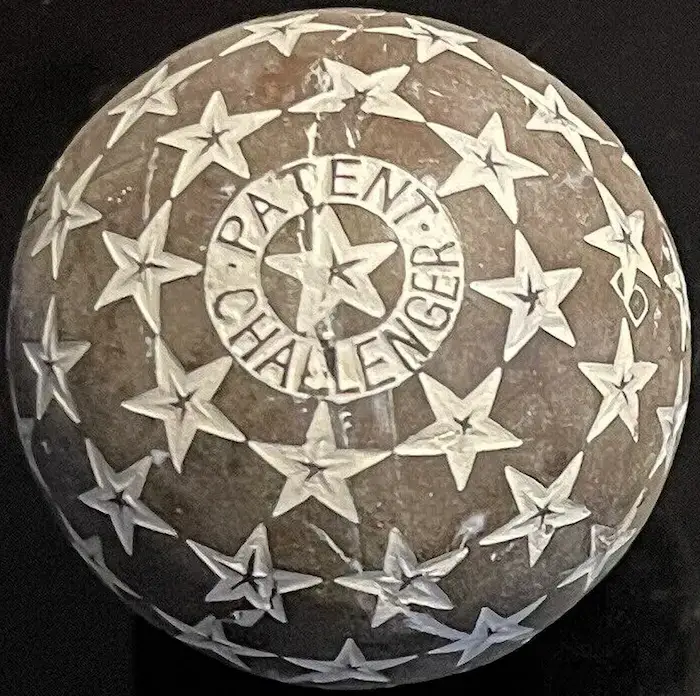
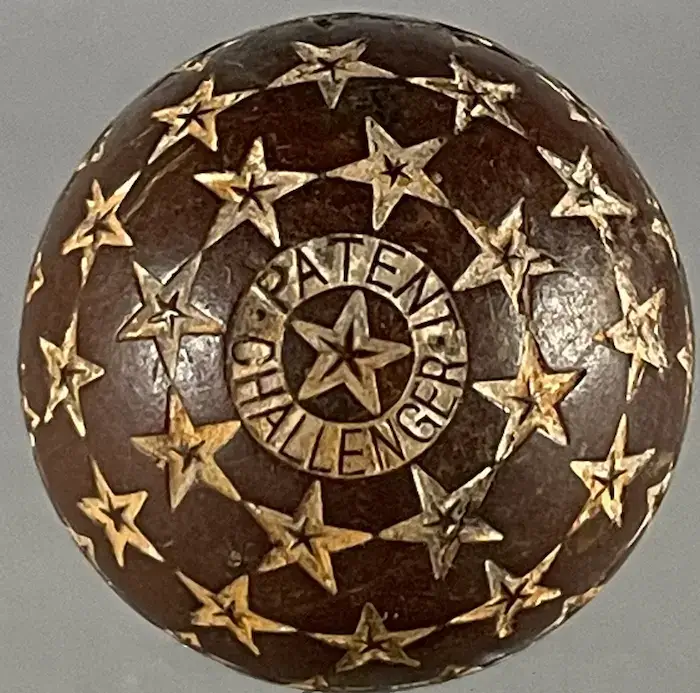
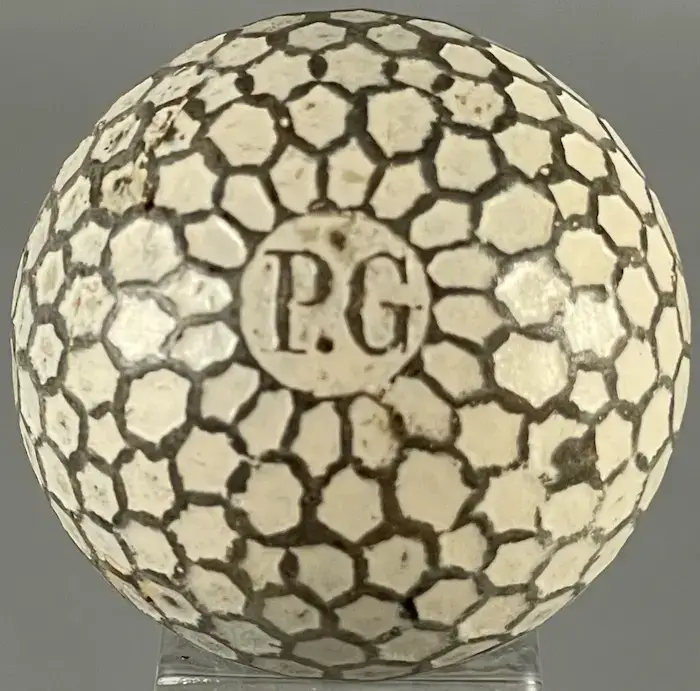
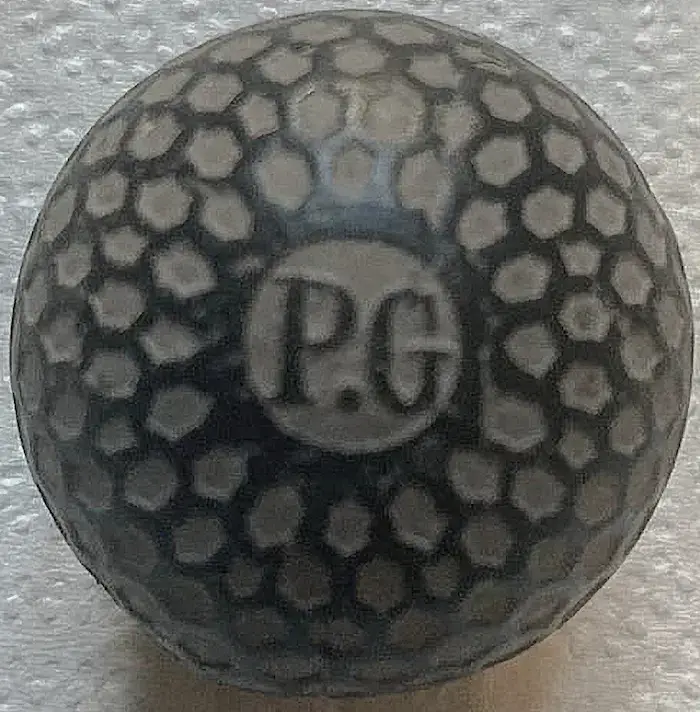
The first ball here (Image 1) is a “PG” ball patented in 1909 by Sir Ralph Payne Gallwey. It’s dark brown gutty cover is visible under a paint chip on the right-hand side of the ball as well as across the surface of the ball where there is no paint.
The second PG ball (Image 2) is painted black and gray. There are several additional differences between the two balls.
On the black ball in Image 2, the “PG” and name badge are larger. The first ring of recessed hexagons on the black ball are much further away from the center circle that encompasses the initials. In addition, the recessed hexagons on the black ball do not match the size of the hexagons in the first ring, the second ring, or the other rings as they encircle the center of the white ball. In fact, 16 hexagons make up the first encircling ring on both balls, but the second rings are different in number. There are 18 hexagons on the white ball while the black ball has 24 hexagons. And there are more differences such as the thickness of the lines between the hexagons. (For more on such name/pattern size differences, see 2.1 Stars and Stripes.)
Arrow balls were made in 1906 by Donald Lowne & Co. of London. The gray/black arrow ball (Image 1), however, does not match the Arrow ball in its old white paint (Image 2). Not only are its brambles a different size, so is the name ring. Furthermore, the black name ring is not elevated. It is simply painted in place, flat to the adjacent surface of the ball, and does not project up like it does on the white Arrow ball. And there is more.
As shown above, the bare cover material under the gray/black paint is not the same color or texture as the bare cover material of the unpainted Haskell Bramble to the right. The cover on the unpainted Haskell Bramble is dark brown gutta percha, complete with a nice sheen and plastic-like look typical of gutta percha covers in good condition. Not so with the bare cover shown on the gray Arrow. The paint-chipped surface of the white Arrow ball at the top of this article has a few small dark brown areas consistent with gutta percha. These are mostly located on the opposite pole.
Another difference between this decorated Arrow and the white Arrow is the bare cover of the decorated Arrow can erase pencil marks off paper. It performed admirably when put to the test. The gutty cover of the Haskell does not erase pencil marks. This is no surprise given that erasers are known for being made from rubber, not gutta percha. The decorated arrow sounds soft and muted when bounced while the Haskell, with its raised name ring, gives off a strong click.
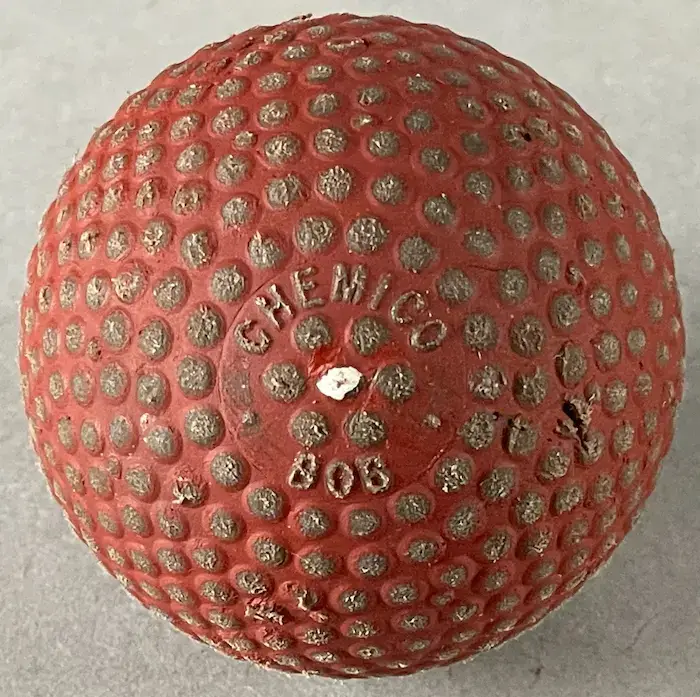
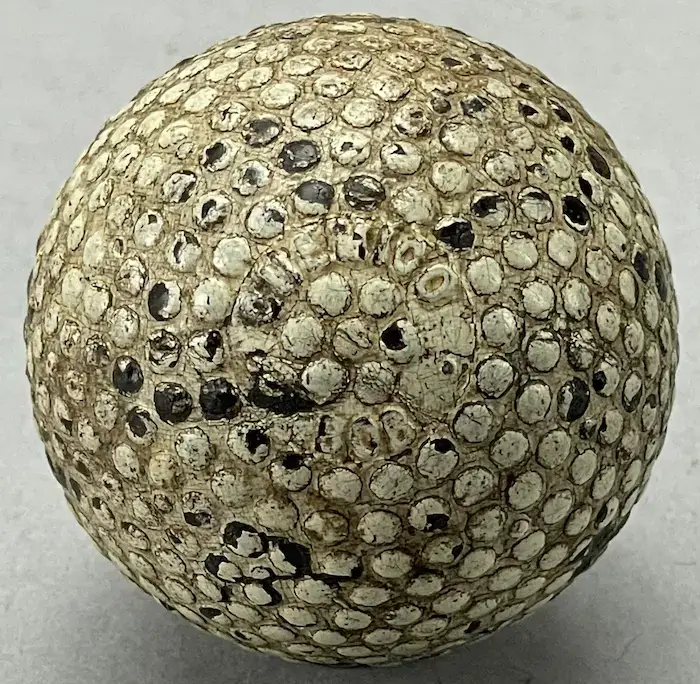
The Chemico Bob was introduced in 1912. The red Chemico Bob has been painted red in modern times. The tops of its brambles, however, are not painted. When you compare the red ball to the Chemico Bob above right, which is still in its original white paint with its dark brown gutta percha brambles visible where the paint is chipped, there are clear differences.
The brambles on the red ball look “furry.” This is not consistent with the brambles found on early 20th-century bramble-pattern golf balls. Another distinct difference are the sounds these two balls make when bounced. The white Chemico Bob sounds much harder than the red one.
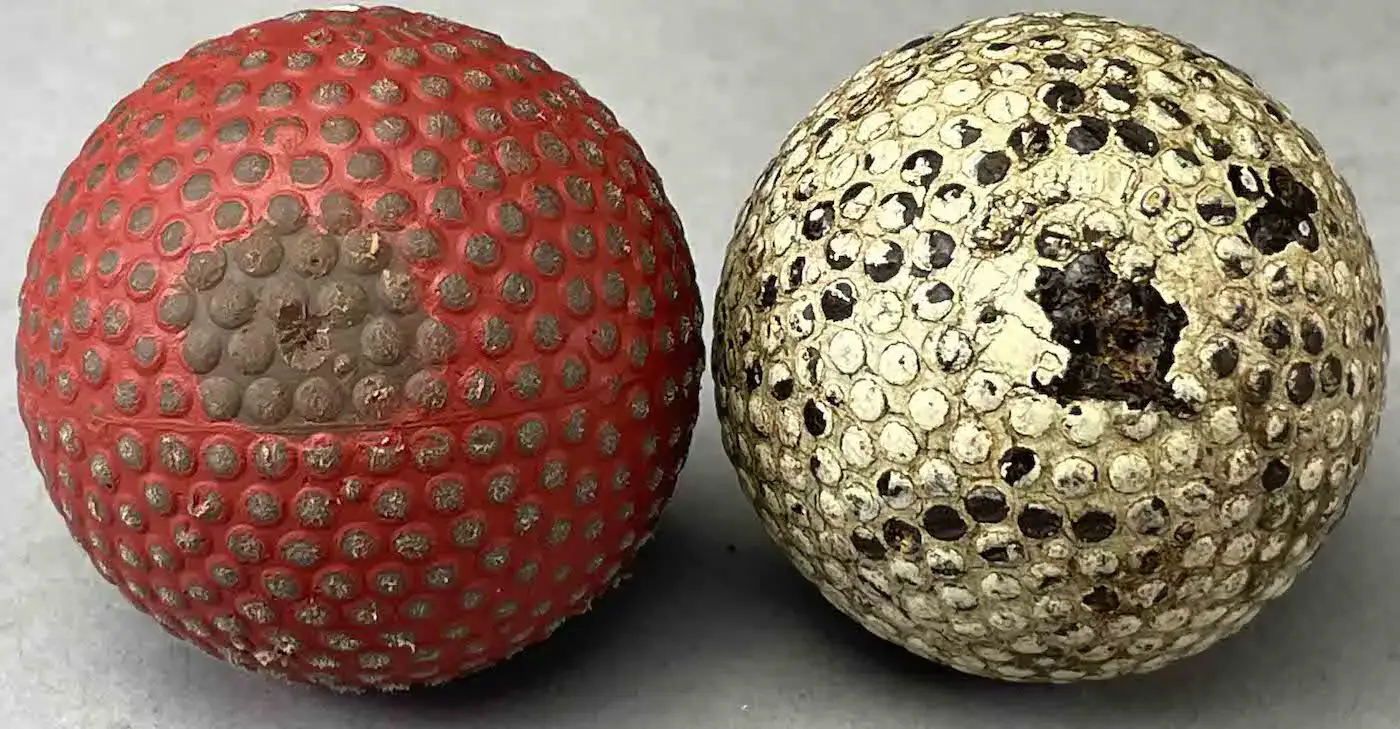
Above, the red Chemico Bob has had a portion of its red paint stripped off its cover and a small bramble removed. The medium brown color of its cover is visible. The old, used white Chemico Bob has never been repainted, and the gutta percha cover under its paint is not consistent with the exposed portion on the red example. A small cone-shaped hole in the surface of both covers shows the difference in the materials when viewed with the naked eye, how they are not the same on or below their surfaces
In this next close-up, we see that the surface between the brambles does not look like the unpainted surface of a genuine gutta percha cover, including the gutta percha visible on the original Arrow ball above. Again, there is no depth, shine, or plastic look to this cover like there is with genuine gutta percha covers.
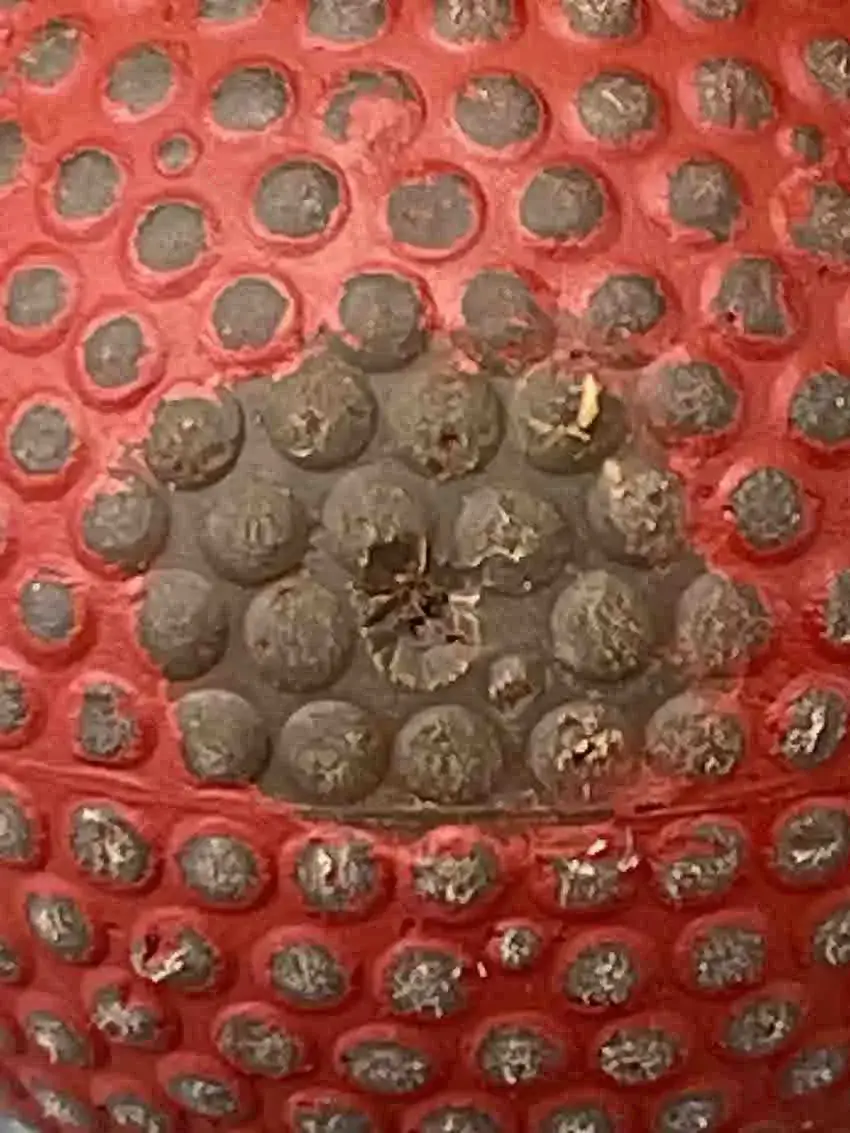
And here a good portion of the cover has been stripped of its paint and cut off the bottom of the red Chemico Bob. The cover flexes very nicely and shows no signs of cracking when bowed. A piece of gutta percha removed from a typical early 1900s golf ball will not bend like rubber. It will break.
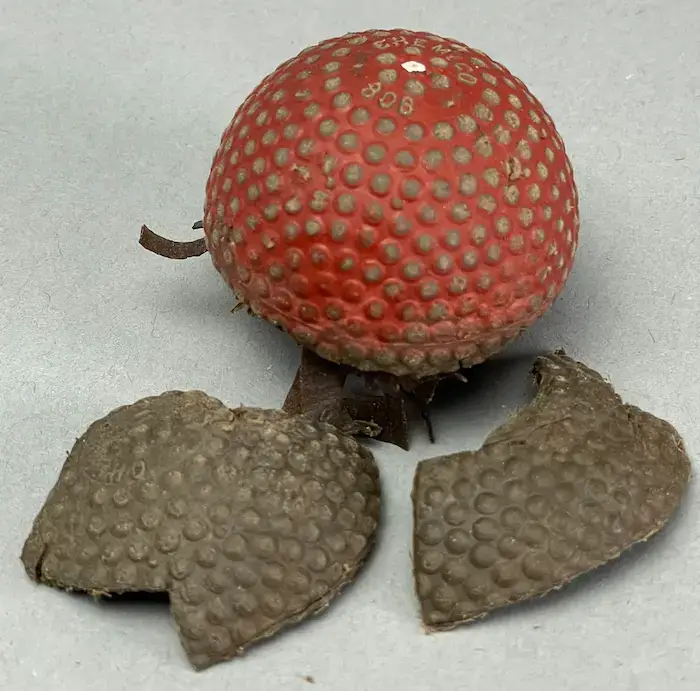
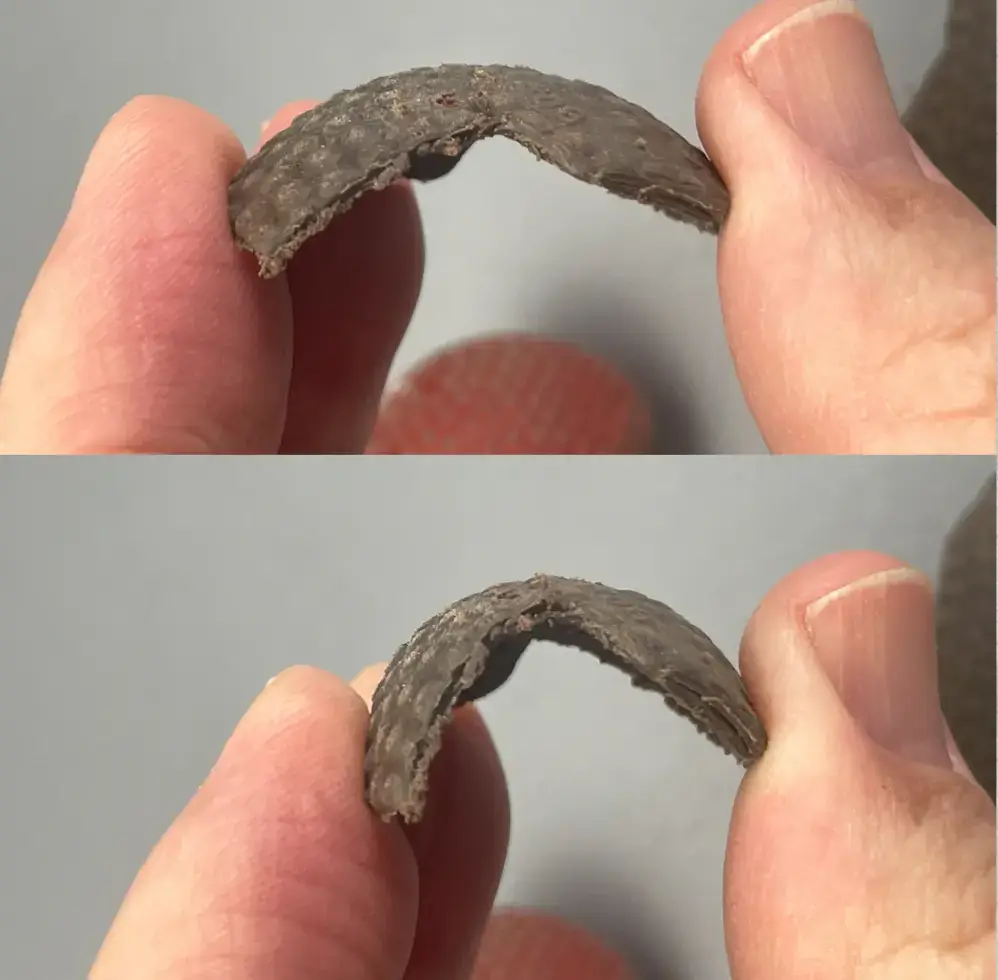
Gutta percha as a finished material is rigid. After being molded, gutta percha becomes hard and inelastic. Consequently, when golf balls were first made from gutta percha, they would sometimes shatter when struck by a club. Therefore, a rule was made that allowed the golfer to play their next shot from the spot attained by the largest broken piece, with no penalty. To make gutty balls more durable, ballmakers began to let them cure for up to 6 months before painting and selling them.
Dating to 1911, one year before the Chemico Bob was introduced, this Wright & Ditson Black Circle ball with its damaged cover tells us much about the nature of gutta percha covers. Inelastic and hornlike to begin with, gutta percha can oxidize and become brittle over time after exposure to air, making the ball fragile. The broken pieces (2 face up and 2 face down) in front of the ball snapped right off the existing cover when an edge was lifted.
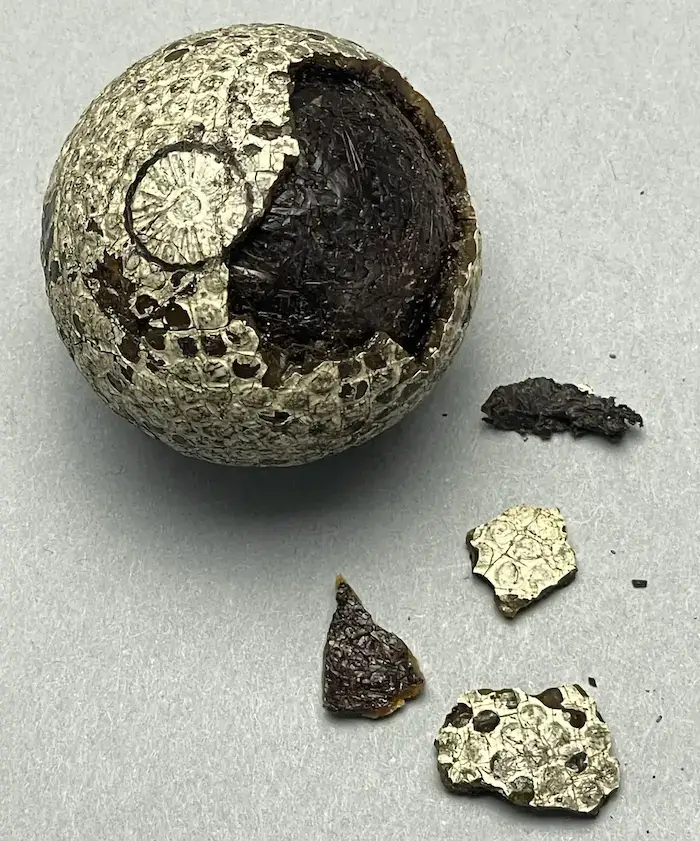
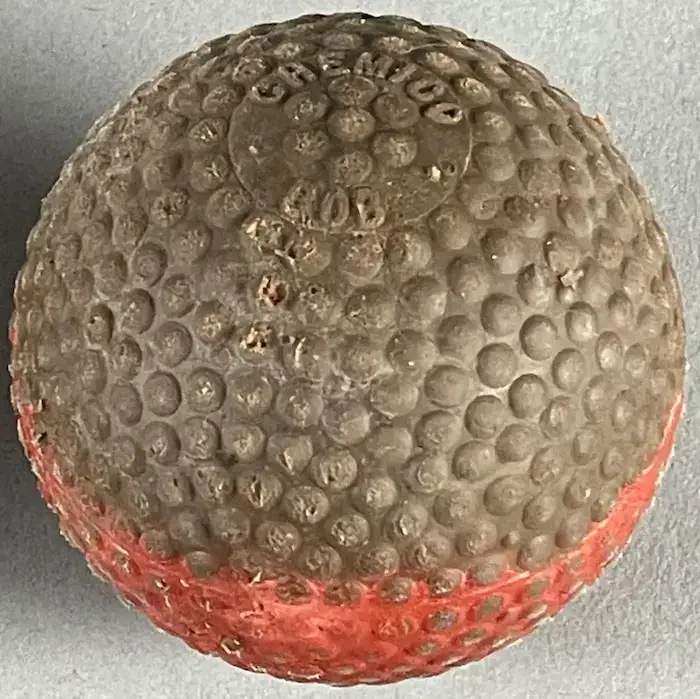
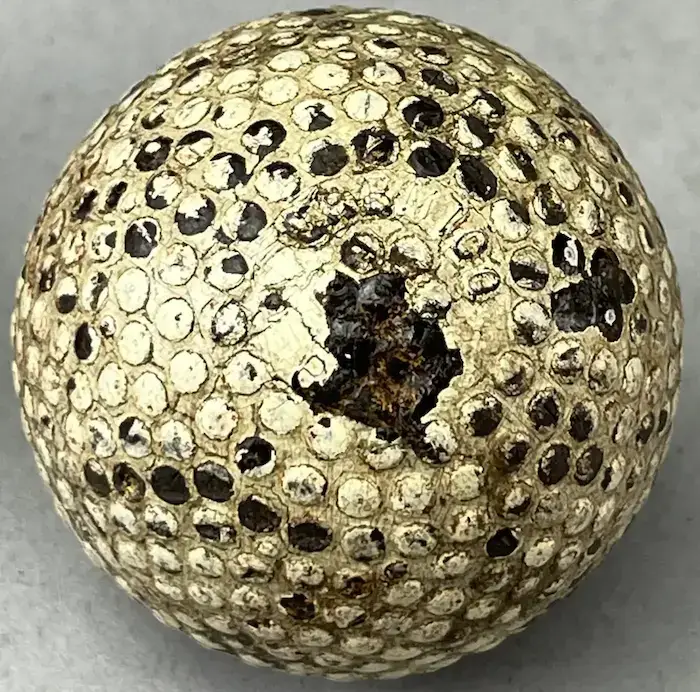
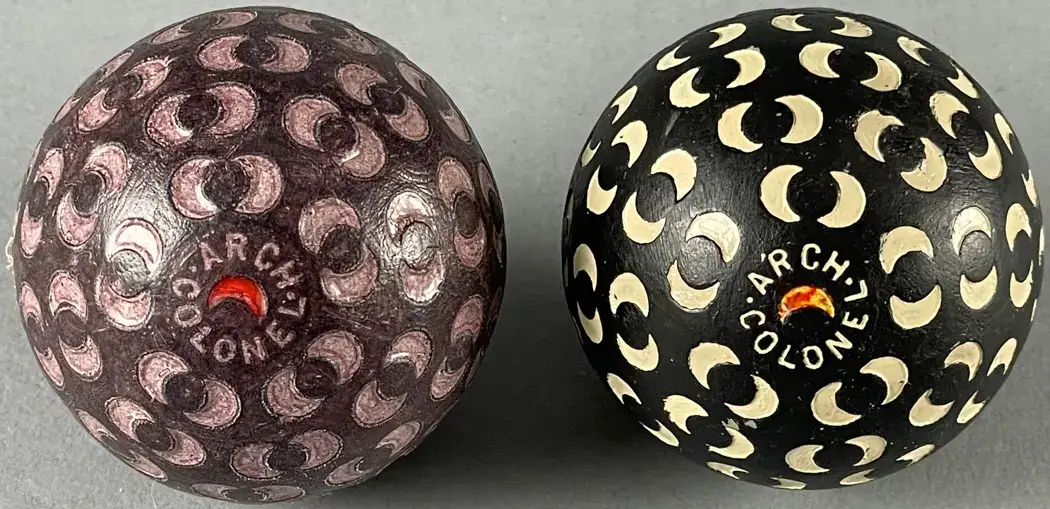

Stripping the paint off a small portion of the purple ball revealed a beige cover under the paint. Stripping the paint off a small portion of the black ball revealed a black cover, but it is not obvious in the picture above. However, it is visible—it’s the small black area between the two crescents to the lower left in the stripped swatch. When stripper was applied to the surface of this ball, the paint came right off but the yellowish coating did not. Only after a second and a third application did the small black patch of the cover underneath begin to appear. Some type of a thin but strong coating was applied to the black cover before the outer layer of black paint was applied.

Taken from the July 1916 Issue of Golfer’s Magazine, this Arch Colonel advertisement reads in part, “Covered with indestructible
White Gutta [italics mine]…. The paint on the colonel golf balls is perfect.”
During the 1890s, a few ballmakers tried making balls from solid white gutta percha, but not for long. They were more yellow than white and
ended up being painted white. The idea of making a golf ball that did not need paint, however, was an appealing idea to any ballmaker. White
gutta percha was also not the best quality in the 1900s. A few ballmakers tried to use it, but they typically mixed in chemicals and other
ingredients.
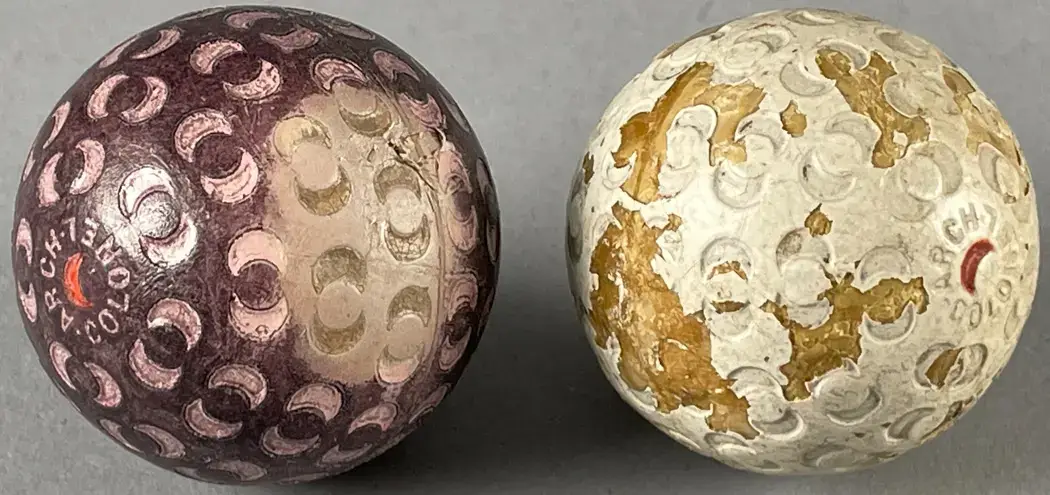
Above right is a 1916 Arch Colonel in its original paint. Much of its paint has been chipped off over the years, so its white gutta perch cover is now visible. Note: white gutta percha typically appears more yellow than white, and despite what the ad above said—and as can be seen from all the chips and missing crescents in its unpainted surface—the white gutta percha used on this Arch Colonel was not indestructible.
According to J.S. Gamble’s 1907 article Gutta Percha Trees of the Malay Peninsula, white gutta percha was a lower or inferior grade of gutta percha. It would sometimes be mixed in with other grades of gutta percha, but rarely used on its own. In short, according to Gamble, it was better suited to be a filler. White gutta percha could also be mixed with various chemicals and additives to improve its qualities. White gutta percha, however, had the benefit of being cheaper to buy.
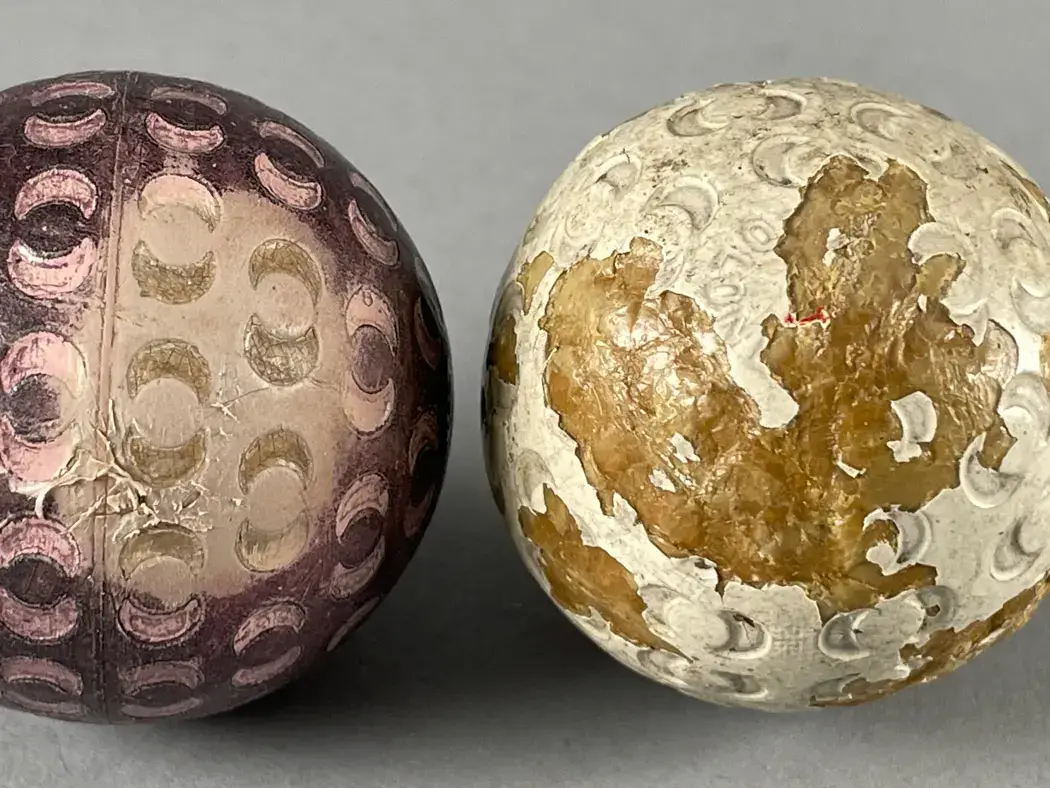
Above right, the exposed gutta percha, which is a natural thermoplastic, appears “plastic-like”. It has a definite shine/sheen and depth that is not consistent with the exposed cover on the ball above left.
Above left, an X-acto knife was used to make multiple cuts on the lower part of the rubber cover where it has been stripped of paint. The cover would not chip and using my fingers to rub off the tiny raised “edges” made by the knife did not work. Trying to cut out a tiny piece required that every bit be cut out. This is not consistent with gutta percha. Because it is hard and inelastic, gutta percha is far more likely to chip or break off when an early 1900s golf ball cover is stuck at an angle with the tip of an X-acto blade.
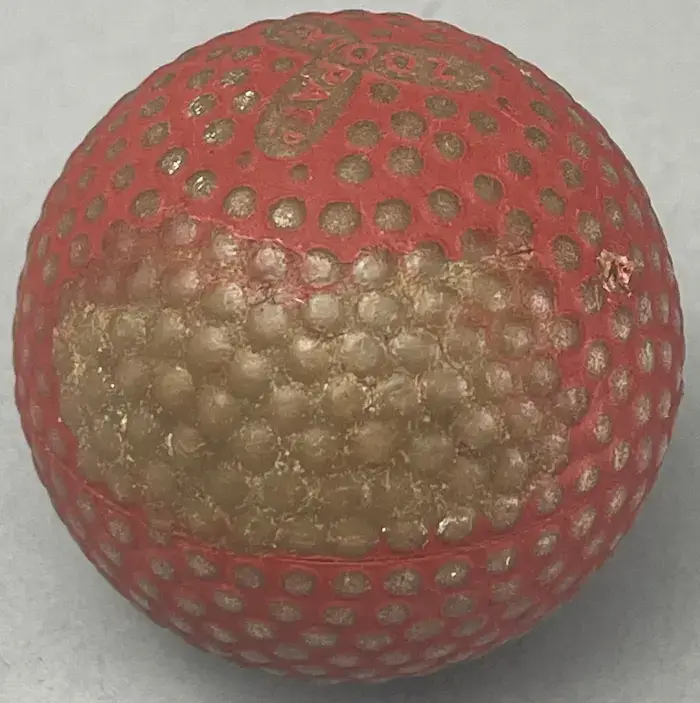
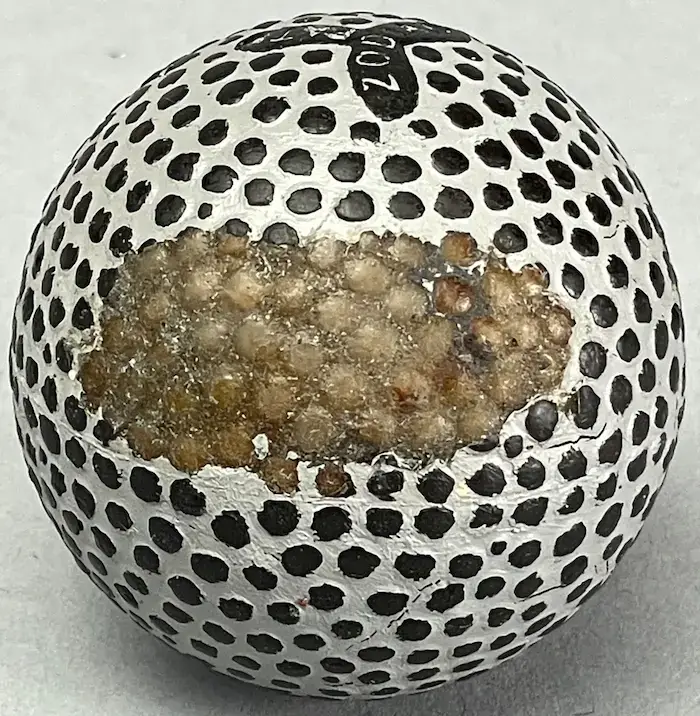
The paint has been stripped off a portion of both the red and gray Martins Zodiac balls above. The color of both bare covers appears to match. Neither bare area, however, matches the unpainted areas on the brown and yellow covers on the old Zodiac balls below. While the colors of these two covers do not match, their material does. Both are gutta percha.
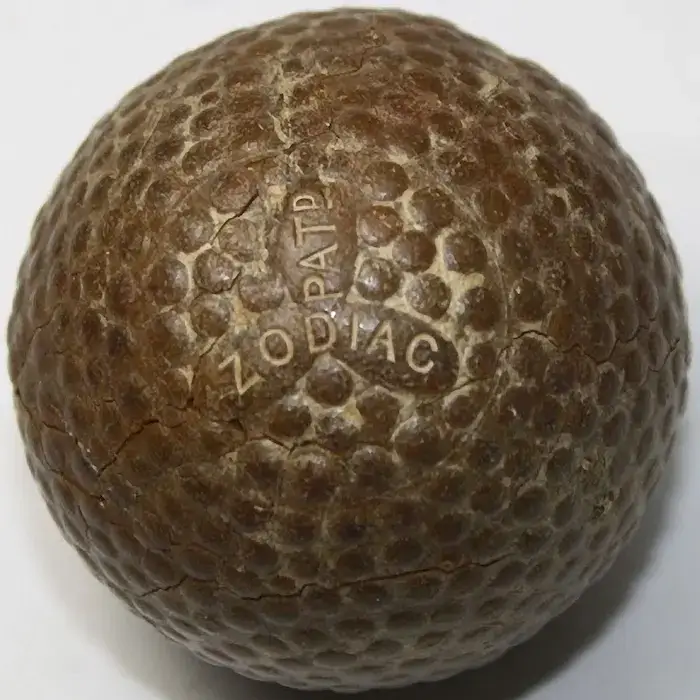
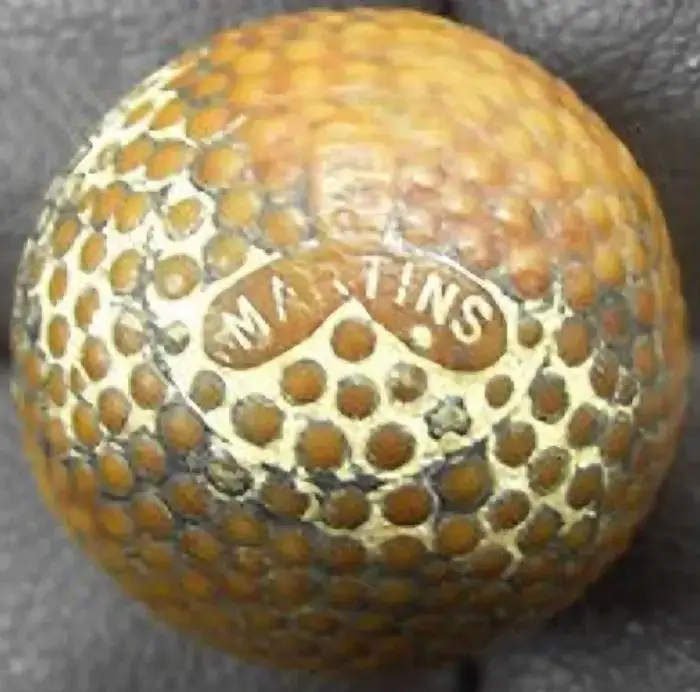
Martins Zodiac was introduced in 1906, when gutta percha covers reigned supreme, and it remained in production for 10+ years. The unpainted dark brown cover on the Zodiac in Image 1 is consistent with the gutta percha covers installed on golf balls in 1906. The yellow cover on the other Zodiac (Image 2) is a “white” gutta percha cover as was used on a few different balls made in the mid-late 1910s. See the prior article on the Arch Colonel to learn more about white gutta percha—which is normally yellow in appearance as used on antique golf balls.
A Reach Paramount introduced in the mid 1910s is shown below right. It’s unpainted white gutta percha cover is consistent with the color and sheen of the white gutta percha cover on the Martins Zodiac shown. Both even have a plastic-like appearance, especially when viewed in person.

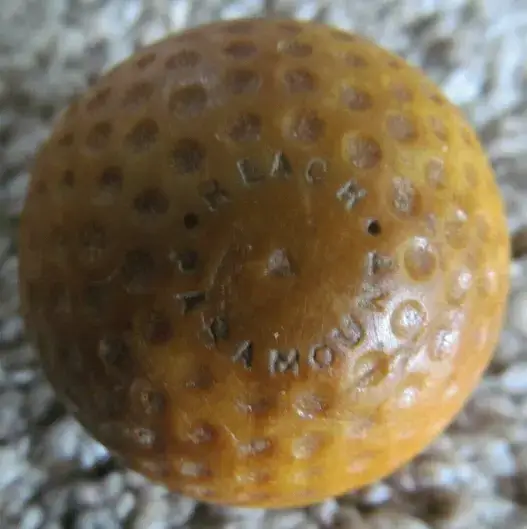
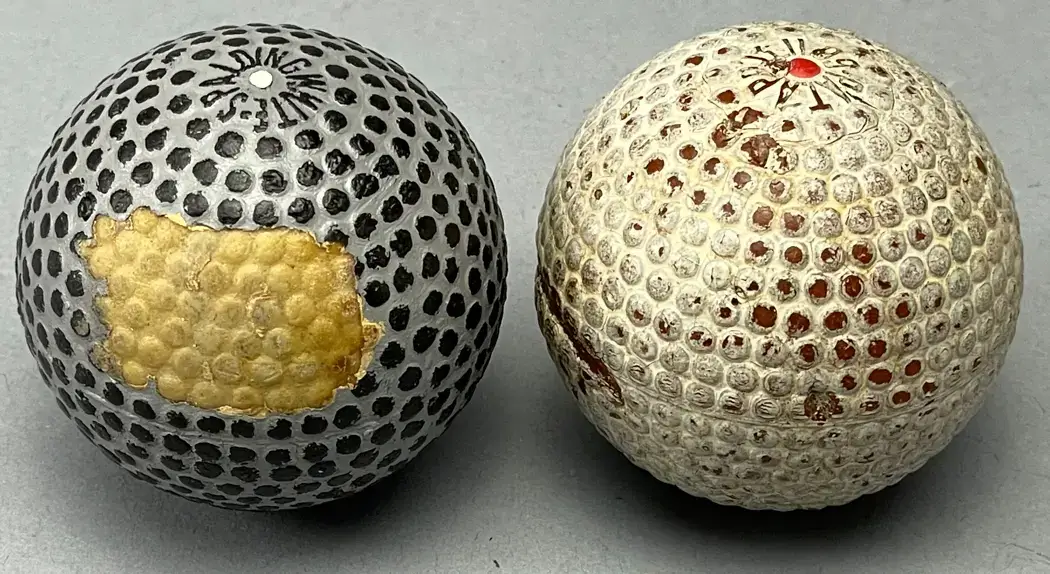
On the left is a modern painted gray and black “Spalding White” with some of its paint stripped away. The ball on the right is a 1906 Spalding White still in its original paint. Its surface is worn and there is a cut on its side. Underneath the paint, visible because of the wear to its surface, is what was advertised in 1907 as a “white gutta percha” cover. Such covers, however, were typically not actually white. The Spalding White white gutty covers today usually appear reddish depending on their environment across the past 115 years, etc.
White gutta percha is still gutta percha, only it comes from a different species of gutta percha tree than those that produced the dark brown gutta percha used for covers. Unlike the gray/black ball, the Spalding White in its original white paint sounds like a solid gutty ball when lightly bounced, giving off a solid bright click.
Once again, the decorated ball does not match the same model ball in its original paint. Their colors, materials, and sounds they make when lightly bounced are different.
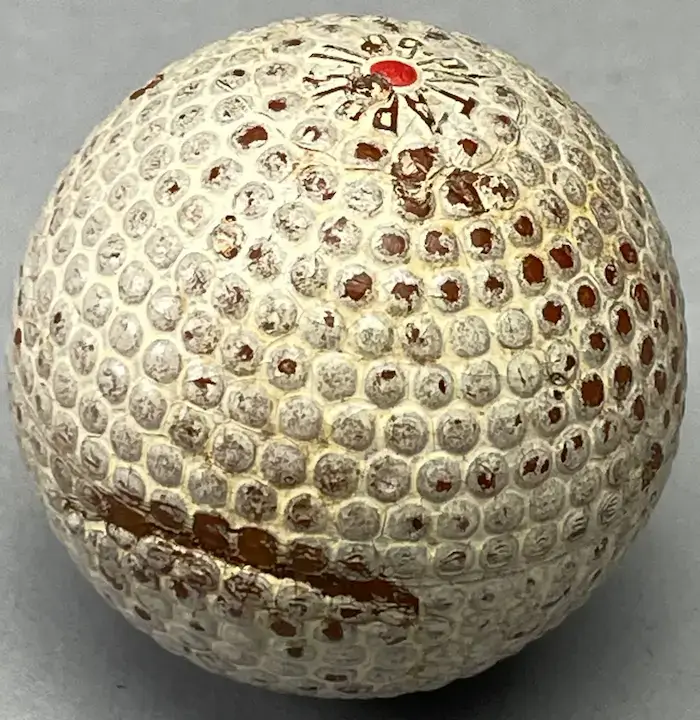
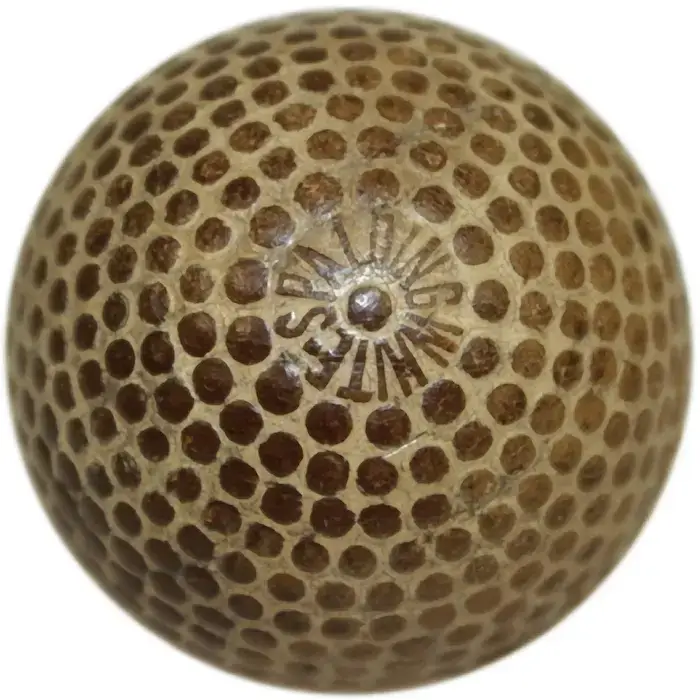
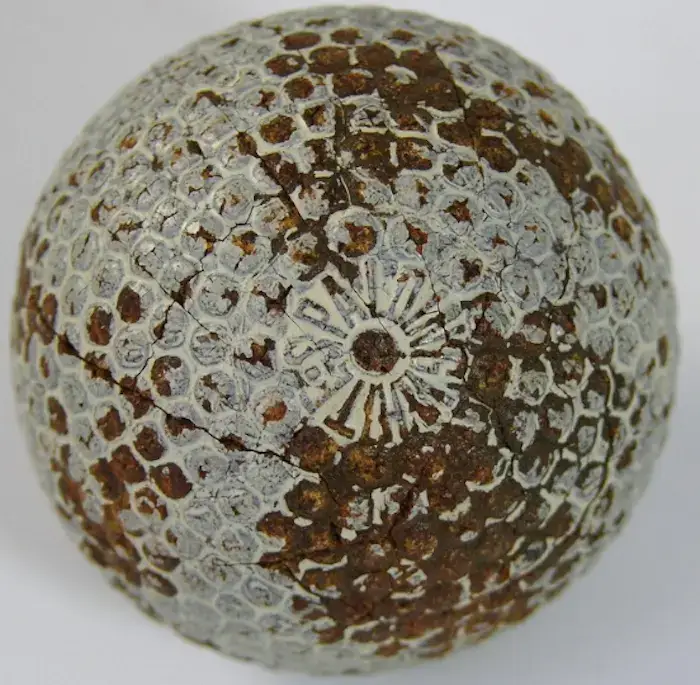
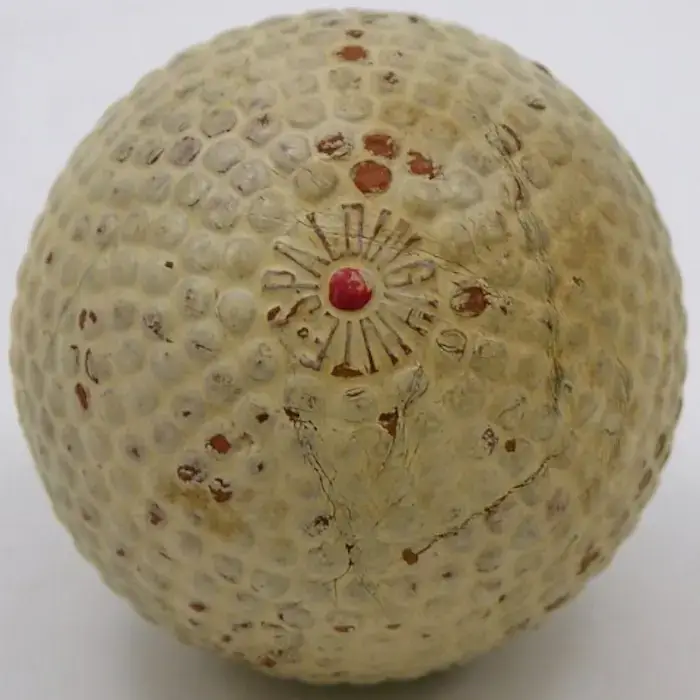
Dating to 1906 or shortly thereafter, the four Spalding White balls above have worn areas where their white gutty covers are exposed. As can be seen, the light-yellow cover on the gray/black ball shown at the beginning of this section is not consistent with the exposed covers on any of the balls in their original white paint.
The color and appearance of what was advertised as white gutta percha covers can vary a great deal from one ballmaker to another. Chemicals and additives mixed in with the white gutta percha can vary the color and look of the material. In addition, the nature of the wear, the environment the ball experienced during its life, and how long the white gutta percha has been exposed to air and light, etc, are also factors that can alter its color/appearance. These differences are sometimes seen when viewing two different balls with white gutta percha covers made by the same maker.
Using white gutta percha to make balls/covers was tried by a few makers in the 1890s and early 1900s.
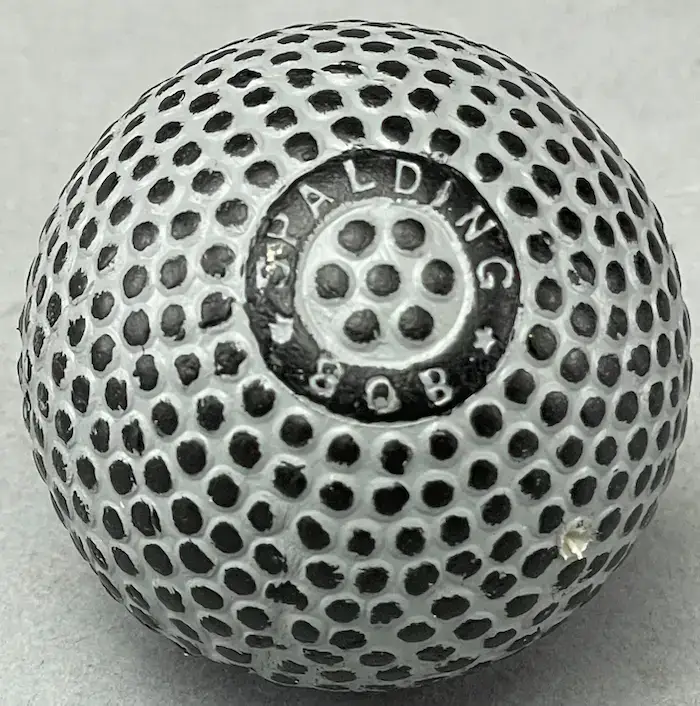

Advertised in the November 6, 1906 issue (p. 186) of Golf Illustrated as “Brand New from cover to core” (i.e. no reclaimed/remolded gutta percha or elastic cores from previously used balls), the Spalding Bob is an early rubber core ball with a gutta percha cover. An example in original white paint with the dark brown gutta percha exposed in worn areas is shown above. Also shown are images of a black and grey painted ball that has had a single bramble removed on one side and a swatch of paint removed on the other.
These alterations to the gray/black-painted Bob reveal that its cover material is not consistent with the cover of the worn Spalding Bob. It also does not make a distinct click when lightly bounced like the worn Spalding Bob in its gutta percha cover.
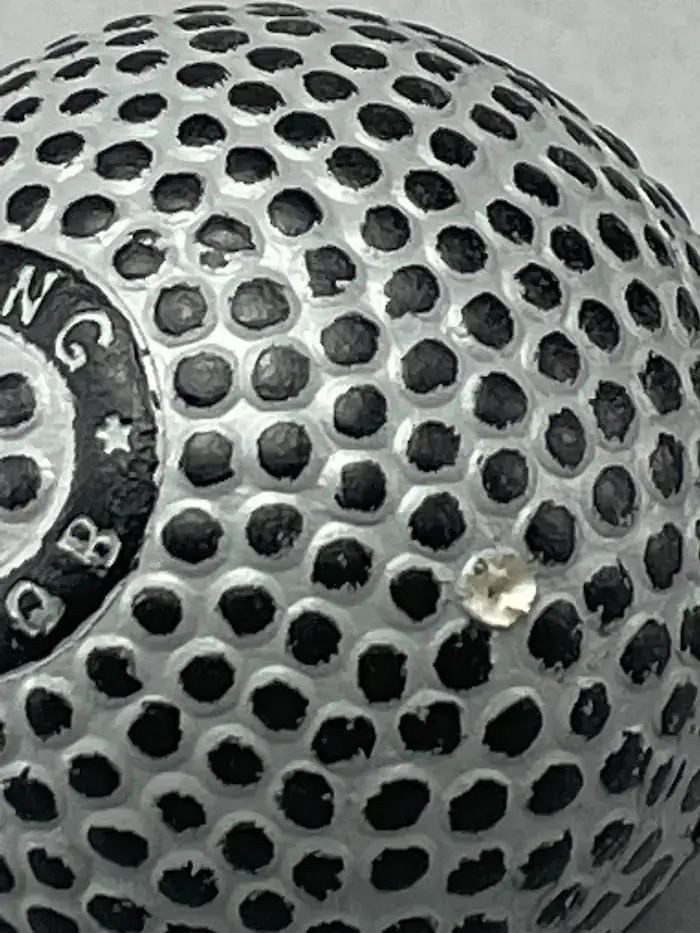
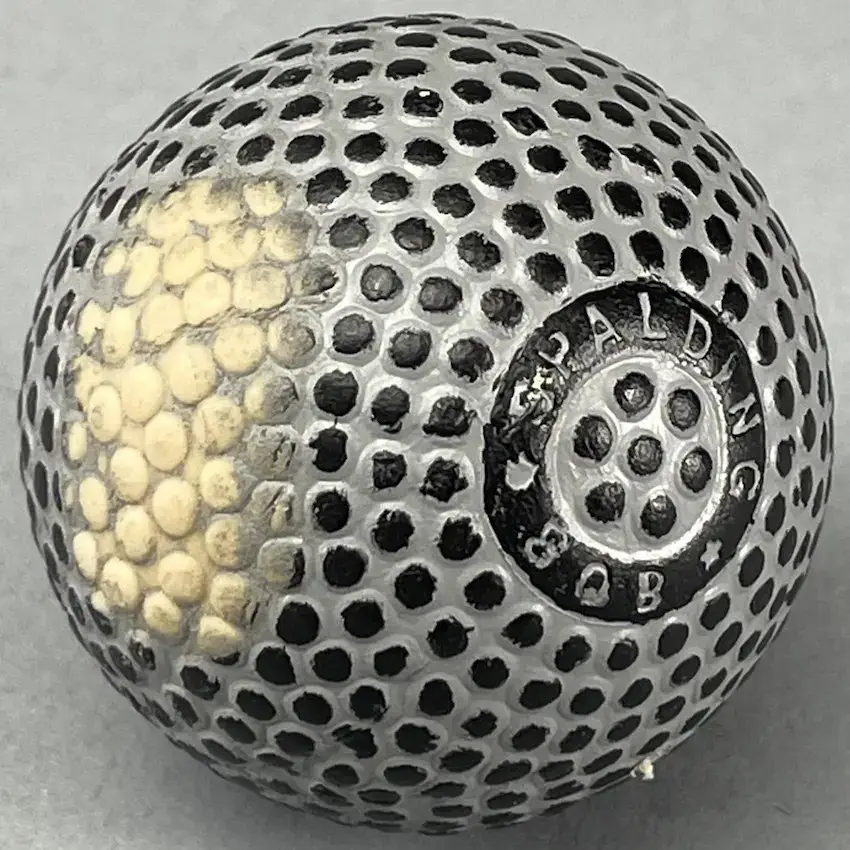
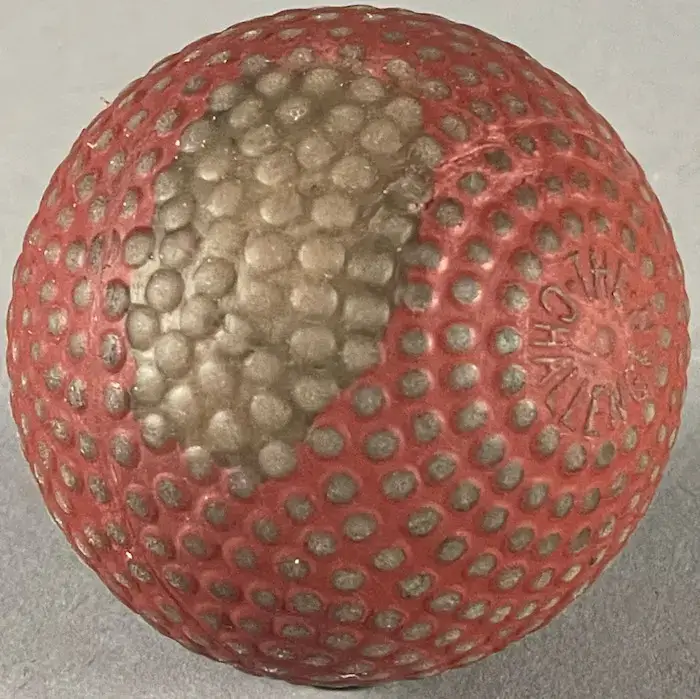
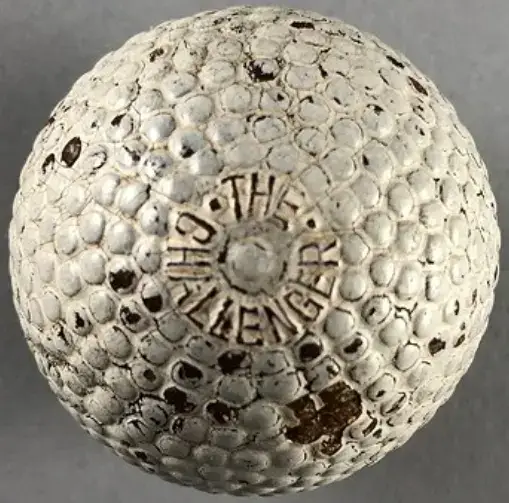
The red Challenger ball has had a portion of its paint stripped off. The unpainted area of its cover is not consistent with the exposed gutta percha on the 1904 Challenger ball in its original white paint in Image 2. However, it is consistent with the bare covers on many other decorated balls that also had a bit of their paint removed.
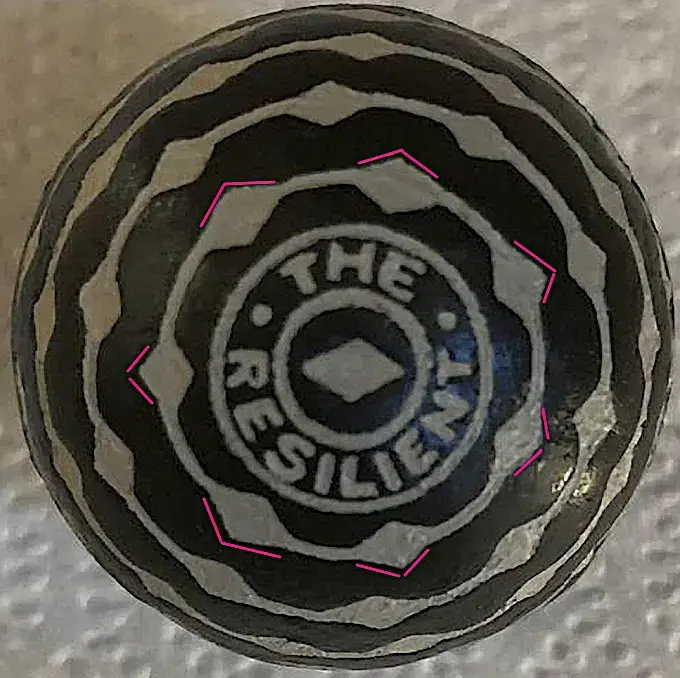
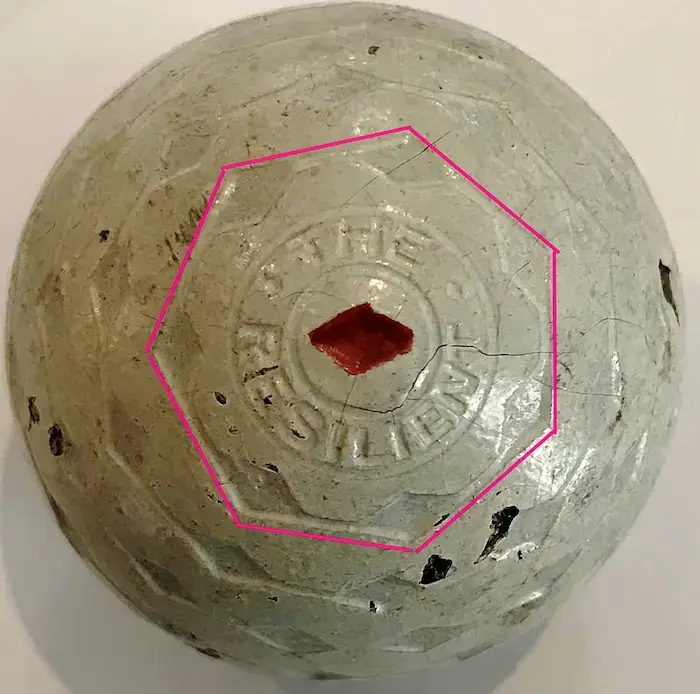
The pattern on the black painted Resilient ball is not consistent with the pattern on the white painted Resilient ball.
On the white ball, the ring of diamonds closes to the pole are inside a seven-sided outer perimeter line, marked in red, that surrounds the pole. This line consists of seven short but straight lines that form a perfect heptagon. It’s the inner perimeter lines that creates the diamond shapes.
On the black ball, the diamond shapes extend above the outer perimeter lines, which are curved, not straight. Consequently, there is an angle on each end of each curved outer perimeter line, as shown by the red V’s.
Compared to the white ball, the name and pole badge on the black ball are larger, and its lines and letters are not as crisp, even, or sharp. (For more on such name/pattern size differences, see 2.1 Stars and Stripes.)
The chipped paint on the c.1910s white ball reveals dark gutta percha underneath.
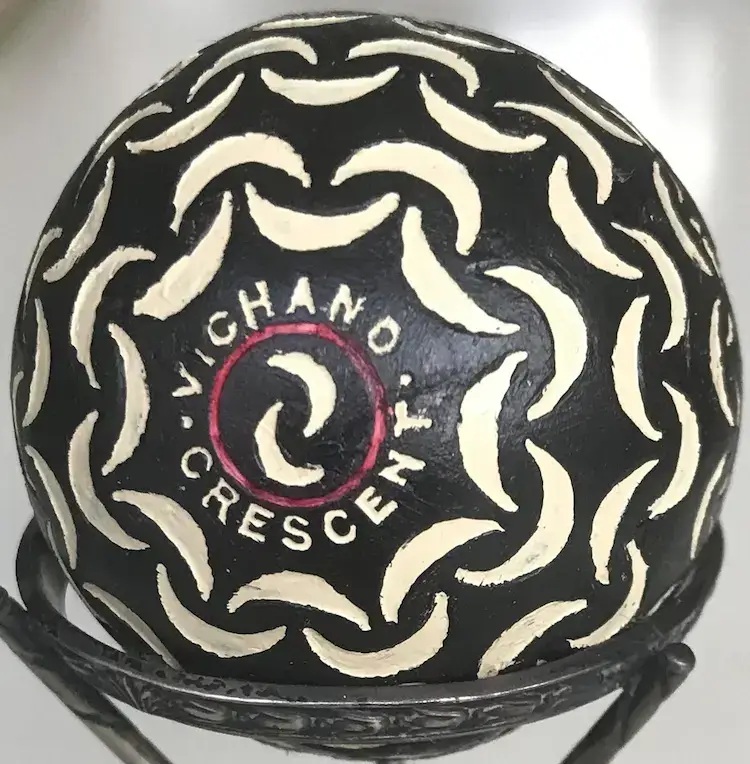
The black-painted Vichand Crescent ball is different from the Vichand Crescent ball in its original white paint. The patterns on the two balls are the same, except they do not quite match. Both balls above are the same size as shown, but in many places the space between the tips of the crescents is larger on the black ball, and the distance between the letters and the nearest crescent is also off in many places.
In the images of the balls below, red arrows point to the differences between the tips of the crescents in relation to the same location on the other ball. There are more such inconsistencies between these balls than the red lines indicate. The dark blue lines on the black ball and the light blue lines on the original white ball call attention to the differences in the distance between some of the letters and their surroundings when one ball is compared to the other. The thin blue lines that extend out from the center of each ball go through the tips of the same crescents in the first ring of crescents. The lines, which are in the same location on each ball, show how the crescents they intersect in the third and fourth rings on one ball are not in the same location as they are on the other ball.
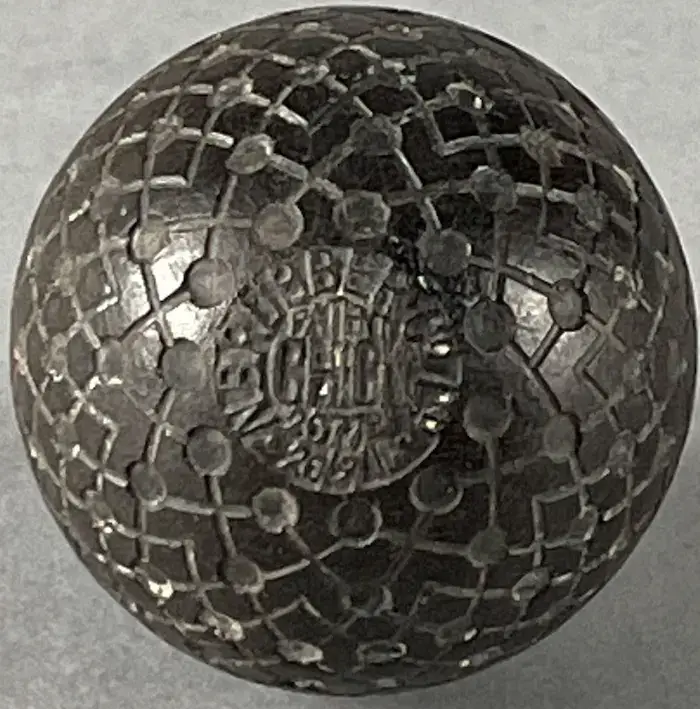
Big Chick golf balls date to 1913 and were made with gutta percha covers, like the one on the 1911 Patent Chick ball to the right. The first Big Chick ball (Image 1) is unpainted other than its white lines and name badge. The cover’s darker gray-brown color is similar to that of gutta percha, but it lacks the shine, sheen, and plastic-like look of gutta percha as can be seen on the second ball (Image 2). Plus, it will erase a pencil line on a piece of paper. It has been my experience that gutta percha, an organic thermoplastic, will not erase a pencil line.
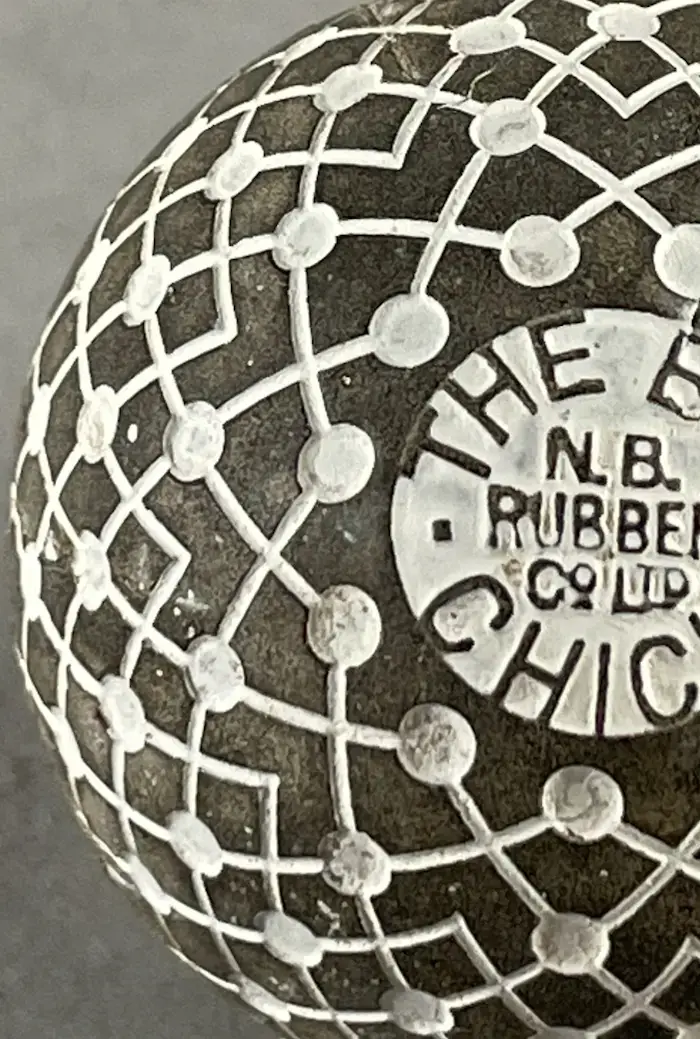
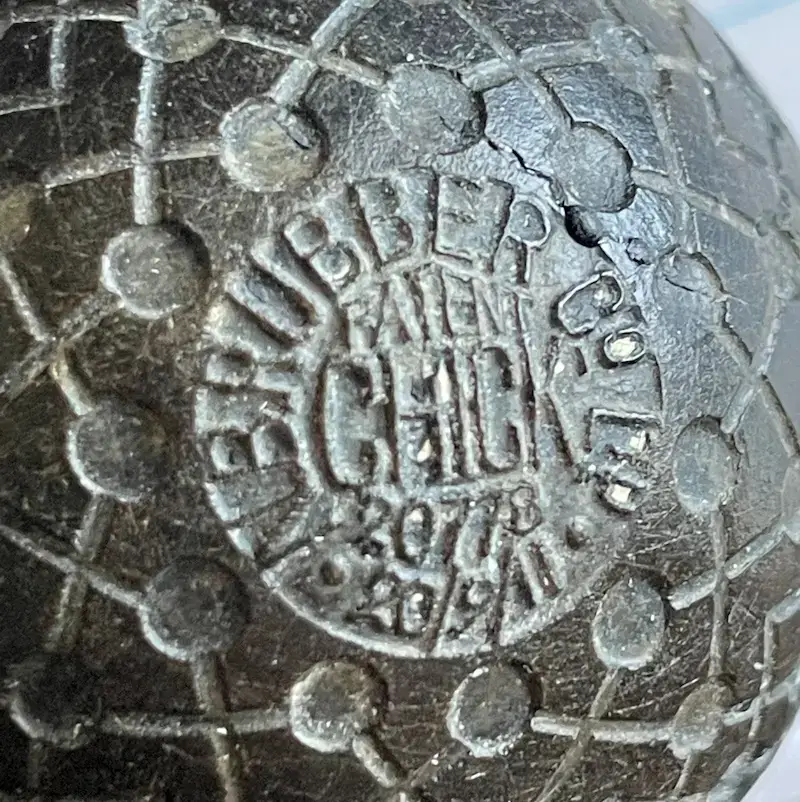
Above are two closeup images. The first image shows the even, nearly unblemished surface of the Big Chick. The other shows the used and marked-up surface of the Patent Chick. Notice how the Patent Chick is covered with pristine tiny scratches. None of this detail is found on the Big Chick despite the fact that it has a strike mark higher on the cover, a strike mark that looks molded in place. Furthermore, the difference in color, shine, texture, and overall general appearance between the two cover materials is readily apparent. The cover on the Patent Chick is consistent with many other exposed gutta percha covers shown in this report no matter their make, while the cover on the Big Chick is consistent with rubber.
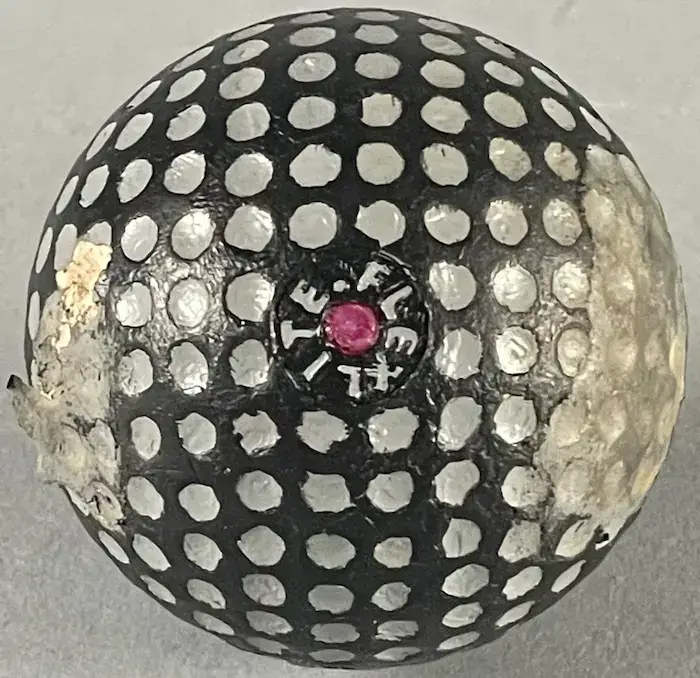
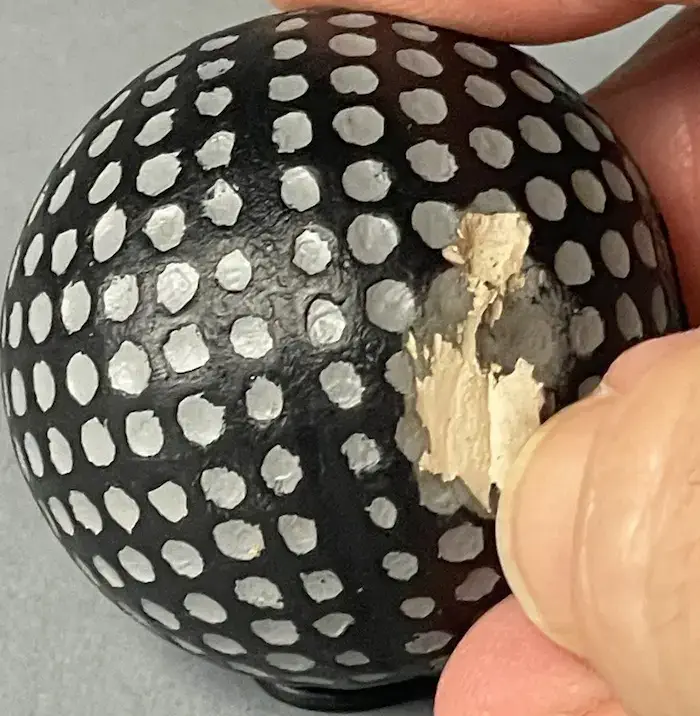
This Flexlite ball is painted black and gray and has what appears to be a tough gray paint/primer directly underneath the black paint. I tried stripping the paint of an area on both sides of the ball, but found it difficult to get through the gray layer. Wanting to get a clear view of the cover itself, I reverted to an X-acto knife. Slicing into the side of the ball revealed the cover is made from flexible white material that looks, swims, and quacks like rubber. In the picture to the right, notice how the thin piece folds well back without breaking. Typical gutta percha covers will not slice so thin nor fold back with such flexibility/resiliency—nor are they white like the material used to form this cover.
For the record, I have never seen any reference to a Flexlite ball with this pattern in either the 19th or 20th-century literature of the game, nor have I ever seen or heard of any verifiable antique Flexlite ball with this pattern.
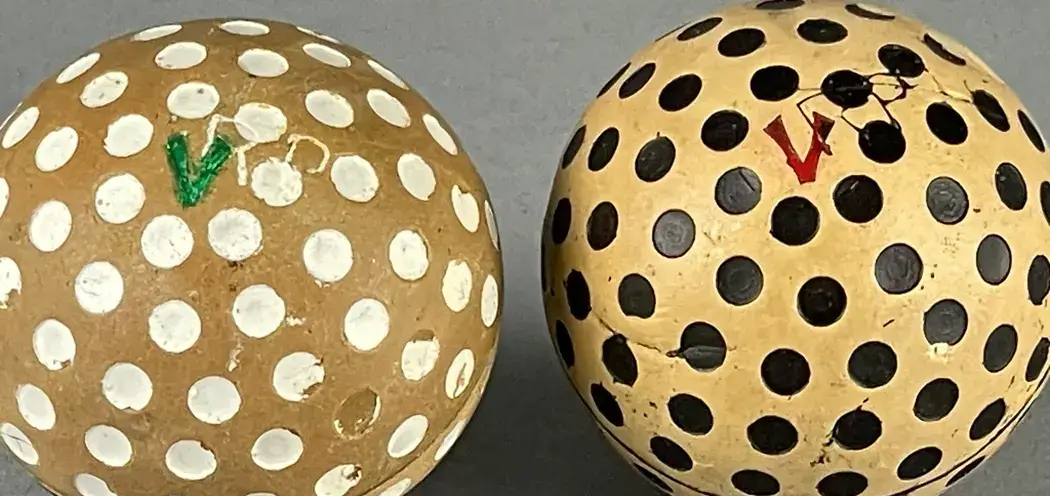
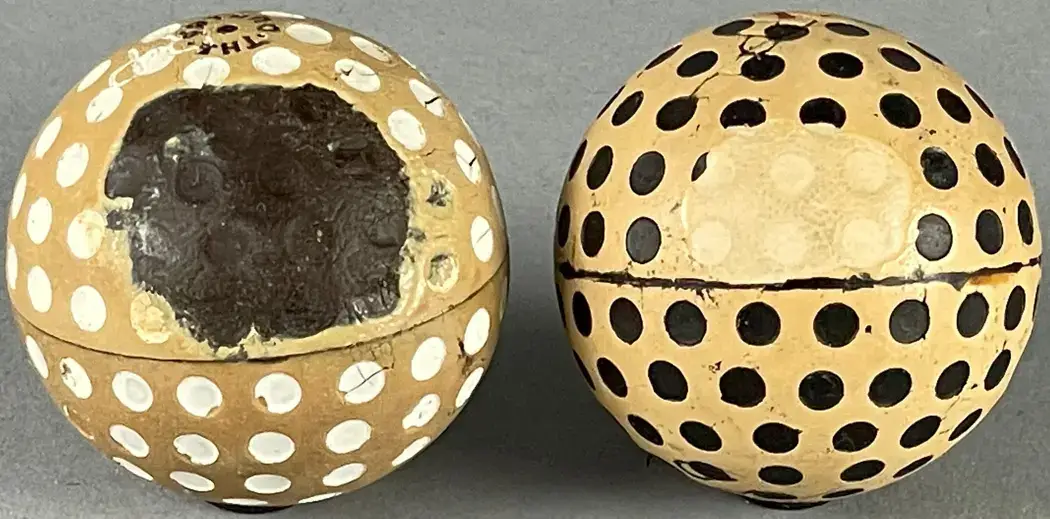
Both Dunlop V dimple balls above have had paint stripper applied to a portion of their covers, and we now see that the two balls do not match each other in the color of their covers do not match. Neither cover matches the well-used 1912 Dunlop V dimple ball in its original white paint shown below. On that ball, there is a chip in the paint and the gutta percha is visible and clearly different from what was used to make the non-reflective brown cover above.
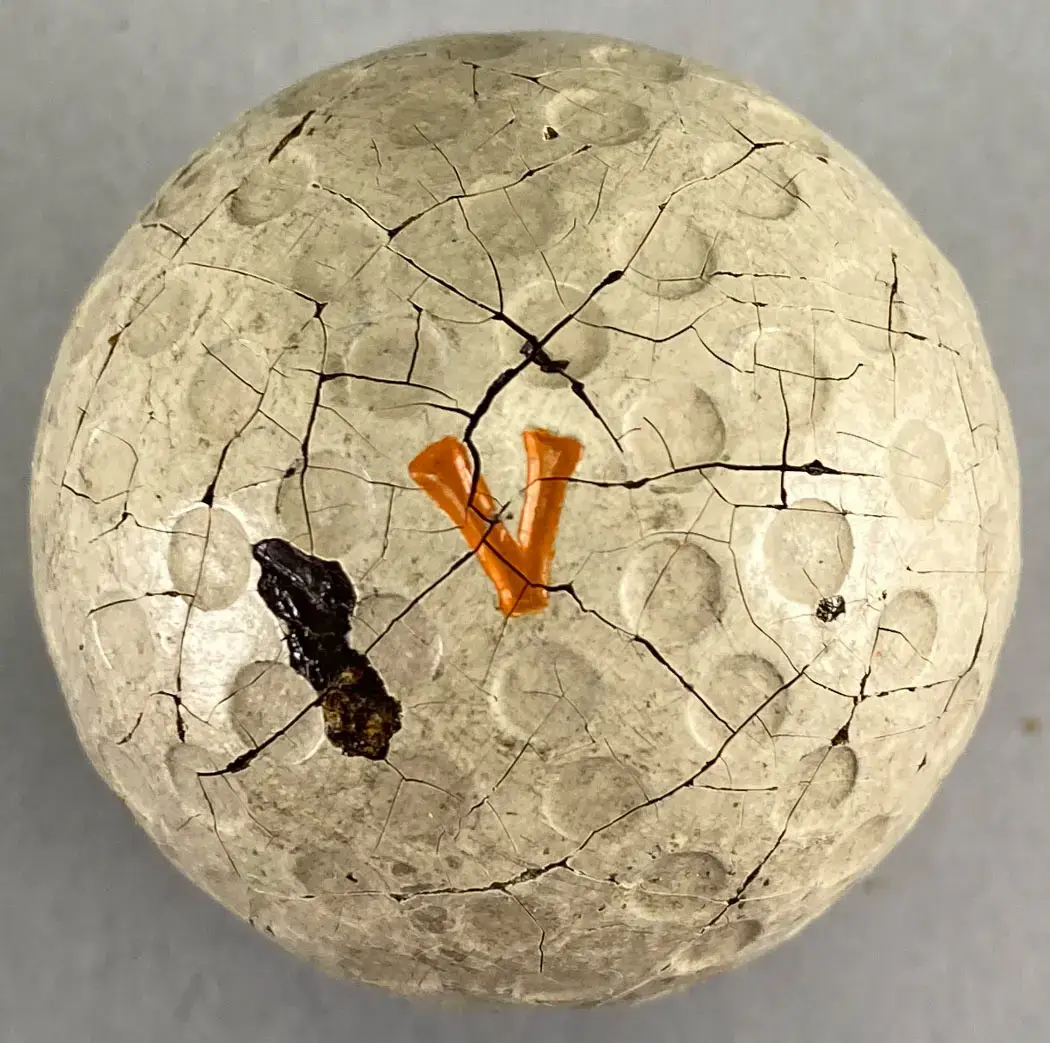
Both covers in the initial ball pictures shown above are marked with the initials “RP”. So, too, are the three decorated Dunlop V balls below. In fact, there is a total of 17 balls that bear the initials “RP” shown in this section. Furthermore, it’s possible that some of the balls that are not stamped RP as pictured were so stamped on their opposite pole. Either way, there is much more here than meets the eye.
Initials on a golf ball or a golf club are historically the initials of a past owner or possibly the maker if found on a really old club. “RP,” however, can work as an abbreviation for “replica.” If anyone who purchased one of these RP-marked balls ever returned it because they felt it was not genuine, the seller could gracefully point out the ball was marked RP because it was, indeed, a replica. No harm, no foul. But to those who did not return one of these balls, the initials would stand as owner’s initials and lend credibility to the idea that the ball was old.
If, however, “RP” was marked on the ball so the maker/seller, if need be, could pivot and describe the ball as a replica, then the maker himself has tipped his hand and admitted to making decorated balls that are not old. I see that as the most likely possibility. After all, it’s a gargantuan stretch to think that 17 golf balls of the same brand and used by the same golfer over 100 years ago were recently found in ponds or wherever and they all made their way to the same person(s) and they all needed to be repainted.
And there is still more to this story.

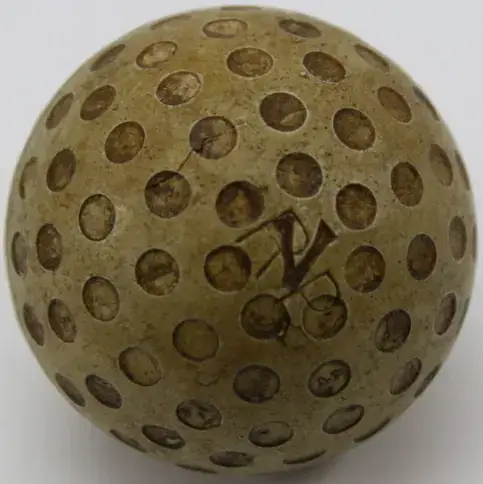
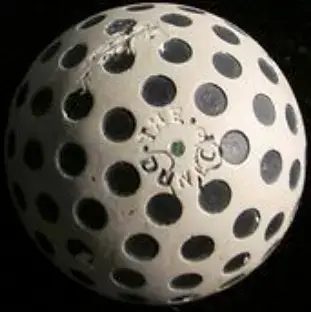
Below, the Dunlop V bramble ball on the left is not a repaint. It is in its original white paint, but the paint appears modern and the cover, visible where the paint has been stripped away, is not consistent with the gutta percha covers used on early 20th-century golf balls.
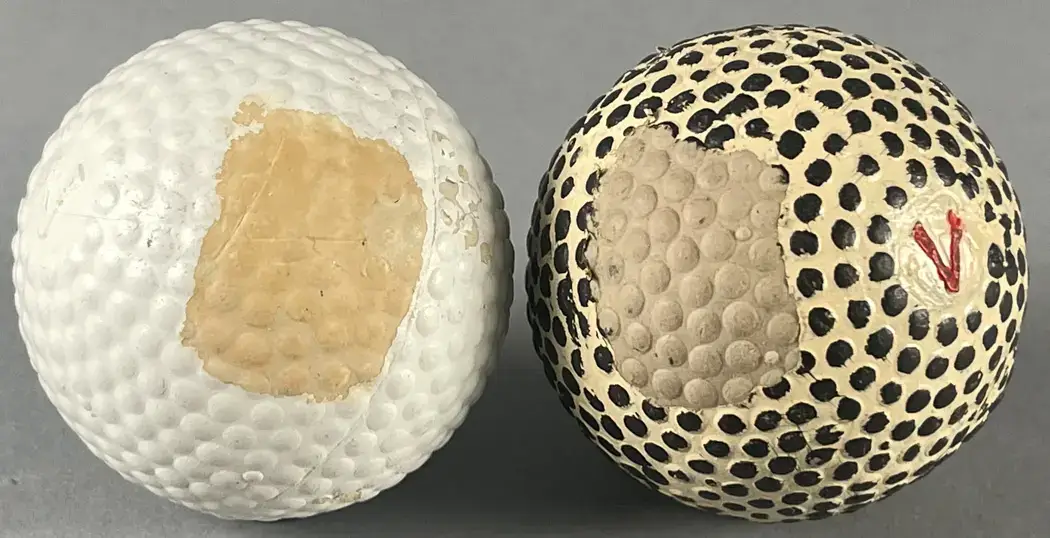
Such is also the case with the Dunlop V bramble ball on the right. Furthermore, both covers appear clean, bright, and relatively new, not from 1912 when the Dunlop V was introduced.
To provide a glimpse at how far decorated balls have entered the golf ball collecting world, I have included more images of decorated Dunlop V balls. Some bear the same RP initials, some include additional initials, and others do not bear any initials. Note that on both the dimple and bramble versions of the Dunlop V, only one pole is marked “V” while the other pole is marked “The Dunlop.” Including the Dunlop V balls already shown above, this article contains 26 different Dunlop V balls that appear painted by the same source. The first 13 balls below were even photographed on the same background.
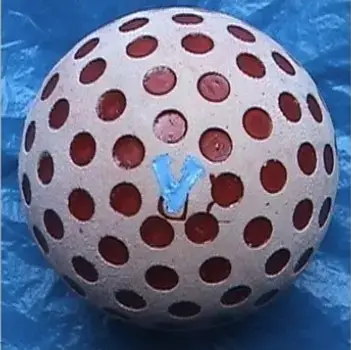
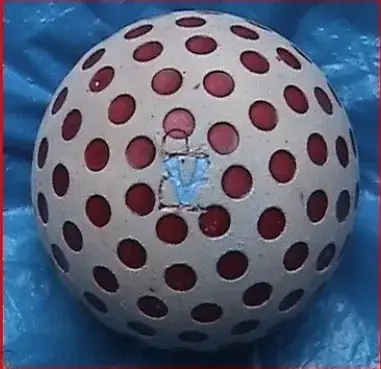
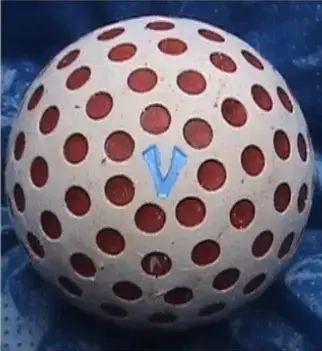
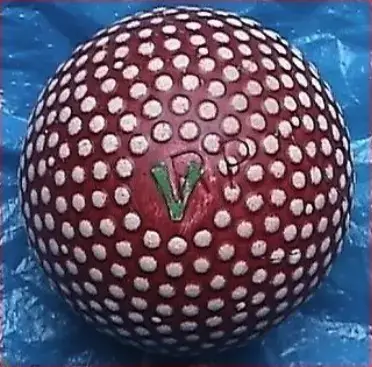
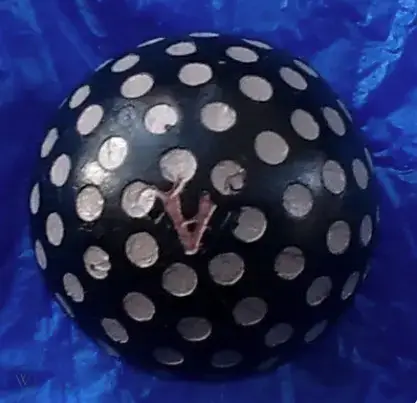
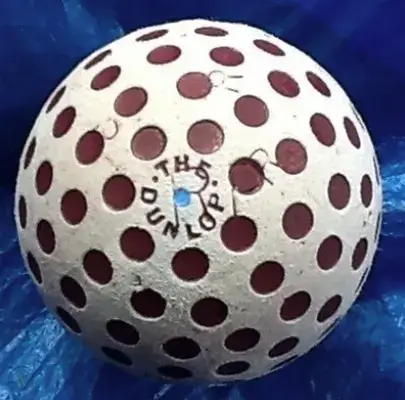
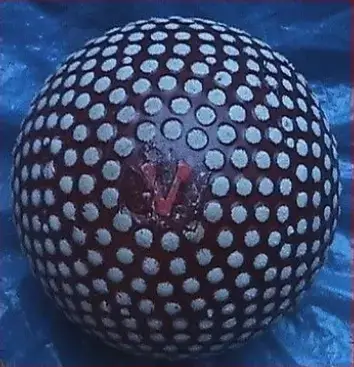
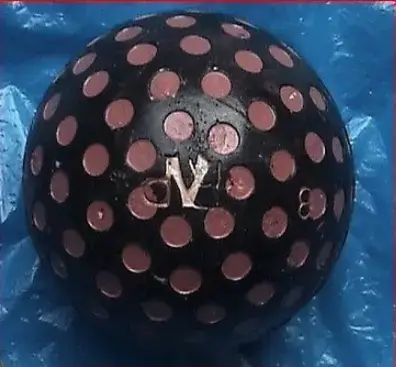
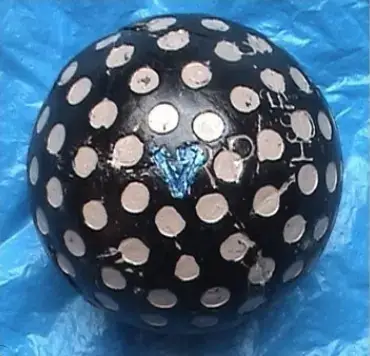
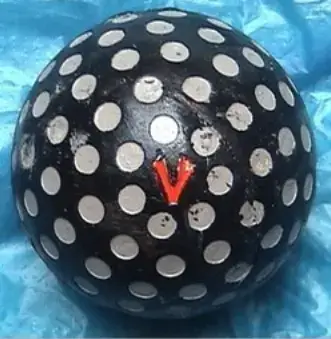
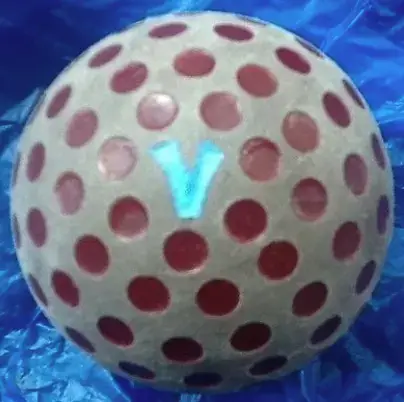
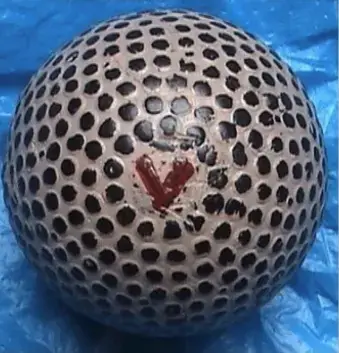
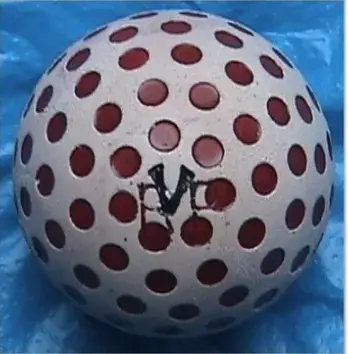
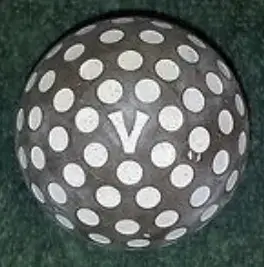

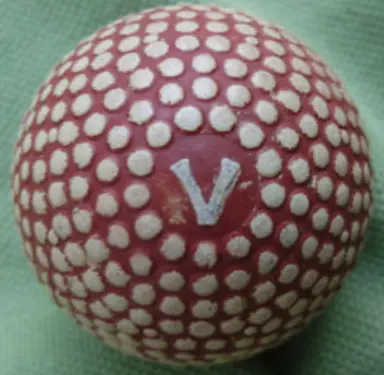
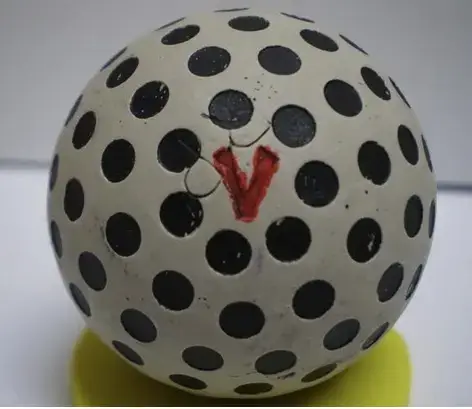
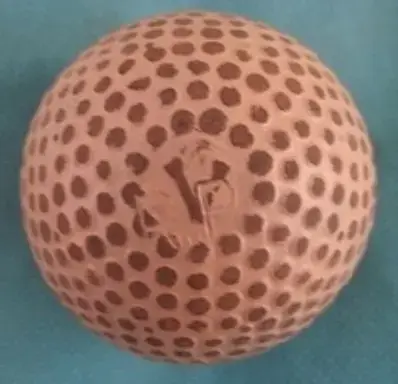
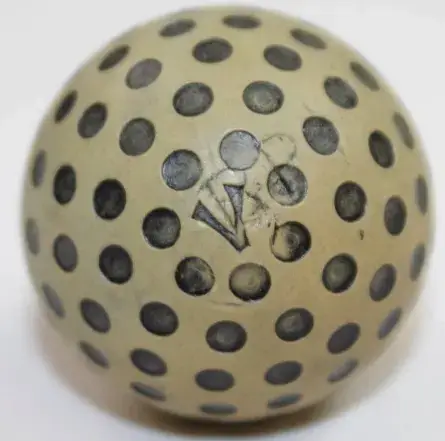
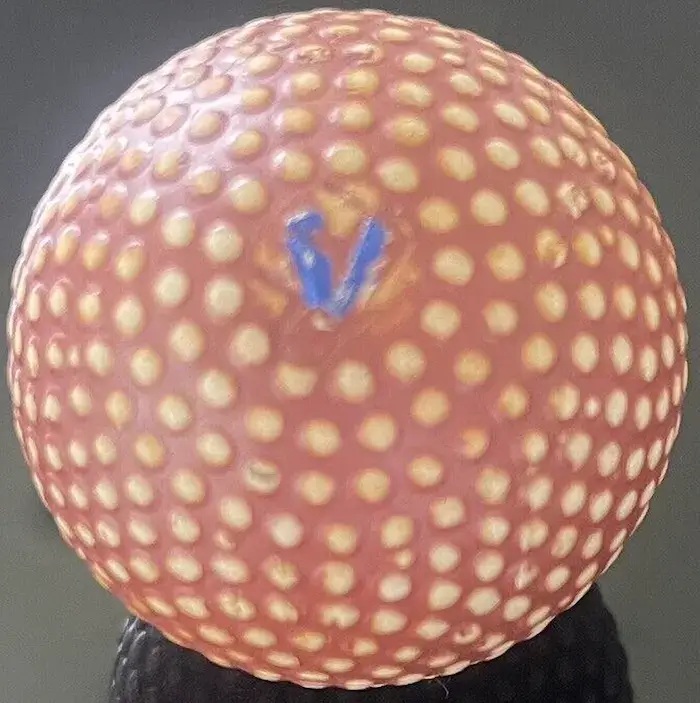
Lest we forget, a genuine 1914 Dunlop V bramble ball in unused condition with original wrapper & bag is shown below.
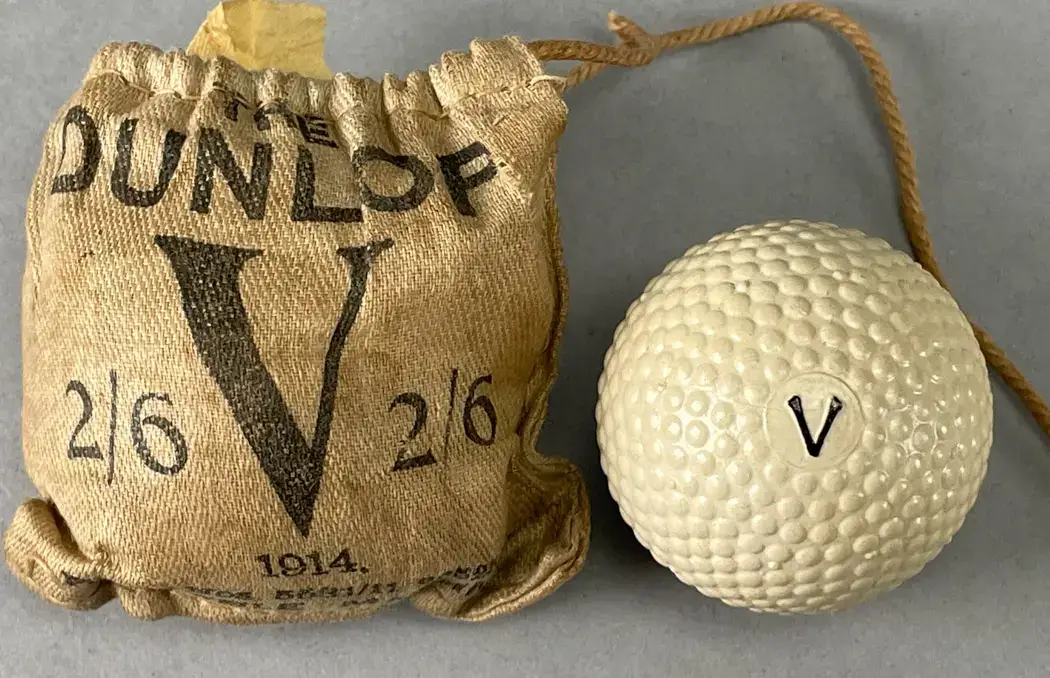
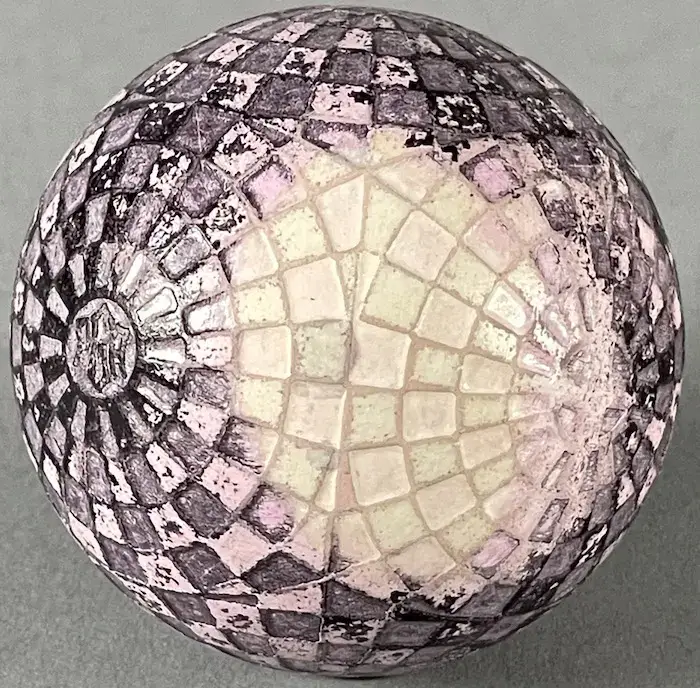
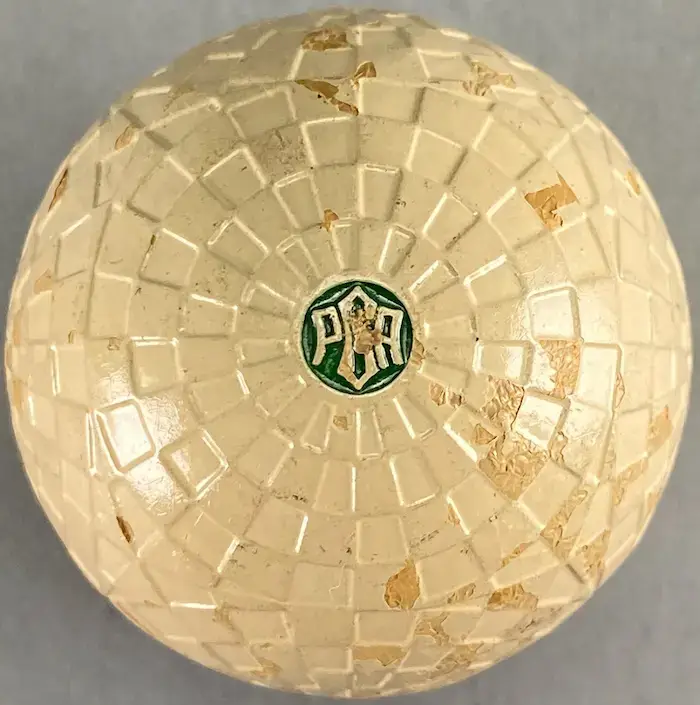
In 1923, Worthington offer the PGA ball with radiating panels. The second ball (Image 2) is an unused example still in its original paint. A few chips in the paint reveal a yellow cover or material underneath the paint. By contrast, the first ball (Image 1) has the same pattern but it’s painted in pink and purple colors. Where the purple/pink paint is stripped off, a white cover is visible.
The only thing these two balls share as shown in this image is the pattern.
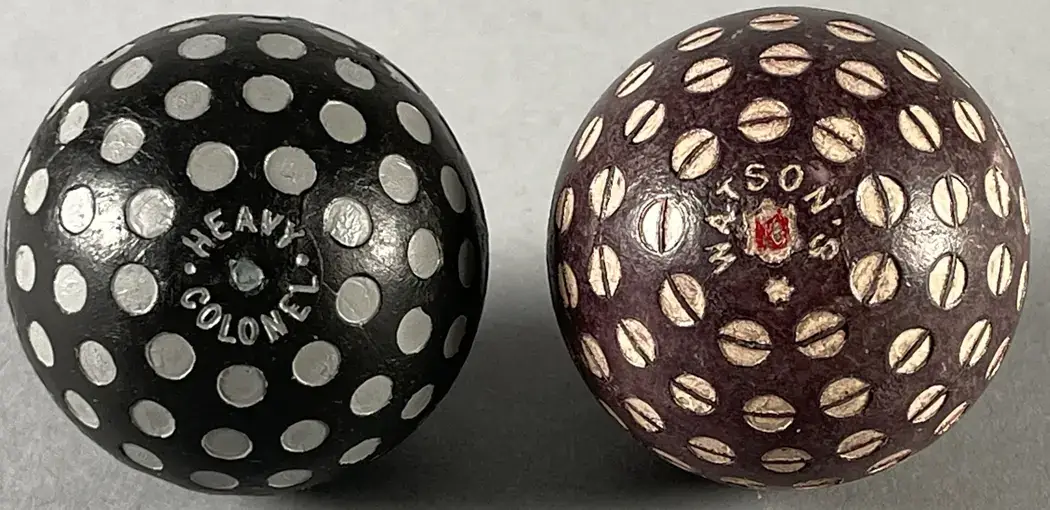
Heavy Colonel balls with large, flat-bottomed dimples were introduced in 1914. It’s estimated that Watson’s 10 ball also dates to the mid 1910s. Stripping off a bit of the paint on the two balls above reveals that their covers are not consistent with the color of early 20th-century gutta percha covers. When bounced, these balls do not sound like they are covered in gutta percha. They sound muted. Plus, unlike gutta percha, the bare areas on their covers work admirably well as pencil erasers.
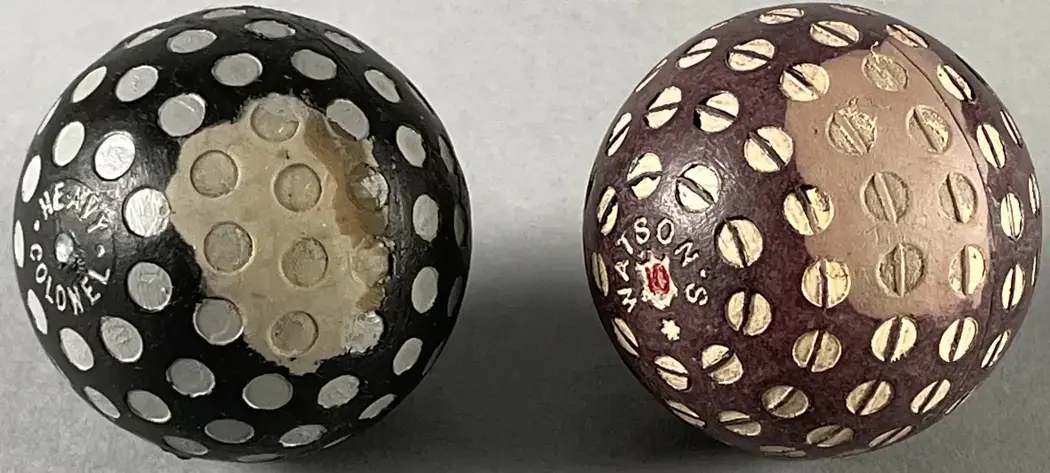
The heavily worn Heavy Colonel ball shown still possesses some of its original white paint in its large, flat dimples. Its dark brown gutta percha cover is quite different from the rubbery gray cover on the Heavy Colonel ball shown above.

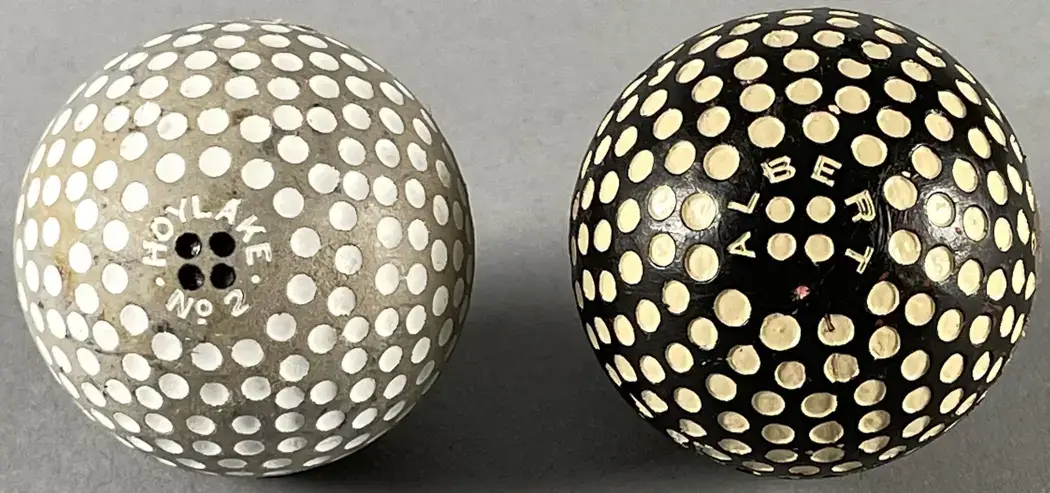
The Hoylake No 2 is unpainted except for the paint in the name and dimples. The Albert ball has recently been entirely painted. The fact that the Hoylake ball will erase a pencil line is a clear indicator that its cover is not painted. Try erasing with the black Albert ball and black paint will come off onto the paper. The part of the Albert’s cover where the paint was removed, however, will erase a pencil line. The fact that the unpainted surfaces on both balls have a soft and slightly tacky texture that will pick up pencil lead indicates to me that these covers are not made from gutta percha.
For the record, I have never seen any reference to a Hoylake No. 2 ball nor an Albert with these patterns in either the 19th or 20th-century literature of the game, nor have I ever seen or heard of any verifiable antique Hoylake No. 2 or Albert ball with this pattern.
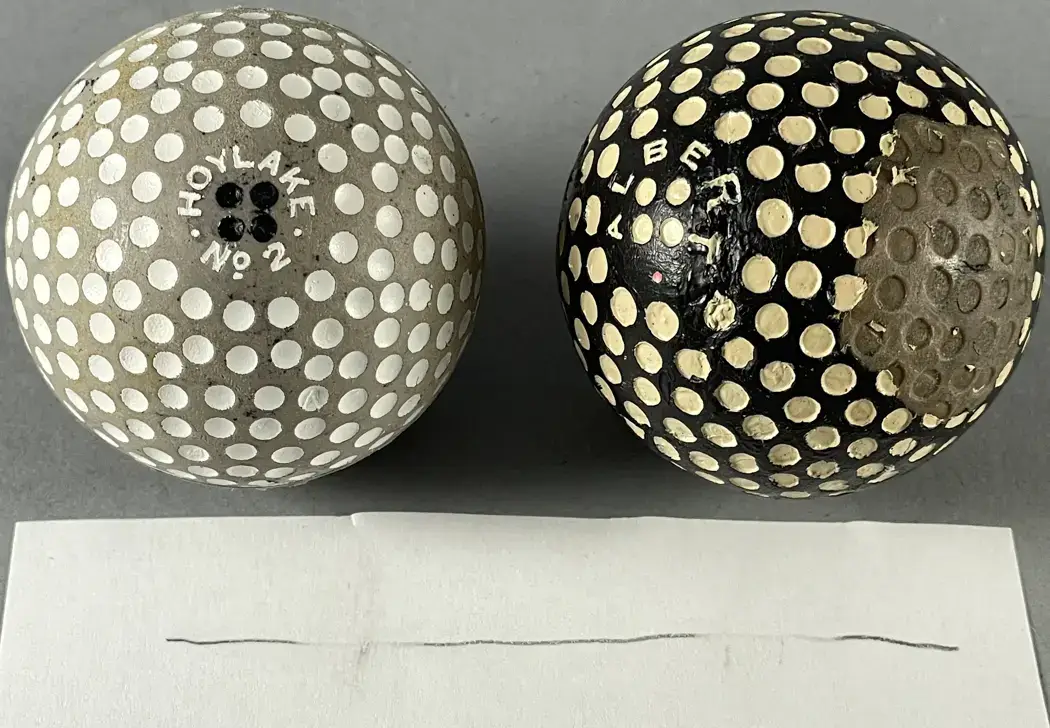

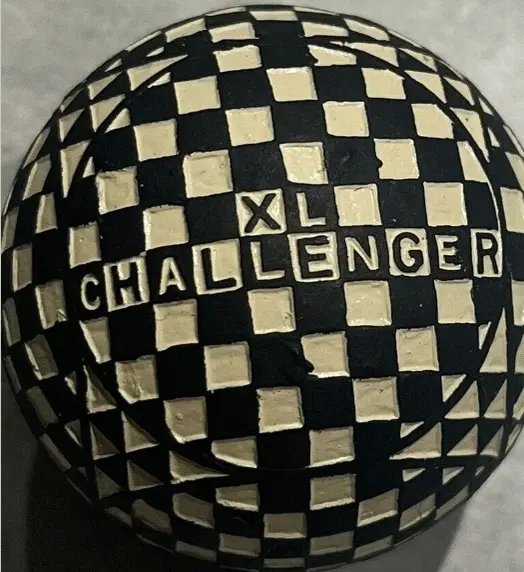
Introduced in 1917 by JP Cochrane, the XL Challenger ball has a one-of-a-kind checkerboard pattern with alternating raised and recessed squares. The ball on the left is a genuine XL Challenger in its original paint. The white paint has been applied only in some of the lettering and in the recessed squares. The raised squares are unpainted gutta percha. A crack in the gutta percha cover is seen just above the “G” in Challenger. Evidence of the gutta percha is also found in the recessed squares where the white paint has chipped or worn away. The ball on the right is completely painted black and white, with no gutta percha visible anywhere. It’s cover is nothing like that on the genuine ball.
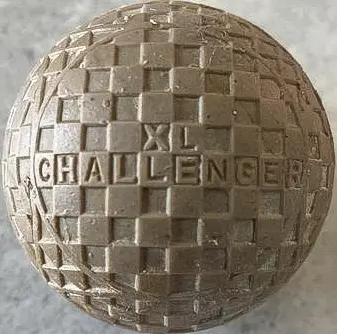

Above left is a recently molded XL Challenger with an unpainted rubber cover. Above right is another black and white painted XL Challenger of recent origin. The thick white paint applied to the ball shows cracking, but it's not from age. As everybody knows, thick paint will often crack when it dries.
Below are two more XL Challenger Balls, only on these balls the covers appear to be painted only in the recessed squares. The raised squares are unpainted—they show the tan rubber used to make the cover.
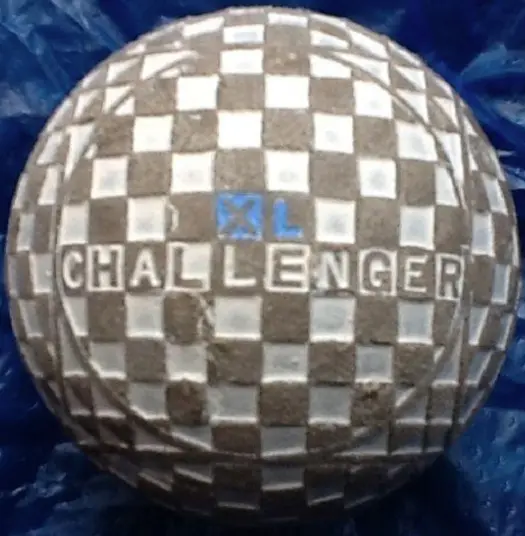

Below are two Challenger XLS balls. The checkerboard pattern on the ball to the left is painted only in its recessed squares, with the raised squares on its rubber cover left unpainted. The ball below right is entirely painted black and white, with gold paint in the “XL”.
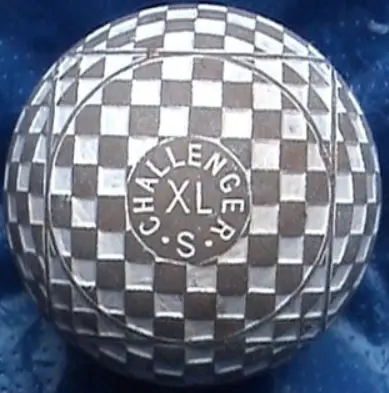
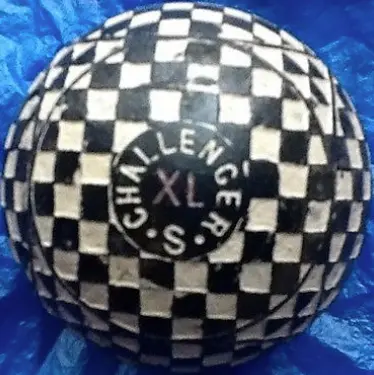
The first ball in this section is the only genuine black/white checkerboard ball I have personally seen. It is clearly made with a gutta percha cover. I have, however, seen many recently painted counterfeit Challenger and Challenger XLS balls, as this section attests. And they all are in the same condition. No chips, dings, cuts, or scratches. No evidence of gutta percha on any of them.
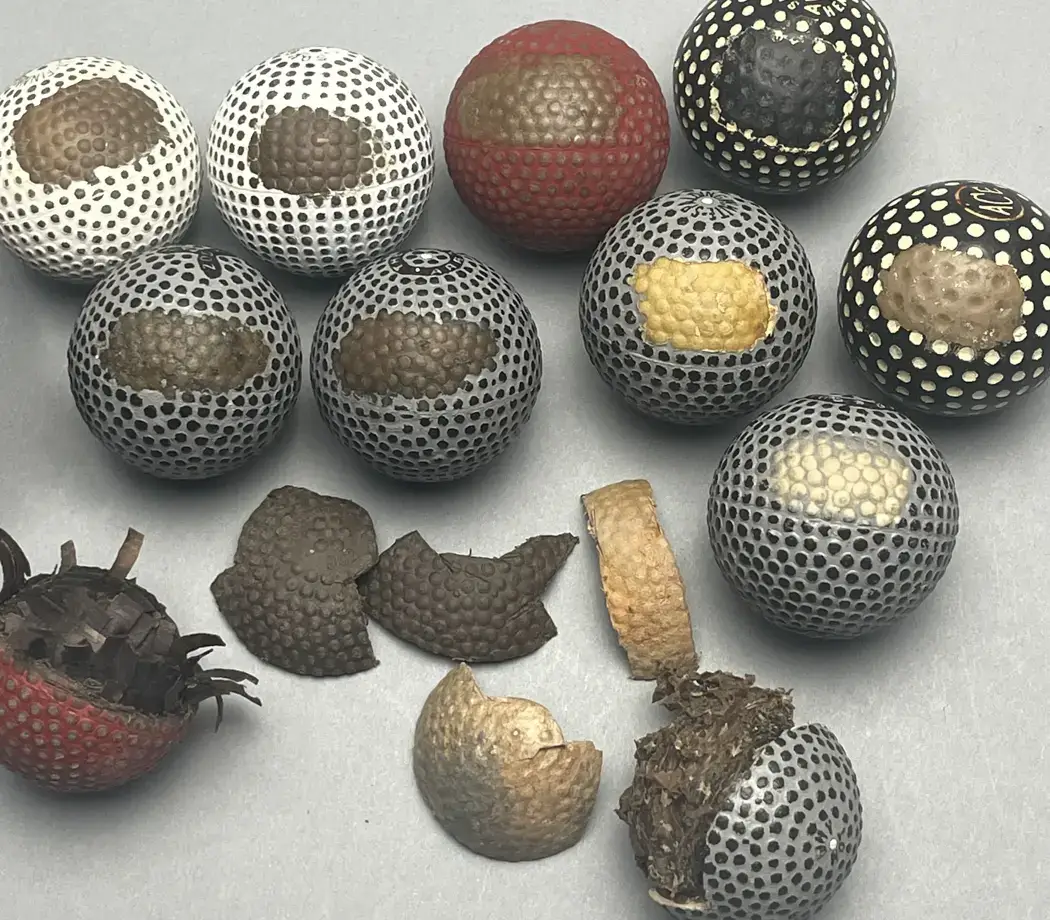
Here are eleven balls with their cover material exposed. Two of them have had pieces of their covers removed and laid out nearby. Where stripped of their paint, the covers appear to be in like new condition with no sign of significant age or use. The only blemish is the gray paint stain on the beige cover of the Why Not in front. The cover pieces cut off each ball are flexible and resilient, as you would expect rubber to be. Gutta percha, on the other hand, is distinctly inelastic and prone to breaking when bending.
The colors of these covers under their paint do not match that of the gutta percha covers on the genuine balls of the same name presented earlier. Furthermore, the paint-stripped areas of the painted covers do not have the hard and sleek feel of gutta percha. Instead, many of them feel tacky. Furthermore, they all work as erasers. (Some work better than others, however, as 2-3 are prone to smearing much like a dirty eraser.) This is similar to other decorated balls shown earlier in this report, including the beige unpainted Aerial and Vaile balls which can erase a pencil line on a piece of paper with little difficulty. It has been my experience, however, that golf balls with bare gutta percha covers do not erase/absorb a pencil line off paper.
Knowing that the bare covers of the painted balls can lift lead off paper tells us that these covers would have absorbed dirt, water, etc. if they were left exposed to dirt, water, or sand for any real length of time, let alone decades. Plus, they would have been exceedingly difficult to keep clean. But these covers appear bright in color, with no dirt, mud, or moisture residue or damage. Point being, any antique golf ball with a clean undamaged cover should never be painted. Doing so will reduce the value of the ball significantly. Just as a valuable coin in its original patina is worth more at auction than the same coin dipped in metal cleaner to make it bright and shiny, antique golf balls in their original paint or unpainted covers will always be worth more than bright and decorative repainted balls.
Also note that the brown color revealed on six of the bramble pattern balls—Finnigan’s Aerial (1910), Squadron (early 1900s), two Martins Zodiac’s (1906), The Arrow (1906), and Chemico Bob (1912) with pieces of its cover cut off and laid out—is very similar across all six balls if not virtually identical in some cases. The color and covers on these six balls, however, are not consistent with the dark brown color of the gutta percha covers found on a typical early 20th-century golf ball.
Such is also the case with the five other balls (Spalding Bob 1906, Avon Heavy Small 1913, Spalding White dot 1906, Ace ?, and cut up Why Not 1911) in the image above. Their white, black, cream, tan, and cut up beige covers sans paint are not consistent with the dark brown color of the gutta percha found on a typical early 20th-golf ball.
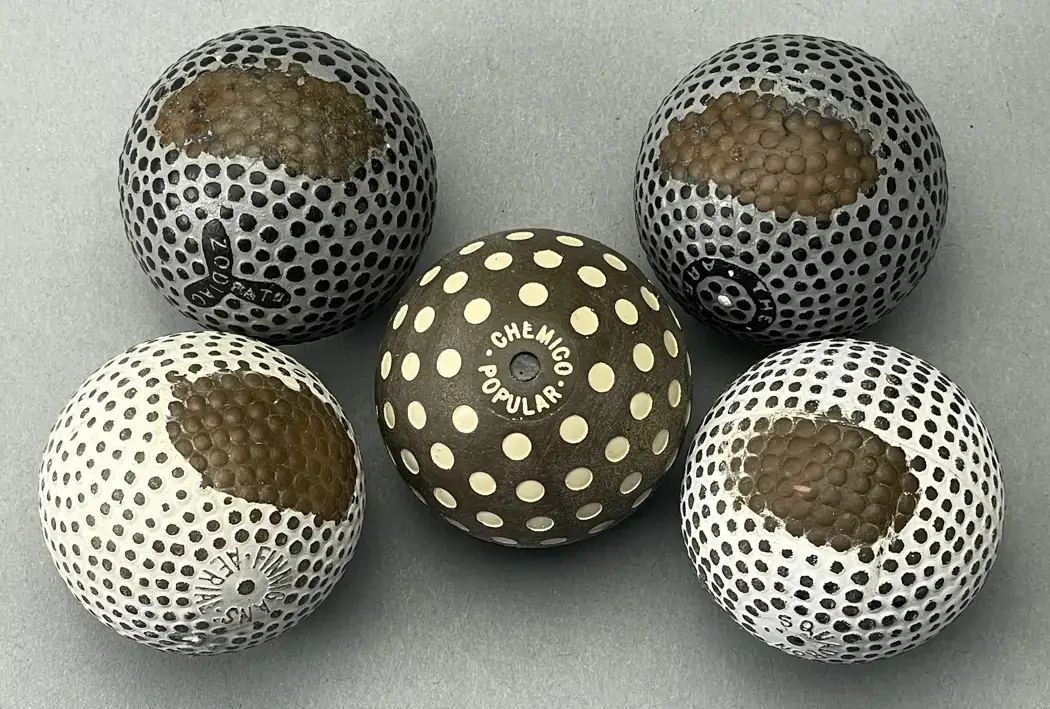
The surface of the Chemico Popular (1913) in the middle was never painted. Only its name and large dimples are paint filled. Its cover is similar to the color of the unpainted covers on the other four decorated balls, and it will erase a pencil line. All 5 feel tacky/rubbery to the touch, not sleek and hard.
None of the covers on these 5 balls are consistent with the gutta percha covers found on the vast majority of all early 20th-century golf balls.
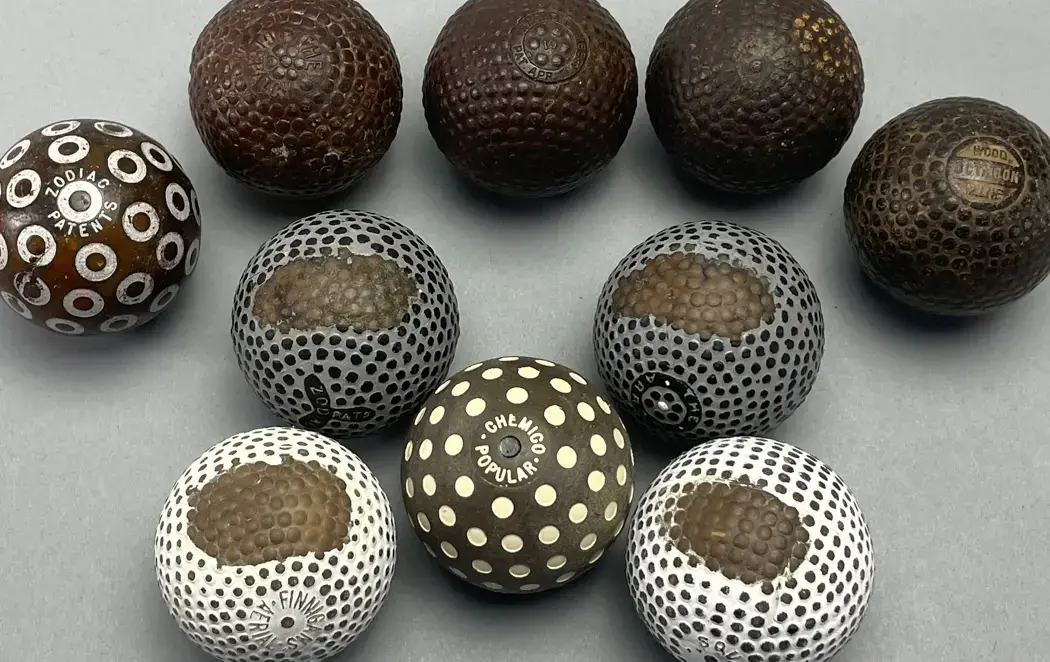
Above are the same five balls shown in the prior image, this time backed by five early twentieth-century rubber core balls that also have their cover material exposed. Four have bramble patterns and one has recessed rings on the cover. Unlike the five balls in front, the five balls across the back have gutta percha covers. The depth of the color of the gutta percha used on these 5 balls is readily apparent and unequaled in the brown molded rubber used to make the other 5 covers. Indeed, the difference in color and general appearance between these gutta percha covers and rubber covers is readily apparent. Again, gutta percha is a thermoplastic and is often described as plastic-like in its appearance, rubber is not.
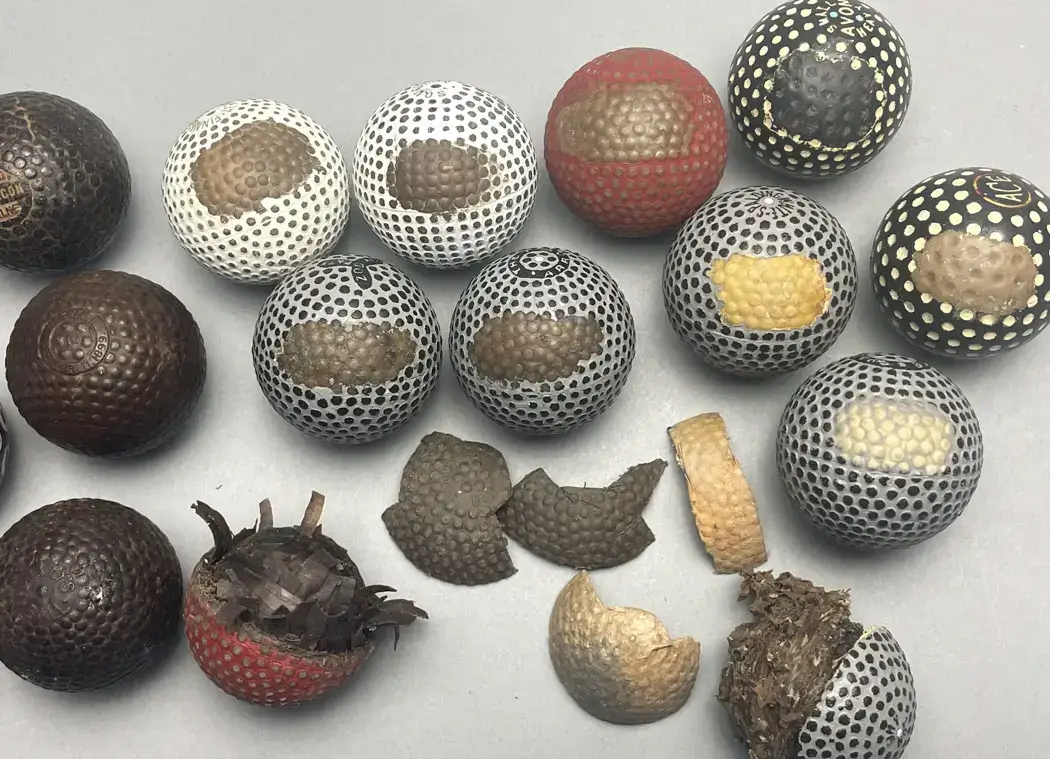
Above the three balls on the left are genuine early 20th-century rubber core bramble balls with gutta percha covers. They are not painted, but they still look outstanding and are eminently collectible. Again, none of the unpainted areas on the covers of the decorated balls to the right are consistent in their color and look when compared to the unpainted covers on the three gutta-percha-covered balls to the left—yet they are all bramble balls except for two at the far right.
Below, a single long pencil line has been erased in 5 different spots by the covers on 5 different golf balls, positioned directly behind their handiwork. None of the gutta percha covers I tested would erase a pencil line.
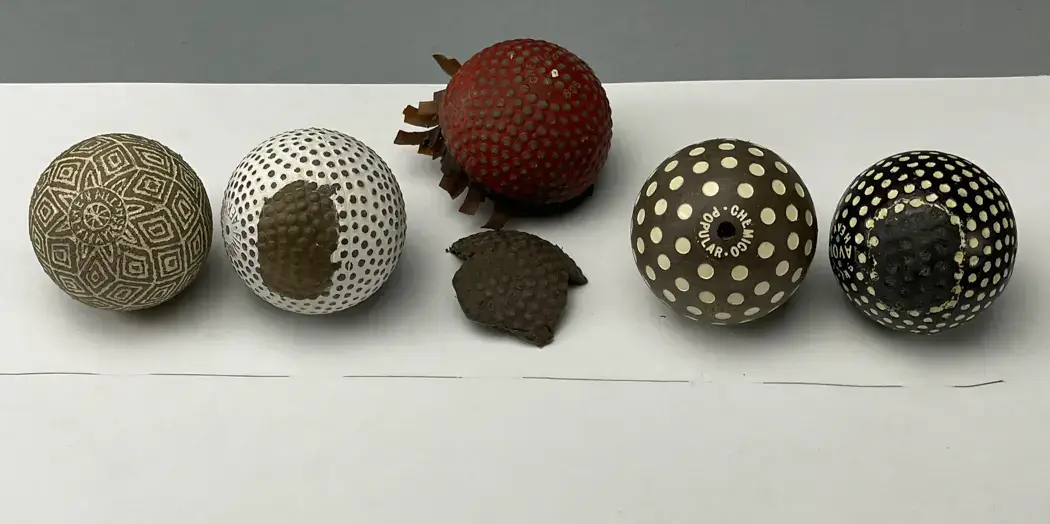
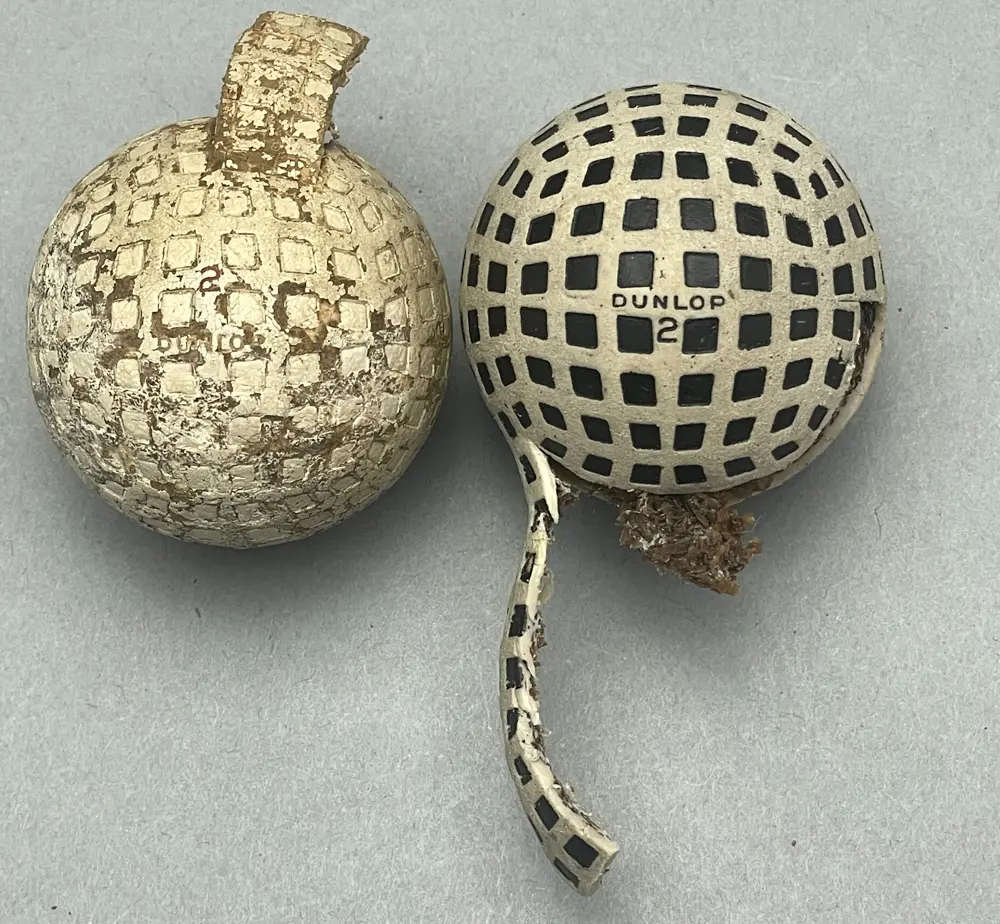
Above left is a Dunlop lattice ball in its original white paint. This was a popular ball, its pattern produced from the mid 1920s into the 1930s. It has a strip cut out of its cover that remains connected at one end. Above right is a decorated Dunlop lattice ball that is unpainted except for the black paint in its name and squares. It also has a strip cut out of its cover.
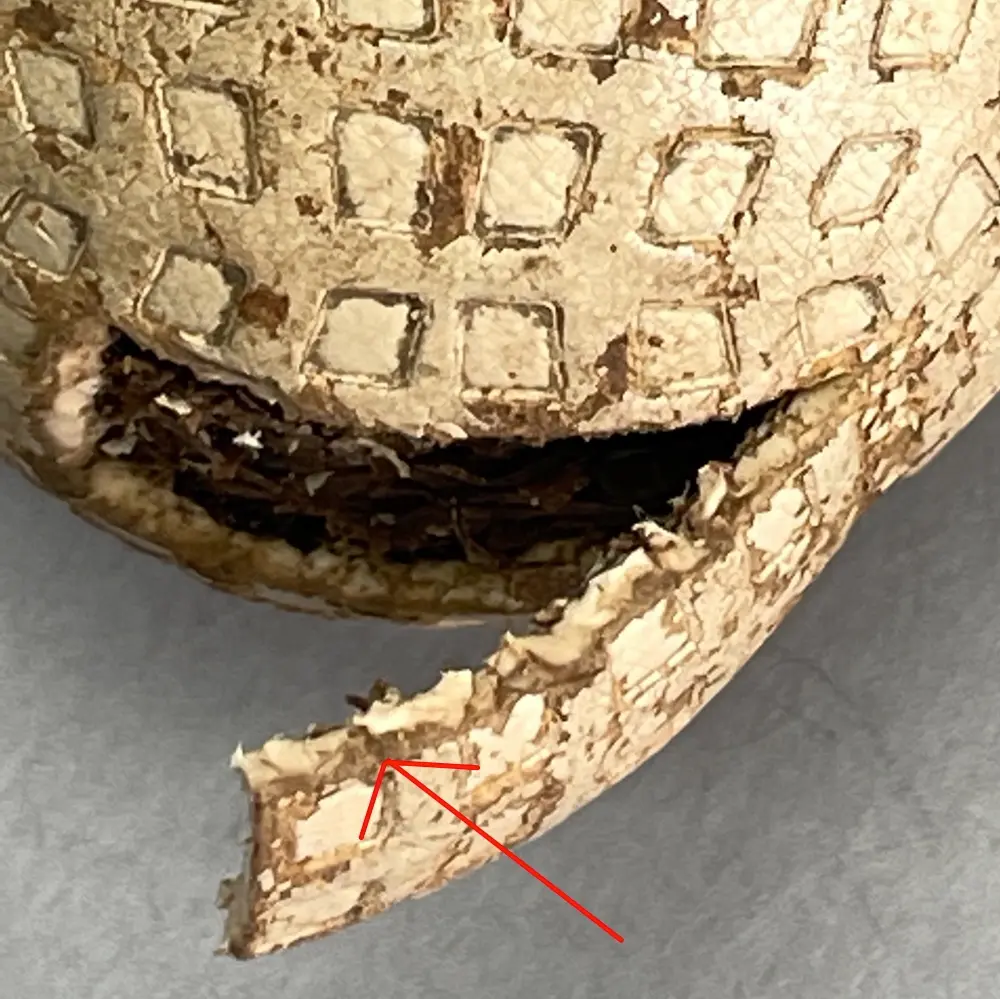
In the image to the left and identified by a red arrow, a brown layer of material underneath the original white paint and above the white base material is visible when viewing the edge of the strip. The brown layer is also visible where the paint has chipped off this ball.
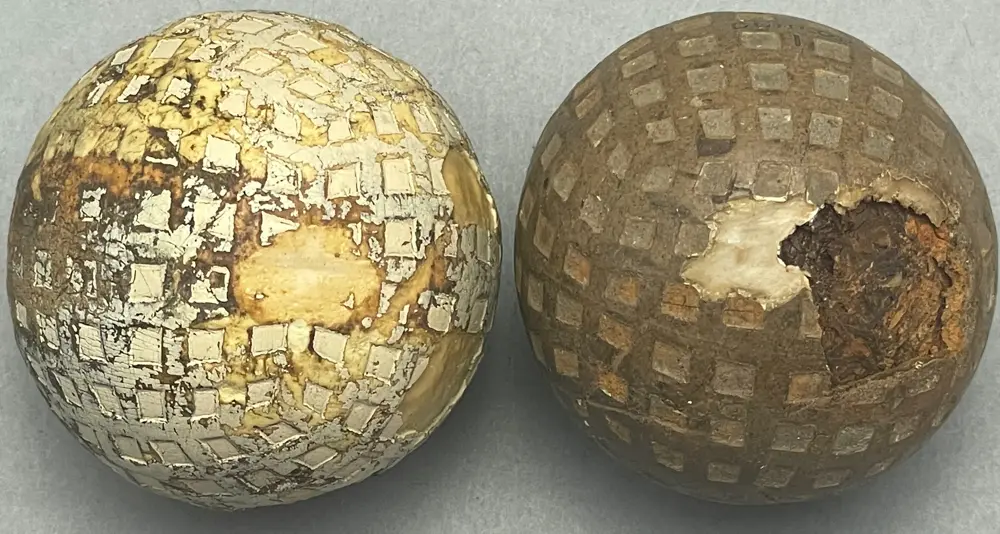
Above are two more Dunlop Lattice balls that have the same lattice pattern. Both balls have had a slice taken out of their sides to expose the creamy white base which is possibly balata or a balata compound used to construct the covers. They also have a brown/orange layer above the white base. The brown layer on the ball on the right appears to have lost all its original paint.
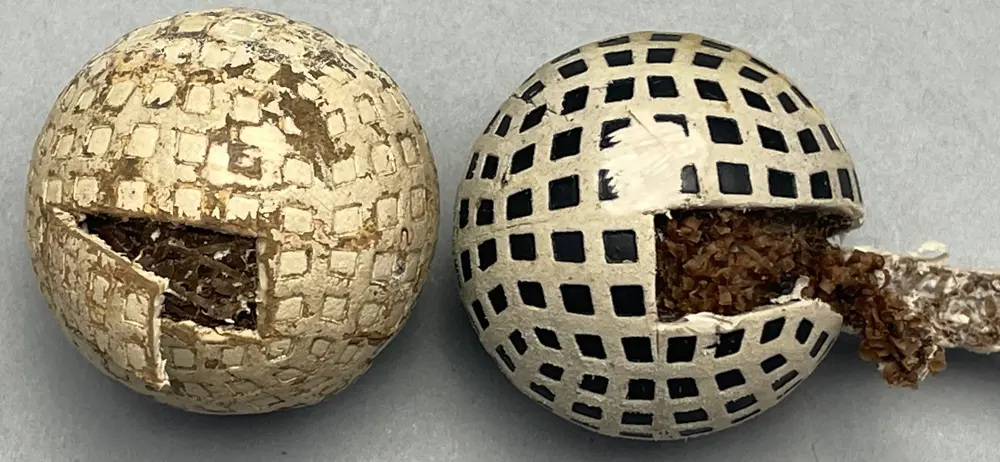
In this image, the top middle of the decorated ball to the right has had a section of its cover cut open. There is no intermediate layer like there is on the Dunlop ball to the left and the two Dunlop balls above. Also, the exposed material under the slice on the decorated ball is neither the same color nor the same material when compared with the area under the slices on the two Dunlop balls above.
The strip cut out of both the ball in its original white paint and the ball with black paint in its pattern showed the differences in their resilience. The strip on the black decorated ball could bend all the way back without creating a crease on the connected side. I bent it back and forth many times and it was rock solid, no worse for wear. The strip on the Dunlop ball with the original paint could bend back and forth, except the strip quickly started to crease and it appeared that it would break entirely off the ball if I were to continue bending it. Once again, the rubbery material used to construct the cover of the decorated ball is not consistent with the materials found on the three Dunlop balls shown that do not bear any modern paint.
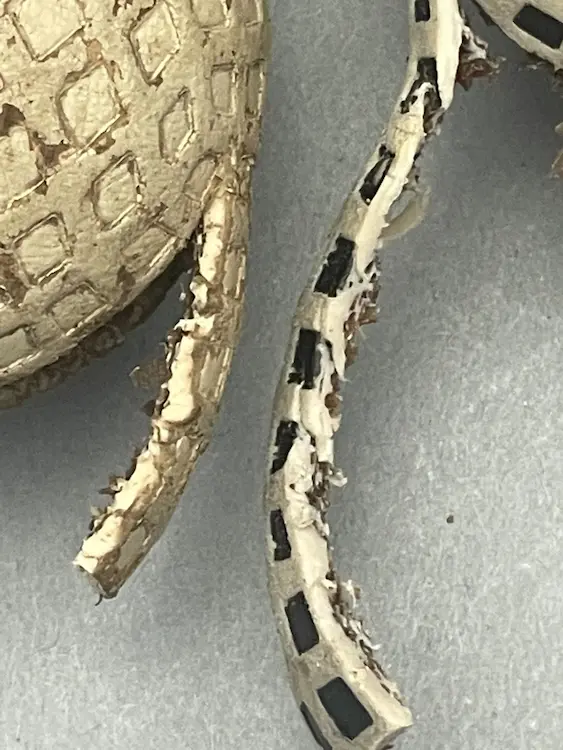
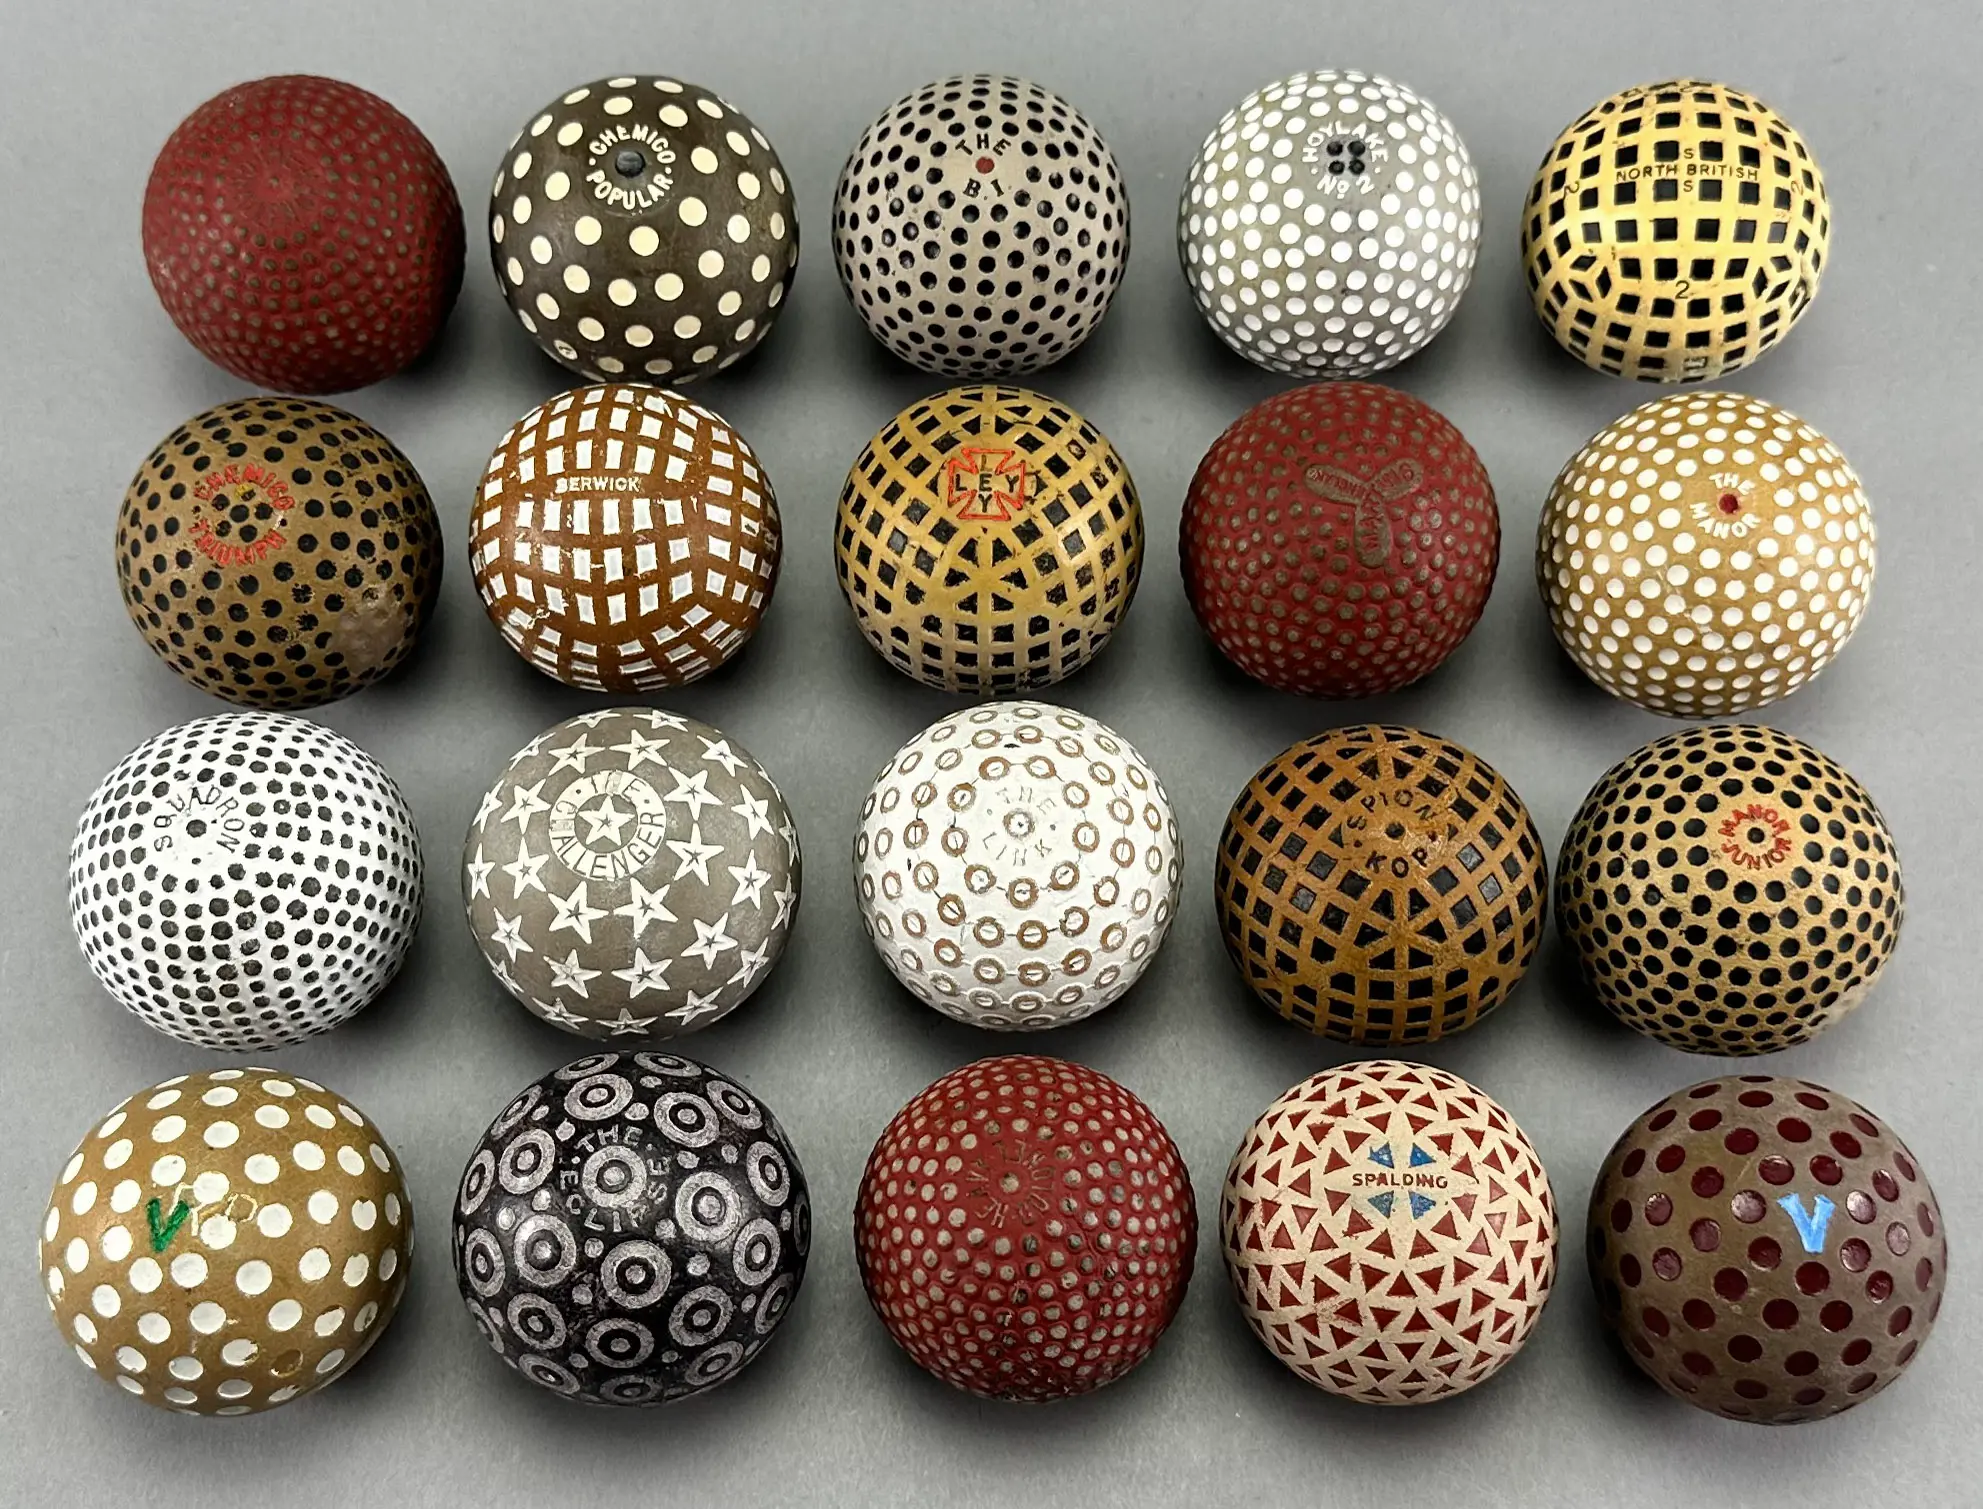
The Manor | Squadron | North British | The Eclipse | Spalding Berwick | Chemico Popular | Chemico Triumph, Manor Junior | LEY | The B.I. Standard Ball | Spalding Blue Triangle | Spion Kop | The Link | P. Paxton's Remade
Many of the decorated balls discussed previously have the expected wound rubber cores like those in the antique balls they are trying to duplicate or create anew. Typically, their recently painted covers are made from synthetic polyisoprene—rubber—rather than the period appropriate cover material. This raises the question of just how this subset of counterfeit balls might have been created.
There is more than one way to install modern covers on inexpensive old rubber cores depending on the knowledge of the person and their access to materials.
The covers on some of these decorated balls reveal what I believe to be a significant part of the process used to make a good number of them. Upon close examination, I found a tiny hole in the cover of not one, not two, but twenty-one balls. Seeing one hole in one ball does not seem like much. In fact, it looks more like a blemish in the paint than anything else. But similar holes on eighteen different decorated balls?
These holes appear to be strategically placed. They were either exactly on the seam of the equator or positioned within a round or square dimple next to the seam. In one instance, the hole forms the perfect center point in the middle of a bullseye-type pattern.
All the holes appeared consistent from one to the next in both size and general location. The holes are quite small, much like a tiny thread hole in a bead. They are not simply random flaws in the molding process. Instead, they were an integral part of it.
When showing images of these holes to two employees at a molding supply store, I was told they are evidence that something like a tiny pin, a thin wire, or high-strength beading thread was used to suspend the core inside the mold, so the uncured polyisoprene could fully surround the old core. In its uncured state, polyisoprene typically exhibits a high viscosity which can make it challenging to process and mold. So, in this instance, a pin in the bottom of the mold could hold the core up; or a wire or beading thread glued to the wound core extending through the top of the mold could do the same thing. Either of these methods would prevent the core from sinking to the bottom of the mold during the curing process. Were that to happen, a portion of the core would remain visible on the surface of the ball after the new cover was molded in place.
Consequently, according to my supposition, the mold was turned on its side and either a pin or thread kept the core suspended while the polyisoprene cured around both the core and the pin or thread. Hence the hole is right on the equator or right next to it, depending on the desire of the person doing the molding and how well they wanted to hide the hole.
Then again, the covers might have been formed around the cores by dip molding the cores in polyisoprene, and the hole is evidence of the thread/wire used in that process. (A dip-molded ball can be remolded to its final shape/cover pattern in a two-part mold as long as the polyisoprene has not been vulcanized.) One thing is for sure, I do not doubt that more of the decorated balls I examined have such holes only they are filled in with modern paint.
Given that these decorated golf balls have been around for upwards of 20 years, the manner and methods used to create them has likely evolved over time. While some balls were made using an outside agency to suspend the cores, I have no doubt that other balls were not, that an easier method to keep the core suspended in place without using pins, wires, or beading thread was devised. Possibly, given the right formulation, the polyisoprene could have also been brushed onto the inside of the molds until both halves were well-coated and thick enough to keep the core suspended after the mold was fully closed and the polyisoprene cured; or it could have been initially formulated as a thin gummy sheet that would lay in the top and bottom halves of the molds just like the gutta percha originally used to cover antique rubber core golf balls.
If someone is trying to recreate old golf balls, there is a variety of molding options available depending on the knowledge, skill, and resources used. Even so, it does not really matter how all these decorated balls were made. What does matter is that they are recognized for what they are. Just like with counterfeit money, it’s far more important to recognize it when you see it, far less important to know how it was made. To that end, the more a person knows about the materials and processes used to make the real thing and its characteristics, the better they will be at recognizing genuine from fake.
Below are the twenty-one balls with such holes. These images are magnified making the hole more obvious. In real life, many of the holes are inconspicuous until you know where and what to look for.
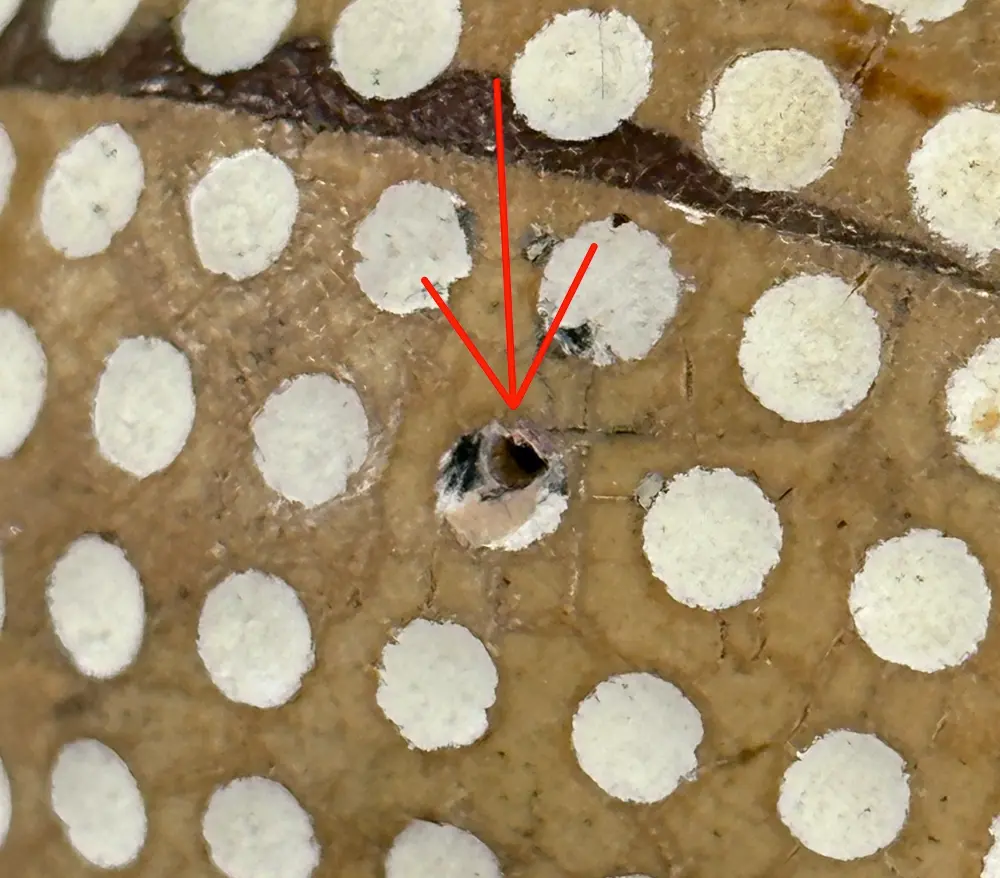
The Manor
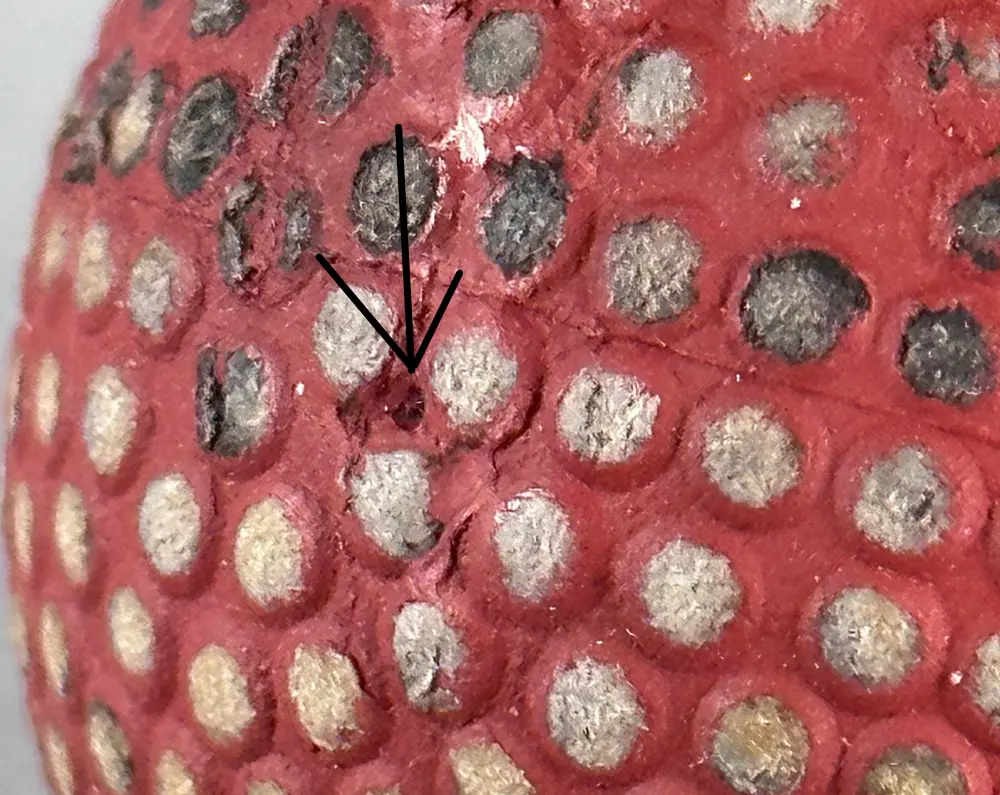
Heavy Colonel
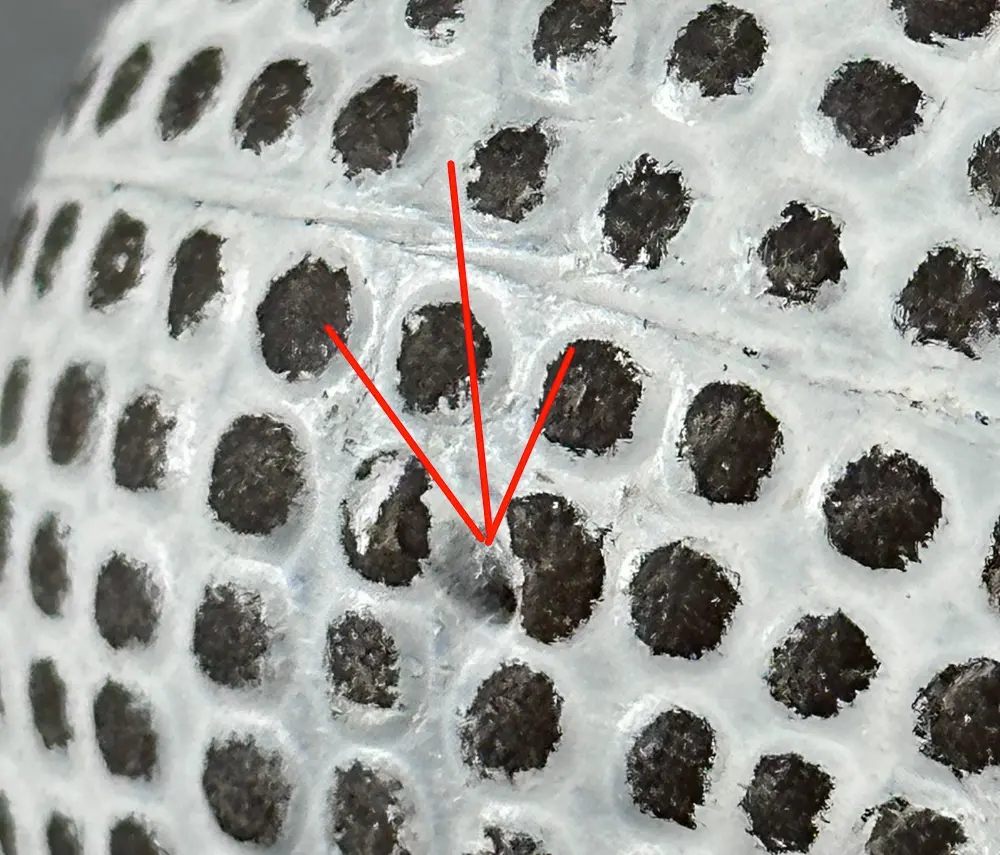
Squadron
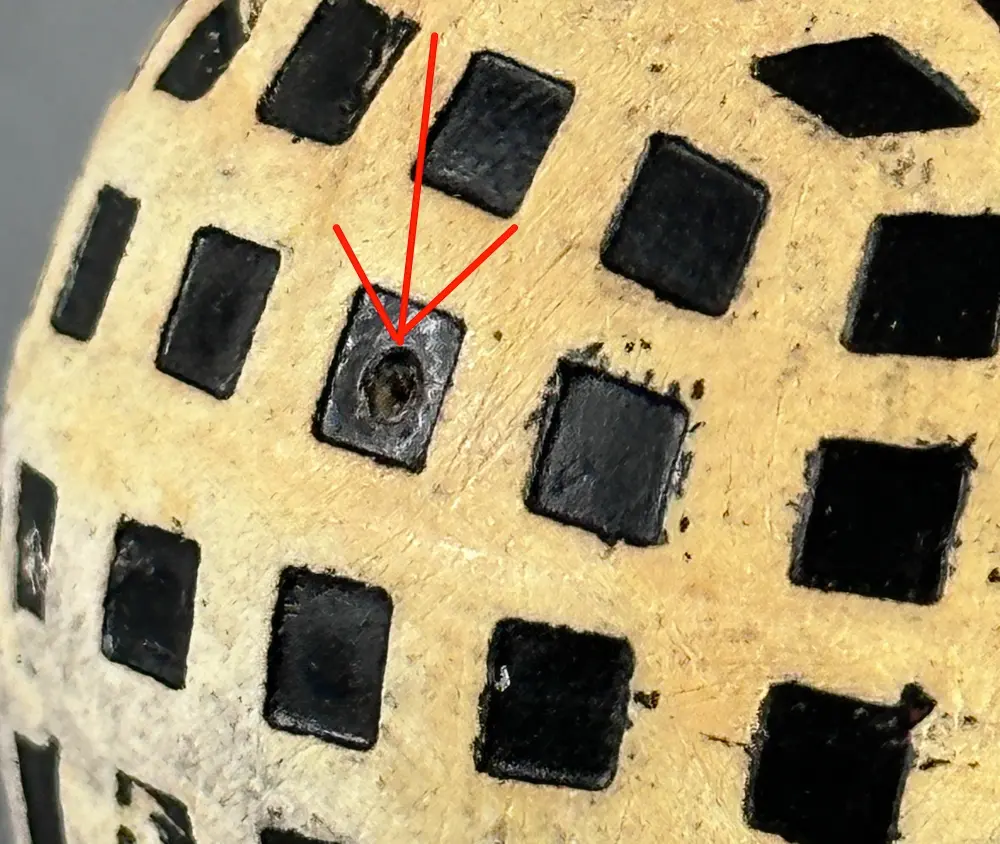
North British, Scotland
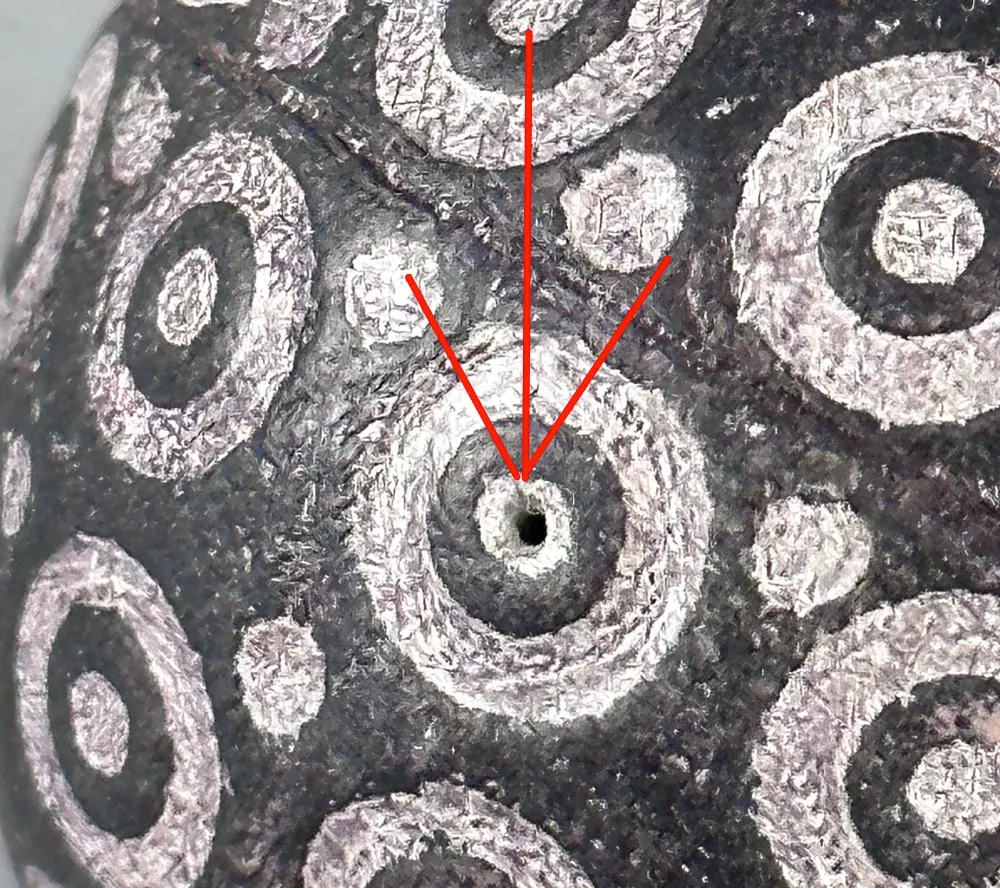
The Eclipse
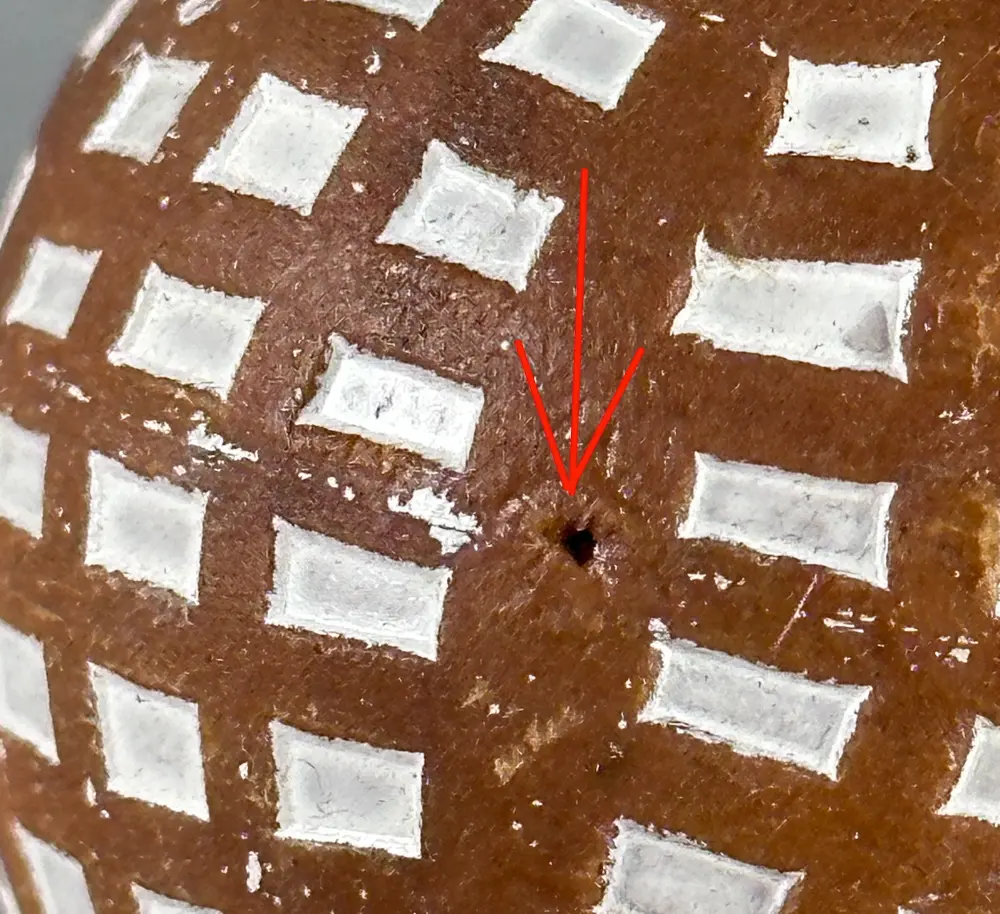
Spalding Berwick
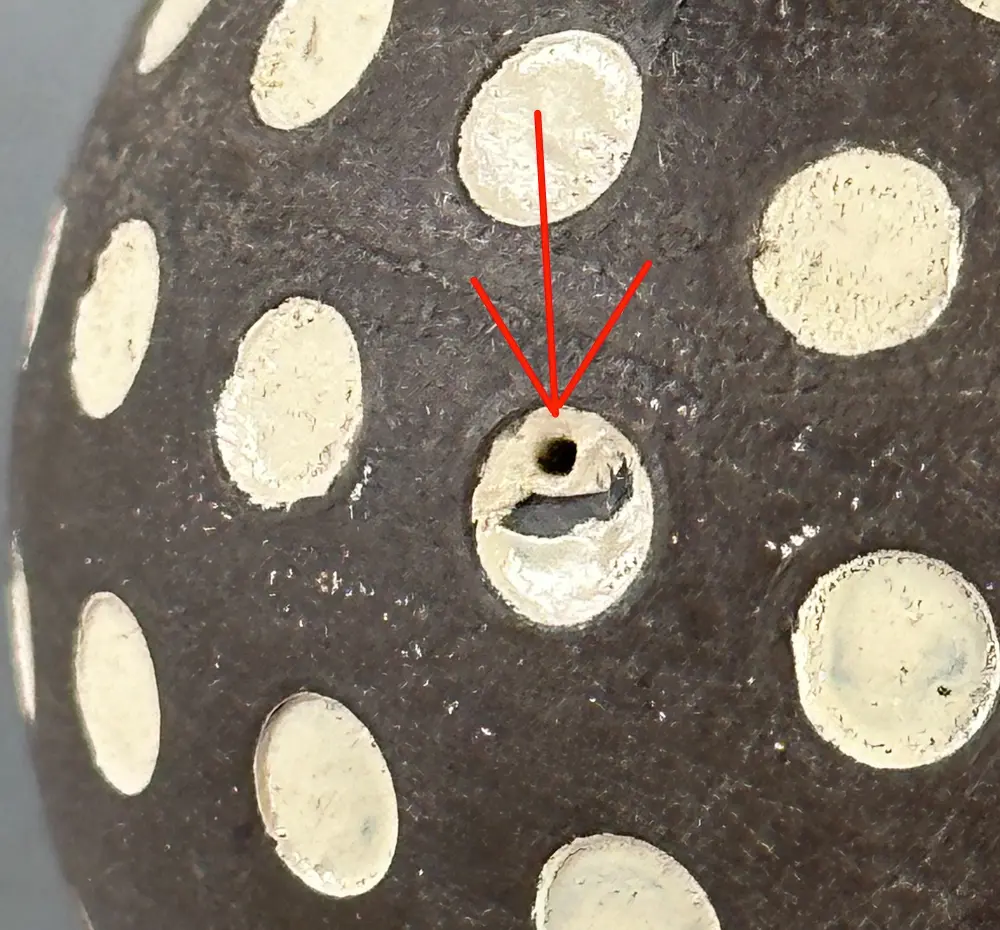
Chemico Popular
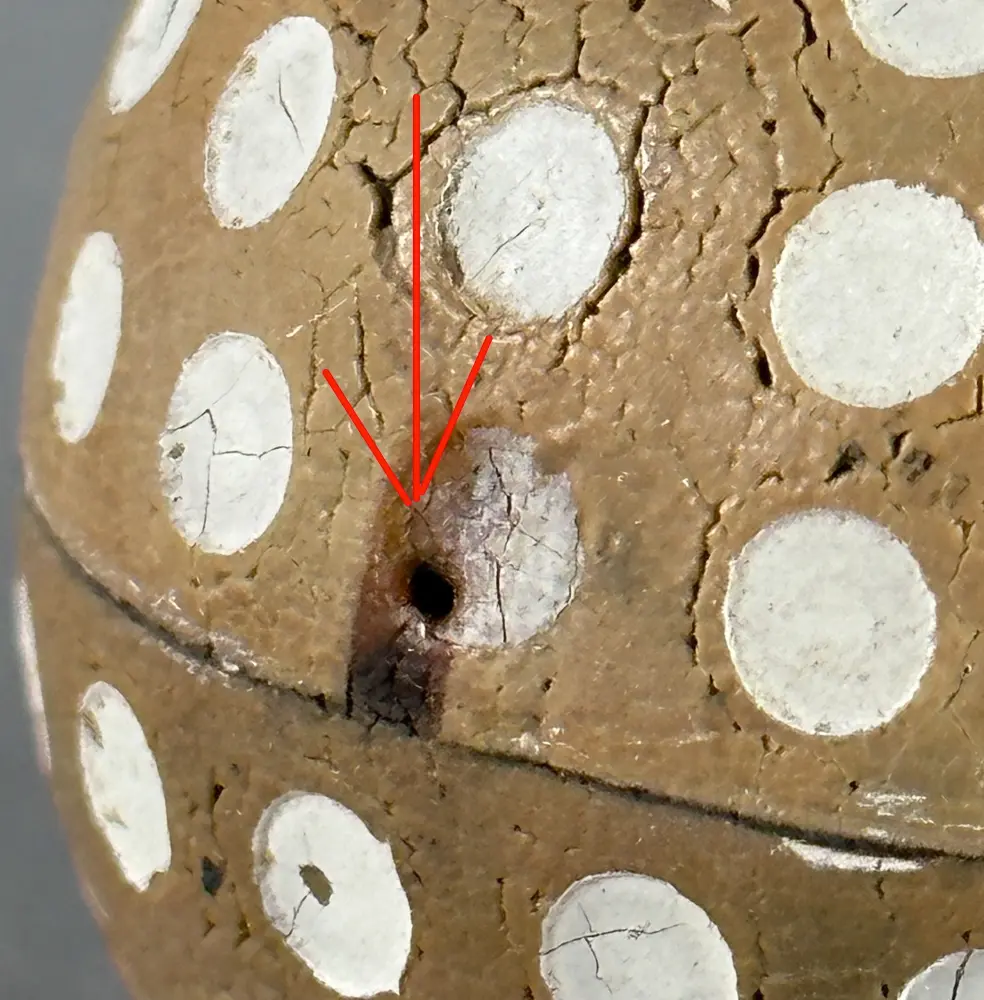
The Dunlop V
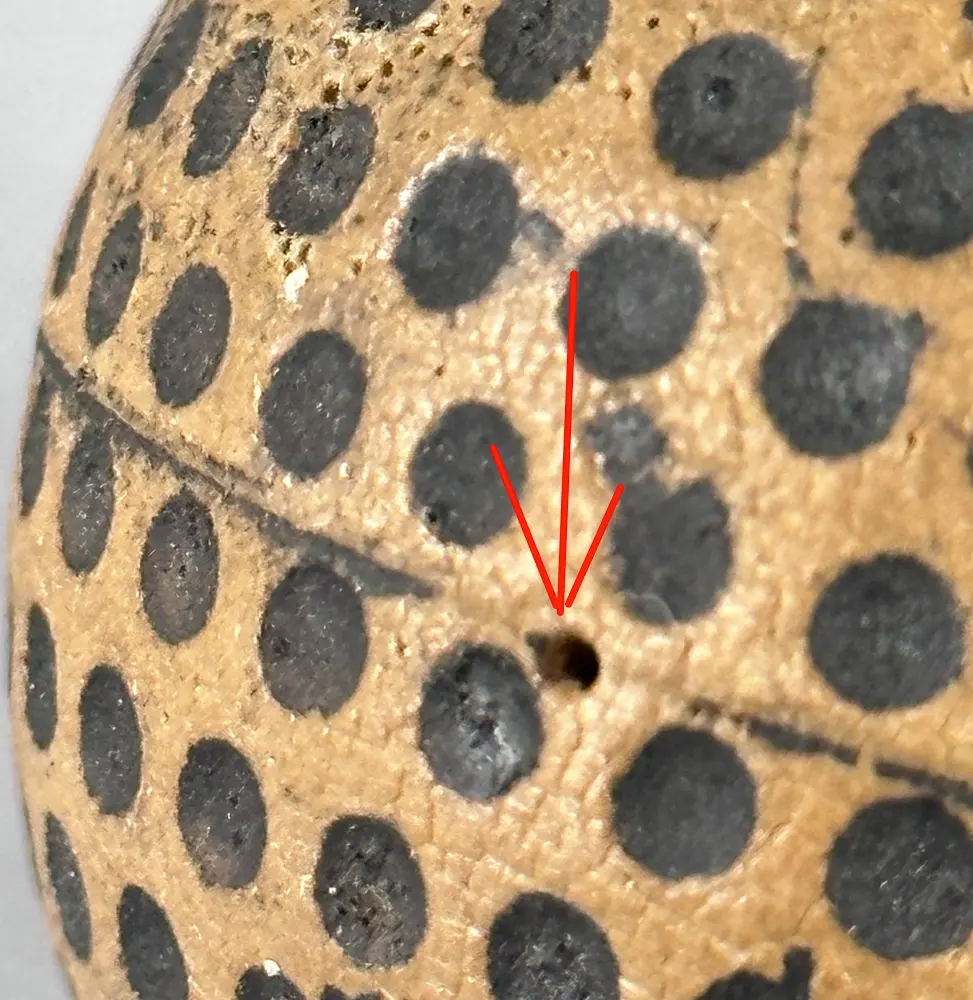
Chemico Triumph
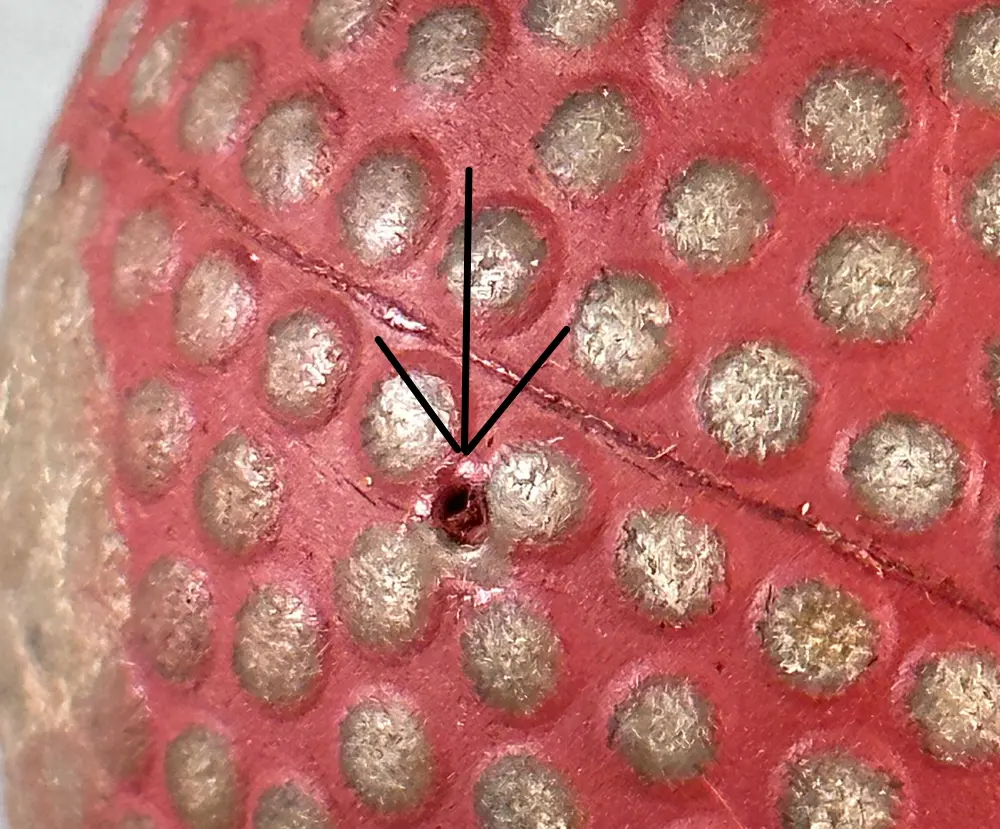
The Challenger
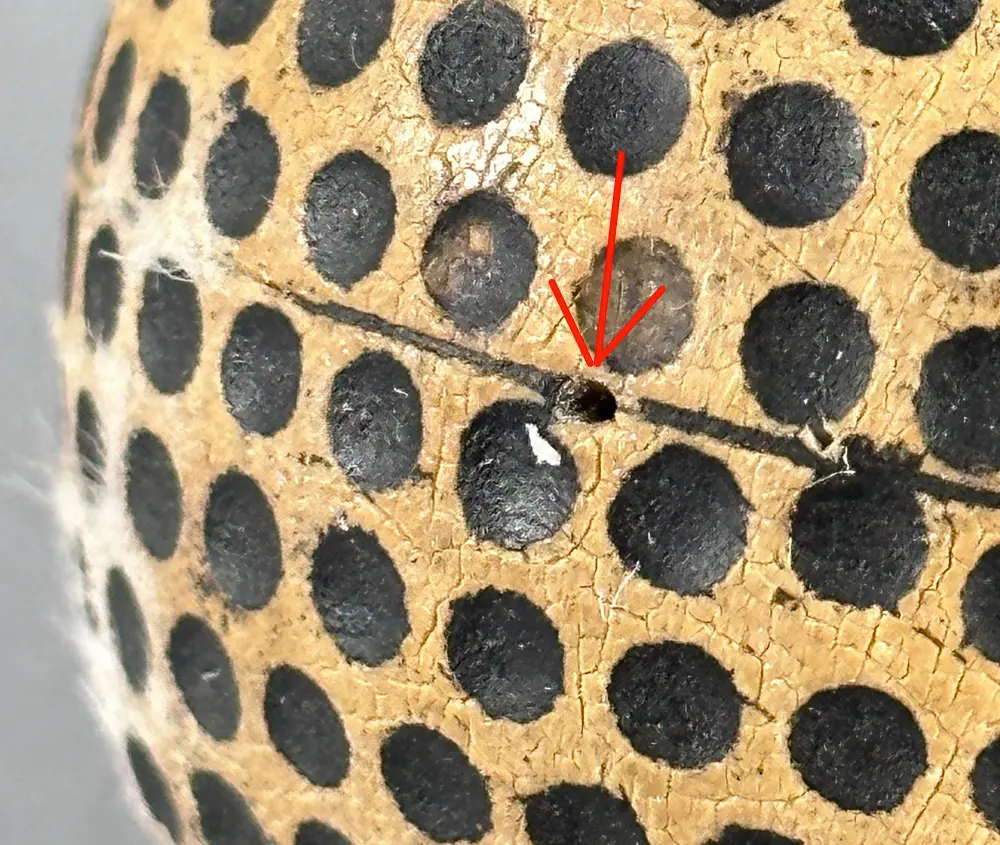
Manor Junior
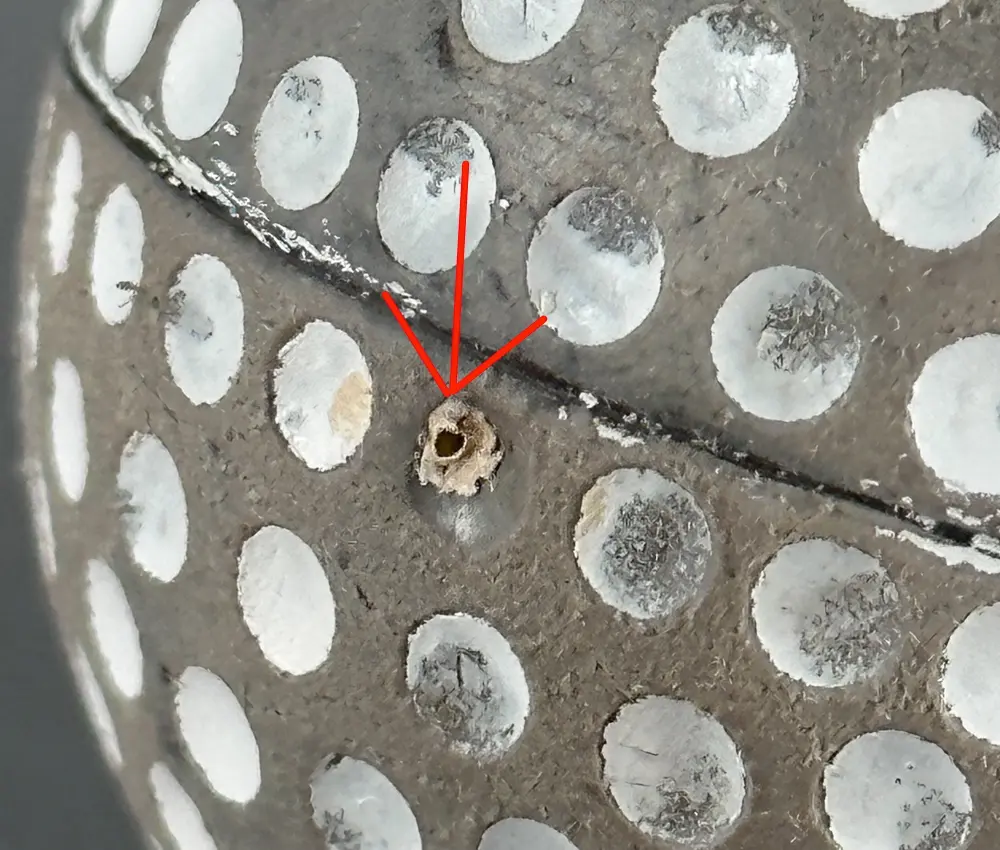
Hoylake No. 2
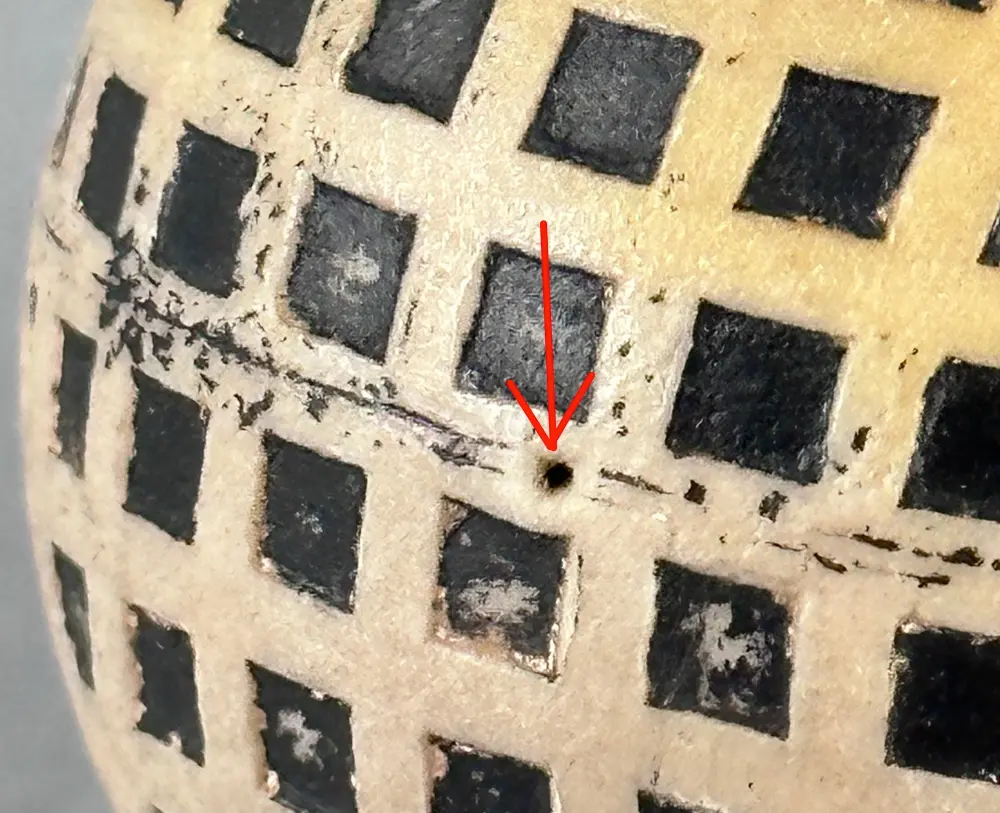
LEY
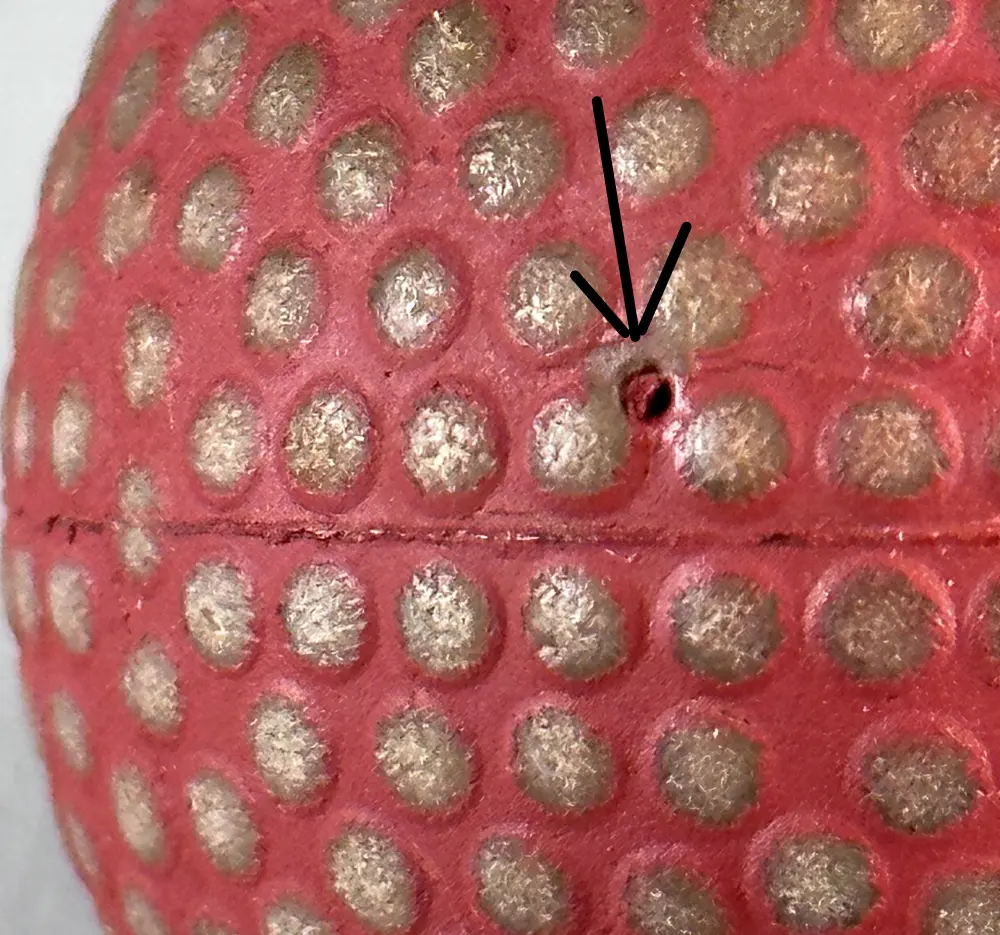
Martins Zodiac Pat'd
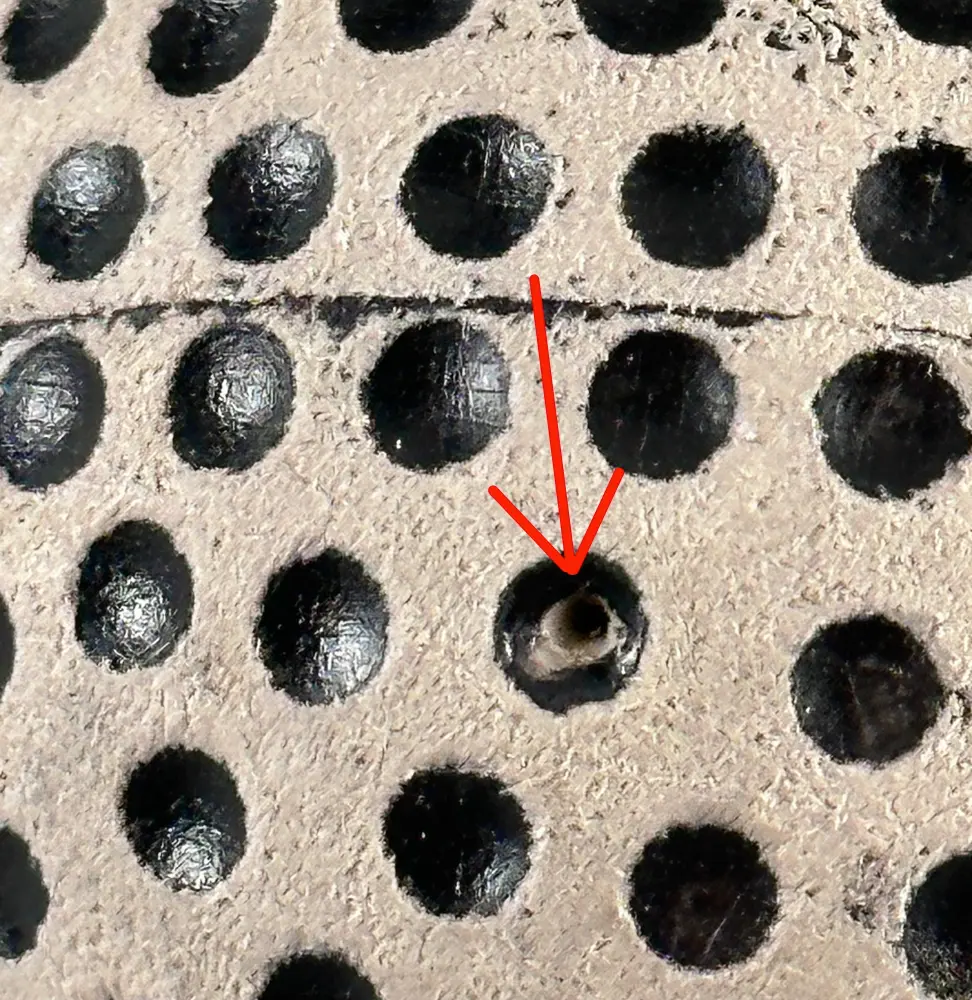
The B. I. Standard Ball

The Dunlop V
The Challenger
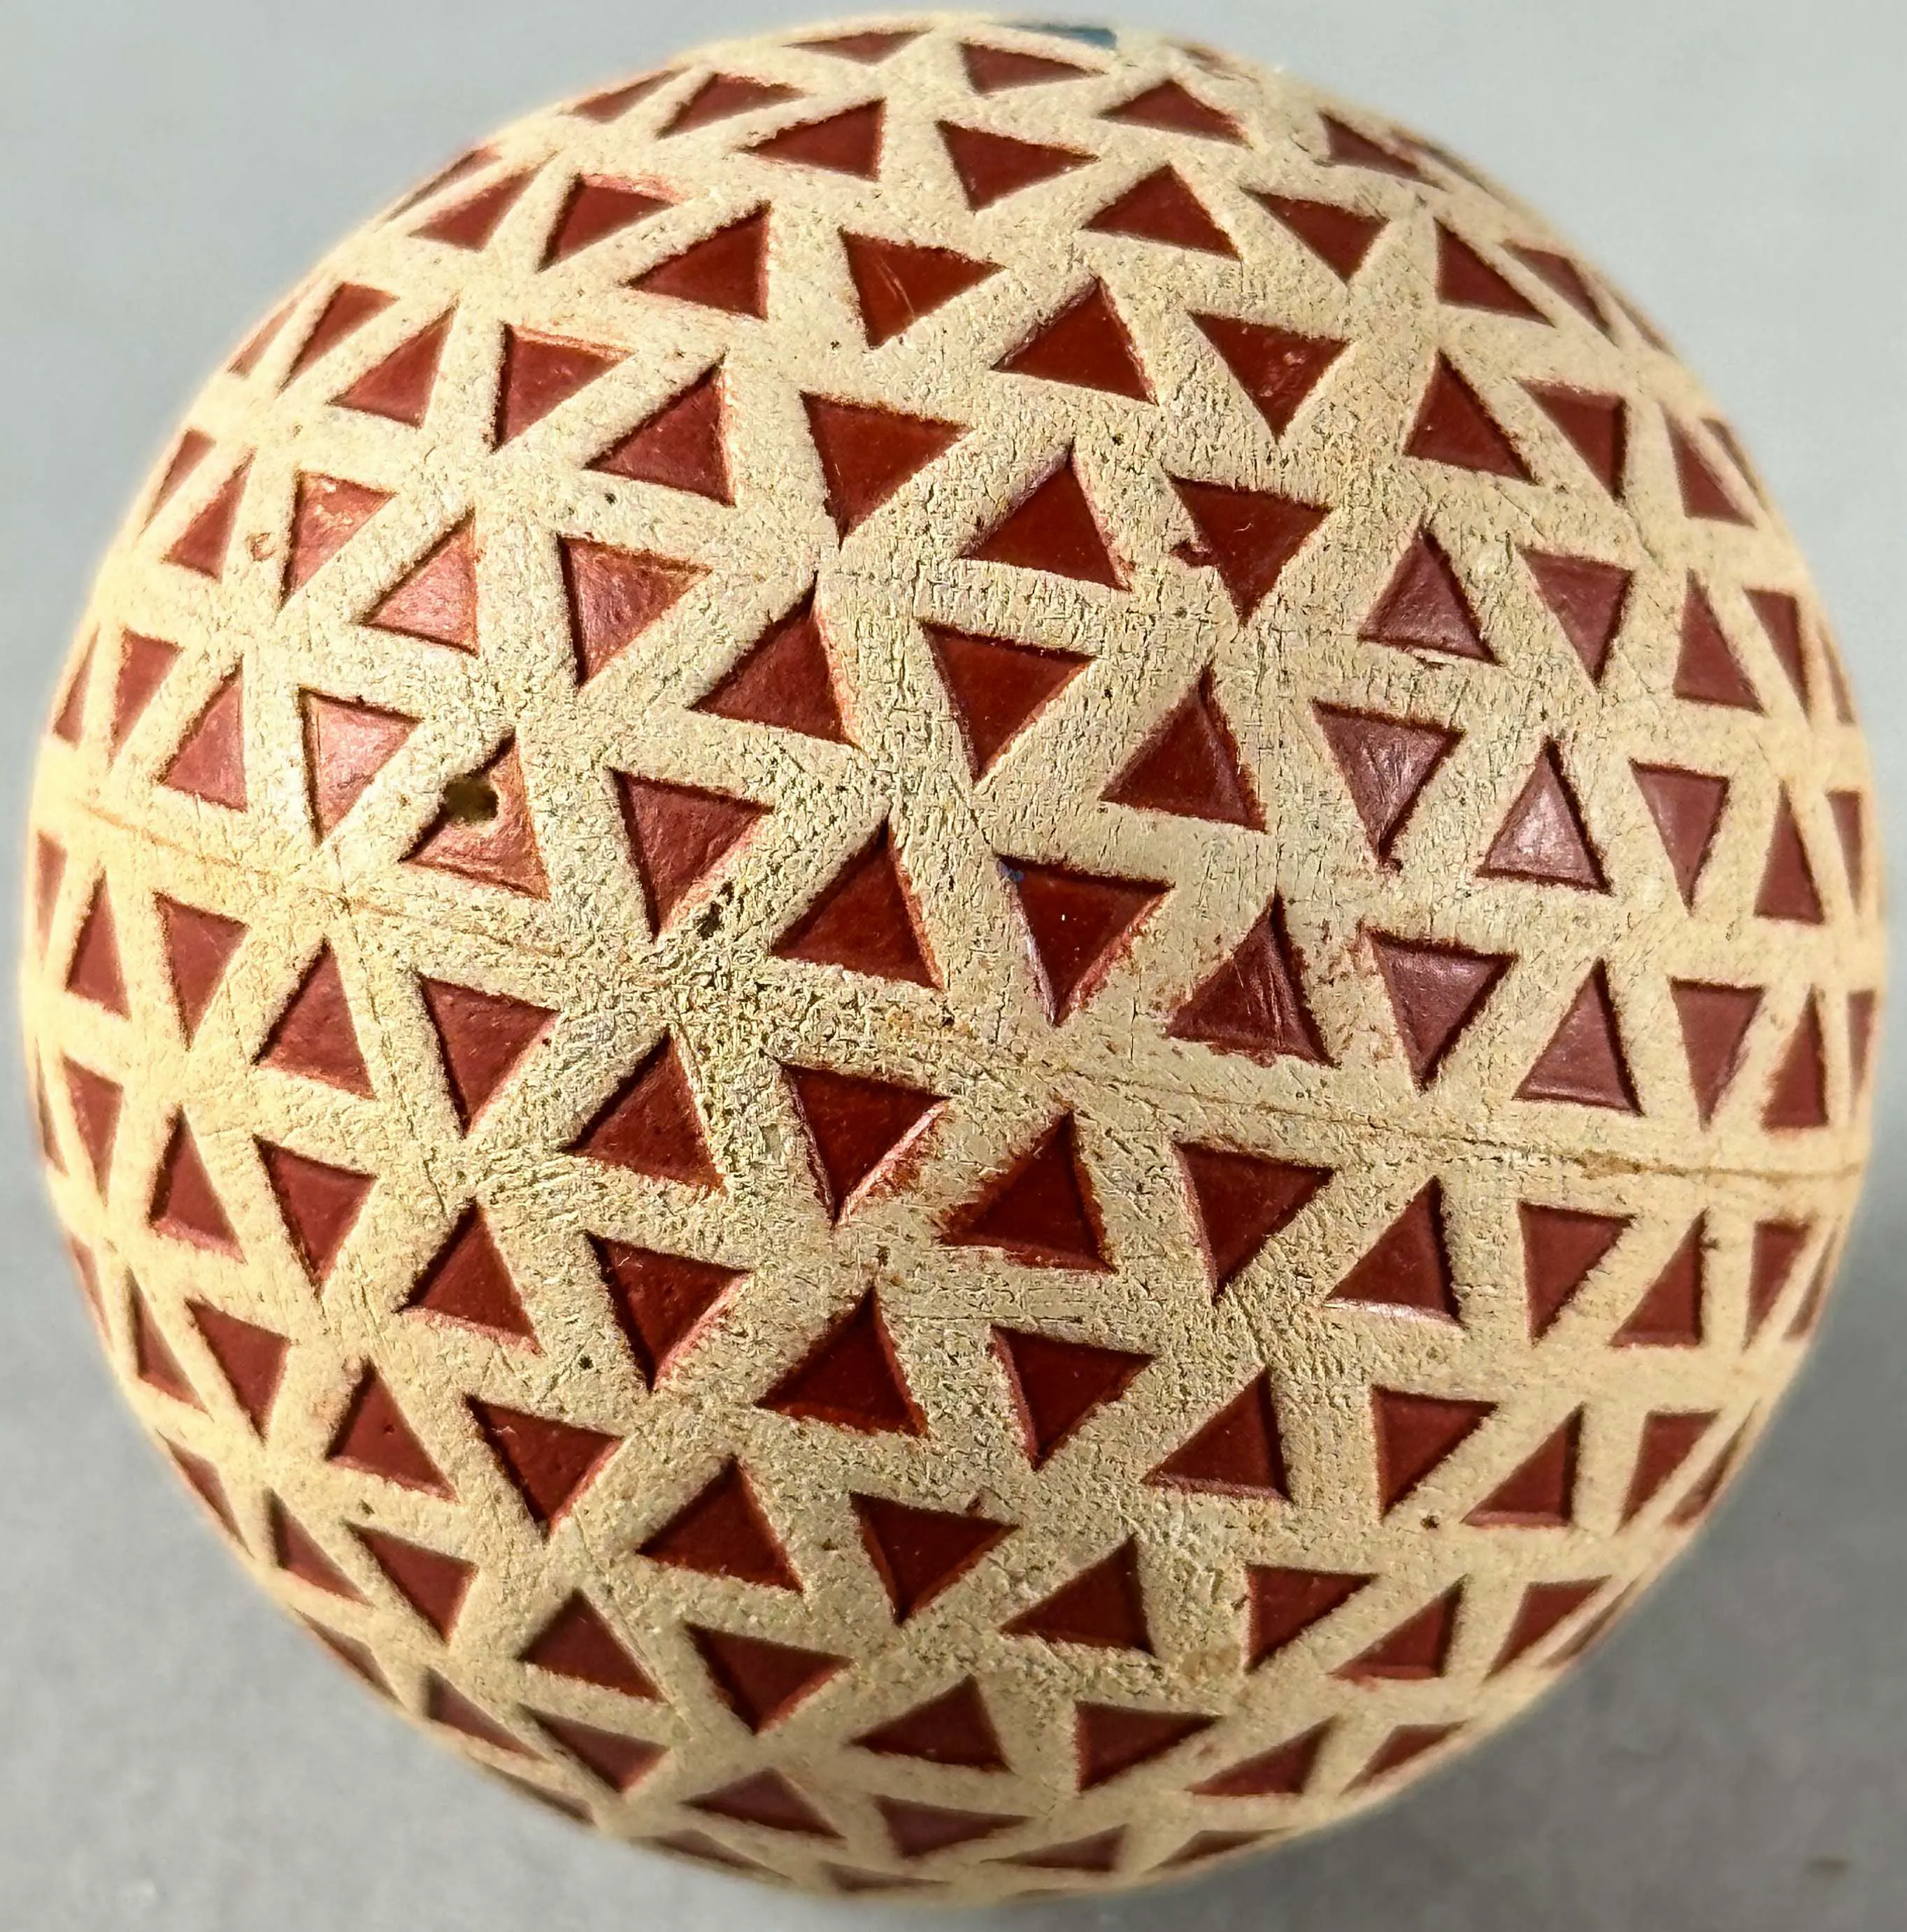
Spalding Blue Triangle

Spion Kop
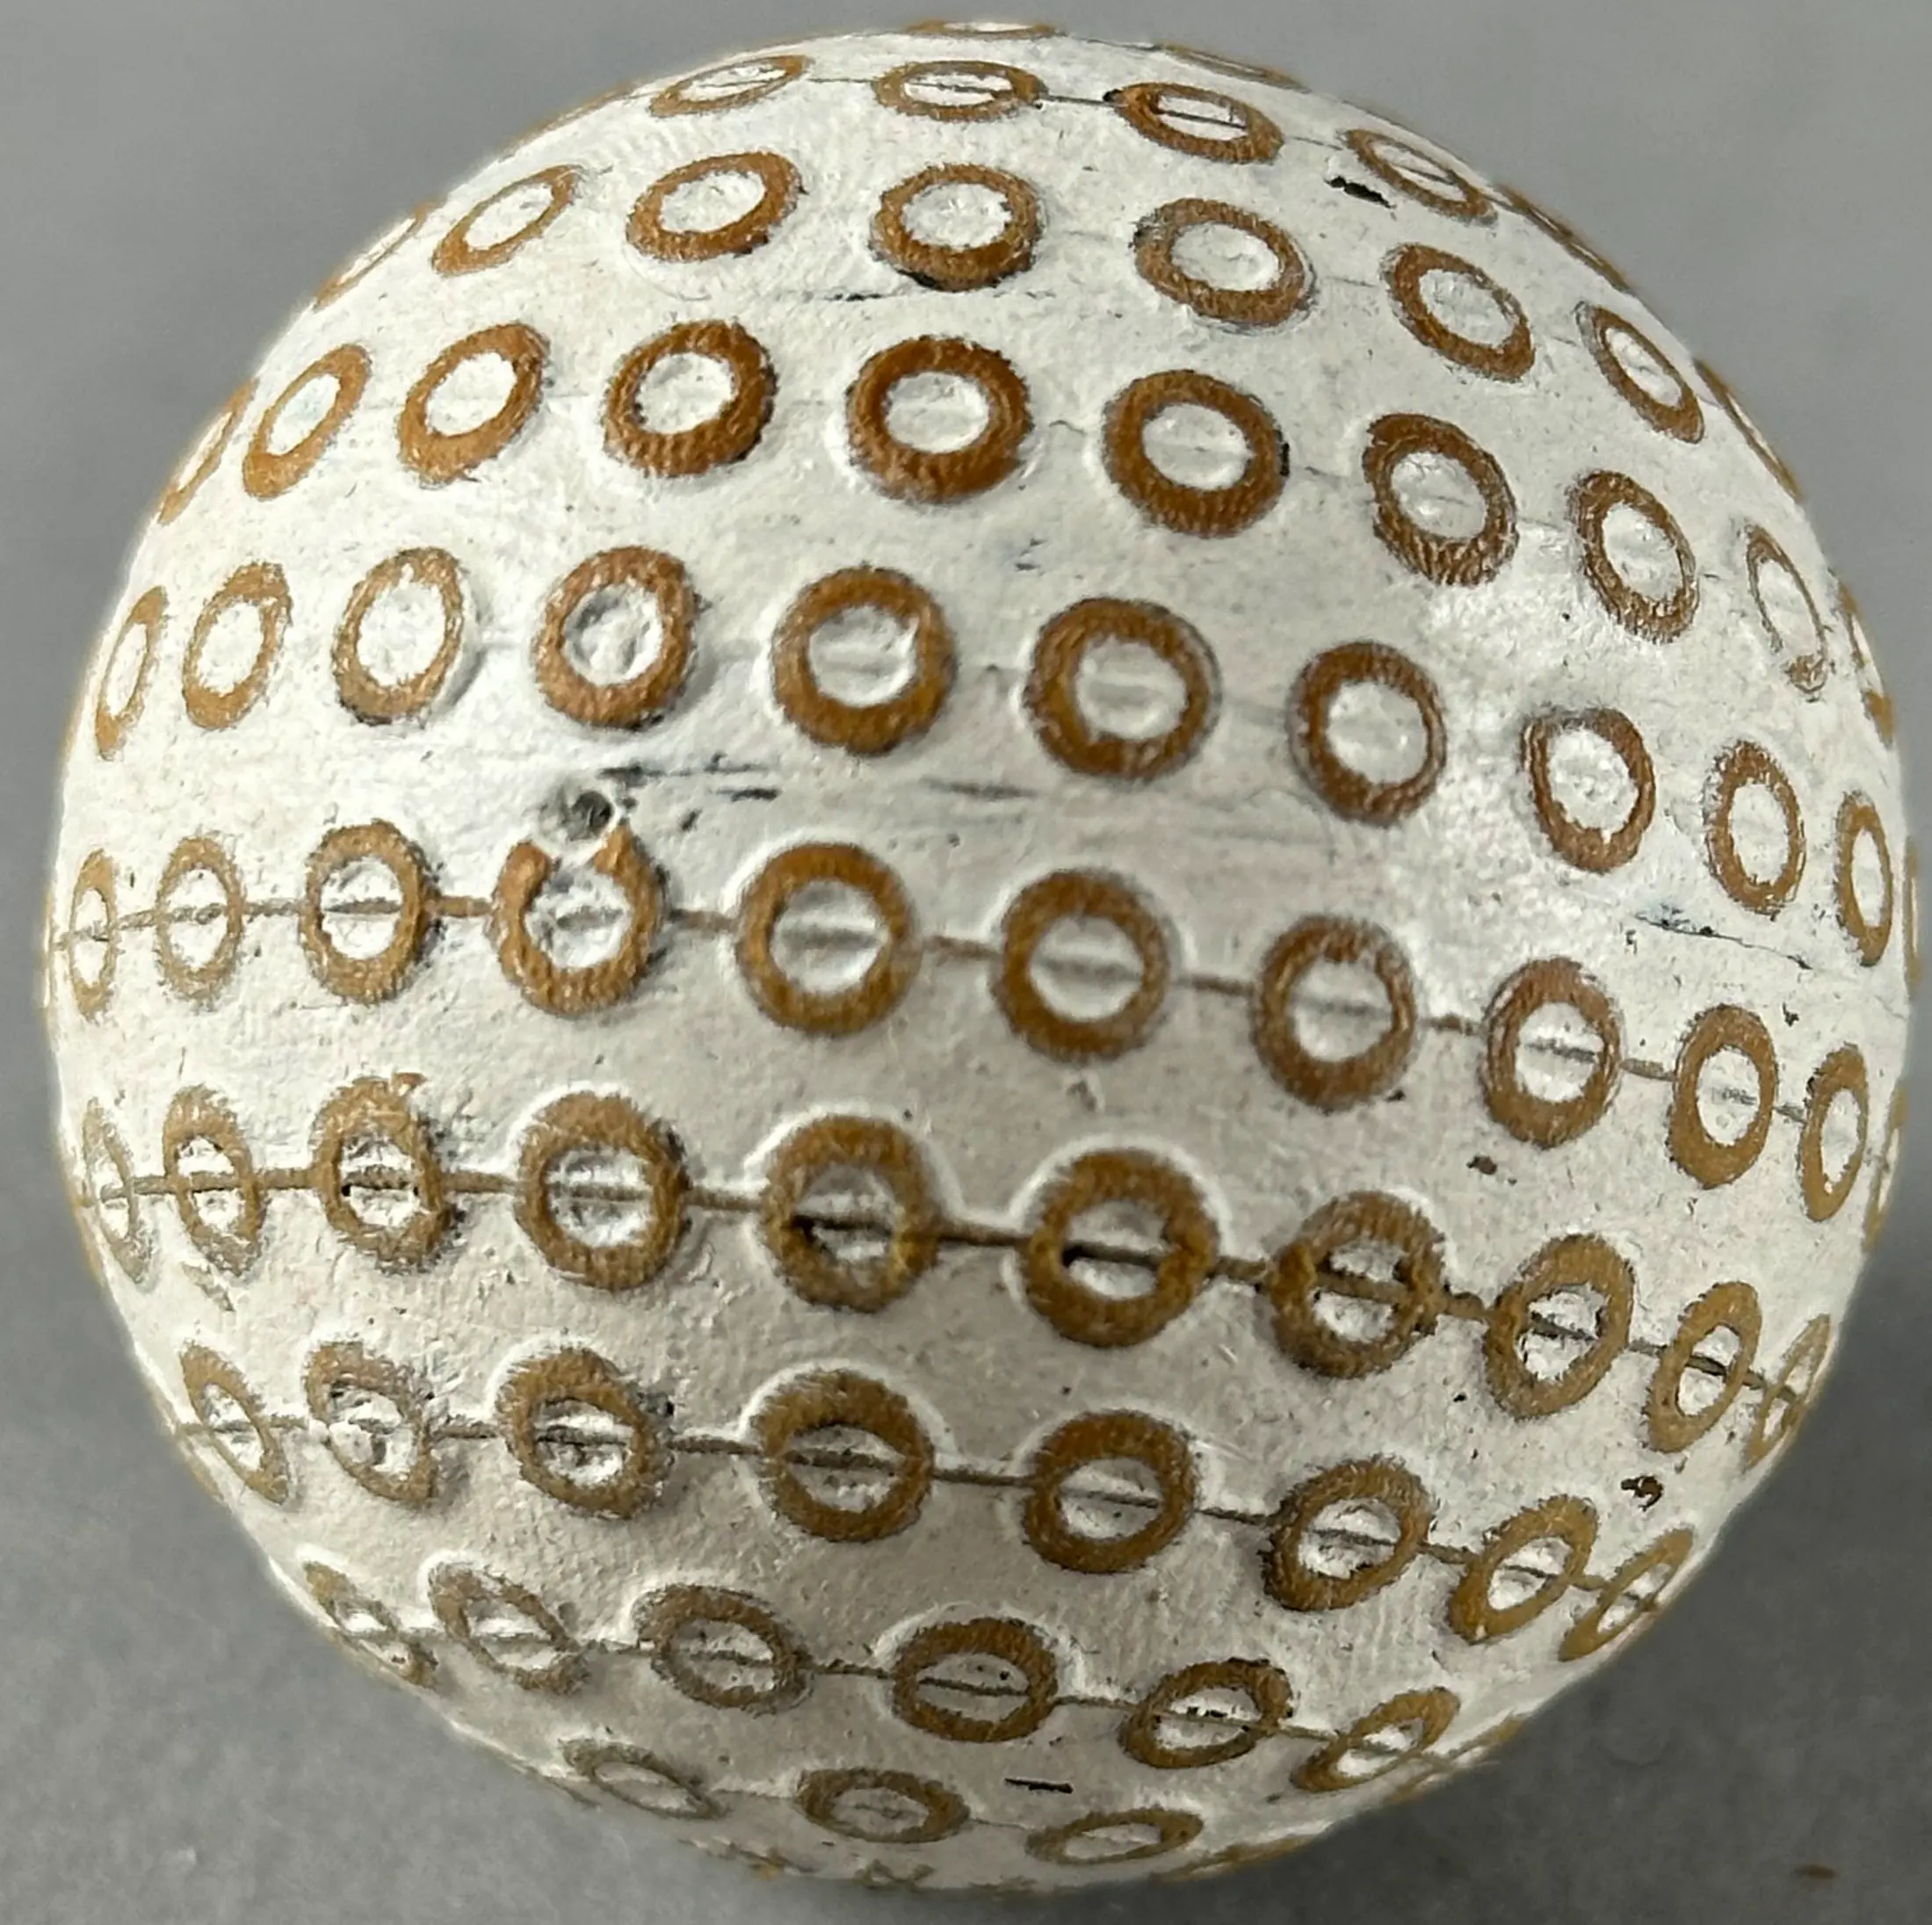
The Link
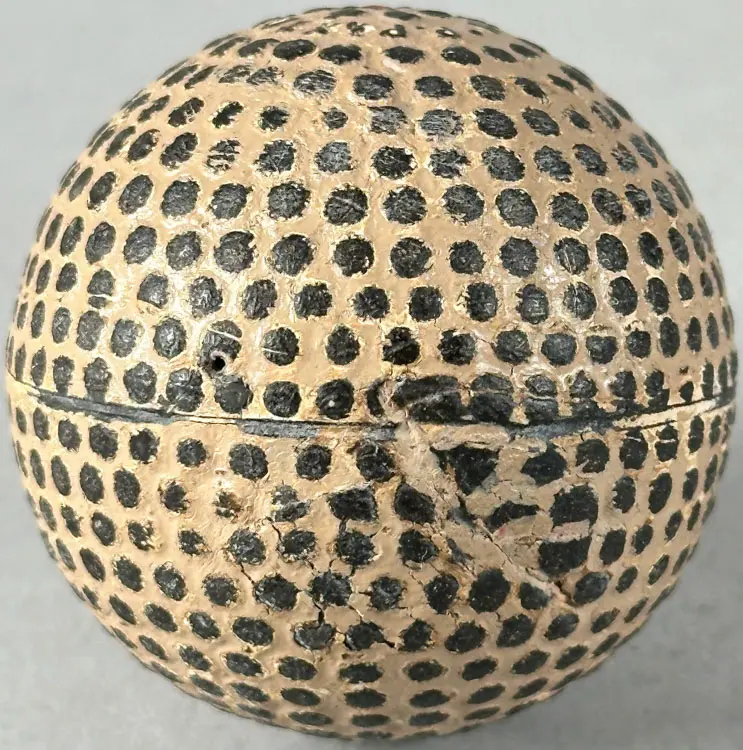
P. Paxton's Remade
In addition to showing molding holes in covers, the 21 images above show some of the different textures found on decorated balls. There is no doubt that the process and molding mix used to make these balls has changed and evolved over the past 20 or so years. The main constants that I found during my examination of the decorated balls sent to me, however, are: the dramatic colors and striking two-color combinations, nearly all the balls look like they have never been used, any strike marks on the balls appear molded in place, no two examples of a ball with an engraved pattern match, the bare covers that should be made from gutta percha are not the correct color of gutta percha as used on genuine antique balls except in one instance, and any unpainted or partially painted covers demonstrate different physical properties compared to gutta percha.
From here, matters get worse. Three of the decorated balls shown earlier and together below—the Chemico Triumph, Manor Junior, and Dunlop V—sound good with a nice click when bounced—like they were made with a typical gutta percha cover! When a small area of their covers was stripped of its paint, however, the first cover was light beige/brown and the second cover was a cream color. Neither the appearance of the two covers nor their colors are consistent with the appearance and colors of early 20th-century golf ball covers. The third cover was a dark brown, the same color as gutta percha—but it looks more like rubber and will erase a pencil line. The above characteristics and the fact that all three balls have a molding hole in the cover as shown earlier tells me that not one of the covers on these balls is old.
As mentioned in section 1.2, all the materials used to make a golf ball combine to affect its sound. I believe the cores of these three balls are much harder than they are in most of the other decorated balls, which is why these three balls sound different from the other decorated balls. The differences in the sound made by cores and balls are demonstrated in a video in section 1.4 and here.
The fact that these three and three other decorated golf balls sound like typical gutta-percha-covered golf balls tells me two things. First, I can’t trust or vet any decorated ball to be genuine by its sound. Even the decorated/black solid gutty balls I examined and described earlier in this article have been significantly modified. Second, any purported antique golf ball not in its original paint or old repaint is not worth taking a chance on in the vast majority of instances. Of course, a ball that has lost its original paint or was never painted is not at issue if the cover material is genuine. Wisely, that has long been the stance of several serious ball collectors. Fresh paint does more than look pretty, it hides.
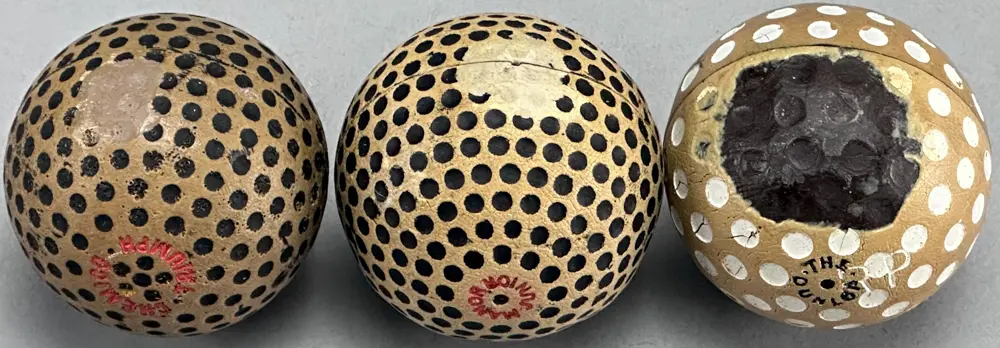
Because genuine and counterfeit antique balls can sometimes share traits, it’s important to consider all the elements that each individual golf ball presents in order to determine if it’s genuine or not. Sometimes a modern remade ball can sound like an old ball. Other times it can have crazing and evidence of wear on its cover. In both instances it can still be a remake. Again, it is important to consider all the elements that make up the ball and ask yourself questions including but not limited to those listed below:
Are there chips in the paint? What is under the chips? How does the ball sound when lightly bounced? Is the unpainted cover the correct color for its era? Is the cover material smooth and hard? Is it textured, rubbery, or tacky? Does it look like gutta percha? Does it appear plastic-like? Is there any amount of translucence? Is the paint the correct color? Does it show evidence of age? Is there crazing in the paint? Is there crazing in the cover? Does the cover appear odd in any way or have a hole in it? Are the letters engraved? Is the pattern engraved? Is there evidence of impression marks in the cover? Is there a double-stamped design on the cover? Is there evidence of asymmetry in the cover pattern or letters. Is there evidence of sanding on the ball? And, of course, is the ball covered in new paint?
Knowing how genuine balls were made makes answering the above questions easier, at least in the large majority of instances. But, again, all things must be considered. Modern remakes can share some of the same characteristics found on genuine balls, but they will not share all of them.
After examining and studying the 100+ decorated balls the collector sent me nearly a year ago, I did not find a single ball that I could verify 100% as an authentic antique golf ball. Then again, I did not try to strip a bit of paint off all the balls to view their bare covers. Why bother? All of the “1900 – 1920 if genuine” balls I did strip revealed covers that were nearly all the wrong color and not made from gutta percha as demonstrated by two dozen pre-1920 impostures shown below and documented earlier in this report.
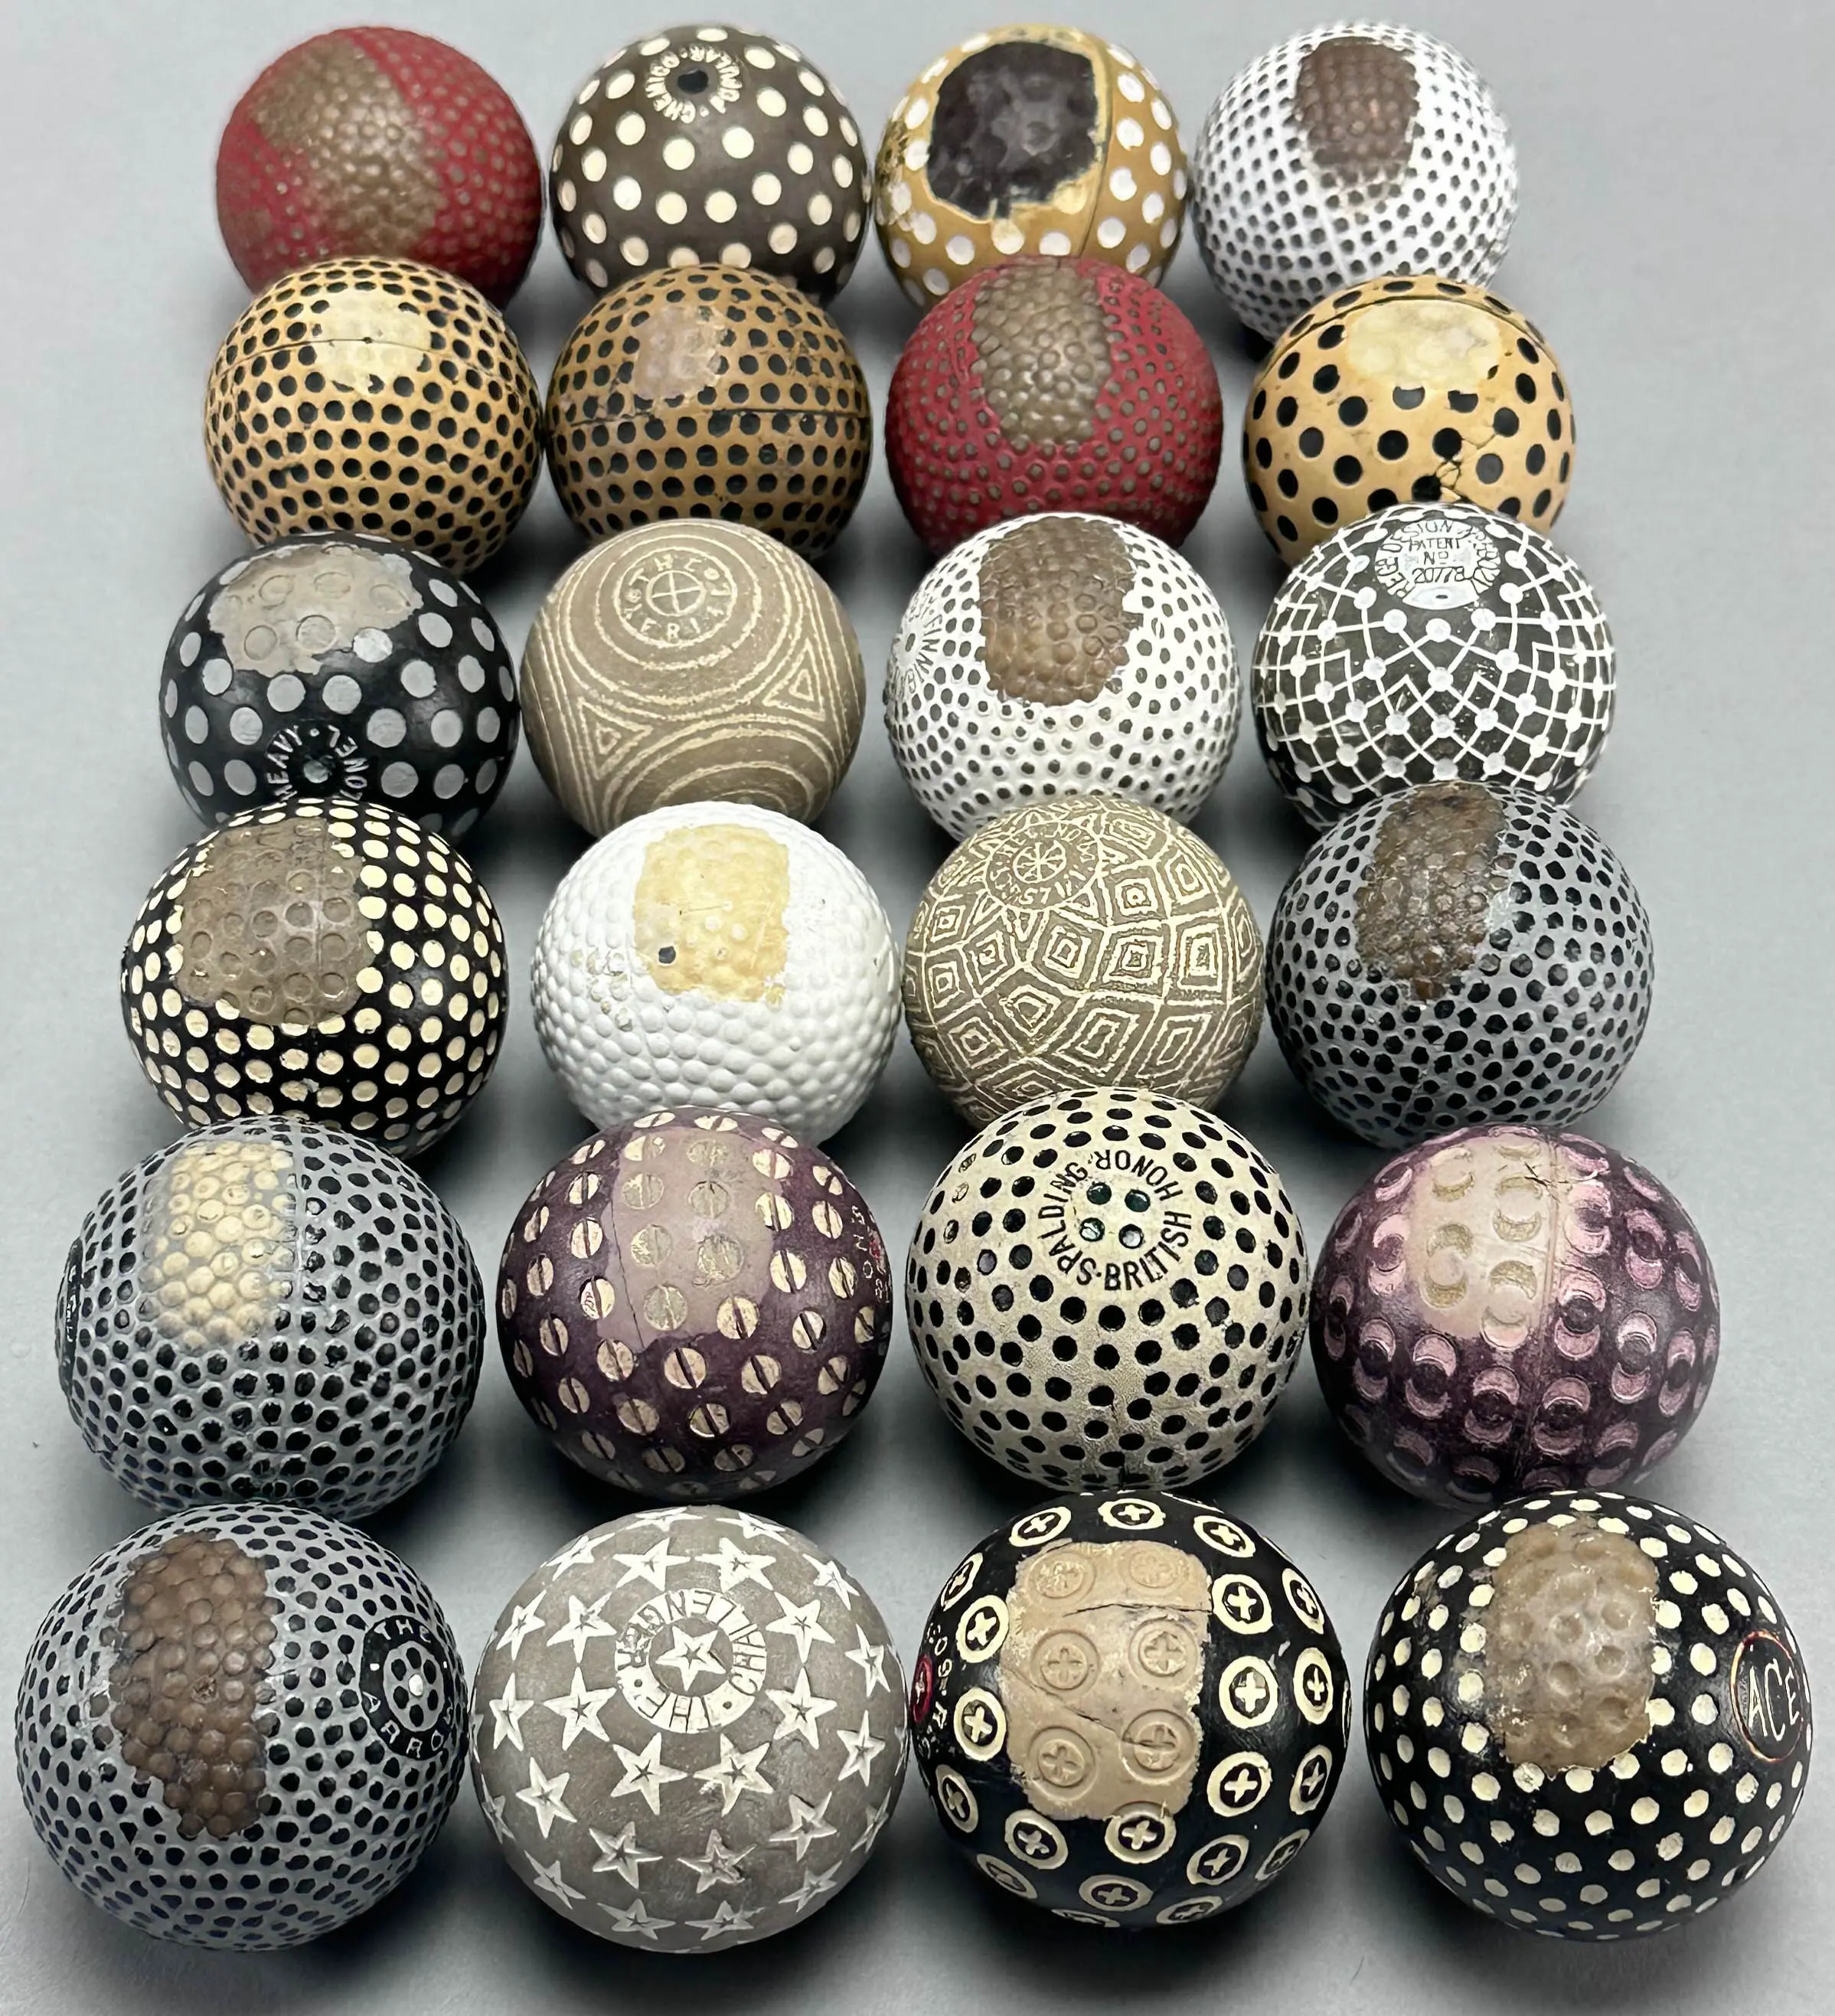
Again, the vast bulk of the balls made between 1900 and 1920, as I document in section 1.2, used gutta percha as the primary ingredient in their covers. I did not need to strip a swatch off the Chemico Popular, Aerial, Big Chick, Vaile, Honor British, and Challenger balls shown above because they only have paint in their patterns. The color, texture, and appearance of their covers were already on full display and, like the balls with stripped swatches, not consistent with that of an early 1900s gutta percha cover.
I do not doubt that there are a few recently painted decorated balls out there that are genuine antique balls in their original cover under their paint. However, after finding so many balls that have been remade into something they originally were not, I now see a decorated paint job as a giant red flag—and it reads, “the chances are extremely high that the name/pattern on this ball, if not its entire cover, is a modern creation.”
Of course, a genuine gutta percha cover on a ball with paint only in its pattern is not a problem. The two balls below might look like decorated balls, but their bare gutta percha covers—be it the deep, rich dark brown or the somewhat translucent naturally yellowish white gutta percha—tells the world that both balls are not just attractive, they are genuine.
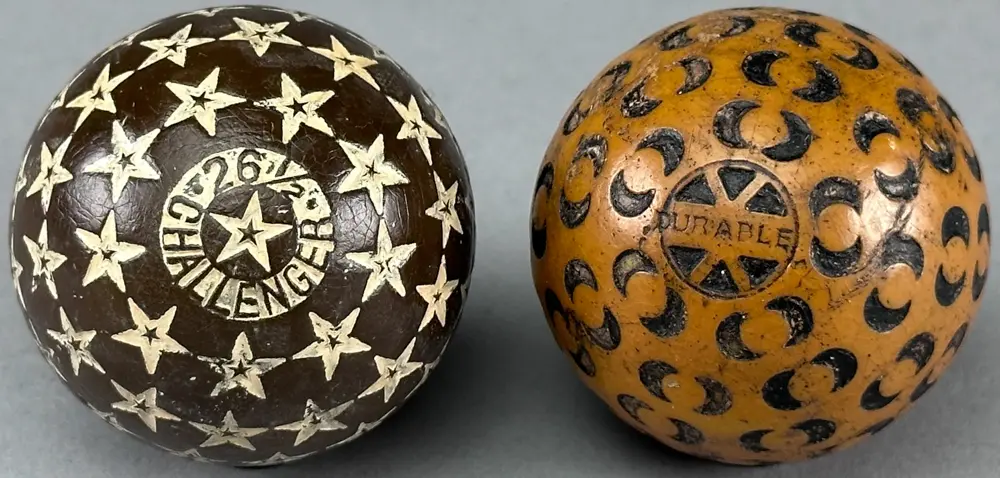
In the sections above, I have presented no less than 68 different models of counterfeit golf balls, and many more than that if you include all the additional counterfeits of the same models. This is a gigantic problem.
I readily acknowledge I do not know everything about the various ways the counterfeiters plied their trade. Their techniques have evolved over the past 20 years or so, that is for sure, and I do not know the mechanics behind how they produced all the different types of fakes they made and continue to make. However, being able to recognize counterfeit golf balls, autographs, watches, money, or anything else is far more important than knowing how they were made.
With all the angles the counterfeiters used to work their scam and the fact there is no simple single test—not even by its sound—to identify all the various types of bogus balls, it can seem confusing to understand what is real and what is not. Just remember, when a genuine antique golf ball has been repainted, it has lost the foundational evidence of its originality. Because its original paint and any exposed gutta percha on any worn or chipped areas are no longer visible, the ball might have gutta percha under the new paint—or synthetic rubber. The pattern itself is no guarantee of authenticity. A wide variety of patterns have already been reproduced on a myriad of balls.
So, how does a collector know if what is supposed to be an early 20th-century rubber-core ball is genuine? Again, there is no single simple answer for every situation and every ball. Below, however, are some guide points to help collectors steer clear of inadvertently collecting counterfeits.
Having said the above, I am also sure there is a small number of recently painted two- color decorated balls that are real (most likely lower-end stuff) but given the degree to which these counterfeit balls have penetrated the hobby, I simply cannot trust any recently painted, or decorated, or engraved, or asymmetrical pattern ball to be legitimate. And even if the ball under the black paint or a two-color scheme happens to be genuine, the paint has poisoned it.
There can be no doubt that the counterfeiters have read my work and are updating their methods to make their fakes appear more legitimate, either that or other nefarious individuals will eventually try to take advantage of this market, as it can be lucrative. The money paid to date for counterfeit golf balls likely totals millions of British pounds. I speak in terms of pounds as the counterfeit balls I have encountered originated from the UK, although they have long been sold and resold all over the US at collector shows and on eBay.
In the future, as two-color and black-painted balls become understood for what they are, I expect more counterfeit ones will be painted solid white. When it comes to single-color repainted balls, I advise collectors to be extremely confident that such a ball is legitimate before making a purchase. New repaints done in the last 20 years, which continue to come onto the market, can sometimes be tricky to discern without stripping the paint.
Given the extent to which the counterfeiters have already gone in their despicable efforts, and the fact that powerful technology can be brought into play if it has not been already, ball collectors need to be diligently on guard. To that end, the purpose of my study, research, and testing of these balls was to inform the golf-collecting world of the giant travesty that has been perpetrated on the hobby for upwards of 20 or more years now. And of that, there is no question. Today, there are now thousands of two-color decorated golf balls in circulation and in a wide variety, much wider than any one person understands—other than the perpetrators. Again, the two colors are not simply used for decoration, as engaging as these balls might be. They are used to distract from and hide the fraud behind the ball.
Bottom line, this is a crime of major proportions that its victims should report to the authorities.